Creating configuration pages
The configuration page is a SharePoint 2013 ASP.NET page, displayed as a dialog when the user displays the configuration for your workflow action from the Workflow designer.
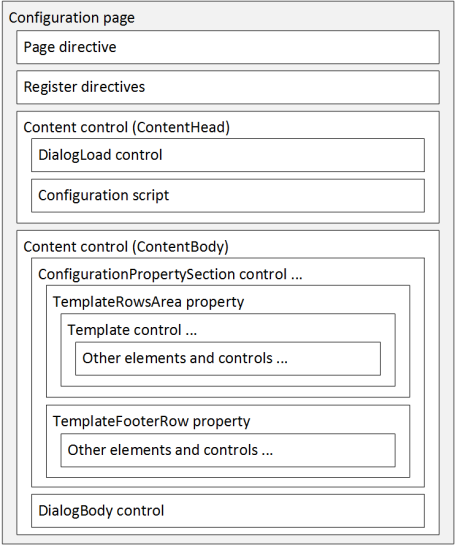
The following diagram illustrates the contents of a configuration page:

A configuration page consists of, at a minimum, the following items:
If you use the Visual Studio 2012 template provided with the Nintex Workflow 2013 SDK, these items are automatically added to the configuration page included with the template. For more information about the Visual Studio 2012 templates, see Installing and using Visual Studio templates.
Page directive
The configuration page should be based off the SharePoint 2013 default master page, to ensure UI consistency across all dialogs, and to enable the SharePoint Ribbon functionality. Add the following Page directive to the very top of the markup for the configuration page, where <CodebehindFile> is set to the name of the codebehind file and <CodebehindClass> is the full name of the class in the codebehind file for the configuration page.
<%@ Page Language="C#" DynamicMasterPageFile="~masterurl/default.master"
    AutoEventWireup="true" CodeBehind="<CodebehindFile>" EnableEventValidation="false"
    Inherits="<CodebehindClass>, $SharePoint.Project.AssemblyFullName$"  %>
Register directives
Several Register directives must be added to the configuration page, to provide the basic functionality needed to interact with configuration settings for the custom workflow action.
The following Register directives must be present in the configuration page:
<%-- Register directives required by Nintex Workflow 2013 --%>
<%@ Register TagPrefix="Nintex" Namespace="Nintex.Workflow.ServerControls"
    Assembly="Nintex.Workflow.ServerControls, Version=1.0.0.0, Culture=neutral, PublicKeyToken=913f6bae0ca5ae12" %>
<%@ Register TagPrefix="Nintex" Namespace="Nintex.Workflow.ApplicationPages"
    Assembly="Nintex.Workflow.ApplicationPages, Version=1.0.0.0, Culture=neutral, PublicKeyToken=913f6bae0ca5ae12" %>
<%@ Register TagPrefix="Nintex" TagName="ConfigurationPropertySection" src="~/_layouts/15/NintexWorkflow/ConfigurationPropertySection.ascx" %>
<%@ Register TagPrefix="Nintex" TagName="ConfigurationProperty" src="~/_layouts/15/NintexWorkflow/ConfigurationProperty.ascx" %>
<%@ Register TagPrefix="Nintex" TagName="DialogLoad" Src="~/_layouts/15/NintexWorkflow/DialogLoad.ascx" %>
<%@ Register TagPrefix="Nintex" TagName="DialogBody" Src="~/_layouts/15/NintexWorkflow/DialogBody.ascx" %>
<%-- Place additional Register directives after this comment. --%>
These Register directives are common to all configuration pages. The following list describes each directive:
-
Nintex.Workflow.ServerControls assembly
This assembly contains the server controls needed by the configuration page to interact with Nintex Workflow 2013.
-
Nintex.Workflow.ApplicationPages assembly
This assembly supports the user controls needed by the configuration page to interact with Nintex Workflow 2013.
-
ConfigurationPropertySection user control
Provides a container for configuration property template controls, for rendering purposes. For more information, see Implementing template controls.
-
ConfigurationProperty user control
Provides the most commonly-used configuration property template control for other Nintex user controls, for rendering purposes. For more information, see Implementing template controls.
-
DialogLoad user control
Registers common scripts that handle standard ribbon functionality, dialog styling, and common functions for manipulating configuration settings. This control is included in the ContentHead control implemented in the configuration page. For more information, see Working with the ContentHead control.
-
DialogBody user control
Renders common panels to edit the labels and common configuration settings. This control is included in the ContentBody control implemented in the configuration page .For more information, see Working with the ContentBody control.
Depending on the requirements of the configuration page and the custom workflow action, you can add Register directives to include other user controls provided by Nintex Workflow 2013. For more information about working with controls on a configuration page, see Working with controls.
Content controls
The configuration page must contain two Content controls, with the following values for the ID attribute:
-
ContentHead
The ContentHead control contains the DialogLoad user control, which provides Nintex-specific functionality when the configuration page is invoked. The DialogLoad user control must be the first child of the ContentHead control.
The ContentHead control also contains a configuration script, in which JavaScript functions necessary to your configuration page can be placed. The configuration script must contain two JavaScript functions, named TPARetrieveConfig and TPAWriteConfig, used to read and write configuration settings, respectively. Combined, they manage reading from and writing to the XML that stores the configuration settings.
For more information about the TPARetrieveConfig and TPAWriteConfig functions, see Working with the ContentHead control.
Note: This Content control must be assigned to the ContentPlaceHolder control named PlaceHolderAdditionalPageHead on the default master page.
-
ContentBody
The ContentBody control contains the ConfigurationPropertySection controls that define the configuration sections for the Action option of the configuration page.
The ContentBody control also contains the DialogBody user control, which defines the configuration sections for the Labels and Common options of the configuration page. The DialogBody control must be the last child of the ContentBody control.
For more information about defining configuration property sections, see Working with the ContentBody control.
Note: This Content control must be assigned to the ContentPlaceHolder control named PlaceHolderMain on the default master page.
The following ASP.NET code illustrates the implementation of the required content controls:
<asp:Content ID="ContentHead" ContentPlaceHolderID="PlaceHolderAdditionalPageHead" runat="server">
    <%-- The DialogLoad control must be the first child of the Content control. --%>
    <Nintex:DialogLoad runat="server" />

    <%-- JavaScript functions for reading and writing configuration data. --%>
    <script type="text/javascript" language="javascript">
        function TPARetrieveConfig()
        {
            // Use this JavaScript function to retrieve configuration settings from
            // the configuration XML and set the values of the corresponding controls
            // on the configuration page.
        }

        function TPAWriteConfig()
        {
            // Use this JavaScript function to retrieve configuration settings from
            // controls on the configuration page and set the values of the
            // corresponding elements in the configuration XML.

	        return true;
        }

        onLoadFunctions[onLoadFunctions.length] = function () {
            dialogSectionsArray["<%= MainControls1.ClientID %>"] = true;
        };
    </script>
</asp:Content>

<asp:Content ID="ContentBody" ContentPlaceHolderID="PlaceHolderMain" runat="Server">
    <Nintex:ConfigurationPropertySection runat="server" Id="MainControls1">
        <TemplateRowsArea>
            <%-- Place ConfigurationProperty controls here --%>
        </TemplateRowsArea>
    </Nintex:ConfigurationPropertySection>

    <%-- The DialogBody control must be the last child of the Content control. --%>
    <Nintex:DialogBody runat="server" id="DialogBody">
    </Nintex:DialogBody>
</asp:Content>
At this point, you have all of the items needed to develop a configuration page. Additional steps are needed to display and interact with configuration settings, such as adding configuration property sections, template controls, server controls, and user controls to the configuration page, but those steps depend largely on the functionality of the custom workflow action. For more information about additional steps, see Working with controls.
See Also
Concepts
Operations
Working with configuration pages