Third Parties
On the Third parties page, you can customize settings for various external components that interact with Process Discovery.
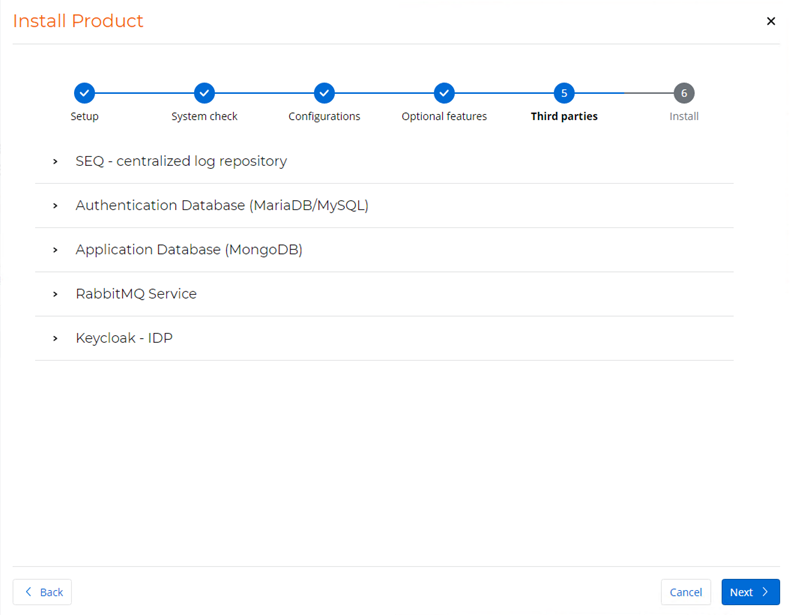
Configure components
Follow the steps below to configure each of these components according to your specific requirements.
Seq is a centralized logging tool that helps you collect, search, and analyze log data from installation sources. Connect to an existing Seq instance to integrate it with your Process Discovery server installation.

-
Select the SEQ protocol:
-
http: This option is suitable for scenarios where security is not a primary concern, or if you have additional security measures in place at the network level. It provides basic data transfer without encryption.
-
https: This option is the secure version of http. It uses encryption (usually SSL/TLS) to protect the data being transmitted between Process Discovery and the Seq server. If you're dealing with sensitive or confidential data, it's recommended to choose https for enhanced security.
-
-
Enter the SEQ Server FQDN (Fully Qualified Domain Name) or keep the default value. This is the unique address of your Seq server on your network. It typically includes the server name and the domain name, e.g.,
server.example.com.Follow the FQDN input requirements:
-
The total FQDN cannotmay not exceed 255 characters.
-
Input must:
-
Start with a letter or a number.
-
Consist of 1 to 63 characters.
-
Only contain alphanumeric characters (a-z, A-Z, 0-9) and hyphens (-).
-
-
-
Enter the SEQ server port. If your Seq server uses a non-default port, enter it here.
-
(Optional) Enter the SEQ API key if it's required by your Seq instance configuration. The necessity of an API key may vary based on your Seq server settings.
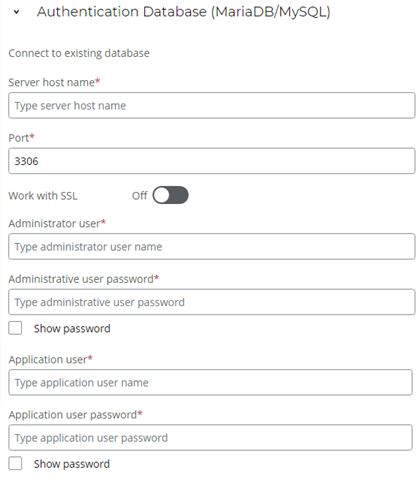
MariaDB and MySQL serve as robust database systems, providing a foundation for efficient data organization and access. Connect to an existing database dedicated to authentication processes.
-
Enter the Server host name, which serves as the unique network address or domain name of your MariaDB/MySQL database server. It can be either an IP address or a Fully Qualified Domain Name (FQDN). The FQDN usually comprises the server's name and domain, e.g.,
server.example.com, and identifies the physical or virtual server that hosts your database instance. -
Enter the Port, if your database server uses a non-default port.
-
Click the Work with SSL toggle to enable or disable SSL.
-
If you toggle the Work with SSL to On, click Select file to select a PEM certificate file.
-
Enter the Administrative user (username) associated with your administrative account for database configuration.
-
Enter the Administrative user password corresponding to the administrative user account. Double-check for accuracy and avoid any typing errors, as incorrect passwords can result in installation failures.
-
Enter the Application user (username) associated with the application user account for database interactions.
-
Enter the Application user password corresponding to the application user account. Double-check for accuracy and avoid any typing errors, as incorrect passwords can result in installation failures.
MongoDB serves as a robust database system, providing a foundation for efficient data organization and access. Connect to an existing database dedicated to supporting your application-specific data requirements.

-
Enter the Server host name, which serves as the unique network address or domain name of your MongoDB database server. It can be either an IP address or a Fully Qualified Domain Name (FQDN). The FQDN usually comprises the server's name and domain, e.g.,
server.example.com, and identifies the physical or virtual server that hosts your database instance. -
Enter the Port, if your database server uses a non-default port.
-
Click the Work with SSL toggle to enable or disable SSL.
-
If you toggle the Work with SSL to On, click Select file to select a PEM certificate file.
-
Enter the Administrative user (username) associated with your administrative account for database configuration.
-
Enter the Administrative user password corresponding to the administrative user account. Double-check for accuracy and avoid any typing errors, as incorrect passwords can result in installation failures.
-
Enter the Application user (username) associated with the application user account for database interactions.
-
Enter the Application user password corresponding to the application user account. Double-check for accuracy and avoid any typing errors, as incorrect passwords can result in installation failures.
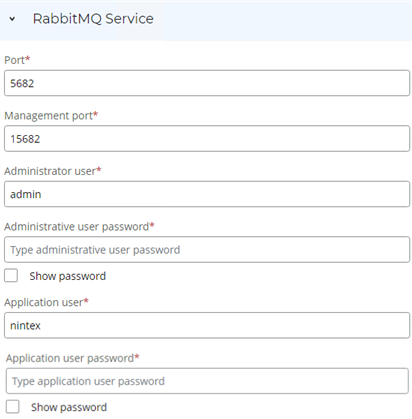
RabbitMQ is a messaging protocol that helps systems communicate. It operates as a task queue, prioritizing and sequencing various tasks within your setup. Tasks may include determining the order of clustering or masking screenshotsand , scheduling upcoming Discovery processes, and more. Configure RabbitMQ to integrate with your Process Discovery environment.
-
Enter the RabbitMQ Port or keep the default value. This port is used for communication between Process Discovery and RabbitMQ.
-
Enter the Management port or keep the default value. This port is used to access the RabbitMQ UI for troubleshooting purposes.
-
Create an administrative user:
-
Enter your desired username for the administrative user. The default is
admin, but you can choose any name. -
Create a password for the administrative user.
To keep your RabbitMQ setup secure and effective, your password must:
-
Consiste of Be 9 - 32 characters. long
-
Contain Have a minimum of one digit, one lowercase character, and one uppercase character.
-
Only containConsist solely of alphanumeric characters (a-z, A-Z, 0-9), dashes, periods, and underscores.
-
Be different than the username.
For passwords, these special characters aren't supported:
Special Character Description Special Character Description ' Apostrophe \t Tab " Double quotation mark \n Line feed & Ampersand \v Vertical tab ⎵ Space \r Caret return ; Semi-colon \ Backslash -
-
Create an application user:
-
Enter your desired username for the system user. The default is
nintex, but you can choose any name. -
Create a password for the system user. Ensure that you follow the same password requirements noted for the administrative user password.
-
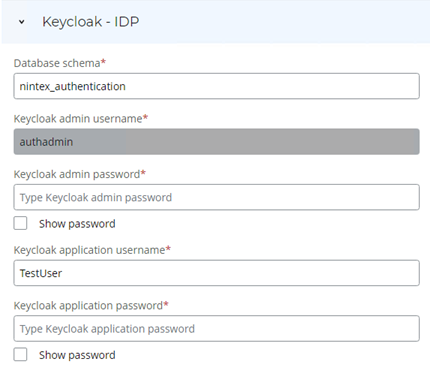
Keycloak is a powerful identity and access management platform used to secure and manage user identities, roles, and permissions. It plays a vital role in ensuring the security and access control of your Process Discovery environment. Configure Keycloak as the Identity Provider (IdP) to enhance security and access management for your Process DiscoveryProcess Discovery tasks.
-
Enter the Database schema. This is the authentication database you previously created for Keycloak, which is required as a prerequisite for installing the Process Discovery server.
-
Create a password for the administrative user.
To keep your Keycloak (IdP) secure and effective, your password must:
-
Consist of Be 9 - 32 characters. long
-
Contain Have a minimum of one digit, one lowercase character, and one uppercase character.
-
Only contain Consist solely of alphanumeric characters (a-z, A-Z, 0-9), dashes, periods, and underscores.
-
Be different than the username.
For passwords, these special characters aren't supported:
Special Character Description Special Character Description ' Apostrophe \t Tab " Double quotation mark \n Line feed & Ampersand \v Vertical tab ⎵ Space \r Caret return ; Semi-colon \ Backslash -
-
Create an application user:
-
Enter your desired username for the application user. The default is
TestUser, but you can choose any name. -
Create a password for the system user. Ensure that you follow the same password requirements noted for the administrative user password.
-
After Once you have finished configuring your settings, complete the installation by clicking Install >.
< Previous step: Optional features
> Next step: Post-installation