State machine
Use the State machine action A tool for building the processes, logic, and direction within workflows. Actions are the steps the workflow performs to complete a process. to provide a construct to define a number of states the workflow can be in. Each state can contain actions that executes when the workflow is in that state. The workflow can move back and forth between states and ends a state when it is instructed to Exit the state machine. You can add two or more branches as states and assign workflow actions to run when the workflow is in each state.
States can be added, deleted and renamed. Deleting a state will delete all actions currently added to it.
A State Machine workflow can be used to route a business process between multiple branches. For example a document can be approved by one team and sent to another team for approval and then to a final team for final approval. If the document is rejected at any time it can be sent back to the previous team to review and resubmit the document.

|
See how to implement this action in a step-by-step solution: Automate document approvals by multiple parties. |
States structure your workflow into repeatable paths that you can switch between at any point, creating back-and-forth interaction in workflows. The workflow progresses through each state according to the actions configured within its branch. Actions below the state machine do not execute until the state machine is exited. The states can be made to run in any order, and conditions determine when to switch from one state to another, allowing workflows to return to earlier states, or move to the next state.
You can define state branches within a workflow for two or more states. Using the State machine action, you can add, rename, and delete states.
When you are designing a workflow:
- The State machine action creates the stages of the workflow.
- The Set next state action controls when one state changes to another and allows you to run a different state within a branch or to exit the state machine to execute actions below the state machine.
Variables are placeholders that store information that changes each time the workflow runs or even during execution of a single workflow instance.
Each variable has a type that determines what values can be stored in the variable, such as a date, number, file path or a workflow user name. For example, if you want to save the name of an employee in a variable, you have to create a variable of type Text. The workflow can then store a name of the employee, such as "John," in the variable.
- Text: Text string.
- Boolean: Yes or No value.
- Date/Time: Date and time value.
- GUID: Globally unique identifier, often used to reference a list item in SharePoint.
- Number: Integer number with decimal value.
- Integer: Integer number with no decimal value.
- Choice: A value that requests a selection from a list of allowed values.
- Person or Group: A value that requests a selection from a user lookup.
- Hyperlink: A value that requests a hyperlink URL and description.
- Dictionary: A container that holds a single logical unit of variables. For more information, see Dictionary variables.
- Collection: An index-based array of values, also known as an ordered list of values. For more information, see Collection variables.
In NintexOffice 365, the different categories of variables that can be used in a workflow are given below:
-
Workflow Context: Context variables that represent data related to the current workflow instance, such as current item or site URL and workflow name.
- Workflow Variables: User-defined variables that you create to store values such as file paths, dates, workflow outputs Variable to store a value or file on completion of the workflow. and other data for use throughout the workflow.
- Start Variables: Workflow variables with the initiation option selected. Start Variables are used to get data from users when a workflow manually starts.
For more information on manually starting a workflow, see .
- Text
- Boolean
- Date/Time
- Number
- Choice
- Person or Group
- Hyperlink
To configure a variable as a start variable, select the Initiation option when creating a variable.
You can insert an existing Workflow Variable or Context Variable into the configuration fields of workflow actions A tool for building the processes, logic, and direction within workflows. Actions are the steps the workflow performs to complete a process. and you can create user-defined variables for use throughout your workflow.
You can create user-defined variables from the Action configuration window when you are configuring a workflow action or from the toolbar of the designer page.
- In the Action configuration window, click in a field that accepts variables.
- Do one of the following depending on the method available;
- On the drop-down list that appears, Click Create New Variable.
- On the Insert Reference pane that appears, expand the Workflow Variables section and click Create New Variable.
- Do the following in the Workflow Variables pane to create the variable:
- For Name, type the variable name you want to use.
- Select a Type.
- If you want to display the variable on the start form, select the Show on start form check box.
- Click Create.
- On the toolbar of the Designer page, click Variables. The Variables dialog box appears.
- Click New and fill in the following:
- For Name, type the variable name you want to use.
- For Type, select a variable type corresponding to the type of data you want to store.
- If you want to specify the variable as a start variable, select the Initiation check box.
- Click
 to specify the Initiation options Initiation options control the display and behavior of the variable on the start form that is displayed when a workflow is started manually..
- Click Save.
For more information, see User-defined variable types and Initiation options.
The following table describes the variable types available in the Variables dialog box as well as their initiation options, which are available when you select Yes for Initiation. Initiation options control the display and behavior of the variable on the start form that is displayed when a workflow is started manually.
| Variable type | Description |
Initiation Available |
Initiation options |
|---|---|---|---|
| Text |
Any text value. Underlying .NET data type: System.String. |
Yes |
|
| Boolean |
Yes or No value. Underlying .NET data type: System.Boolean. |
Yes |
|
| Date/Time |
Date and time value. Underlying .NET data type: System.DateTime. |
Yes |
|
| GUID |
Globally unique identifier, often used to reference a list item in SharePoint. Underlying .NET data type: System.Guid. |
No |
(n/a) |
| Number |
Numeric with a Decimal value. Underlying .NET data type: System.Double. |
Yes |
|
| Integer |
Numeric without a decimal. Underlying .NET data type: System.Int32. |
No |
(n/a) |
| Choice |
A value that requests a selection from a list of allowed values. The value selected by the workflow initiator is stored in the variable. Underlying .NET data type: System.String. |
Yes |
|
| Person or Group |
A value that requests a selection from a user lookup. The item selected by the workflow initiator is stored in the variable. Underlying .NET data type: System.String. |
Yes |
|
| Hyperlink |
A value that requests a hyperlink URL and description. Two text boxes are provided:
The values entered by the workflow initiator are stored in the variable. Underlying .NET data type: System.String. |
Yes |
|
| Dictionary |
A container that holds a single logical unit of variables. For more information, see Dictionary variables. Underlying .NET data type: Microsoft.Activities.DynamicValue. |
No |
(n/a) |
|
Collection |
An index-based array of values, also known as an ordered list of values. For more information, see Collection variables. |
No |
(n/a) |
You can insert a Workflow Variable, Reference A workflow reference which is used to construct content containing information specific to the list or library item and to the current instance of the workflow. or a Context Variable into the configuration fields of workflow actions A tool for building the processes, logic, and direction within workflows. Actions are the steps the workflow performs to complete a process..
Each field that accepts variables accepts one or more methods for inserting variables. The method available differs depending on the field.
Available methods are given below:
-
Click on the field and select an existing variable from the drop-down list for the field.
- Click on the field, click Create New Variable, and fill the following fields in the Workflow Variable pane that appears:
- For Name, type the variable name you want to use.
- Select the Show on start form check box if you want to display the variable on the start form.
- Click Create.
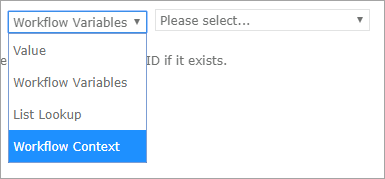
- Click on the field, select Workflow Variables or Workflow Context, and select a variable from the corresponding drop-down list.
- Click Advanced Lookup, select Workflow Variables or Workflow Context from the drop-down list that appears, and then select a variable from the corresponding drop down and click Insert.
- Click on the field that accept references and from the Insert Reference pane that appears on the right, double-click on a reference to select. Available sections and lookup values depend on the options available for the workflow action.

- Current item URL: The URL of the item the workflow is associated item. Available only for list workflow actions.
- Current site URL: The URL of the site the workflow is associated site.
- Initiator login name: The login name of the person who started the workflow instance.
- Initiator display name: The display name of the person who started the workflow instance.
- Initiator email address: The email address of the person who started the workflow instance.
- Instance ID: The unique identifier of the workflow instance.
- List ID: The unique identifier of the list the workflow is associated with. Available only for list workflow actions.
- List Name: The name of the list the workflow is associated with. Available only for list workflow actions.
- Manager login name: The login name of the manager of the initiator (the person who started the workflow instance).
- Manager display name: The display name of the manager of the initiator (the person who started the workflow instance).
- Manager email address: The email address of the manager of the initiator (the person who started the workflow instance).
- Publish user: The person who published the workflow.
- Workflow name: The name of the executing workflow.
| Section | Description |
|---|---|
| Item Properties |
Metadata columns for the item the workflow is associated with. Available only for list workflows. |
| Workflow Context |
Context variables that represent data related to the current workflow instance, such as current item or site URL and workflow name. |
| Workflow Variables | Workflow variables configured for the workflow. |
You can configure variables to collect data when a workflow is manually started. These variables will be shown on a start form used to initiate the workflow and allows users to specify a value for the workflow variable before the workflow starts, basically passing values into the workflow before it starts.
Variables displayed on a start form are also known as the "start data" of the workflow and represent data that must be collected when the workflow is started.
Note: If the workflow starts automatically, then default values are used for start data.
To learn how to manually start a workflow, see Start a workflow manually.
Configure a variable to show on a workflow start form:
-
Open the required workflow. The workflow designer opens.
- On the toolbar, click Variables. The Variables window opens.
-
To edit an existing variable, click the required variable. The row becomes editable.
or
- Select the Initiation check box for the required variable.
- If you want to configure initiation options, click
 to open the Initiation options dialog box, make the changes and click OK. For more information about the fields, see User-defined variable types and Initiation options.
To create a variable, click New on the Variables window toolbar, enter a Name, and select the Type for the variable.
- Click Save to commit changes.
Add and configure the State machine action
-
Click the Logic and Flow action group in the action toolbox.
or
Type the action name or function in the Search field at the top of the action toolbox.
- Drag the State machine action to the designer canvas.
-
Do one of the following to open the Action configuration window:
- Double-click the action.
- Click
 on the action and then click Configure.
See Action configuration window for more information.
- Type the states to use in Enter the possible state for this state machine.
- Click Add state to add more states.
-
Select the state to start the state machine in Choose the state that this state machine will start in.
- Click Save.
If you want you can change the sequence of branches in a State machine action:
- On the design canvas, click the down-arrow for the state branch and then select one of the following items.
- Move branch left
- Move branch right
For more information about the fields and settings, see State machine fields, buttons, and settings
| Field | Description |
|---|---|
| Enter the possible states for this state machine |
The states to be used in the State machine. You can add, rename, and delete states as needed. Two states are provided with the names "State 1" and "State 2" by default which you can rename if you want.
|
| Choose the state that this state machine will start in |
The initial state for this state machine to start from. Note: To set the initial state using a lookup, select Other Value. |
 .
.