Configure SAML with Okta as identity provider
 An Organization administrator role is required. For information, see User roles.
Before you begin, read Configure SSO with an Identity provider connection.
Jump to:
-
Configuration steps:
Get the Identity Provider data from Nintex Workflow |
- In the Identity provider connections page in Nintex Workflow, click Add connection.
- In the Add connection panel, select Okta as the identity provider.
- Audience URI (SP Entity ID)
- Single sign on URL
- Attribute Statements
- Keep your Nintex Workflow browser open and go to Okta.
Additional fields appear for the following:
Note: You will later need to copy and insert these values in specific fields in Okta.
For detailed information on each field that appears on the setup wizard, see Identity provider connection setup wizard elements and description.
Add Nintex Workflow to Okta |
Sign in to Okta as an administrator and complete the following steps:
- Add Nintex Workflow as an application or service provider for SAML.
- Copy the Audience URI (SP Entity ID) and Single sign on URL values, and the attribute statements from Nintex Workflow, and then paste them in the corresponding fields in Okta.
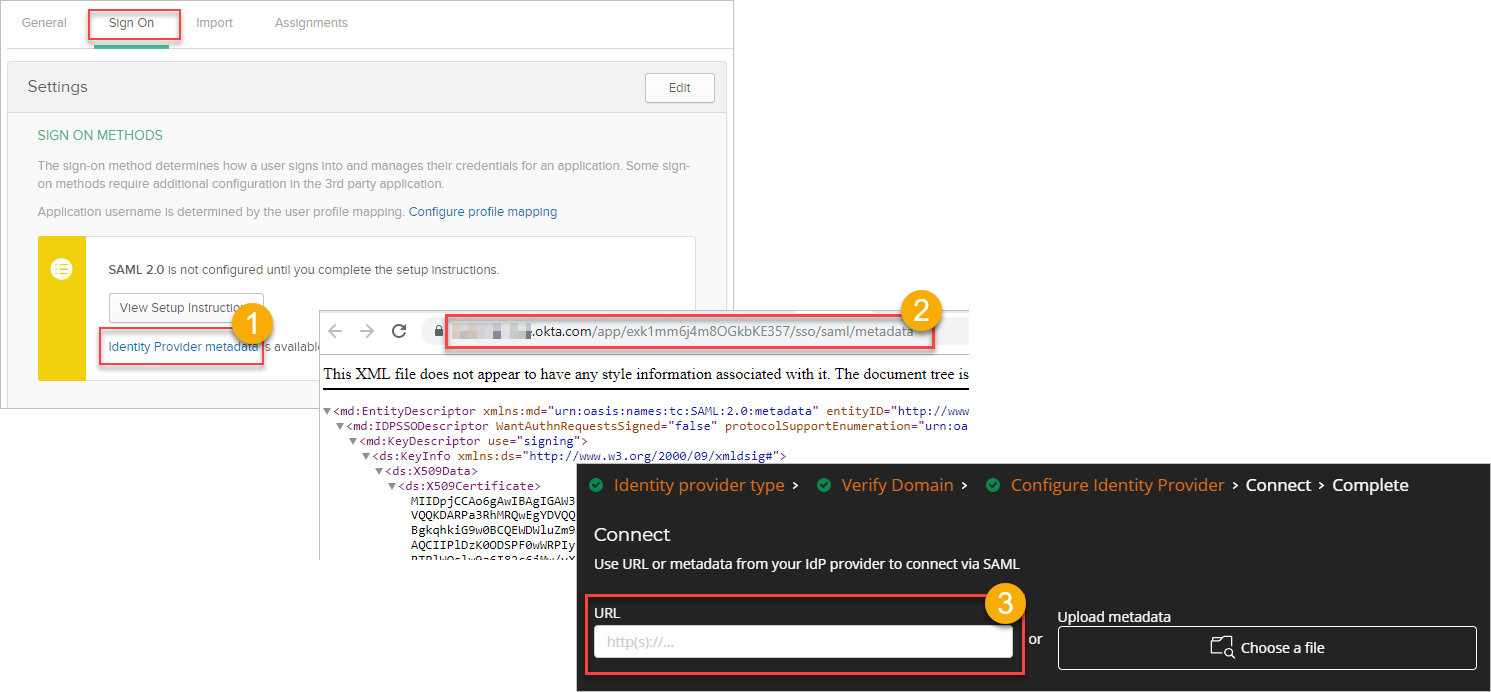
- Retrieve the SAML metadata URL or file. Copy the metadata URL, and paste it in the URL field of Nintex Workflow's setup wizard.
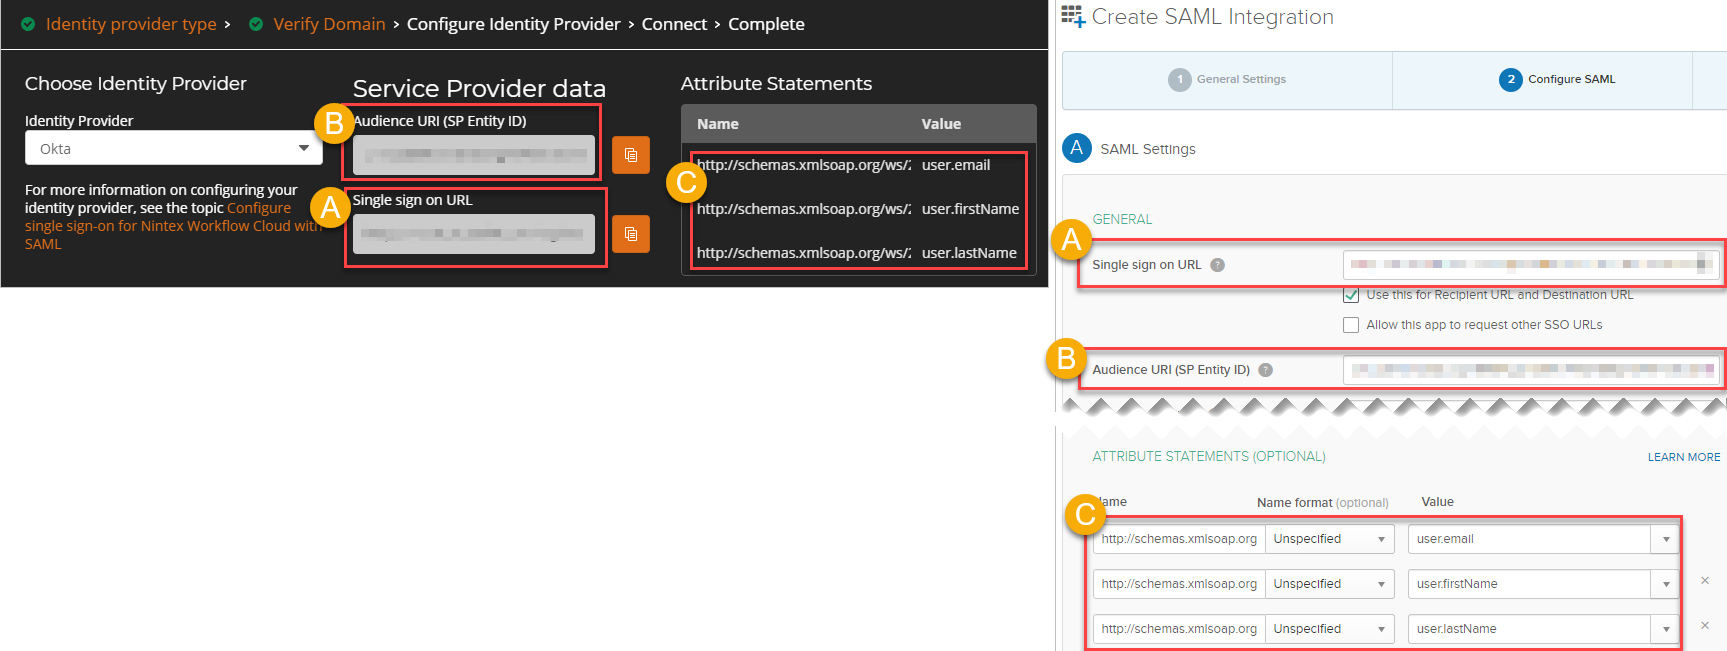
Note: Map the three identity attributes: First name, Last name, and Email.
Caution: After adding Nintex Workflow as a SAML application to your identity provider, make sure that users exist in the directory of your identity provider. Depending on the identity provider, an empty directory may cause SAML configuration to fail. For information on how to manage user accounts, refer to your identity provider's documentation.
For the SAML configuration steps in Okta, see the Okta documentation.
Complete the SAML configuration |
- Make sure that you have provided the metadata URL or file in Nintex Workflow's setup wizard.
- Make sure that your domain is successfully verified.
Follow these steps to complete the SAML configuration:
- In the Connect page of the setup wizard in Nintex Workflow, click Connect.
- To copy the One-time password URL, click
 (Copy) next to the One-time password URL field.
 - Open a new tab on your web browser, paste the copied URL and press ENTER.
- Enter your email address, and click Submit.
- Enter the one-time password you received, and click Sign in.
Note: The Connect button is enabled only when your domain is successfully verified and you have provided the metadata URL or file.
After connecting, your SAML configurations are checked. If successful, the setup wizard goes to the final page with the following information:
| Information | Description |
|---|---|
| Expiry date of certificate | Date when your certificate expires. |
| Recipient email address of the reminder for certificate expiry |
When your certificate is expiring soon, a reminder email will be sent to the recipient email address. Caution: You must renew the certificate before the expiry date. |
| One-Time Password (OTP) URL |
The One-Time Password (OTP) URL is used for troubleshooting purposes when configuration fails and you are locked out of your tenant. Follow these steps to access your tenant when you cannot sign in due to a failed configuration of SAML: For verification, a one-time password is sent to your email address. The one-time password expires after five minutes. You can access your Nintex Workflow tenant and resume configuring your identity provider connection. |
- Click Done.
The Identity provider connection section now lists information about your SAML configuration such as provider, domain, person who completed the configuration, and the date of configuration.
Test your SAML connection |
- Sign in to your Nintex Workflow tenant.
- Click Sign in or press ENTER.
- In Okta's login page, type your credentials, and then submit.
You are taken to the login page of Okta.
If the SAML configuration is successful, you are granted access to the Nintex Workflow tenant.
 Identity provider connection setup wizard elements and description
| Page | Section | User interface element |
Description |
||||||||||||||||||||||||||||||||||
|---|---|---|---|---|---|---|---|---|---|---|---|---|---|---|---|---|---|---|---|---|---|---|---|---|---|---|---|---|---|---|---|---|---|---|---|---|---|
| Identity Provider | Choose Identity Provider | Identity provider |
Displays the list of identity providers you can use for your tenant's identity federation. |
||||||||||||||||||||||||||||||||||
| Service Provider data |
|
(Appears after you select an identity provider) In the context of our SAML configuration, the service provider is Nintex Workflow. Depending on the identity provider you choose, the SAML terminologies displayed in this section correspond with what your identity provider uses. SAML terminologies used in identity providers
|
|||||||||||||||||||||||||||||||||||
|
Attributes |
Set of identity data about a user. In configuring SAML in Nintex Workflow, only three attributes are requested from the identity provider:
|
||||||||||||||||||||||||||||||||||||
|
(Copy) |
Click to copy the values in the fields. | ||||||||||||||||||||||||||||||||||||
| Connect |
URL |
Location of the SAML metadata An XML document that contains information about a SAML deployment.. |
|||||||||||||||||||||||||||||||||||
| Upload metadata | The SAML metadata file. | ||||||||||||||||||||||||||||||||||||
| Complete |
<Date> |
(Only displayed for SAML) Expiry date of the certificate. |
|||||||||||||||||||||||||||||||||||
| <Email address> |
(Only displayed for SAML) Email address to receive reminder when certificate is soon to expire. |
||||||||||||||||||||||||||||||||||||
| One-Time Password (OTP) URL | <URL> |
The One-Time Password (OTP) URL is used for troubleshooting purposes when configuration fails and you are locked out of your tenant. Follow these steps to access your tenant when you cannot sign in due to a failed configuration of SAML:
For verification, a one-time password is sent to your email address. The one-time password expires after five minutes. You can access your Nintex Workflow tenant and resume configuring your identity provider connection. |
|||||||||||||||||||||||||||||||||||