Microsoft Face Recognition
Important: This connector and its actions have been removed from Nintex Workflow and can now be found in Nintex Gallery.
Microsoft Face Recognition provides AI algorithms that detect, recognize, and analyze human faces in images. Facial recognition software is important in many different scenarios, such as identity verification, touchless access control, and face blurring for privacy. For more information on Microsoft Face Recognition see the company website.
In the context of Nintex Workflow, Microsoft Face Recognition is a connector A software component that allows seamless integration with third-party services, business applications, and content stores. Examples include Salesforce, Box, and Microsoft SharePoint. Connectors are used to create connections required for workflow actions and start events.. The Microsoft Face Recognition connector is used to create connections for Microsoft Face Recognition actions A tool for building the processes, logic, and direction within workflows. Actions are the steps the workflow performs to complete a process.. Use Microsoft Face Recognition actions to manage people's face images and details, and to identify people in images.
Jump to:
Create a Microsoft Face Recognition connection
Note: Your browser-stored credentials are accessed to create connections. Either clear credentials from browser memory or make sure the stored credentials are for the intended environment.
Create a connection from the connections page or from the action configuration panel when configuring the action. For information about creating connections and assigning permissions, see Manage connections.
In the Add a new connection section, complete the fields as follows:
|
In this field |
Select or enter the following |
|---|---|
| Connection name | A name for your new connection |
| API Key | Your Microsoft Azure Cognitive Service API key. In the Azure portal, access your API key and location value on your Cognitive Service > Keys and Endpoint page. |
| Location | Get you location entry on your Cognitive Service > Keys and Endpoint page. |
Microsoft Face Recognition account requirements
- You must have an Azure account with a Cognitive Service subscription and have the Face service configured to use this connector's actions. For more information see Microsoft Azure Face.
-
You must use your Microsoft Azure Cognitive Service API key and location entry to create a connection. In the Azure portal, access your API key and location entry on your Cognitive Service > Keys and Endpoint page.
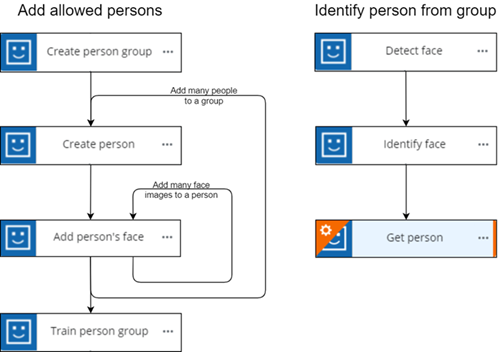
Action flow
When using Microsoft Face Recognition, you must configure actions in a particular order, as some actions are dependent on data from others. The required action flow is shown below:
Create a Microsoft Face Recognition data lookup
Use the Microsoft Face Recognition data lookup to retrieve a list of person groups, and to retrieve a list of people from a person group. Each data lookup is configured for a specific user. You can create as many data lookups as you need.
For example, to allow users to select a specific person in a form, add a drop-down list of people from a person group to the form using a Data lookup control A form control that allow users to select from a drop-down list that has values sourced from a third-party service.. The Data lookup form control uses a Microsoft Face Recognition - Get people data lookup to list the people available from the person group in the drop-down. For more information on creating a data lookup and assigning permissions to it, see Data lookups.
You can create a data lookup to:
- Get people: List people defined within a person group from your Microsoft Face Recognition account.
- Get person group: List the person groups available from your Microsoft Face Recognition account.
Microsoft Face Recognition data lookup fields
To access the data lookup fields, in the Add data lookup section, select Microsoft Face Recognition in the Connector field and then select the Operation.
|
Operation |
Field or selection |
Description |
|---|---|---|
| Get people | Connection |
The connection to use for the data lookup. |
| Person group ID | The person group that contains the list of people. You can use the output of the Get person groups data lookup to provide the Person group ID. | |
| Get person groups | Connection |
The connection to use for the data lookup. |