Repeat data in Microsoft Word
You can repeat rows, tables, and sections in Microsoft Word.
Jump to:
Repeat rows
-
Add the Generate document action to the workflow and open the action configuration panel. For more information, see Add an action to the workflow.
-
Configure the Document templates section so that there is at least one template and corresponding Output file name.
-
In the Repeating data section, click Add repeating data.
-
Specify a Collection.
-
From the Repeat by drop-down, select Row.
-
Click Open Nintex Document Tagger.
The Nintex Document Tagger opens in a separate browser window and shows all tags for the workflow you are editing.
Collections specified in the Repeating data section of the configuration panel and their child parameters are displayed in the Repeating data section of the Nintex Document Tagger.
-
In the Show tags for section, click Word.
-
In the Workflow repeating data section, click Row, and then locate the collection that you want to be repeated in the document.
-
Click the Start tag for the collection to copy it, and then paste it into your Word document.
Example: The tag would be:
<<Case_Start>>This tag will prompt Nintex Workflow to produce a new row of data for each child record of the collection.
-
Once the tag is placed in your Word document, you can assign other tags to the columns within your table.
Note: Collections nested in a parent collection are not supported.
-
Save the Word document.
The Microsoft Word output is shown below. As you can see, three rows of data that are related to the Acme Co. account were added into the document.
The tagged document below is what we'll use for our Word example. When we run the workflow, you should receive multiple rows of data with the Case information.


Repeat tables
-
Add the Generate document action to the workflow and open the action configuration panel. For more information, see Add an action to the workflow.
-
Configure the Document templates section so that there is at least one template and corresponding Output file name.
-
In the Repeating data section, click Add repeating data.
-
Specify a Collection.
-
From the Repeat by drop-down, select Table.
-
Click Open Nintex Document Tagger.
The Nintex Document Tagger opens in a separate browser window and shows all tags for the workflow you are editing.
Collections specified in the Repeating data section of the configuration panel and their child parameters are displayed in the Repeating data section of the Nintex Document Tagger.
-
In the Show tags for section, click Word.
-
In the Workflow repeating data section, click Table, and then locate the collection that you want to be repeated in the document.
-
Click the Start tag for the collection to copy it, and then paste it into the header row or column of your Word document.
Example: The tag would be:
<<Case_Start>>
This tag will prompt Nintex Workflow to produce a new table of data for each child record of the collection.
-
Once the tag is placed in your Word document, you can assign other tags to the rows or columns within your tables.
Note: Collections nested in a parent collection are not supported.
-
Save the Word document.
The Microsoft Word output is shown below. As you can see, three tables of data that are related to the Acme Co. account were added into the document.
The tagged document below is what we'll use for our Word example. When we run the workflow, you should receive multiple tables of data with the Case information.

Repeat sections
-
Add the Generate document action to the workflow and open the action configuration panel. For more information, see Add an action to the workflow.
-
Configure the Document templates section so that there is at least one template and corresponding Output file name.
-
In the Repeating data section, click Add repeating data.
-
Specify a Collection.
-
From the Repeat by drop-down, select Section.
-
Click Open Nintex Document Tagger.
The Nintex Document Tagger opens in a separate browser window and shows all tags for the workflow you are editing.
Collections specified in the Repeating data section of the configuration panel and their child parameters are displayed in the Repeating data section of the Nintex Document Tagger.
-
In the Show tags for section, click Word.
-
In the Workflow repeating data section, click Section, and then locate the collection that you want to be repeated in the document.
-
Click the Start tag for the collection to copy it.
Example: The tag would be:
<<Case_Start>>This tag will prompt Nintex Workflow to produce a new section of data for each child record of the collection.
- In your Word document, navigate to Developer tab > Controls section.
- Click Add a Rich Text Content Control to add the control to your document.
- Click the Rich Text Content Control box to highlight all the fields.
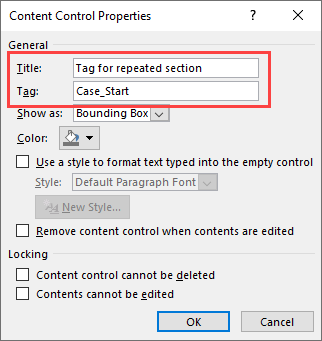
- In the ribbon, navigate to Developer tab > Controls section > Properties.
- Add a title and paste the Start tag that you copied from the Nintex Document Tagger.
- Click OK.
- Add more tags to the Rich Text Content Control box.
-
Save the Word document.
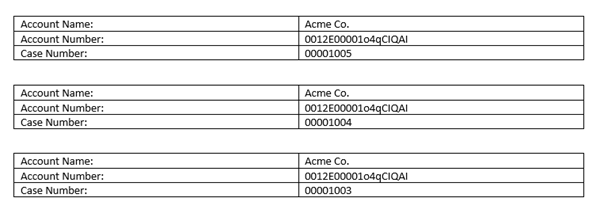
The Microsoft Word output is shown below. As you can see, three sections of data that are related to the Acme Co. account were added into the document.
Note: Make sure that the Developer tab is visible in your ribbon.

A text box is inserted into your Word document.
Note: Collections nested in a parent collection are not supported.
The tagged document below is what we'll use for our Word example. When we run the workflow, you should receive multiple sections of data with the Employee information.

