Runtime translation
Runtime translation allows your views and forms to be translated at runtime. You can add or remove languages, and set a default translation language for views and forms. You can manually update auto-generated translation values, or use the export/import functionality to do this.

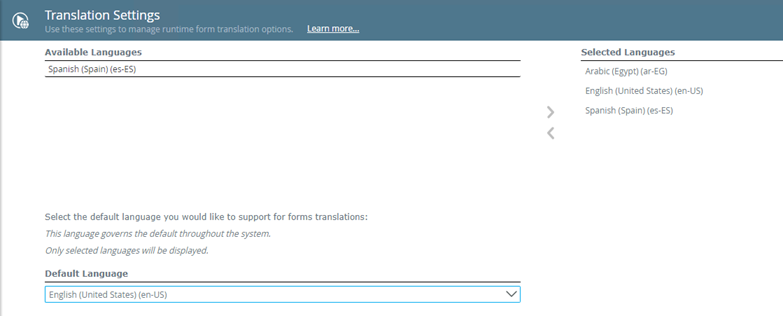
The Translation Settings node allows you to enable translations per product, add or remove languages that views and forms are translated to, and set the default language for translation and automatic key creation.
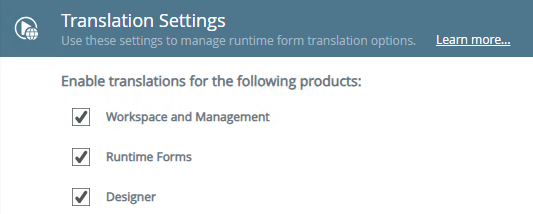
Translations can be enabled or disabled per product to allow people to view it in all supported languages. Translations for Workspace, Management, and the Designer is applicable to design time translation, and translations for Runtime Forms is applicable at runtime.
Follow the steps below to enable translations per product:
- Under Enable translations for the following products, select the check box for the product that you want to allow translations for. To disable translations for a product, uncheck the check box.
You can also specify the preferred language for these products in Workspace. See Workspace settings for more information.
Note that when setting the preferred languages in Workspace, it affect all users that have access to Workspace, Designer and Management.
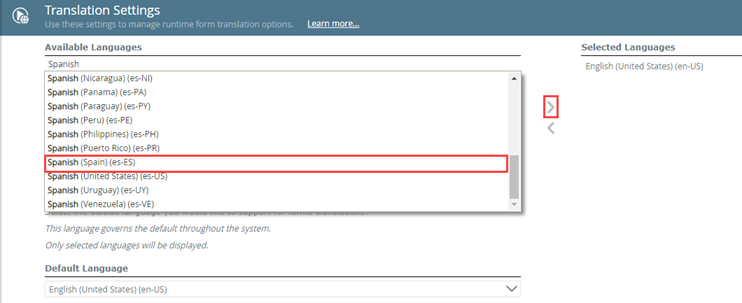
Search for a language that you want to use for runtime translations in the Available Languages section and add it as a selected language, which is then used as the language for runtime views and forms translation.
Follow the steps below to add a language as a selected language.
- Under Available Languages search for the language you want your runtime views and forms to be translated to, then click > to add the language to the Selected Languages list. If the required language isn't returned when typing only the language, try adding the location or locale code to filter the list further.

Selected Languages are used to determine the language for runtime views and forms translation. You can have multiple selected languages and use one of them as your default language. Having multiple selected languages gives you the ability to add translation values for those languages instead of only the default language. To add a language, see Available Languages.
Follow the steps below to remove a language from the Selected Languages list.
- Under Selected Languages select the language you want to remove, and then click < to remove the language.

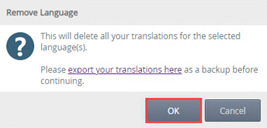
- Click OK on the pop-up message. Note that your existing translations for this language are removed when you click OK. If you remove a Selected Language which is set as the Default Language, the system uses English (United States) (en-US) as the default language.
The default language is the language that your runtime views and forms use for fall-back behavior and for automatic key creation when a view or form is saved or checked in. The languages available for selection are the languages in the Selected Languages list.
Follow the steps below to select a language as the default language.
- Under Default Language select the language that you want to use as your default language.

- Click OK to change the default language.
The Forms Translations node allows you to create custom translation values for your views and forms. When you save or check in a view or form, the system detects areas that can be translated and automatically generates keys and values based on the default language you configured in the Translation Settings node. You can manually update the auto-generated translation values per key with your custom values, or use the export/import functionality to update multiple keys with custom translation values. If a control, view, or form is deleted, the translation tied to it is also removed.
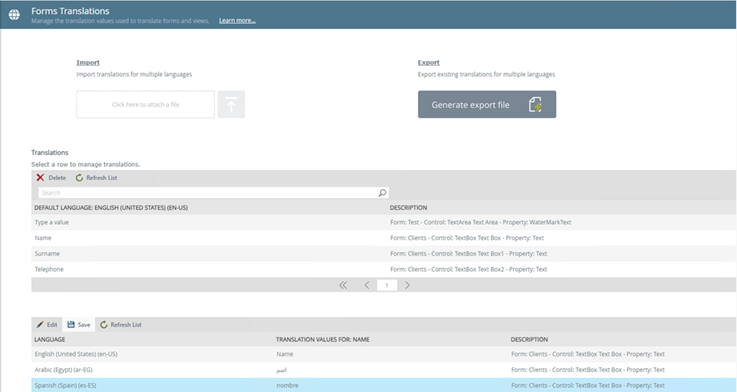
Use the Translations section to manually add a custom translation value per key and selected language.
- Under Translations search and select the key that you want to create a custom translation value for.

- The list populates with all selected languages and values for that key. Select the language that you want to add a custom translation value for.
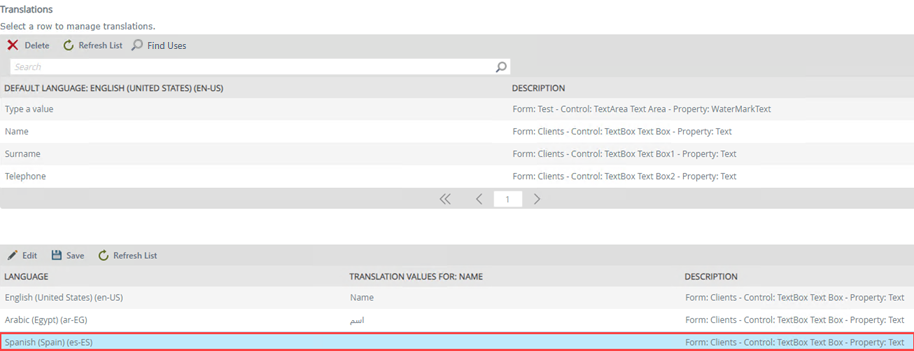
- Click Edit and type the value next to the language. Click Save to save the new translation value.

The Find Uses button allows you to view a list of instances for which a translation has been used within a view or form.
- Select a key then click Find Uses.

- This opens the list of instances.

Property Description Use The view or form name. Breadcrumb This is where the translation is found within the view or form in the order of view/form name – control name – property name. Link A link to the view or form where the translation is used. Clicking the link opens the view or form in the Designer.
Context Browser mapped properties
You can create translation keys for properties that are mapped from the Context Browser in the Designer. In the example below we use a rule with date values.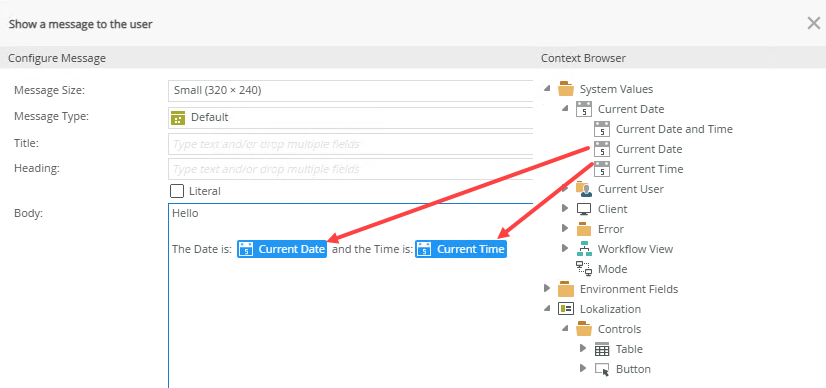
The translation key looks like the following based on its position and order within the message.
Use the Export feature to export existing translations into a XLSX (Microsoft Excel Spreadsheet) file. Note that all existing translations are exported. Use the file to add custom translation values for multiple keys and languages. Once edited, you must import the file to apply the changes.
Follow the steps below to export existing translations.
- Under Export click Generate export file.

- Click the generated file to download it to your machine.

Open the downloaded XLSX file and replace the Value next to the language you want to edit with the custom value for that language. You can also use another editor such as Excel or Notepad. When you export translations that were created for a language, for example English as the default language, you must copy that key and provide your preferred Locale and Value for the new language you want to import. To ensure localization is applied correctly, the Locale you provide in this file must exist in the Selected Languages list. Do not edit the Key values as the system uses these values to identify the translation values.
- The XLSX template used to export translations must be used in the same format to import new or edited translations. Do not change any of the columns or headers.

| Description | How to use | |
| Key | System identifier for the translated value. Do not edit this Key because as it is a system key. | Copy the key you want to add a new translation value for and provide your preferred Locale and Value for the new language you want to import. |
| Locale |
Language code for the translated value. Locale code formatThe locale code format is defined according to RFC 4646. It is structured as languagecode2-country/regioncode2, where languagecode2 is a two-letter language code and country/regioncode2 is a two-letter subculture code. Examples include fr-FR for French (France) and en-US for English (United States). |
Copy the key you want to add a new translation value for and provide your preferred Locale and Value for the new language you want to import. |
| Value | Translation value for the Key, for example when you provide a value for the Name key in Spanish, the value is nombre. | Type in the new translation value for the Key. |
| Source | The source for the value. | Type in or copy custom detail for the source. |
| Description | Description for the value. | Type in or copy custom description. |
Once you have updated your custom translations in the export file, you can import those changes into the system. Note when you import the changes, any existing translations are overwritten.
- The CSV or XLSX template used to export translations must be used in the same format to import new or edited translations. Do not change any of the columns or headers.
- Import files must be Comma Separated Value (CSV) or XLSX (Microsoft Excel Spreadsheet) files.
- Ensure the locale language in the imported file exists in the Selected Languages list before importing the file.
Follow the steps below to import the edited file.
-
Under Import click Click here to attach a file.

-
Select the file where it is saved on your machine and then click the upload button.

The example below shows how to add a custom translation value to an existing key for a selected language.
-
Go to Management > Translations > Translation Settings.
-
Under Available Languages search for Spanish (Spain) (en-ES) and add it as a selected language.
-
Set the Default Language to English (United States) (en-US).
-
Create a SmartObject with the properties Name, Surname, and Telephone.

-
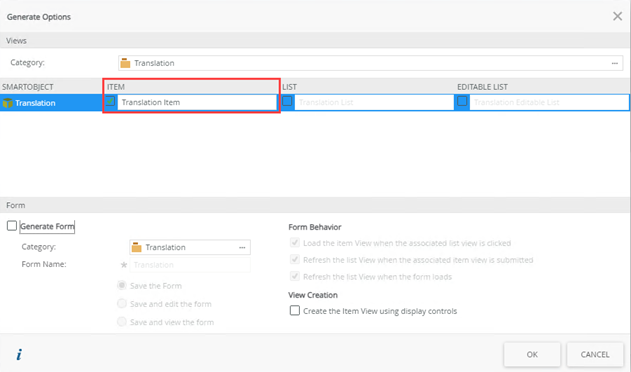
Generate an Item view from this SmartObject.
-
Go to Management > Translations > Forms Translations.
-
In the Translations section note the keys that were automatically created for English (default language) when the view was auto-generated. Select the Name key.

-
Select Spanish and click Edit as shown below. You want to add a custom translation for the Name key in Spanish (Spain) (en-ES).

-
Type "nombre" in Translation Value and click Save.

-
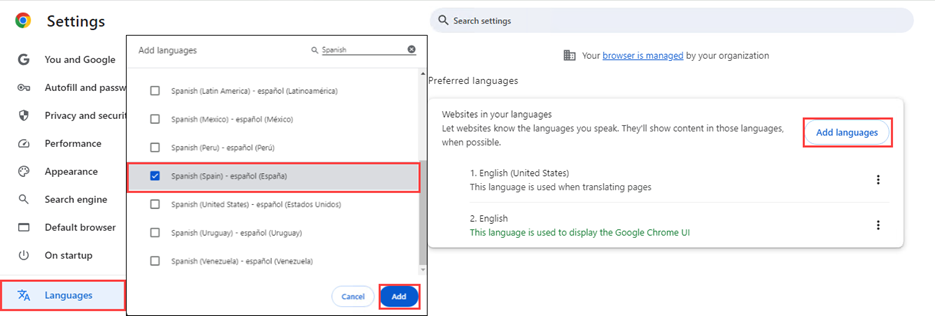
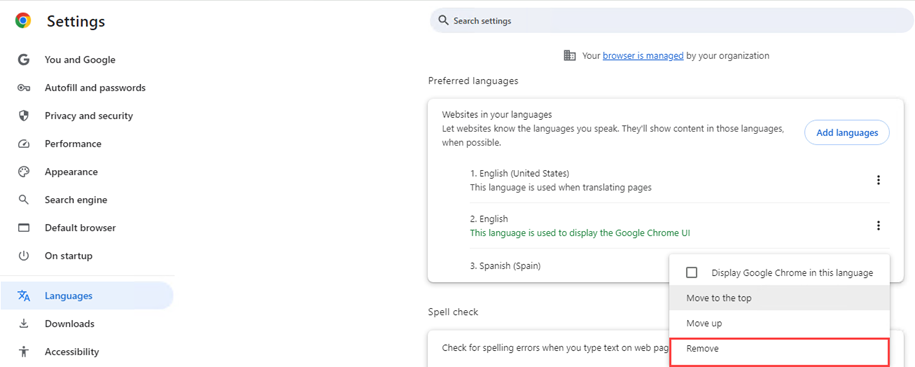
Go to your browser’s Preferred languages setting and add Spanish (Spain).
-
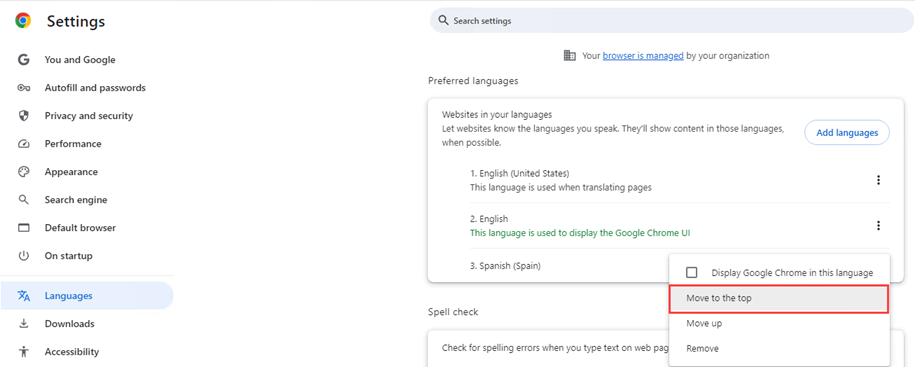
Click the option for Spanish and select "Move to the top". This will now change your default language to Spanish for web pages.
-
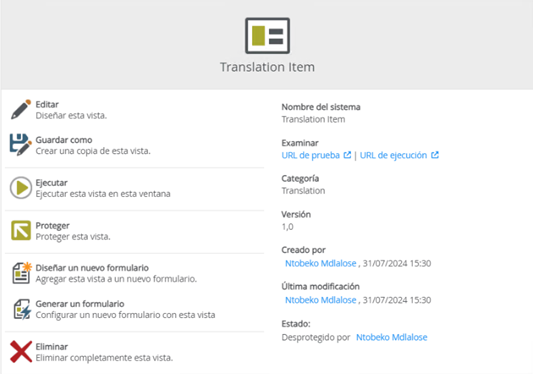
Return to the Designer and refresh the page. The Designer now shows in the localized language. See Considerations for words that are not translated.
-
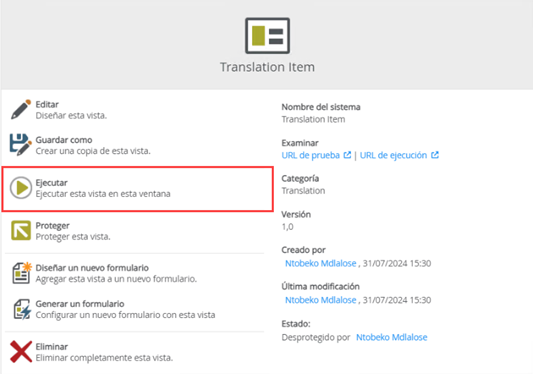
Select the view you created in the beginning and select Ejecutar (Run).
-
The Name now shows as "nombre". The rest of the keys are shown in English as that is the language they were originally created in.
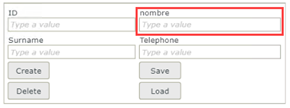
-
If you want to return your browsers Preferred language back to English, move English (United States) to the top in your browser's Preferred languages or remove Spanish (Spain).
When a form rule contains a static value in a SmartObject input property as shown below, the value is translated using the browser's language when executing the SmartObject at runtime.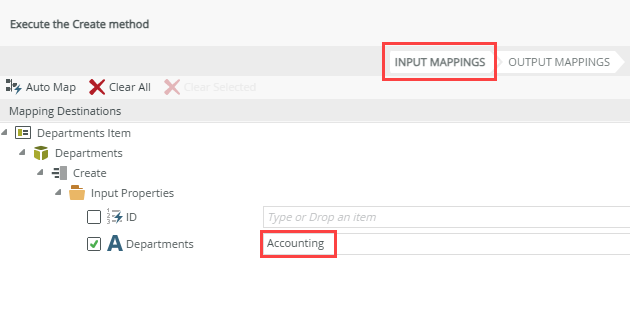
Use one of the following solutions if you don't want the value to be translated.
Solution 1: If you use multiple languages for translation, provide the same value for all languages in Management>Forms Translations>Translations as shown below. 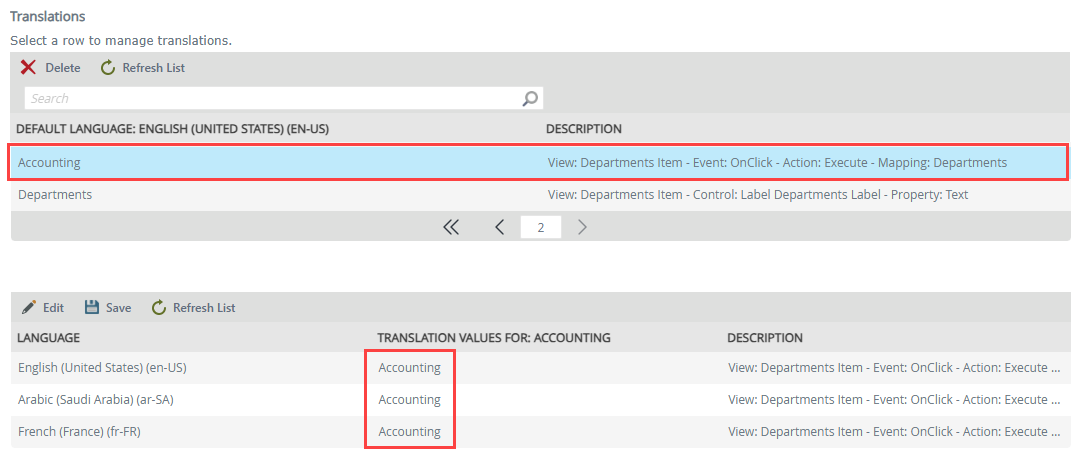
Solution 2: Create an expression for the value and use a Text>Empty String operator in the same text box to avoid translations as shown below, then use the expression in the SmartObject input property instead of the static value.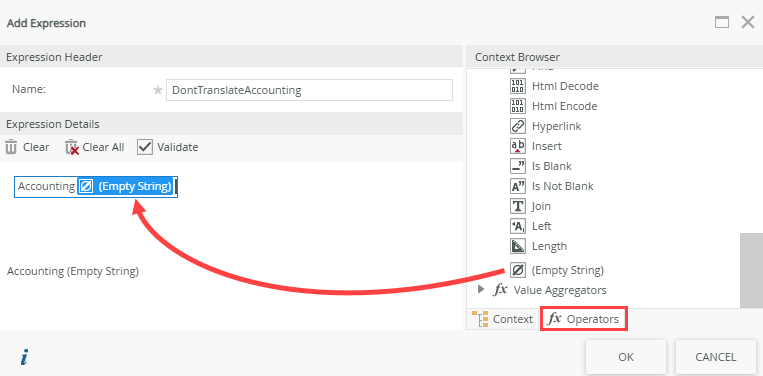
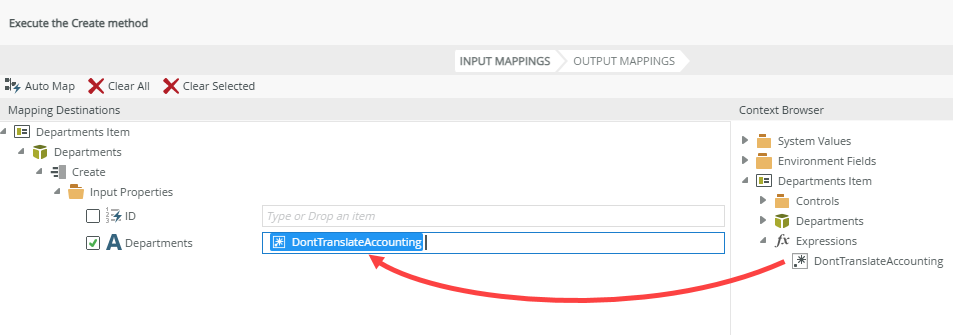
Solution 3: Localization is enabled by default. Runtime translation only happens when you have set a default language. If you don’t set a default language, it is effectively disabled. If you don't want to use the Localization feature, you can contact Nintex Customer Support to disable localization.
- The following words are not translated as they are reserved system words. You can however provide your own translation by using Forms Translations for these words:
- Category
- Delete
- Create
- Modify
- View
- Execute
- Security
- Form
- Inbox
- My Forms
- My Overview
- Users
- Settings
- SubForm
- UserName
- Process
Copy
All / (All)
- Available Languages - If the required language isn't returned when typing only the language, try adding the location or locale code to filter the list further.
- Default Language - The default language cannot be deleted or removed. It can only be changed.
- Auto-generated keys are generated in the environment’s default language (as selected in Translation Settings).
- Events like evaluating conditions are recorded in the language they were set up in. For example, if a user responds to a task with Approve, it will show as Approve regardless of the user's language preference.
- Any custom objects, custom messages, and custom text are not translated. This includes SmartObject, view, form, style profile, and workflow names and can show at runtime in items such as filters and more.
- K2 Trust and Identity Token screens are not translated when doing any online integration such as Exchange Online and SPFx SharePoint Site Collection.
- Export/Import
- You cannot use Package and Deployment to transfer translations to another environment. Use the Export and Import features to do this.
- When using the Export feature for runtime translations, all keys are exported. You cannot export a filtered list, for example just English keys.
- New imported keys must always have a default value. For example, when you export translations that were created for English as the default language, you must copy that key and provide your preferred Locale and Value for the new language you want to import.
- When importing translations, ensure there are no duplicate keys in the import CSV file as duplicates won't be imported.
- Only selected languages can be imported. If the language is not in the list of Selected Languages, you won't be able to import that language.
- The CSV template used to export translations must be used in the same format to import new or edited translations. Do not change any of the columns or headers.
Changing the Default Language if keys already exist will show empty values if the new default language never had an entry for that key.
- The “Generate export file” button is not translated and shows in English.
- Existing solutions must be checked out, edited and saved, and then checked in for strings to be generated for forms translations.
- Workspace and Management follow the same translation principles as Designer. English, French, Spanish, German, and Arabic are the supported languages for Designer, Workspace, and Management. For runtime translations of views and forms, any language can be used for translation. See Fall-back behavior for a better understanding of how localization is applied and expected behavior.
-
The translation settings for Workspace and Management, Runtime Forms, and Designer are enabled by default.
-
The translation settings for Workspace and Management, Runtime Forms, and Designer can only be set and managed by a user with Admin rights in Management.
-
The Filter For Language SmartObject property setting can be used to translate data within a SmartObject at runtime.
-
You can use a query string parameter to test a specific language translation on a view or form at runtime without changing your browser settings or the Runtime Forms Preferred Language setting in Workspace.
- See Considerations in the Localization topic for Design time and general considerations.