Form - Properties Page
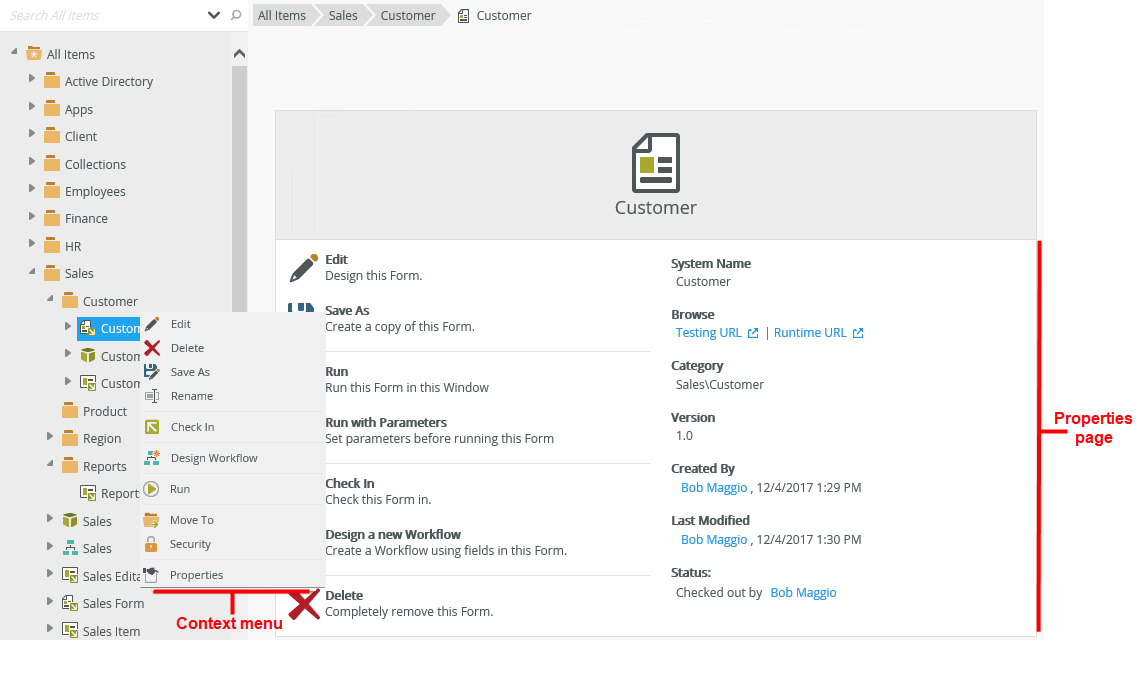
Right-clicking an existing form allows you to perform actions on the form, such as Edit, Rename, Save As, and Delete. You can also see these actions by selecting a form and using actions on the form properties page, both of which are shown here.
| Feature | Description | How to use it |
|---|---|---|
| Edit | Allows you to edit the form. If you don't see this option you don't have modify rights. For more information on the different rights, see the Authorization topic. | Click Edit |
| Rename | Renames the form. If you don't see this option you don't have modify rights. For more information on the different rights, see the Authorization topic. | Select the form and click Rename |
| Save As | Creates a copy of the form | Click Save As, and then type a new name |
| Run | Opens the form in runtime | Click Run |
| Run with Parameters |
The Run with Parameters option is available when you add a view, or form parameter or form states. This option allows you to specify any values for the parameters of the form before running it to test and troubleshoot your form states without using a workflow. You can add the State query string parameter to the URL of your form: ?_state=[value] where the value is the state name. However, the preferred method is to use the Run with Parameters option from the Designer, select the form and use the Run with Parameters option. When you use the Run with Parameters feature, testing different parameter values may result in unexpected behavior. You should only use this feature if you fully understand the impact of doing so.
|
Click Run with Parameters, and then specify one or more values to run the form |
| Check In | Makes the form available to other people | Click Check In |
| Check Out | Checks the form out for you to edit | Click Check Out |
| Design a new Workflow | Opens the Workflow Designer | Click Design a new Workflow |
| Delete | Deletes the form. If you don't see this option you don't have delete rights. For more information on the different rights, see the Authorization topic. | Click Delete |
| Cancel Check Out | Cancels the check out action and reverts the form back to its previous state | Click Cancel Check Out |
| Move To | Use this to move a form to another category. If you don't see this option you don't have modify rights. For more information on the different rights, see the Authorization topic. | Select Move To from the menu, browse to the category where the form is to be moved, and select OK |
| Security | Opens the Security dialog where you can grant people View, Execute, and Security rights to the form. For more information on the different rights and how to assign them, see the Authorization Overview topic. | Click Security |
| Properties | Opens the Properties page where you can see the page details and actions | Click Properties |
- If you use a "Runtime Only" license, only the Run option is available. To identify the type of license, go to Management Site > Licenses and check what type of license is used for SmartForms.
- To make changes to a form you must check out the form first. A checked-out form is not available for editing by other people and you must check it back in for other people to see the changes you made.
The Browse URLs (Testing and Runtime) are automatically set based on your environment and not stored anywhere. Called the Vanity URLs, they represent the full URL to the view or form.
http://DEV2SP:81/Runtime/Runtime/View.aspx?_name={ViewName}
http://DEV2SP:81/Runtime/Form.aspx?_name={FormName}
ProtocolWebSiteWebApplicationWebPageQueryParameters
You can build custom URLs that automatically map to the runtime URL.
For example, you have a view named TaskList2
If you type the following URLs into your browser's address bar:
http://DEV2SP:81/Runtime/View/TaskList2/
http://DEV2SP:81/Runtime/Runtime/View/TaskList2/
http://DEV2SP:81/Runtime/R/A/N/D/O/M/View/TaskList2/
http://DEV2SP:81/Runtime/HR/Employee/OnboardingView/TaskList2/
The URLs are mapped to a single URL by the server:
http://DEV2SP:81/Runtime/Runtime/View.aspx?_name=TaskList2
The part is fixed and can be changed in IIS and DNS
The part is the pattern matched by the HTTP Module
The part is the actual ASPX page that services the request
The duplicate /Runtime/Runtime/ is not required, and you can edit it in the Environment Library as shown below to have a single /Runtime/.

The following are examples of URL conventions that you can use:
- Vanity URL: http://dlx/SmartForms/Runtime/Form/test+form/
- By ID: http://dlx/SmartForms/Runtime/Form.aspx?id=b73caa60-ea6c-4948-a77e-18e05987a2ff
- By Name: http://dlx/SmartForms/Runtime/Form.aspx?name=test form
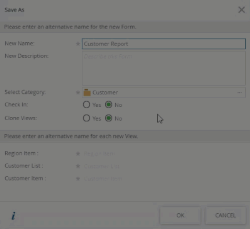
The Save As action allows you to create a copy of the form with a different name. This allows you to create multiple forms that are more or less similar in design, but without designing them from scratch. 
| Feature | Description | How to use it |
|---|---|---|
| New Name | The new name given to the duplicate form | Type a new, unique name |
| New Description | The new description given to the duplicate form | Type a new description (optional) |
| Select Category | List of categories available where the new form can be saved | Select a category from the list or click the ellipsis next to the category to create a new category |
| Check In | If you select Yes, the form is checked in when saved and is available for use by other people. If you select No, the form is still available for you to edit, but other people won't have the ability to use it yet | Select Yes if the form must be checked in and be available for use by others |
| Clone Views |
If you select Yes, duplicate views are created for the form. If you select No, the existing views are used on the duplicate form
|
Select Yes if duplicate views are to be created in the same category, and type a new name for each of the new views. Alternatively select a new category. |
