2. Edit the New Hello World view and form
Now that you have generated SmartForms, you can edit them using theDesigner. In this step, you edit the New Hello World view and remove unused controls. Then you edit the New Hello World form and remove the attachments view. The product added this view automatically when you generated the views and forms for the Hello World list. The attachments view allows you to attach files to list and library items. You do not use the attachments feature in this tutorial, so you can remove it. Finally, you edit a rule and add an action that shows a message after you submit the form.
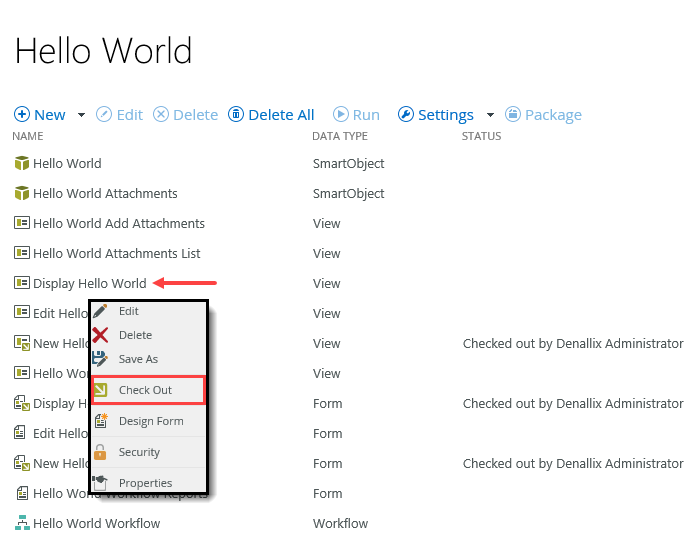
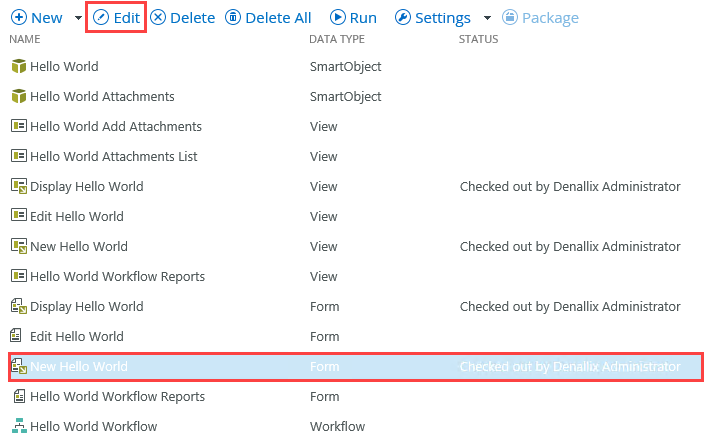
- Check out the following views and forms for the Hello World application:
- New Hello World Form
- New Hello World View
- Display Hello World Form
- Display Hello World View
- From the Application page, check out the following views and forms (right-click and select Check Out):
- New Hello World Form
- New Hello World View
- Display Hello World Form
- Display Hello World View
-
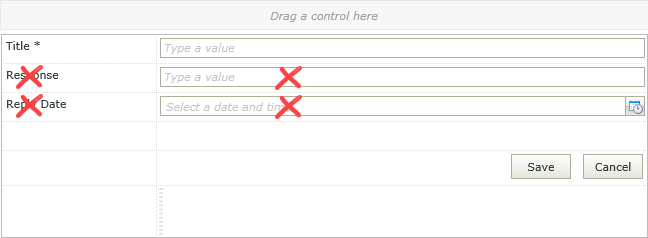
Edit the New Hello World view and remove the Response and Reply Date controls from the view. You will see a pop-up indicating the controls have dependencies. Select the Remove all dependencies option whenever you see this message.
- Select the New Hello World View and click Edit.
- The view opens in theDesigner. Now you can edit the view to customize it for your own needs. In this case, you don't need the response or reply date controls, so you will remove them. (Remember, the workflow updates these columns in the list.) Select the Response label, then use your keyboard <DELETE> key to remove the label.
- Delete the Response text box. You will see a pop-up indicating the control has a dependency. Change the selection on the pop-up to Remove all dependencies, then click OK.
Keep dependencies and mark them as invalid: This option keeps the dependency in place and flags its location (in the rule) with a red error badge. You must edit the rule and fix or remove the dependency. You cannot check in a view or form that has dependency errors. In this example, deleting the Review Status Text Box control results in the Create Button input mapping property becoming invalid. Since you deleted the control from the view, the fix here is to delete the control reference from input mappings.
- Remove all dependencies: This option removes the dependency from any rules that reference it.
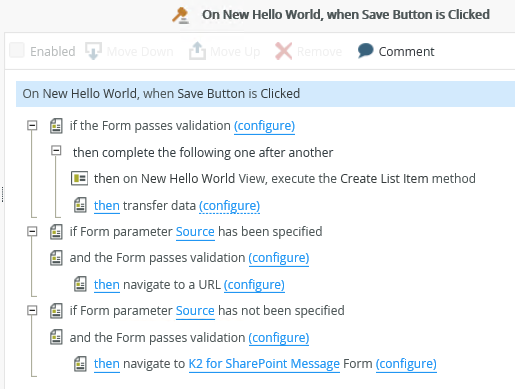
- Repeat the steps above and delete the Reply Date label and Calendar control. Select the option to Remove all dependencies when prompted. Your view should look like the image below.
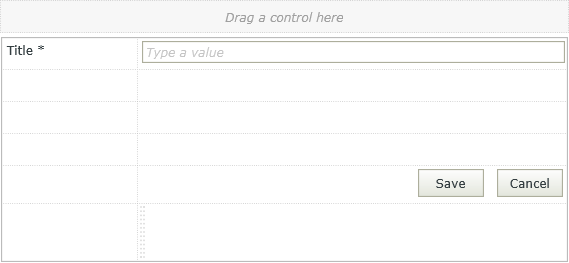
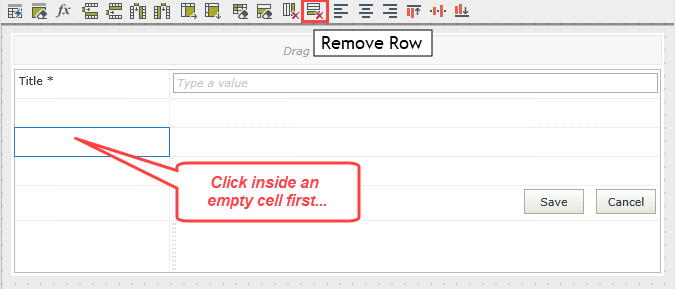
- Notice there are now several blank rows in the layout table. You can delete the rows using the remove row tool. Click inside an empty cell. Click the Remove Row icon found in the view canvas menu bar.
The view canvas menu bar: When you select an element on the design canvas, the view canvas menu bar appears with appropriate tools. When working with a table layout for instance, the menu bar offers tools to add and delete rows or columns, align the cells to the left, right or center, and merge cells. Click a cell in the layout table to select it, then take a minute to hover over the icons in the menu bar to familiarize yourself with the different tools for customizing the layout table.
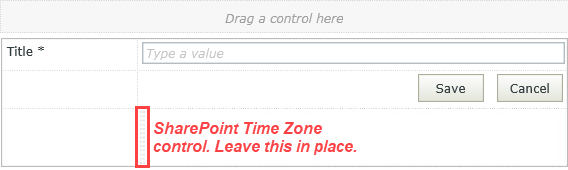
- Repeat the steps above to remove the remaining empty rows. You may see an extra row at the bottom of the layout table. This row contains a control placeholder for the SharePoint Time Zone. Leave this row and control placeholder in place, as deleting it may cause a SharePoint error later on.
- Click FINISH to save your edits and exit the view. The FINISH button is near the upper right corner of your screen.
When you change a control that results in a rule discrepancy, you will see the Dependencies warning. At the top of the dialog, you will see the reference control name. The middle pane displays the rules that are dependent on the control. In the sample below, the Review Status Text Box control is being deleted from the view, resulting in the dependencies warning. There is one rule dependent on the Review Status Text Box control: When Save Button is Clicked.
You have two options: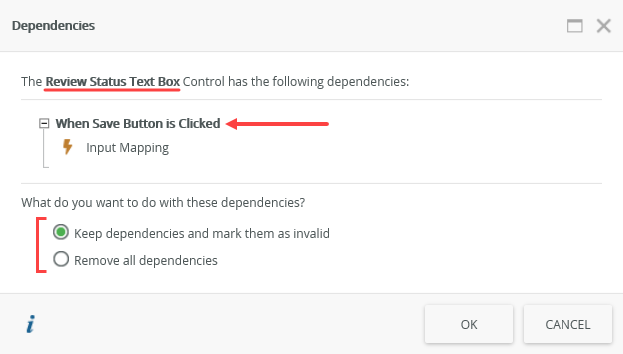
You have edited the view used to create new items in the Hello World list. Next, you edit the form that contains the default views. You remove the attachments view from the form - users do not need to add attachments. (the product adds the attachments view to generated forms by default.)
- Select the New Hello World View and click Edit.
-
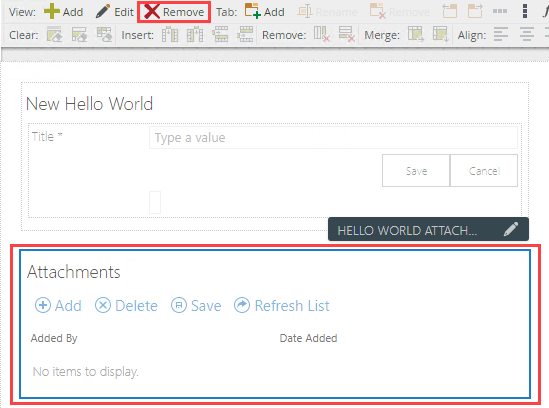
Edit the New Hello World Form and remove the Attachments view from the form. Once again, select Remove all dependencies when you see the warning. If you see a red warning badge next to the Rules tab, follow the steps in the caution box below to fix the issue.
After making a control on a view invisible or deleting a control on a view, the associated form may display a red warning badge on the RULES icon. You must correct the issues before continuing. On the RULES screen, the rule associated with invisible or deleted controls also shows the red warning badge.
NOTE: This Caution Box uses images from a Hello World application. Your screen shots may not match exactly if you are building a different application. The steps for removing orphaned control references are the same, however.
Edit the rule, then locate the red configure links (there may be more than one). You need to edit each action that has a red configure link.
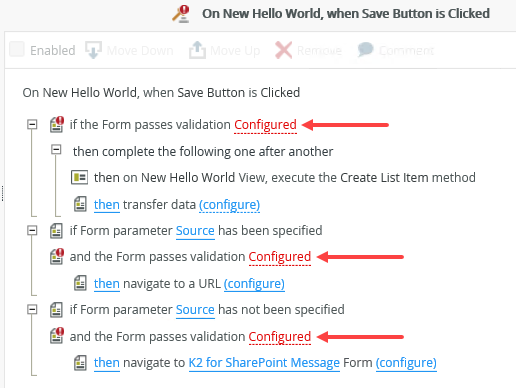
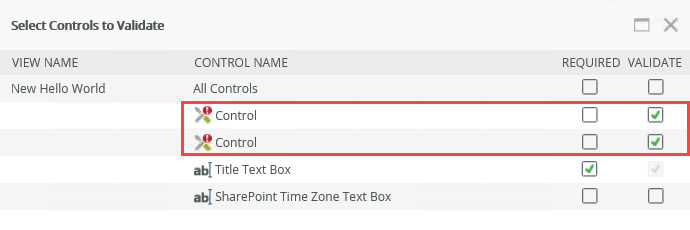
UNCHECK the Validate boxes that have unnamed Controls. (There may be more than one.) Click OK.
This removes the validation errors and any red warning badges. You can continue with the tutorial.
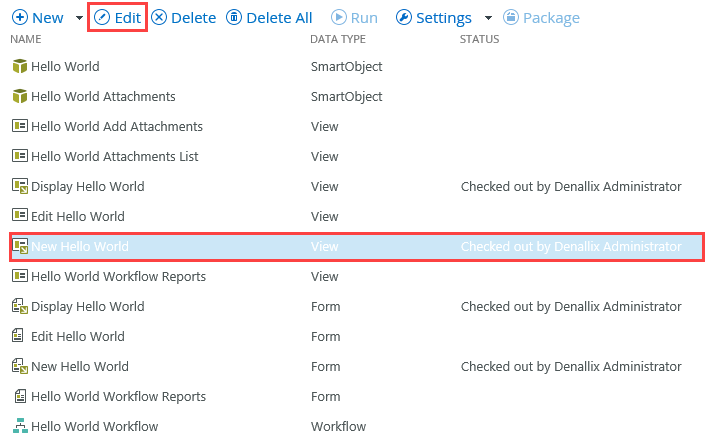
- On the Application page, select the New Hello World Form, then click Edit.
- Select the Attachments view, then click the Remove button in the toolbar. When you see the Dependencies pop-up, select Remove all dependencies, then click OK.
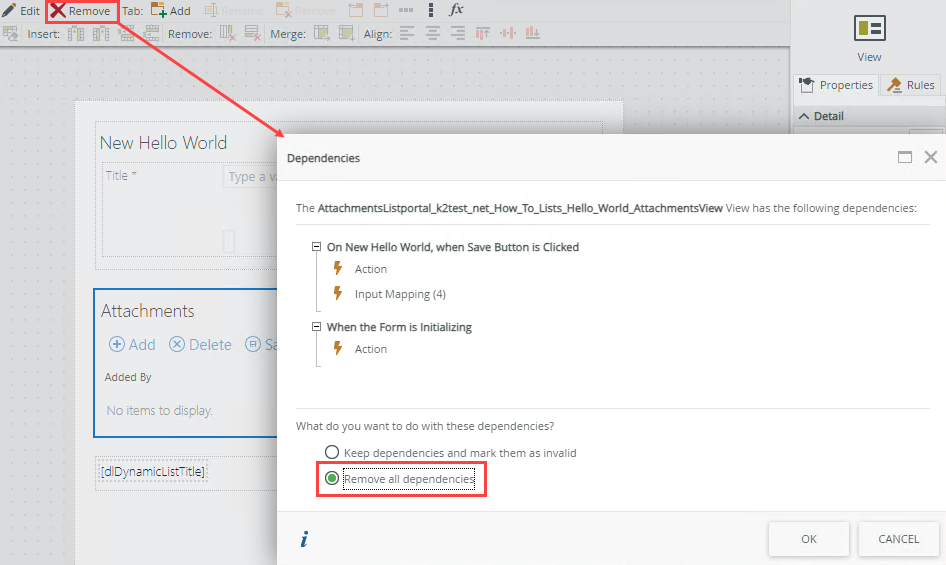
Your form should look like the image below. If you see a red warning badge next the RULES tab, follow the steps in the caution box below the image to resolve the issue.

After making a control on a view invisible or deleting a control on a view, the associated form may display a red warning badge on the RULES icon. You must correct the issues before continuing. On the RULES screen, the rule associated with invisible or deleted controls also shows the red warning badge.
NOTE: This Caution Box uses images from a Hello World application. Your screen shots may not match exactly if you are building a different application. The steps for removing orphaned control references are the same, however.
Edit the rule, then locate the red configure links (there may be more than one). You need to edit each action that has a red configure link.
UNCHECK the Validate boxes that have unnamed Controls. (There may be more than one.) Click OK.
This removes the validation errors and any red warning badges. You can continue with the tutorial.
- On the Application page, select the New Hello World Form, then click Edit.
- Next, you edit an existing rule and add an action that shows a message after you submit the form. This provides a visual indication that the form submitted successfully. Edit the On New Hello World, when Save Button is Clicked rule. Add an action to show a message to the user. Move the action to just below the transfer data action. Configure the message with the current user's display name. Use the images below as reference, if needed. Finish the form to save and exit after you set the message action.
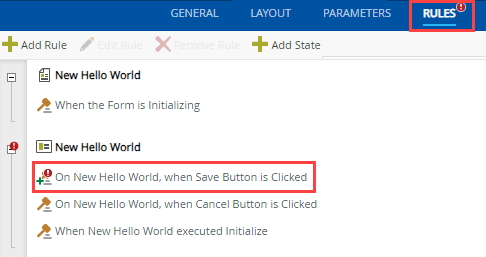
- Next you edit an existing rule on the form and add an action to show a message to the user after they click the Save button. At the top of the screen in the breadcrumb bar, click the RULES button to jump to the rules screen. (If you worked through the error mentioned above, you will already be on the rules screen.)
 Rules exist at the control level, view level, and form level. If you apply rules at the view level, the rules carry through anywhere you use the view. So, if you add the view to several forms, the view rules apply across all forms. If you apply the rule at the form level, the rule applies to the form and view only. In other words, if you apply the same view to another form, the form rule will not carry through.
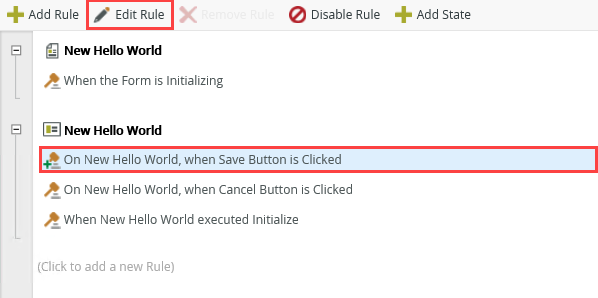
 - In the list of rules, locate the On New Hello World, when Save Button is Clicked rule. Select the rule, then click the Edit Rule button.
- Events define when the rule should run, such as when a button is clicked, or when the form loads. (Events are optional, you can define "event-less" rules that you can call from other rules.)
- Conditions define whether the rule should run. If the criteria are true, continue the rule, and if the criteria are not met, stop the rule. For example, a condition might evaluate a form to confirm that required fields have content. (Conditions are optional - not all rules will require conditions.)
- Actions define what the rule should do. For example, show a message, start a workflow, or enable a form field. Rules can contain multiple actions that are run in sequence or in parallel.
- Confirm the Actions tab is active, then enter
message
into the search box. As you type, the product returns results.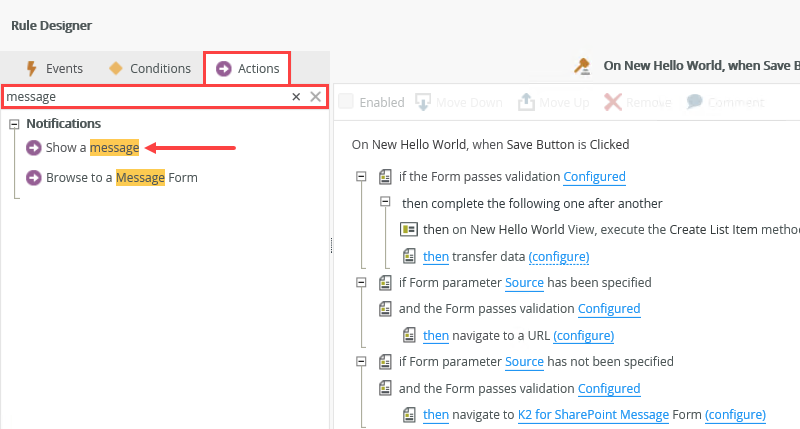
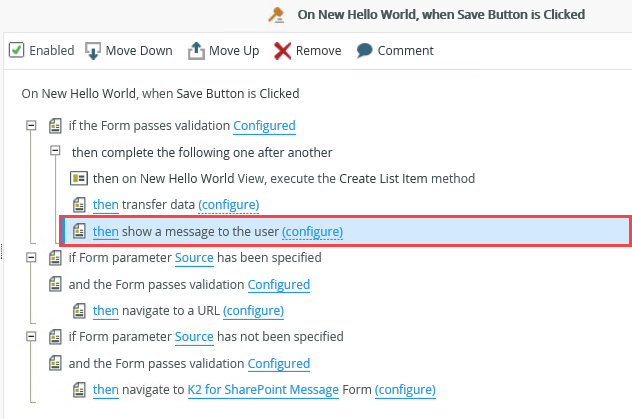
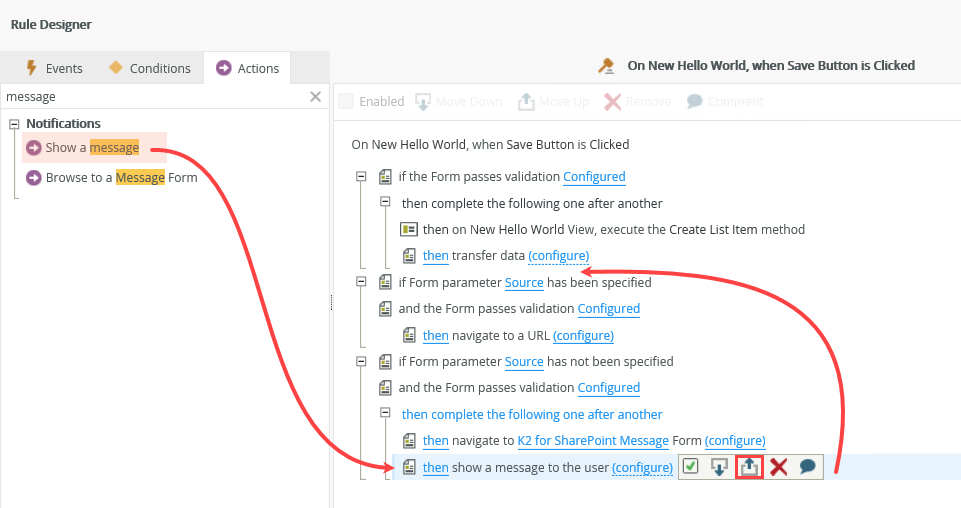
- Click once on the Show a message action. The product adds the action to the rule definition screen. Use the up arrow to move the Show a message action up so that it resides just after the transfer data action.
After the user clicks the submit button (the event), the rule for this event specifies that the product should perform the following conditions and actions:
- First check that the Title field is not empty (a validation condition)
- Then create a new list item in the Hello World list
- Then transfer the form content (basically, the Title field content) to the new list item
- Finally navigate to the Hello World list
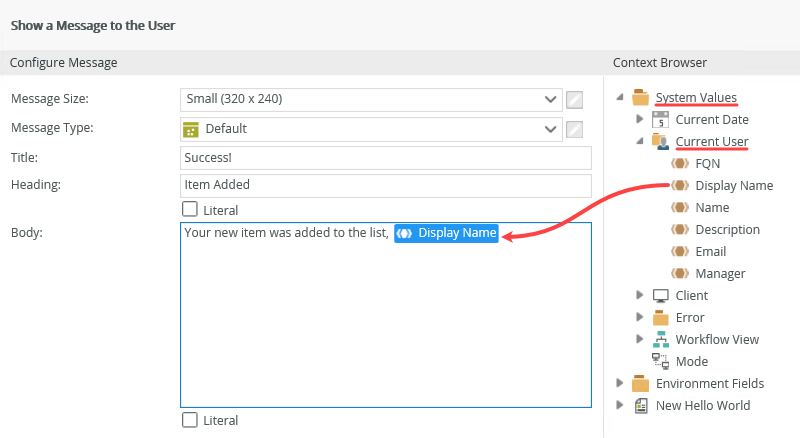
- Click configure to open the message configuration.
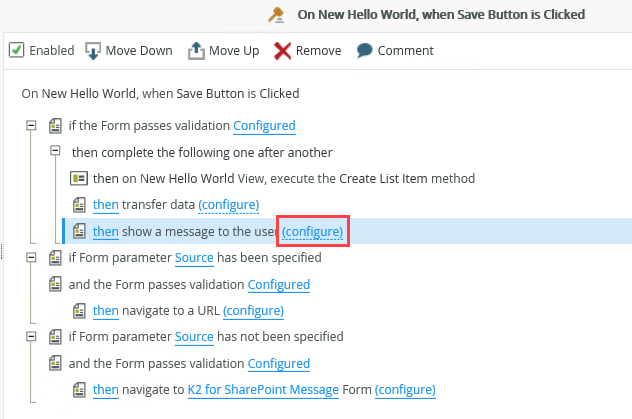
- On the Show a message to the user screen, enter anything you like for the Title and the Heading.
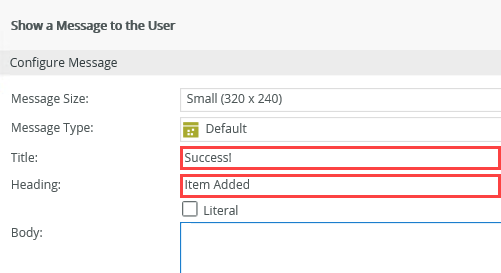
- In the body of the message, enter some text, then drag and drop the Context Browser > System Values > Current User > Display Name into the body. Once again, you are using a value from the Context Browser which the product replaces at runtime with the current user's name.
- Click OK at the bottom of the window to complete the action configuration.
- Click OK to finish editing the rule. Click FINISH to save and exit the form.
Notice the various actions that the rule performs when the user clicks the save button. You will add a new action to this rule that shows a message to the user.
Rules consist of events, conditions and actions. A valid rule contains at least one action.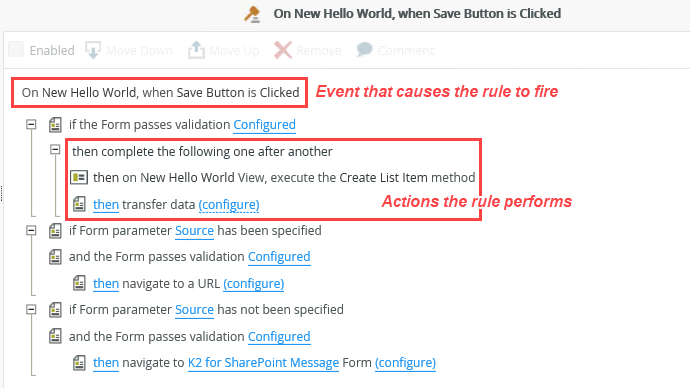
- Next you edit an existing rule on the form and add an action to show a message to the user after they click the Save button. At the top of the screen in the breadcrumb bar, click the RULES button to jump to the rules screen. (If you worked through the error mentioned above, you will already be on the rules screen.)
Review
In this step, you edited the New Hello World view. You removed unused controls, then removed empty rows in the layout table. You also edited the New Hello World form. Here, you removed the unused Attachments view, then added a new action that shows you a message after you submit the form. You have now had an introduction to theDesigner, the tool used to create and edit views, forms, and SmartObjects! In the next step, you edit the display view and form, once again removing unused controls.