Integrating the product and Azure Government Cloud Computing High Security(GCC)
Only Azure Government tenant administrators and experienced administrators should perform the steps in this article.3
Azure Government is the mission-critical cloud, delivering breakthrough innovation to US government customers and their partners. Only US federal, state, local, and tribal governments and their partners have access to this dedicated instance, with operations controlled by screened US citizens. The key difference between Microsoft Azure (Commercial) and Microsoft Azure Government is that Azure Government is a sovereign cloud. It's a physically separated instance of Azure, dedicated to U.S. government workloads only. It's built exclusively for government agencies and their solution providers.
Authorized administrators can configure K2 to integrate with an Azure Government tenant using this article. Only customers with access to an Azure Government tenant can have their environment configured to integrate with GCC and the product only supports GCC High Security.
For more information about AAD integration see Azure Active Directory in the ]User Guide. For information on manually integrating with Microsoft Azure (Commercial) see the topic Manually Configure K2 for Azure Active Directory (AAD). For information on inbound OAuth, see the KB article Configure AAD and K2 Services for Inbound OAuth.
High-level steps of the configuration
This list summarizes the high-level steps you need to follow to configure the product to integrate with Azure GCC. For a detailed guide, see the Detailed steps section below.
This procedure assumes that there has been no previous integration, and that this is a 'clean' install.
General configuration
- Install the Azure PowerShell module locally to manage Azure resources.
GCC configuration
- Add the following apps to your tenant:
- K2 for Office 365
- Exchange Online for K2
- Register SharePoint with your tenant.
Installation and configuration
- Install the product.
- Edit configuration files to integrate with Azure GCC.
- Configure the Exchange Feature in K2 Management.
- Install and configure Nintex K2 for SharePoint.
- Configure newly added OAuth Resources:
- Microsoft Online (MSOA, AADMGMT)
- SharePoint (add Nintex K2 for SharePoint app)
- Configure newly added OAuth Resources:
During the configuration you need the following information from your subscription. Copy and save these values down as you go.
| Item | Example Values |
|---|---|
|
304e7ece-9380-43ac-a35c-a4645d5bba5e |
|
sO7Uu2gC84Gdx/Vb7jcaGqek7KrPAfGfcsjlMS5m6AE= |
Detailed steps
Follow the steps here to install the product, configure, and integrate with Azure GCC. Some of the Azure management is handled through PowerShell commands. If you do not have the Azure PowerShell module installed, proceed with step 1.
Follow the instructions in the Microsoft article Install Azure PowerShell on Windows with MSI to install or update the Azure PowerShell module. At the time of writing, the latest version of the module is 8.2.0.
After installation, run PowerShell and connect to your tenant with the following command:
Connect-AzAccount -Environment AzureUSGovernment
Follow the prompts and log in using the Azure Government tenant Global Admin credentials.
Keep PowerShell open, we'll issue some commands in this same session (connected to Azure US Government) as we step through this process.
Now we add K2 for Office 365 and Exchange Online for K2 in preparation for installing and configuring the product in later steps.
- Open a browser and navigate to the following URL. Change the [tenant] placeholder to your tenant name:
https://login.microsoftonline.us/[tenant].onmicrosoft.com/adminconsent?client_id=ca5cc53d-936b-4e82-ba6c-6b013c961933
- When prompted, log in with the Global Admin credentials.
- Accept the Permissions requested.
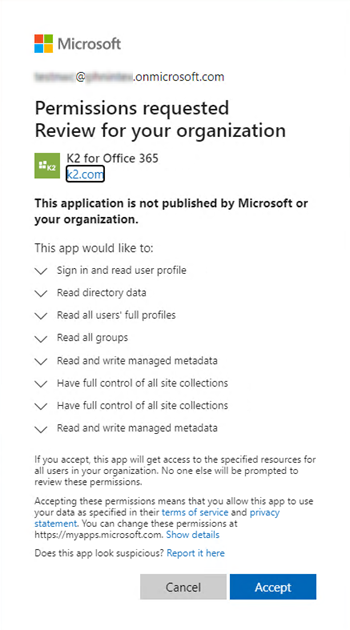
- Click OK on the trust site.
- Navigate to the Azure Government site:
https://portal.azure.us - Select the Azure Active Directory tile and then in the Manage section, select Enterprise Application. You should see that the K2 for Office 365 app has been added and permissions granted.
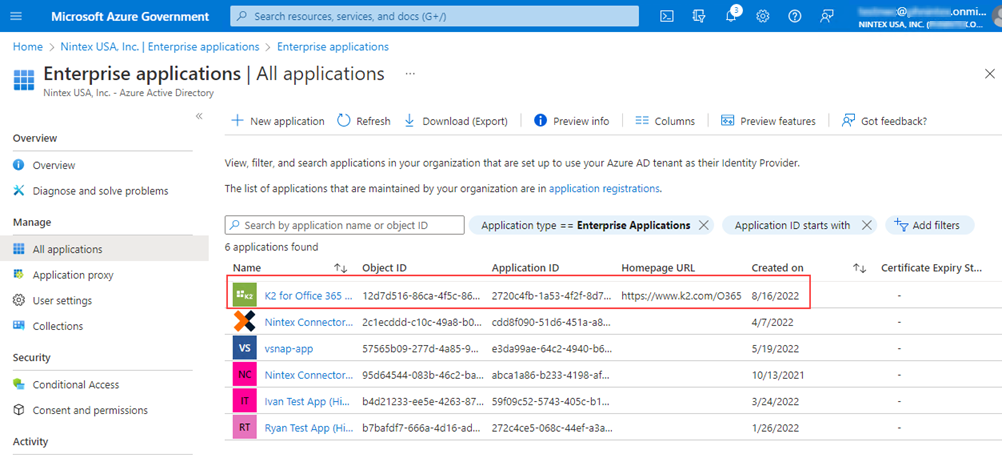
Next, create Application ID, client secret, and apply security certificate
- Copy the Application ID for the K2 for Office 365 app from the Enterprise applications page.
- Replace the [Application ID] placeholder in the first of the following three commands with what you copied in the step above. Then paste these three lines into PowerShell and run them.
Create App ID and Client Secret
$app = Get-AzADServicePrincipal -ApplicationId [Application ID]
$spcreds = New-AzADSpCredential -ObjectId $app.Id -StartDate (Get-Date) -EndDate ((Get-Date).AddYears(2))
$app.Id- PowerShell returns the K2 for Office 365 Application ID (a GUID).
- Now create the Client Secret by running the following command in PowerShell:
$spcreds.SecretText
PowerShell returns the Client Secret for the K2 for Office 365 app. Copy the Client Secret and save it for later. - Run the following PowerShell command to add the security certificate and certify for K2 for Office 365.
Create the certificate
$cert = 'MIIDvzCCAqegAwIBAgIUA5gwHTJs7pYk1RjIo83Sw+ct3TAwDQYJKoZIhvcNAQELBQAwbzELMAkGA1UEBhMCVVMxCzAJBgNVBAgMAldBMREwDwYDVQQHDAhCZWxsZXZ1ZTELMAkGA1UECgwCSzIxFDASBgNVBAsMC0RldmVsb3BtZW50MR0wGwYDVQQDDBRLMlRydXN0LlByb2QuU2lnbmluZzAeFw0yNDA3MjkxNTA3MzJaFw0zNDA3MjcxNTA3MzJaMG8xCzAJBgNVBAYTAlVTMQswCQYDVQQIDAJXQTERMA8GA1UEBwwIQmVsbGV2dWUxCzAJBgNVBAoMAksyMRQwEgYDVQQLDAtEZXZlbG9wbWVudDEdMBsGA1UEAwwUSzJUcnVzdC5Qcm9kLlNpZ25pbmcwggEiMA0GCSqGSIb3DQEBAQUAA4IBDwAwggEKAoIBAQCoG99bL1arYEsviP0wvd3I5kpSxkM/Ou4v8WO8GR+uzzUrsw/xsK9wAJ5NnNKijOQJ2uAPlHQrXKQJ70n9JGgxK9gzoWvQ5RiCqrxRaSpzicgC4arpkyABxoZmqHul+K6WKOlGQA5zPj3twLqopzogPl6foIrVpwX5EYFoNpWhsqqhUrFh8c2ico69MMFSyw5+zHHFmbaQerzi0n3BRF7Jrnv5FOnx06aEZ4cT5NlHYFsm4wot16XLPpruXFKtI82zTugAip115fIt+63TqLx2fgfhWWHr9WC4zZVnaT5Qs3KsZw/nR/RAxfm0H1k/HIs43gNa9f63FyFk23EY3Nx5AgMBAAGjUzBRMB0GA1UdDgQWBBRA1TNxCyeb9Ros/mZq/sKh/SxZdzAfBgNVHSMEGDAWgBRA1TNxCyeb9Ros/mZq/sKh/SxZdzAPBgNVHRMBAf8EBTADAQH/MA0GCSqGSIb3DQEBCwUAA4IBAQCfMy0kU05gbsh6M+SuR1MRvrvjC0+S2w/DVuDlwAsVN8pZFfWZo9y7m4QbHrh9FkVeVwXkYLd6kRCltHlESYnGGZtBx712OGma/BniDqGBspjSphkRA2smG6SBOyEPXdvY5Ss+14usdws0gmpN9Um8r5kc4wDfvr0s6I9O8odPHMhtqi6GVavY6ozIwyW+XsFmQ1yb2TKdBXIJFGjKIwMztaVv1h5REBKrD+mL5dWJtFzrM6LewXwUYTUIyMJnVeFsG/pN0/6BpPTcEY6+nwJWEXeHLkII3Jzn7fwcvO0upprJhBzOcKzN5WeDek1htW6caAEsrpgD7sJGRJk6lOee'
$cer = [X509Certificate]::new([convert]::FromBase64String($cert))
$credential = New-Object -TypeName "Microsoft.Azure.PowerShell.Cmdlets.Resources.MSGraph.Models.ApiV10.MicrosoftGraphKeyCredential" -Property @{'Key'=($cer.GetRawCertData());  'Usage'='Verify';   'Type'='AsymmetricX509Cert'}
$spcreds = New-AzADSpCredential -ObjectId $app.Id -KeyCredentials $credential- Refresh the browser on the Azure portal - Enterprise applications and you will see that the K2 for Office 365 app now has a certificate.

- Open a browser and navigate to the following URL. Change the [tenant] placeholder to your tenant name:
https://login.microsoftonline.us/[tenant].onmicrosoft.com/adminconsent?client_id=94df5a56-cc88-4652-9c6a-3ce5450777fe
- When prompted, log in with the Global Admin credentials.
- Accept the Permissions requested.
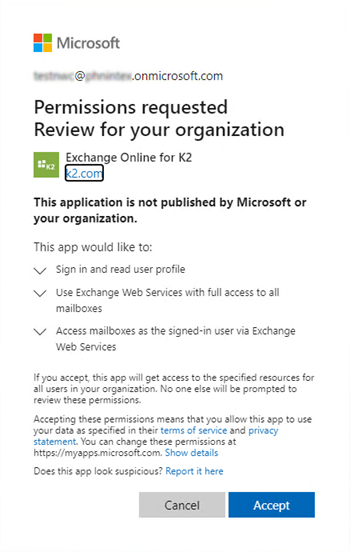
- Click OK on the trust site.
- Navigate to the Azure Government site:
https://portal.azure.us - Select the Azure Active Directory tile and then in the Manage section, select Enterprise Application. You should see that the Exchange Online for K2 app has been added and permissions granted.
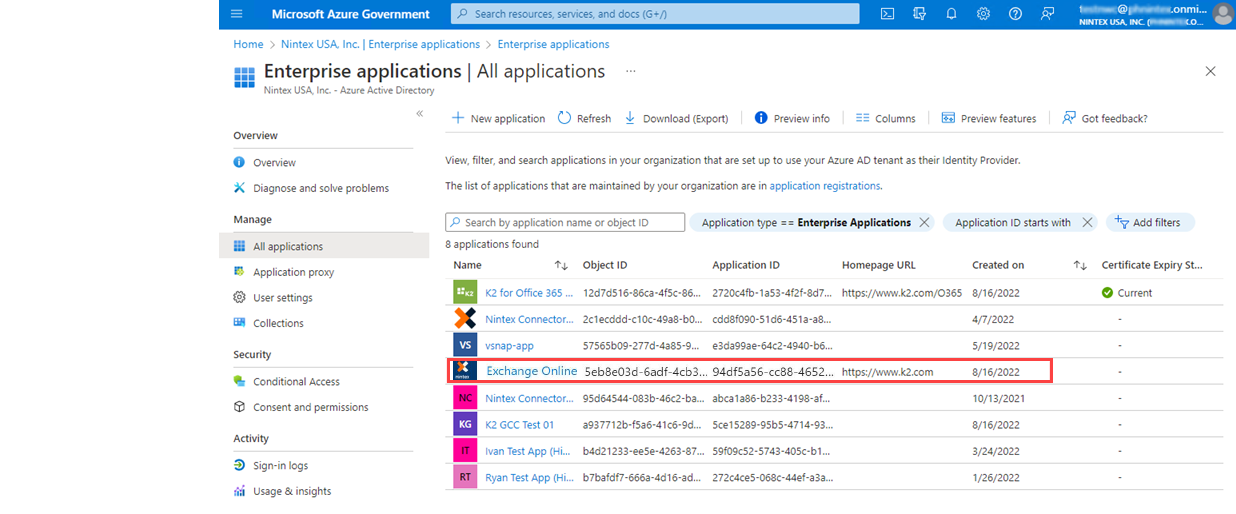
Next, create Application ID, client secret, and apply security certificate
- Copy the Application ID for the Exchange Online for K2 app from the Enterprise applications page.
- Replace the [Application ID] placeholder in the first of the following three commands with what you copied in the step above. Then paste these three lines into PowerShell and run them.
-
Copy
Create App ID and Client Secret
$app = Get-AzADServicePrincipal -ApplicationId [Application ID]
$spcreds = New-AzADSpCredential -ObjectId $app.Id -StartDate (Get-Date) -EndDate ((Get-Date).AddYears(2))
$app.Id - PowerShell returns the Exchange Online for K2 Application ID (a GUID).
- Now create the Client Secret by running the following command in PowerShell:
$spcreds.SecretText
PowerShell returns the Client Secret for the Exchange Online for K2 app. Copy the Client Secret and save it for later. - Run the following PowerShell command to add the security certificate and certify for Exchange Online for K2.
Create the certificate
$cert = 'MIIDvzCCAqegAwIBAgIUA5gwHTJs7pYk1RjIo83Sw+ct3TAwDQYJKoZIhvcNAQELBQAwbzELMAkGA1UEBhMCVVMxCzAJBgNVBAgMAldBMREwDwYDVQQHDAhCZWxsZXZ1ZTELMAkGA1UECgwCSzIxFDASBgNVBAsMC0RldmVsb3BtZW50MR0wGwYDVQQDDBRLMlRydXN0LlByb2QuU2lnbmluZzAeFw0yNDA3MjkxNTA3MzJaFw0zNDA3MjcxNTA3MzJaMG8xCzAJBgNVBAYTAlVTMQswCQYDVQQIDAJXQTERMA8GA1UEBwwIQmVsbGV2dWUxCzAJBgNVBAoMAksyMRQwEgYDVQQLDAtEZXZlbG9wbWVudDEdMBsGA1UEAwwUSzJUcnVzdC5Qcm9kLlNpZ25pbmcwggEiMA0GCSqGSIb3DQEBAQUAA4IBDwAwggEKAoIBAQCoG99bL1arYEsviP0wvd3I5kpSxkM/Ou4v8WO8GR+uzzUrsw/xsK9wAJ5NnNKijOQJ2uAPlHQrXKQJ70n9JGgxK9gzoWvQ5RiCqrxRaSpzicgC4arpkyABxoZmqHul+K6WKOlGQA5zPj3twLqopzogPl6foIrVpwX5EYFoNpWhsqqhUrFh8c2ico69MMFSyw5+zHHFmbaQerzi0n3BRF7Jrnv5FOnx06aEZ4cT5NlHYFsm4wot16XLPpruXFKtI82zTugAip115fIt+63TqLx2fgfhWWHr9WC4zZVnaT5Qs3KsZw/nR/RAxfm0H1k/HIs43gNa9f63FyFk23EY3Nx5AgMBAAGjUzBRMB0GA1UdDgQWBBRA1TNxCyeb9Ros/mZq/sKh/SxZdzAfBgNVHSMEGDAWgBRA1TNxCyeb9Ros/mZq/sKh/SxZdzAPBgNVHRMBAf8EBTADAQH/MA0GCSqGSIb3DQEBCwUAA4IBAQCfMy0kU05gbsh6M+SuR1MRvrvjC0+S2w/DVuDlwAsVN8pZFfWZo9y7m4QbHrh9FkVeVwXkYLd6kRCltHlESYnGGZtBx712OGma/BniDqGBspjSphkRA2smG6SBOyEPXdvY5Ss+14usdws0gmpN9Um8r5kc4wDfvr0s6I9O8odPHMhtqi6GVavY6ozIwyW+XsFmQ1yb2TKdBXIJFGjKIwMztaVv1h5REBKrD+mL5dWJtFzrM6LewXwUYTUIyMJnVeFsG/pN0/6BpPTcEY6+nwJWEXeHLkII3Jzn7fwcvO0upprJhBzOcKzN5WeDek1htW6caAEsrpgD7sJGRJk6lOee'
$cer = [X509Certificate]::new([convert]::FromBase64String($cert))
$credential = New-Object -TypeName "Microsoft.Azure.PowerShell.Cmdlets.Resources.MSGraph.Models.ApiV10.MicrosoftGraphKeyCredential" -Property @{'Key'=($cer.GetRawCertData());  'Usage'='Verify';   'Type'='AsymmetricX509Cert'}
$spcreds = New-AzADSpCredential -ObjectId $app.Id -KeyCredentials $credential- Refresh the browser on the Azure portal - Enterprise applications and you will see that the Exchange Online for K2 app now has a certificate.

In this step you configure a SharePoint add-in and register it with Microsoft Azure Access Control Service (ACS) which issues an access token to the add-in that allows the add-in access to the resources in the SharePoint tenancy. For more information see the Microsoft article Three authorization systems for SharePoint Add-ins.
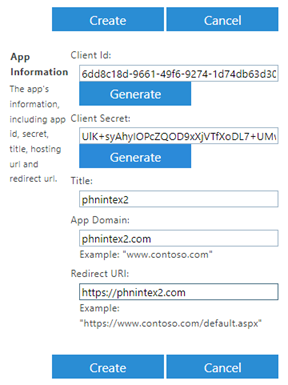
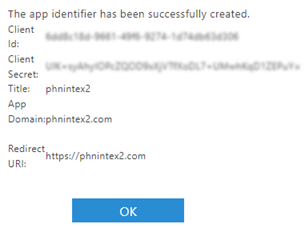
- Create a new ACS principal using your tenant's appregnew.aspx page.
- Navigate to the appregnew.aspx page in your tenant. Replace the [tenant] placeholder in this URL with your tenant name.
https://[tenant]-admin.sharepoint.us/_layouts/15/appregnew.aspx - Set permissions.
- Navigate to the appinv.aspx page in your tenant. Replace the [tenant] placeholder in this URL with your tenant name.
https://[tenant]-admin.sharepoint.us/_layouts/15/appinv.aspx- Paste the Client ID from step 1d above into the App Id field and click Lookup. The other values from step 1 will be filled in.
- Copy and paste the following XML into the Permission Request XML text area.
CopyPermission Request XML
<AppPermissionRequests AllowAppOnlyPolicy="true">
  <AppPermissionRequest Scope="http://sharepoint/content/sitecollection" Right="Manage" />
</AppPermissionRequests>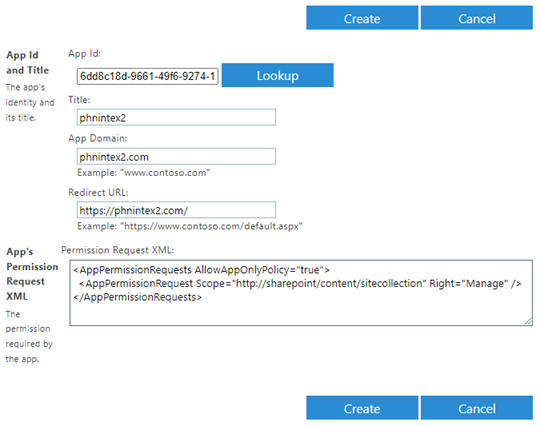
- Click Create and then click Trust It on the Do you trust <app title>? page.

Perform a standard installation of the product(as described in the Install section of this guide), with one exception. When you configure the Exchange server, use the following Exchange Online details (replace the [tenant] placeholder with your tenant name):
From Address: k2service@[tenant].onmicrosoft.com
EWS URL: https://outlook.office365.us/EWS/Exchange.asmx
Do not run the K2 for SharePoint wizard.
In this step you will run scripts which change certain default values in files installed during the product system install. The changes allow integration with Azure GCC.
- Contact Customer Support to obtain the following scripts/file
gccupdate.ps1
webupdate.ps1
SourceCode.SmartObjects.Services.SharePoint15.Common.dll.config
The gccupdate.ps1 script changes these resources from https://graph.microsoft.com to https://graph.microsoft.us- AADResource
- MSOnlineResource
- AADGraphClientBaseURL
- Paste the
SourceCode.SmartObjects.Services.SharePoint15.Common.dll.configfile into [K2 installation folder]\ServiceBroker. The default installation folder for the product is C:\Program Files\K2.
The config file adds a key allowing login to Azure GCC (US). - Run the webupdate.ps1 script to edit the K2 Designer and Runtime configuration
The script changes the Claims metadata base URL from https://login.microsoftonline.com to https://login.microsoftonline.us and backs up the original web.config files to web.config.bak. - Run the following two SQL scripts against the product database. The scripts make changes to parameters for Microsoft Online AppOnly and SharePoint OAuth resources.
Microsoft AppOnly OAuth Resource
INSERT [Authorization].[OAuthResourceTypeParameter] ([TypeParameterID], [ResourceType], [ParameterName], [ParameterDescription], [UrlEncode], [AuthorizationDefaultValue], [TokenDefaultValue], [RefreshDefaultValue], [AuthorizationRequest], [AuthorizationResponse], [TokenRequest], [TokenResponse], [RefreshRequest], [Encrypted]) VALUES (N'465ad7b0-5d14-4475-9c16-92a74fb4c3a4', N'Microsoft Online AppOnly', N'instance_aware', NULL, 0, N'true', N'true', N'true', 1, 0, 1, 0, 1, 0)
GOSharePoint OAuth Resource
INSERT [Authorization].[OAuthResourceTypeParameter] ([TypeParameterID], [ResourceType], [ParameterName], [ParameterDescription], [UrlEncode], [AuthorizationDefaultValue], [TokenDefaultValue], [RefreshDefaultValue], [AuthorizationRequest], [AuthorizationResponse], [TokenRequest], [TokenResponse], [RefreshRequest], [Encrypted]) VALUES (N'fe5219aa-baa4-4bf9-b6e1-7fbf753366d7', N'SharePoint', N'acs_base_url', NULL, 0, N'https://login.microsoftonline.us', N'https://login.microsoftonline.us', N'https://login.microsoftonline.us', 1, 0, 1, 0, 1, 0)
GO
One row per script should be affected.
For more information on the Exchange feature, see the topic Exchange Online Feature Activation in the User Guide.
- Navigate to the Management site.
- Click Manage Features on the Dashboard.
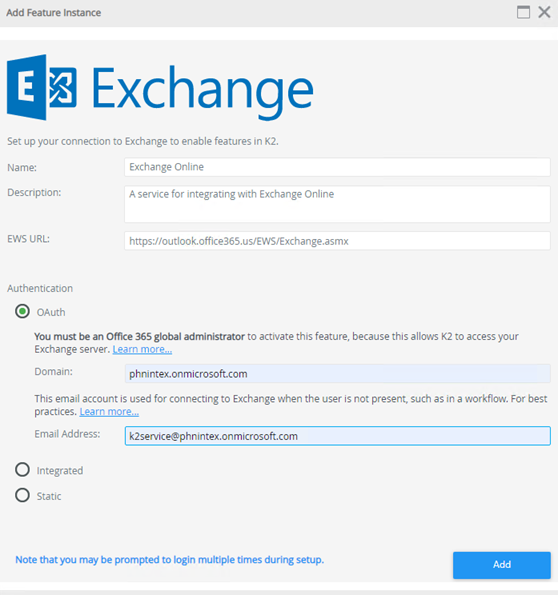
- Select Exchange Online and click New Instance.
- Edit the feature values as follows:
- Authentication: OAuth
- EWS URL: https://outlook.office365.us/EWS/Exchange.asmx
- Domain : [tenant].onmicrosoft.com
- Email address: k2service@[tenant].onmicrosoft.com
Replace the [tenant] placeholder with your tenant name.
- Click Add .
- When prompted, login with the global admin account.
- Accept the Permissions requested.
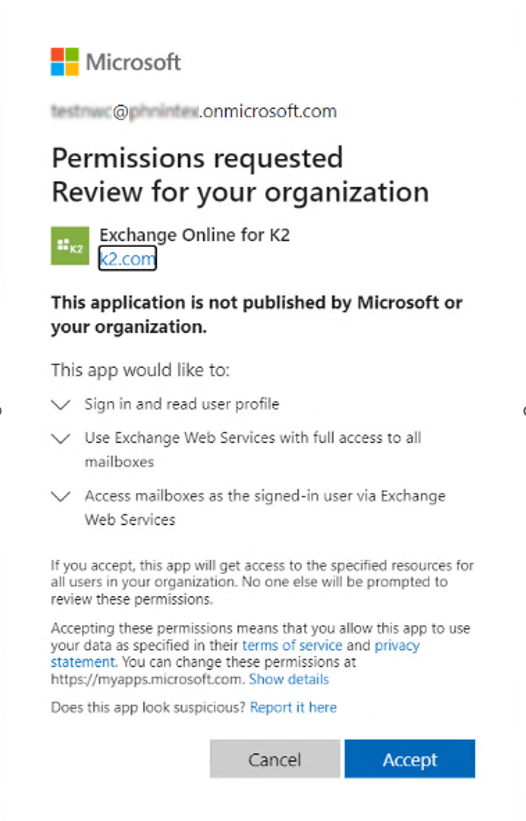
Before continuing with the OAuth Token on the Configuring Exchange wizard, do the following.
- Open a NEW tab in your browser and navigate to another Management site, don't use the already open Management site.
- Expand Authentication, and OAuth. Then select Resources.
- Select the Exchange resource to expand the Resource Parameters.
- Notice that resource in the Resource Parameter list displays as .com instead of .us.

-
Edit the resource parameter and change the .com to .us for the Authorization Value, Token Value, and Refresh Value. Click OK to continue.
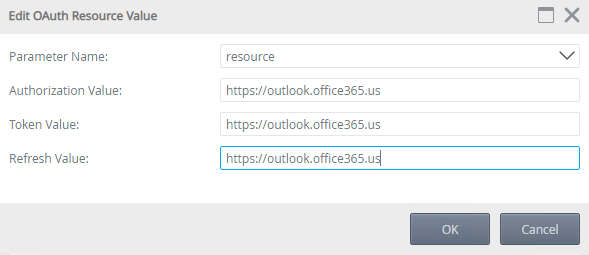
- Select the client_secret parameter and click Edit.
- Paste the client secret you created earlier in the Exchange section into the Token and Refresh value fields.
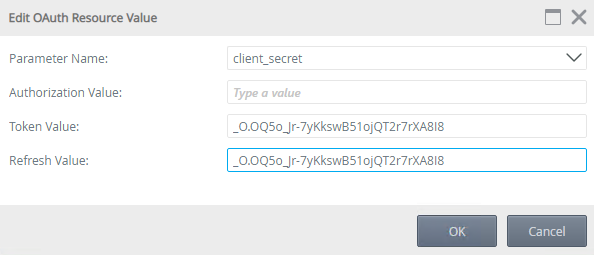
- Click OK to save the changes.
Now we continue with the OAuth Token on the Configuring Exchange wizard.
- Go back to the 1st Management tab where the Configuring Exchange wizard is open. Click Continue.
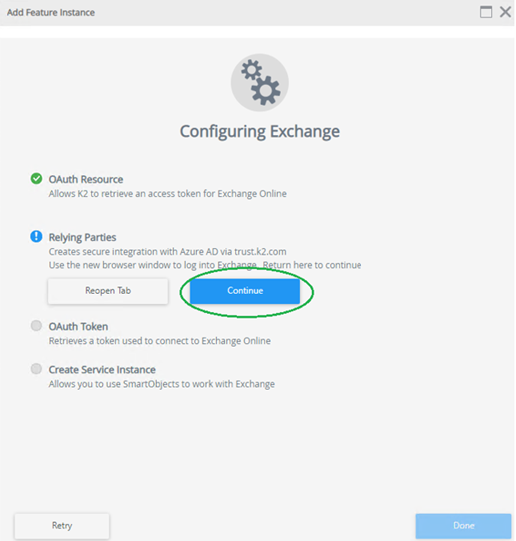
- When prompted, login with the global admin account.
- Accept the Permissions requested

- On the Configuring Exchange wizard click Continue.
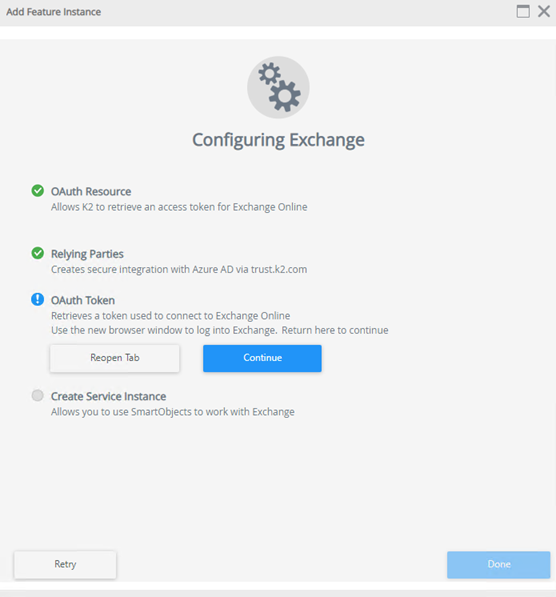
- Once Exchange Configuration is complete, click Done.
- Expand Integration and select Services Instances.
- Select Exchange Online and click Edit.
- Make sure that the OAuth Resource Audience and EwsURL point to .us and not .com – if not, change to .us and click OK to save the changes.
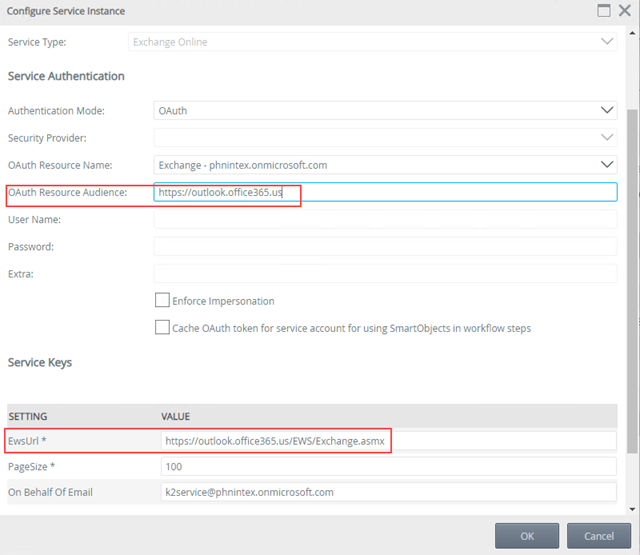
If you did need to edit the .com to .us, a Service Instance Updated dialog shows, click OK on it to finish.
In this step you will add the Nintex K2 for SharePoint app to your SharePoint.US tenant. You will encounter errors and correct the issues by adding some settings to the products OAuth configuration.
Follow the instructions in the topic on installing the Nintex K2 Five for SharePoint app but during the Registration wizard you will encounter an Azure Access Control Service (ACS) error. The steps below explain how to correct this and complete the installation.
- When the Registration wizard starts and you configure the link to the server, follow the prompts to sign in with your Azure Government tenant global admin credentials.
- Accept the Permissions request and the let K2Trust site configuration finish.
- The Registration wizard will start running but an SP error will come up. This is due to the ACS issue.
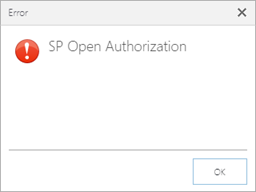
- Click OK to continue.
- Click Finish to finalize the Registration wizard.
- Navigate to the Management site (refresh if it was already open).
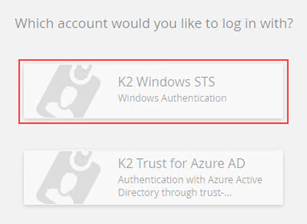
- When asked what account you would like to log in with, select Windows STS.
- Expand the Authentication node and the OAuth node.
- Click on Resources. Other than the previously added Exchange resource, you will see three new resources: MSOA, AADMGMT, and SP.
- MSOA Resource configuration
- Check that the Authorization and Token endpoints start with https://trust.k2.com/. If they do not, edit them and replace the domain. For example:
https://trust.k2.com/331zzc78-2f87-43ce-bzzz-d45zzb2b0cf9/authorize/oauth/2/request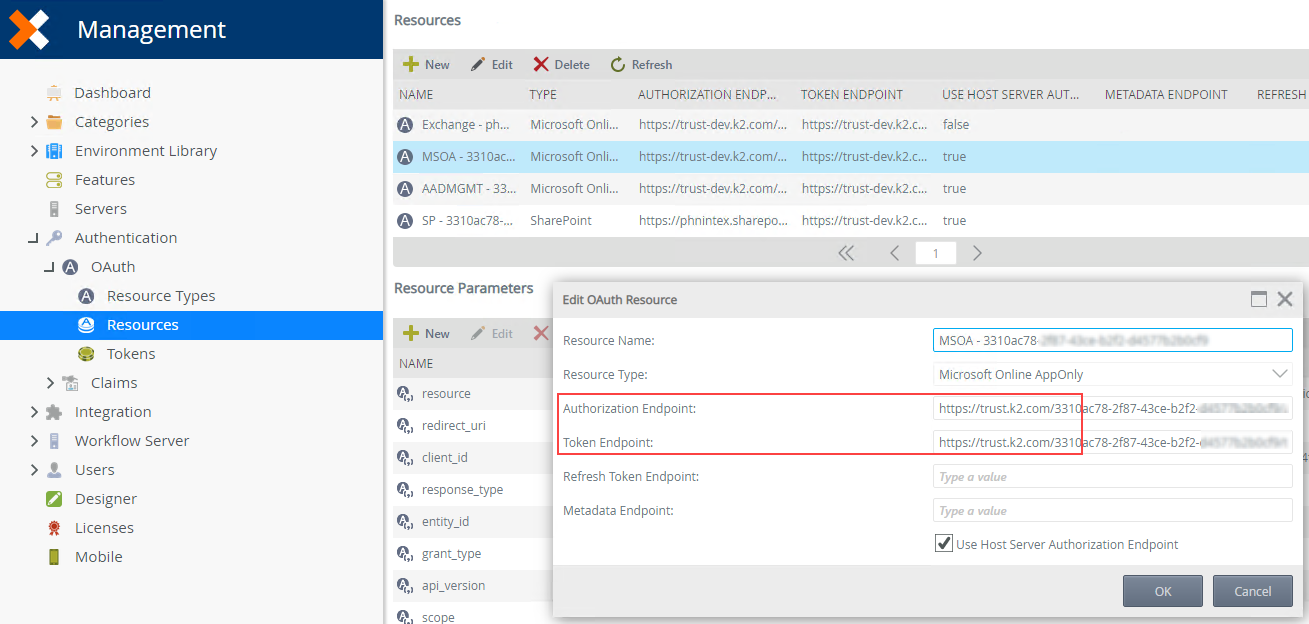
- Select the client_secret resource parameter and click Edit.
- Paste the Client Secret you copied when you added the K2 for Office 365 app to the Azure GCC tenant into the Token and Refresh value fields. Then click OK to save and continue.
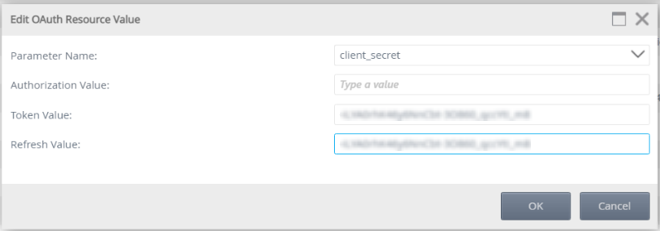
- Click New to create a new resource parameter.
- Select instance_aware from the drop-down.
- Enter true as the Authorization, Token, and Refresh values. Then click OK to save and continue.
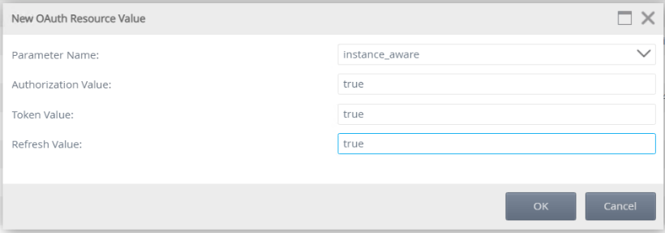
- Check that the Authorization and Token endpoints start with https://trust.k2.com/. If they do not, edit them and replace the domain. For example:
- AADMGMT Resource configuration
- Check that the Authorization and Token endpoints start with https://trust.k2.com/. If they do not, edit them and replace the domain. For example:
https://trust.k2.com/331zzc78-2f87-43ce-bzzz-d45zzb2b0cf9/authorize/oauth/2/request - Click New to add a new parameter and select client_secret from the drop-down.
- Paste the Client Secret you copied when you added the K2 for Office 365 app to the Azure GCC tenant into the Token and Refresh value fields. Then click OK to save and continue.

- Click New to create a new resource parameter.
- Select instance_aware from the drop-down.
- Enter true as the Authorization, Token, and Refresh values. Then click OK to save and continue.

- Check that the Authorization and Token endpoints start with https://trust.k2.com/. If they do not, edit them and replace the domain. For example:
- SP Resource configuration
- Check that the Token endpoint starts with https://trust.k2.com/. If it does not, edit it and replace the domain. For example:
https://trust.k2.com/331zzc78-2f87-43ce-bzzz-d45zzb2b0cf9/authorize/oauth/2/request - Click New to add a new parameter and select client_secret from the drop-down.
- Paste the Client Secret you copied when you configured SharePoint on the Azure GCC tenant into the Token and Refresh value fields. Then click OK to save and continue.

- Click New to add another new parameter and select acs_base_url from the drop-down.
- Enter https://login.microsoftonline.us as the Authorization, Token, and Refresh values. Then click OK to save and continue.
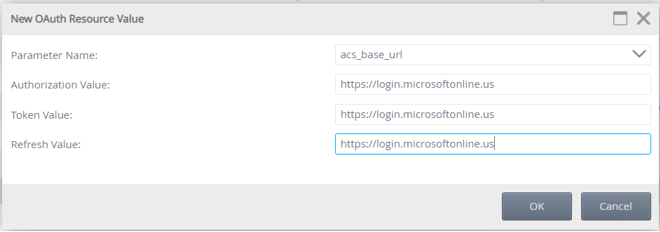
- You need to change the client_id, but do not do it in the Management site. Instead, navigate to the
SourceCode.SmartObjects.Services.SharePoint.Integration.dll.configfile in the [K2 installation folder]\ServiceBroker folder. - Open the file in Notepad and find SharePointClientId.
- Replace the value with the following:
c7d9edce-16c7-43b3-a00b-ad4db2810983
Save the file to finish.
- Check that the Token endpoint starts with https://trust.k2.com/. If it does not, edit it and replace the domain. For example:
Enable uploading product pages to SharePoint (for activating new sites)
Before you can run the Activation wizard, you must run a couple commands in the SharePoint Online Management Shell to connect to your SharePoint tenant and allow adding pages.
- Navigate to SharePoint Online Management Shell.
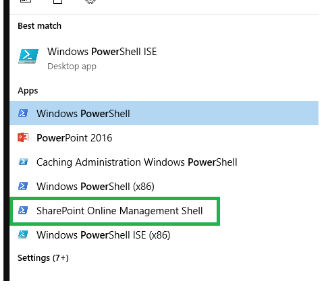
- Run the following command, replacing the [tenant] placeholder with your tenant name:
Connect-SPOService -Url https://[tenant]-admin.sharepoint.us - Follow the prompts and login with Azure global admin credentials.
- Run the following command, replacing the [site] placeholder with your Nintex K2 SharePoint site:
Set-SPOSite https://phnintex.sharepoint.us/sites/[site] -DenyAddAndCustomizePages 0 - Start the Activation wizard in the Nintex K2 for SharePoint app, logging in when prompted.
- During activation, a dialog will pop up informing you that a token will be created on your behalf. Wait for the Authorization Successful page and green ticks on all items in the Activation page.
- Click OK on the Please log in pop up. Activation is now complete.
