Part 2: Build your first Nintex workflow in SharePoint 2016
Follow the steps in this page to build your first Nintex workflow in SharePoint 2016.
i Important
To build workflows in Nintex for SharePoint 2016, you must meet the following requirements:
• You must have Design permission in your SharePoint environment.
• You must be a member of the Workflow Designer’s group in SharePoint. For more information on how to configure allowed workflow designers, see SharePoint on-prem user permissions for Nintex.
For this tutorial, we will create a workflow that automates the leave request process in your organization using Nintex for SharePoint 2016. To achieve this goal, we have the following steps:
Step 1: Create a SharePoint list
Step 2: Open Nintex for SharePoint
Step 3: Send an acknowledgment email to the initiator
Step 4: Solicit the manager’s response to the leave request
Step 5: Notify the initiator if leave request is rejected
Step 6: Notify HR if leave request is approved
Step 7: Notify initiator if leave request is approved
Step 8: Save and publish the workflow
i Note
In this tutorial, the following roles are used consistently in context with SharePoint terminologies:
• Initiator: The staff member who submitted the leave request.
• Manager: The staff member’s direct manager who responds to the leave request.
Step 1: Create a SharePoint list
- Log in to your SharePoint environment.
- Navigate to the site where you want to create a list.
- From the toolbar, click
 (Settings) and then select Add an App.
 - In the new page that appears, click Custom List. A new dialog appears.
- In the Name field, type “Leave Request” and then click Create.
Upon successful submission, a page appears to display site contents including your new list.
- Click the name or icon of the list you recently created, which is "Leave Request".
- In the new page that appears, click edit.
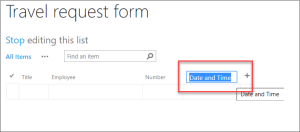
- From the table, click + (Add column) and then select Choice.
- If a column type does not appear in the list, click More Column Types, then select the desired column type and provide a Column name.
- For some column types, you can simply select from the drop-down list and no additional window appears. You can rename the column right inside the heading of the table. The following image is an example:
-
In the new window that appears, do the following:
-
In Column name, type “Leave Type”.
-
Select Choice.
-
Type each choice on a separate line:
-
“Annual Leave”
-
“Sick Leave”
-
“Leave without pay”
-
“Maternity Leave”
-
-
- Leave other fields blank or with their default values.
-
Click OK. The new column appears on your list.
-
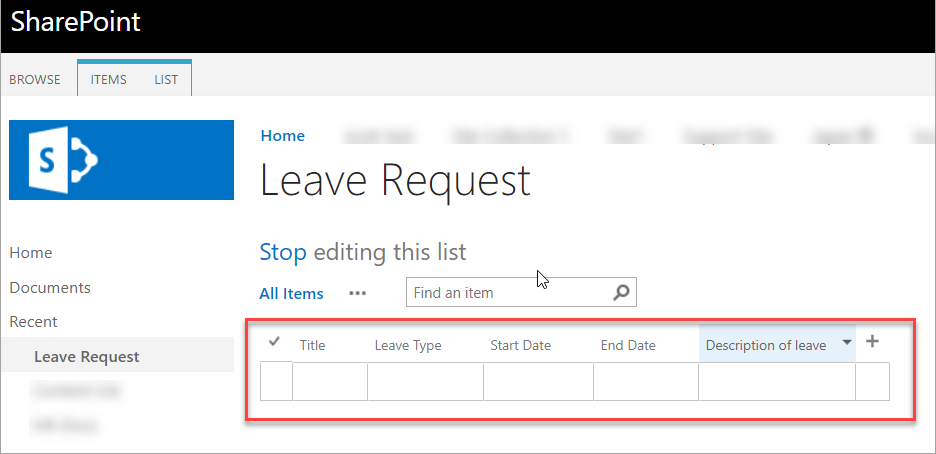
Repeat previous four steps to create the following columns:
Column type
Column name
Date and time Start Date Date and time End Date Multiple lines of text Description of leave Click the following image to see how your columns should look like:

-
After the columns are created, click Stop editing this list.
Now, we can begin attaching a Nintex workflow to this list. Let’s move on the next steps.
Step 2: Open Nintex for SharePoint
- On the same page where you added columns for your list, click the List tab from the ribbon.
- Click the drop-down arrow in
 Workflow Settings and then select Create a Workflow in Nintex Workflow.
The workflow designer canvas appears.
Step 3: Send an acknowledgment email to the initiator
In your workflow, use the Send notification action to configure sending an email to the employee who successfully submitted a leave request. This email serves as an acknowledgment receipt of the leave request.
- Locate the Send notification action from the toolbox. Do any of the following:
- In the search field, type the name of the action.
- Click the User interaction group. If an action is used several times, it also appears in the Commonly used group.
- Drag the Send notification action onto the drop zone.

- Double-click the Send notification action to open the configuration dialog.
- To add the recipient of the email:
- Click
 (Browse) next to the To field.
 - Select the Lookup section.
- Select Initiator, and then click Add.
- Click OK.
- Click
- To provide an informative description for the subject:
- In the Subject field, type "Leave Request" then add space.
- Click
 (Insert Reference) next to the Subject field.
 - In the Item Properties tab, double clickLeave Type.
- In the Common tab, double click Initiator's Display Name.
- Click OK.
- Add a space between the two references Leave Type and Initiator's Display Name.
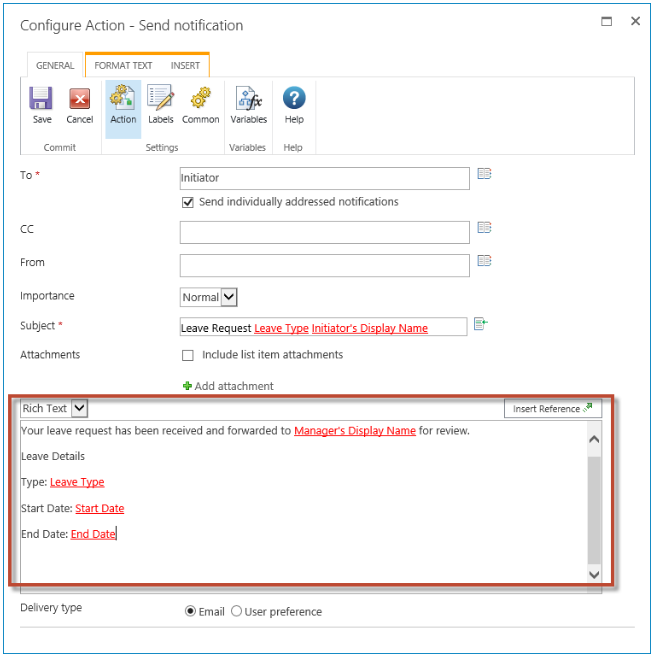
- In the email body text box, type the following message:
Your leave request has been received and forwarded to Manager's Display Name for review.
Leave details:
Leave Type: Leave Type
Start date: Start date
End date: End date
Note: Replace the red text with references. Use the
 Insert Reference option and locate the following references:
From the Common tab , select Manager’s display name.
From the Item Properties tab, select Leave type, Start date,and End date.Click the following image to see what your configuration should look like:

- From the ribbon, click General > Save.
Step 4: Solicit the manager’s response to the leave request
Use the Request Approval workflow action to configure an email to notify and solicit the manager’s action for the leave request.
- Locate the Request approval action from the toolbox:
- In the Search field, type the name of the action.
- Click the User interaction group. If an action is used several times, it also appears in the Commonly used group.
- Drag a Request Approval action onto the drop zone below the Send Notification action.
- Double-click the Request Approval action to open the configuration dialog.
- To add recipient of the leave request:
Click
(Browse) next the Approvers field.Select the Lookup section.
Click Manager and then click Add.
Click OK.
Note: To enable the automatic selection of a user's manager, the information must be available in the user's Active Directory account. If you are accessing a Nintex trial on a Nintex-hosted site, the user's manager information will not be available, as the Standard Edition of Nintex Workflow does not support Active Directory.
-
In the ribbon, click Task Notification.
-
In the Edit settings for field, select Manager.
-
A message appears warning that your configurations will override the values for Manager and changes to all approvers will no longer affect this user. Select OK to continue.
-
In the Delivery type field, select Email.
-
In the Subject field, type "Approval Required", if not already automatically generated.
-
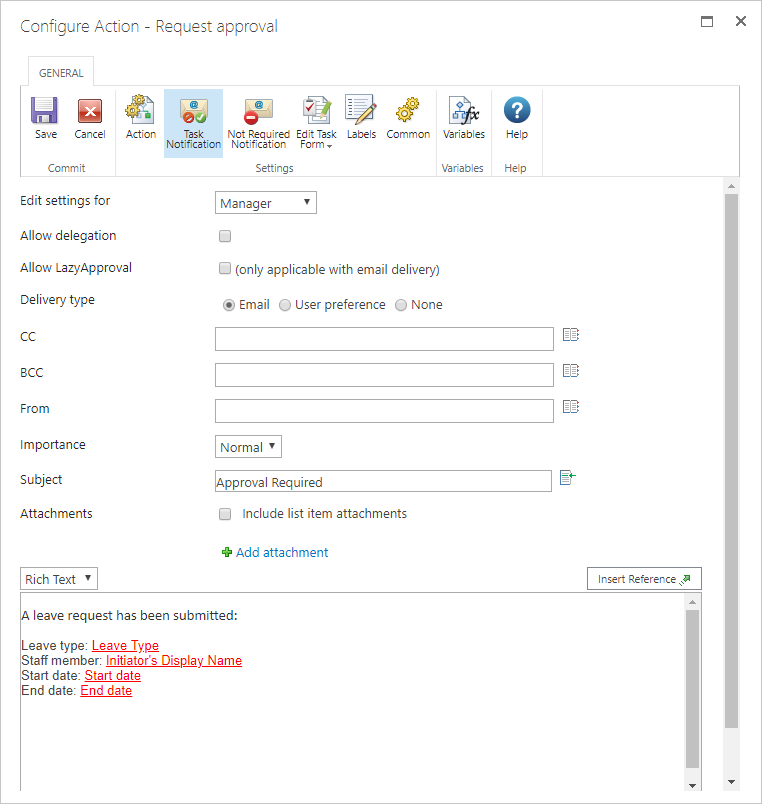
In the email body text box, type the following message:
A leave request has been submitted.
Leave type: Leave Type
Staff member: Initiator's Display Name
Start date: Start date
End date: End date
Note: Replace the red text with references. Use the
Insert Reference option and locate the following references:
From the Item Properties tab, select Leave type, Start date,and End date.
From the Common tab, select Initiator's Display Name.Click the following image to see what your configurations should look like:

- From the ribbon, click General > Save.
Now we have completed the configuration of notifying the manager when a staff member submits a leave request. Based on the response, we will configure the workflow to process the following results:
- Approval: If leave request is approved, an email is sent to both HR and the initiator.
- Rejection: If leave request is rejected, an email is sent to the initiator.
Let’s do that in the next steps.
Step 5: Notify the initiator if leave request is rejected
Use another Send Notification action to inform the employee when the leave request is rejected.
- Locate the Send notification action from the toolbox:
- In the search field, type the name of the action.
- Click the User interaction group. If an action is used several times, it also appears in the Commonly used group.
- Drag a Send Notification workflow action onto the first branch of the Request Approval action. The first branch is located on the left side of the canvas and indicates the Declined outcome.
- Double-click the Send Notification action to open the configuration dialog.
- To add a recipient of email notifying rejection of leave request:
- Click (Browse) next to the To field.
- Select the Lookup section.
- Click Initiator, then click Add.
- Click OK.
- Click
- To provide an informative Subject description:
- Click (Insert Reference) next to the Subject field.
- In the Item Properties tab, double-click Leave Type and then click OK.
- In the same field, type "has been rejected".
- Click
- In the Email body text box, type the following message:
Your leave request for Start date to End date has been rejected.
Note: Replace the red text with references. Use the
Insert Reference option and locate the following references:
From the Item Properties tab, select Start date,and End date. - From the ribbon, General > Save.
Step 6: Notify HR if leave request is approved
Now we can also add a Send Notification action to inform the HR Manager if a leave is approved for an employee.
- Locate the Send notification action from the toolbox. Do one of the following:
- In the search field, type the name of the action.
- Click the User interaction group. If an action is used several times, it also appears in the Commonly used group.
- Drag a Send Notification action onto the second branch of the Request Approval action. The second branch is located at the right side of the canvas and indicates the Approved outcome.
- Double-click the Send notification action to open the configuration dialog.
- To add the HR staff as recipient of the email notifying approval of leave request:
- In the To field, click (Browse).
- Select External email address section.
- Type the email address of the HR staff.
- Click Add and then click OK.
Tip: Tip: You can also use an internal search for your HR department.
- In the To field, click
- In the Subject field, type "Leave request is approved".
- In the email body text box, type the following message:
Leave Type request of Initiator's Display Name has been approved by Manager for between Start date and End date.
Note: Replace the red text with references. Use the
Insert Reference option and locate the following references:
From the Common tab, select Initiator's Display Name, Manager.
From the Item Properties tab, select Leave Type, Start date,and End date. - From the ribbon, General > Save.
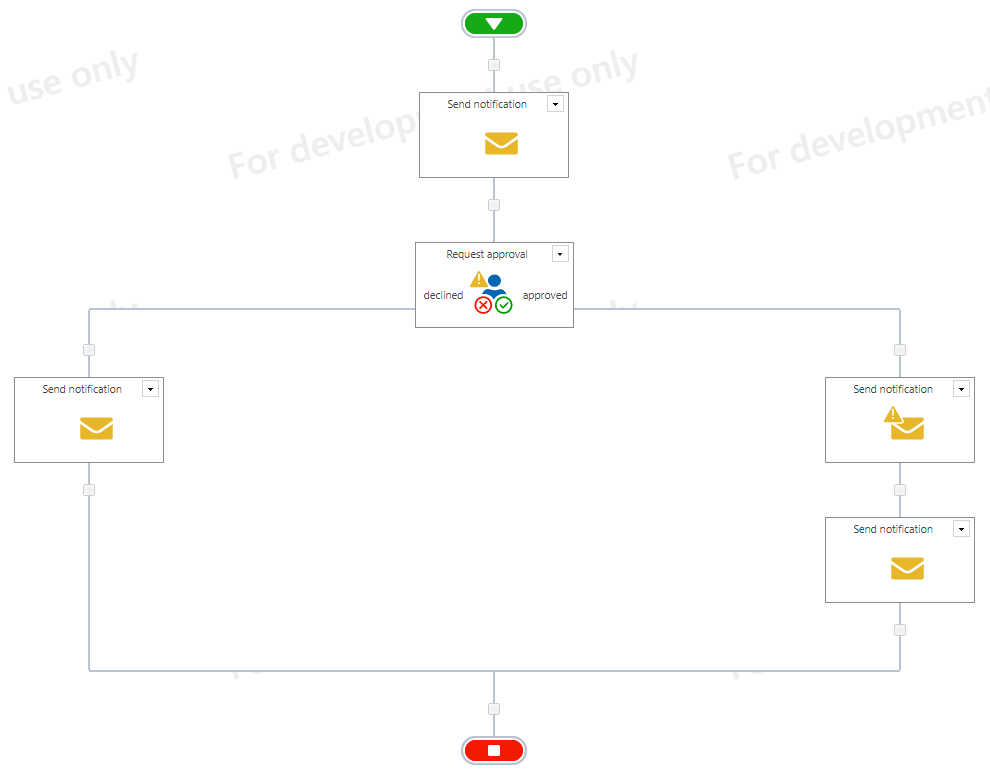
Step 7: Notify initiator if leave request is approved
Instead of configuring a new Send Notification action from scratch, we can copy the Send Notification action from the first branch of the Request Approval branch to the second branch and then update the action to replace the recipient with the initiator.
-
Click the drop-down arrow of the Send Notification action located on the declined branch of our Request approval action, and select Copy.
-
Below the Send notification action that sends email notification to HR staff, right-click on the drop zone and select Paste.
-
Double-click the new action to open the configuration dialog.
- In Subject and email body text box, replace the text "rejected" with "approved".
-
From the ribbon, click General > Save.
Your workflow should look like the following:
Step 8: Save and publish the workflow
-
In the Nintex Workflow 2016 ribbon, click Save.
-
In the Title field, type “Leave Request”.
-
In the Description field, type “Use this workflow to process leave requests”.
-
Click Submit.
-
In the Nintex Workflow ribbon, click Publish and then click Submit.
Congratulations! You have created you first workflow on SharePoint.
Next step:
Go to Part 3 : Design your first Nintex form in SharePoint 2016