RPA server GUI upgrade or repair
Nintex System Manager provides a comprehensive solution for managing the upgrade or repair of RPA. The repair process allows you to change existing configurations, such as enabling or disabling TLS, without upgrading to a higher version.
The upgrade process is started when you have an existing Nintex RPA installation and you use an RPA installation bundle zip file for a newer version. The repair process is started when you use an installation bundle zip file for the same version as the RPA version that you installed previously.
The following sections are relevant information related to the process.
The following is a list of important items to verify and prepare before doing an upgrade or repair. It is advised to complete this checklist to experience a smooth upgrade/repair process:
| Item | Remark | |
| 1 | Type of environment (E.g. Dev/Test/Prod) | |
| 2 | What is the current version? | |
| 3 | What is the targeted version? | |
| 4 | Does the hardware and software meet the minimum/recommended specifications for Server & Clients? It is recommended to have at least 20GB free disk space in the RPA server during the upgrade process. | |
| 5 | Automation type (Attended or Unattended) Refer: Configurations > General Settings |
|
| 6 | Is TLS/SSL used?
If yes, prepare the necessary credentials and/or files. Refer: Configurations > Security Options |
|
| 7 | Determine the account to be used as the application services user and have the password on hand.
Refer: Configurations > Customize Application Services User Is a domain account required as application services user? If yes, the domain account must have local admin and log on as a service privileges & able to execute the setspan commands on the RPA server. |
|
| 8 | Is Active Directory (AD) used for managing the users? If yes, determine the account to be used to connect to AD and the Organizational Unit the RPA users belong to. Refer: Configurations > Customize User Management |
|
| 9 | Is Single Sign-On enabled?
If yes, have the KEYTAB files on hand. Refer: Configurations > Client-Server Authentication |
|
| 10 | Determine the two databases used by RPA. The default names are nintex_RPA and nintex_Authentication. Is the MSSQL Server’s sa user available for use during the upgrade? If no, you will need an account that has access to the MSSQL Server, with Refer: Third Parties > MSSQL (Database Server) |
|
| 11 | Can anti-virus software, if present, be disabled/turned off during server installation? If no, it may block or significantly slow down the upgrade process. |
|
| 12 | Can a backup of the server be performed prior to the upgrade? It may be necessary to abort the upgrade in the event of complications. |
Before you start, we strongly advise you to create a restore point for the server VM. You may need to restore the server to its original configuration if the upgrade or repair process is not successful.
There are various items that System Manager will refer to and depend on during the upgrade/repair process. You should perform the following actions before starting the process:
-
Log in to the console and verify the following:
- Task Queue: Ensure there are no pending tasks.
- Running Tasks: Ensure there are no tasks running currently.
- Triggers: Ensure that all triggers are set to Inactive status.
- Approved Robots: Ensure none of the approved robots have the Running status.
- Disable any anti-virus software that is running so that it doesn't block the upgrade/repair process, and to improve performance during the process.
- Check your system's environment variables by searching for "Environment variables" and see whether NODE_TLS_REJECT_UNAUTHORIZED is present. If it is, remove it.
- Ideally, you should have created a server restore point. If this is not possible, you should make backups for the two RPA databases - Nintex and Nintex_Authentication (these names may vary depending on whether you made changes to it during installation).
- Ensure the port used for the database connection is configured correctly. In SQL Configuration Manager, go to SQL Server Network Configuration > Protocols for [database instance name]. In the right pane, double click TCP/IP. In IP Addresses > IPAll section, make sure the TCP Port field has the value 1433 (or a port that your IT department has configured for database connections).

The primary method of installing RPA is through System Manager, which provides a user-friendly graphical interface.
To install System Manager, follow these steps:
-
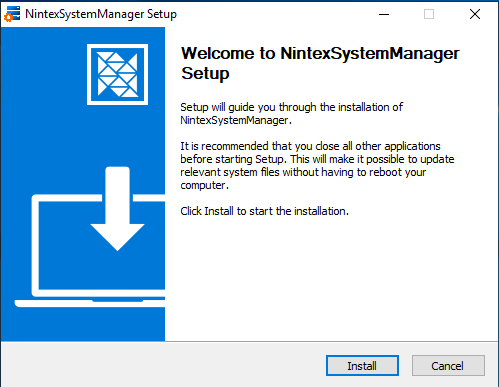
Locate and run the System Manager executable file:
NintexSystemManagerSetup.exe. -
Click Install.
-
(Optional) Select the Run NintexSystemManager checkbox to launch the application immediately after installation.
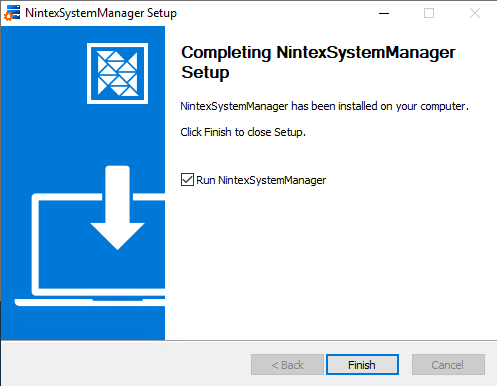
-
Click Finish.
Make sure you complete all steps in Prerequisite and have successfully installed Nintex System Manager before proceeding with the upgrade or repair process.
If you are upgrading from Nintex RPA 22.9 or later, the latest version of System Manager is able to retrieve the parameters you used previously and automatically populate the same fields.
After installing System Manager, you can run it. It will guide you through the RPA upgrade or repair process.
The System Manager GUI guides you through the following steps:
| Page | Description |
|---|---|
| Welcome | Page to select the ZIP file that you want. |
| Setup | Page used to enter server details and specify the desired destination folder. |
| System check | Verifies that your system meets the requirements for the software. |
| Configurations | Page to configure the preferred connection option and specify the desired port. |
| Optional features | Page to enable or disable key features. |
| Third parties | Page to configure settings for various external components used in the system. |
| Upgrade | Page that shows the progress of the procedure. |
| Completion | Indicates the successful completion of the process. Choose to launch the System Manager immediately or exit the installer. |
When System Manager starts, do the following:
- Drag the RPA installation bundle ZIP (.zip) file into the designated box or select the ZIP file by clicking Select file.
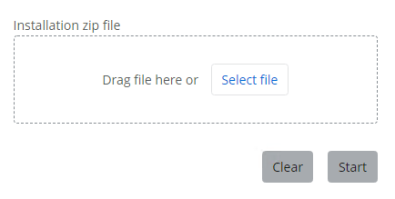
- Click Start to begin the process.
> Next step: Setup
Following are actions to be taken after you have performed the upgrade or repair:
- Restart the Server VM.
- Log in to the Admin Tool to manage the Nintex RPA platform.
- Log in to the Console Plus to create and manage robots, tasks, and triggers.
- Check that Triggers are working.
- Log in to Console and check Email server settings. For more information, see Setting Up the Email Server.
- Install the latest version of the clients. You do not need to uninstall them first.
- Check whether Dynamic Advanced Commands (DAC) is installed in the RPA server or client VMs. Reinstall them accordingly depending on whether they were originally on the server or client machine(s).If the DAC is installed in the server, allow some time (up to an hour) for it to synchronize updates with client machine(s).
DAC must be installed to ensure an error-free RPA operation. - Check that the relevant wizards appear in RPA Admin and Studio.
- Check that wizard permissions have been applied correctly in Robot, Studio and Console.
- Check that users are synchronized between Keycloak and Nintex Admin Tool user.
- Check that users have the appropriate user roles as specified in Keycloak's user Role Mapping.
- If you are using Active Directory, check that users have a
tenantIdattribute in User Federation. To do this, go to Console > Users. For each user, go to [ID] > Attributes and make sure there is an entry withKey = tenantIdandValue = Company ID(you can retrieve the Company ID from Nintex Admin at General > General tab in the Company ID field). Add one if this not available. If you are unable to add it, go to User Federation > [ID] > Settings > Edit Mode and change the value toWritable. - To validate Single Sign-On for Client Server Authentication, log in to the client machine using an Active Directory user account that has been imported into Aerobase (and synchronized in the Admin tool). Start a client application (Studio or Robot), and if the setup is successful, it will log in automatically without requiring manual credentials.
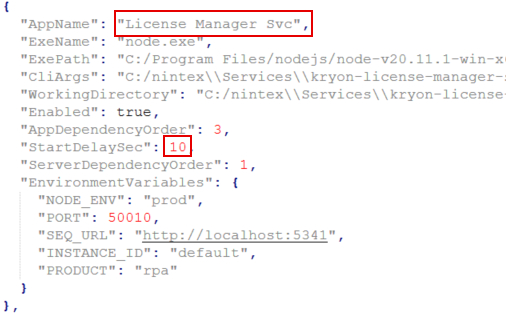
-
Go to the RPA Server installation folder and edit the appsettings.Production.json file (for example [RPA installation folder]\services\Kryon.Server.ServicesWatchdog\appsettings.Production.json).
-
Find the License Manager Svc section.
-
Change the value for StartDelaySec property to
10. -
Restart the virtual machine and access RPA Console normally now.
Issue
When restarting your virtual machine and you log in to RPA Console after an upgrade or repair, you may see the error "Oopsi! You are not authorized, please contact the administrator."
Cause
This is because the License Manager service attempted to connect to the local SQL server before the database service is fully up and running. This resulted in an unauthorized user message.
Resolution
To resolve this issue, follow the steps below:
An example of the section that should be edited as follows: