Third Parties
On the Third parties page, you can customize settings for various external components that interact with the Nintex RPA platform.
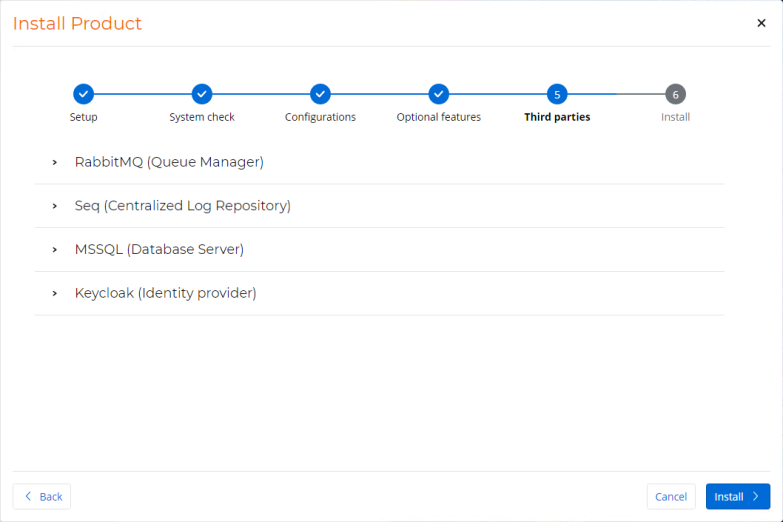
What to do on this page
Follow the instructions below to configure each of these components according to your specific requirements.
RabbitMQ plays a vital role in prioritizing, sequencing, and distributing tasks to the robots. It acts as the manager for orchestrating and managing the flow of tasks. In this section, you will configure RabbitMQ to integrate with your RPA environment.

-
Enter the RabbitMQ Port or keep the default value. This port is used for communication between RPA and RabbitMQ.
-
Enter the RabbitMQ UI port or keep the default value. This port is used to access the RabbitMQ UI for troubleshooting purposes.
-
Create an administrative user:
-
Enter your desired username for the administrative user. The default is
Admin, but you can choose any name. You can create a new user or reuse an existing one. This user is able to perform administrative actions, such as logging into the RabbitMQ GUI. -
Create a password for the administrative user.
To keep your RabbitMQ setup secure and effective, your password must:
-
Be 9 - 32 characters long
-
Have a minimum of one digit, one lowercase character, and one uppercase character
-
Consist solely of alphanumeric characters, dashes, periods, and underscores
-
Be different than the username
For passwords, these special characters aren't supported:
Special Character Description Special Character Description ' Apostrophe \t Tab " Double quotation mark \n Line feed & Ampersand \v Vertical tab ⎵ Space \r Caret return ; Semi-colon \ Backslash -
-
Create a system user:
-
Enter your desired username for the system user. The default is
nintex, but you can choose any name. You can create a new user or reuse an existing one. This is an internal-only user for running RabbitMQ actions and cannot log into the GUI. -
Create a password for the system user. Ensure that you follow the same password requirements noted for the administrative user password.
-
-
(Optional) Click Test connection to validate the RabbitMQ connection.
Seq is a centralized logging tool that helps you collect, search, and analyze log data from various sources within your RPA installation. In this section, you can specify the Connection option.
If you select Install locally, Seq will be installed on the same server as your RPA installation. The default values for Seq protocol, Seq server FQDN, and Seq server port will be used and cannot be changed.
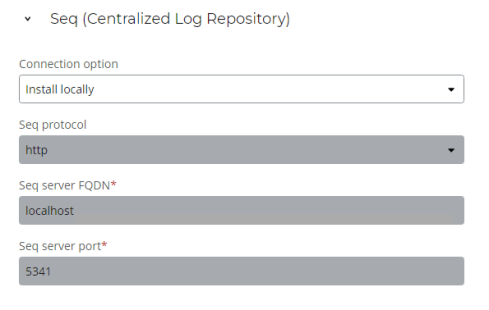
If you already have a separate Seq instance running, you can select Connect to an existing Seq.
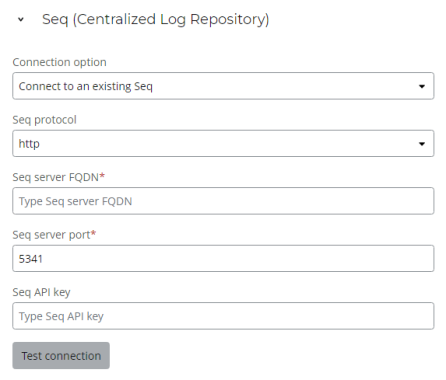
You can then configure the following to connect RPA to your Seq instance:
-
At Seq protocol:
-
http: This option is suitable for scenarios where security is not a primary concern, or if you have additional security measures in place at the network level. It provides basic data transfer without encryption.
-
https: This option is the secure version of http. It uses encryption (usually SSL/TLS) to protect the data being transmitted between RPA and the Seq server. If you're dealing with sensitive or confidential data, it's recommended to choose https for enhanced security.
-
-
At Seq server FQDN, type the Seq server's FQDN (Fully Qualified Domain Name) or keep the default value. This is the unique address of your Seq server on your network. It typically includes the server name and the domain name, e.g.,
server.example.com. -
At Seq server port, type your Seq server's non-default port.
-
At Seq API key, type your Seq server's API configuration, if relevant. This field is optional.
Once complete, you may click Test connection to validate the Seq connection.
Microsoft SQL Server (MSSQL) is a powerful database system used to organize and access data effectively. It's crucial for your RPA setup. In this section, you'll connect to your existing MSSQL database, ensuring smooth data handling for your RPA tasks.
-
Select the MSSQL option:
-
Install locally: Select this option if you want to install MSSQL on the same server as your RPA installation.
-
Encrypted database connection and SSPI are not supported when you install locally.
-
Selecting this option will prevent you from changing the default value for the Database server FQDN.
-
Unless there are specific company policies, such as naming conventions or security requirements, you can keep the default values.

-
Enter the Database instance name or keep the default value.
-
Enter the Database instance port or keep the default value.
-
Enter the Database name or keep the default value.
-
Enter an SQL password: The password should only consist of alphanumeric characters (A-Z, a-z, 0-9) and exclamation marks (!).
-
-
Connect to existing database: Select this option if you already have an MSSQL database instance and want to integrate it with your RPA server installation for efficient data management in your automation environment.
-
-
If you select Connect to existing database, configure the following:
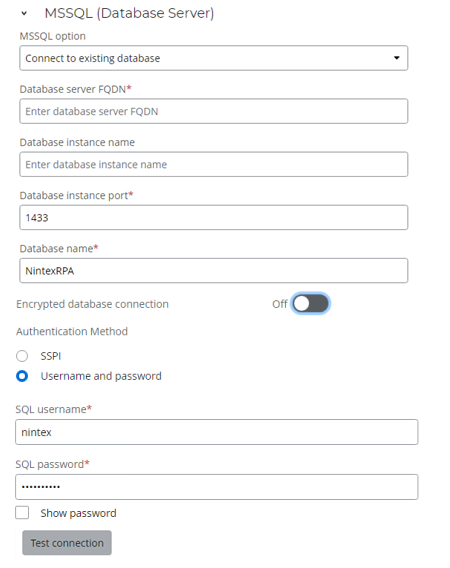 Remember to input these details accurately to ensure a successful connection to your existing MSSQL database.
-
Enter the Database server FQDN, which serves as the unique network address of your MSSQL database server. The FQDN usually comprises the server's name and domain, e.g.,
server.example.com, and identifies the physical or virtual server that hosts your database instance. -
Enter the name of the existing Database instance name.
-
Enter the Database instance port. If your MSSQL server uses a non-default port, enter it here.
-
Enter the Database name.
-
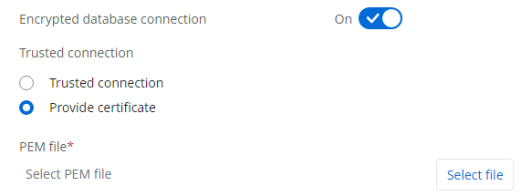
Click the toggle to enable or disable an Encrypted database connection.
-
If you toggled the Encrypted database connection to On, select one of the two options:
-
Trusted connection
-
Provide certificate
-
-
Click Select file to select a PEM certificate file.
-
Select an Authentication Method:
-
SSPI (Security Support Provider Interface): This option is disabled when the Local system account is chosen for the Application's Services user on the Configurations page.
- To enable SSO as the authentication method for the database during this step, you must have previously configured it according to the section, (Optional) Configure SSPI for DB authentication on the Server GUI installation page. If you haven't done so, please cancel the installation, perform the steps, and then start the installation again.
- If you are using SSPI (database), ensure that the user you selected has permissions for the folder where the product is being installed.
-
Username and password: If you select this authentication method, enter the SQL username and password. Double-check for accuracy and avoid any typing errors, as incorrect passwords can result in installation failures. The username and password must be for an existing user account; you cannot create a new user for this purpose.
The existing user account must have the Server role
sysadminfor the MSSQL Server.In Microsoft SQL Server (MSSQL), an SQL user refers to a database user account that is created and managed within the SQL Server instance. These users are associated with logins, which are used to authenticate and authorize access to SQL Server.
-
-
(Optional) Click Test connection to validate the MSSQL connection.
If the test fails with the "Failed to connect to the database" error, check that the port in MSSQL is not empty and specified correctly. To do this, start up MSSQL Server Configuration Manager. Go to SQL Server Network Configuration > Protocols for MSSQLSERVER > TCP/IP > IP Addresses. The TCP Port field should be populated.
-
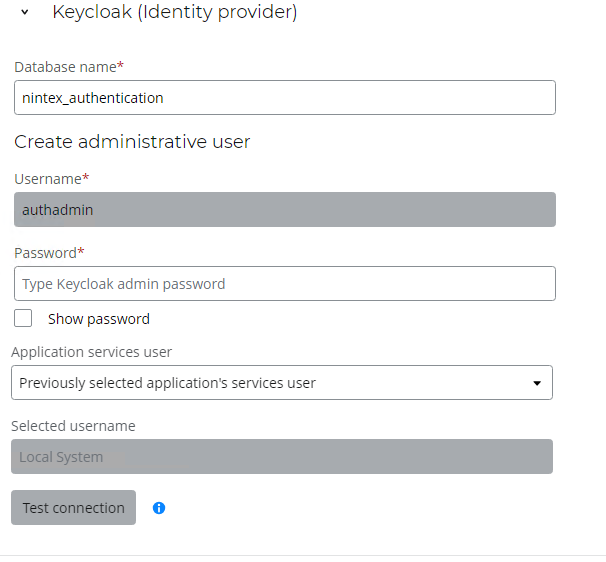
Keycloak is a powerful identity and access management platform used to secure and manage user identities, roles, and permissions. It plays a vital role in ensuring the security and access control of your RPA environment. In this section, you'll configure Keycloak as the Identity Provider (IdP) for your RPA setup, enhancing security and access management for your RPA tasks.
-
Enter the Database name. This is the authentication database you previously created for Keycloak.
-
Create a password for the administrative user.
The administrative user is a crucial account with full administrative privileges for managing the Keycloak server and its configurations. This user, created during the initial setup, can access the admin console to manage realms, users, clients, roles, and other resources.
To keep your Keycloak (IdP) secure and effective, your password must:
-
Be 9 - 32 characters long
-
Have a minimum of one digit, one lowercase character, and one uppercase character
-
Consist solely of alphanumeric characters, dashes, periods, and underscores
-
Be different than the username
For passwords, these special characters aren't supported:
Special Character Description Special Character Description ' Apostrophe \t Tab " Double quotation mark \n Line feed & Ampersand \v Vertical tab ⎵ Space \r Caret return ; Semi-colon \ Backslash -
-
Select the user account that you want to use for running Nintex RPA and related services on your server. If you have unique security requirements or restrictions to customizing service access, choose Specific user account.
This pertains specifically to the credentials used for Keycloak authentication. You have the flexibility to use one set of credentials (User X) for Keycloak and a separate set (User Y) for other RPA services.-
Previously selected application's services user: Refers to the user account you previously selected on the Configurations page for the Application's services user.
-
Local system account: Select this option to use the built-in Local System account, which typically has extensive permissions on the local machine. However, it may not have network or domain access rights.
-
Specific user account: Select this option to specify a custom Windows user account. This allows you to control the precise permissions and access rights assigned to the Nintex RPA services. You can define which folders, resources, and network locations the services can interact with, providing a higher degree of security and control.
-
-
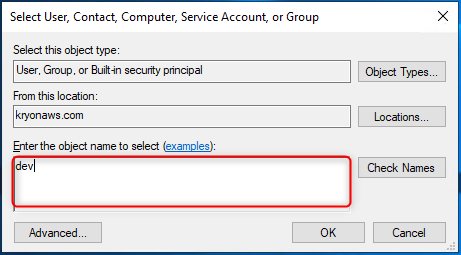
If you select Specific user account for Application services user field, click Select user to choose a different account.
-
Type the name in Enter the object name to select.
-
Click Check Names.
-
Select a name from the list of Matching names.
Make sure that you select a user account for which you have the matching password.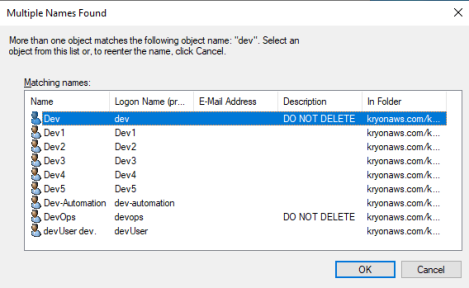
-
Click OK on the Multiple Names Found window.
-
Click OK on the Select User, Content, Computer, Service Account, or Group window.
-
Enter the password for the previously chosen user account. Double-check for accuracy and avoid any typing errors, as incorrect passwords can result in installation failures.
-
-
(Optional) Click Test connection to validate the Keycloak connection.
The availability of this button depends on the configuration of MSSQL in the previous section.
Once you have finished configuring your settings, complete the installation by clicking Install >.
In the next step, you will not be able to cancel the installation process after the Stopping services step.
< Previous step: Optional features