8. Add a Tabbed Form to Create a New Contact
In this step you will add a tab to the form for adding new contacts. This adds convenience for your users, as they can manage contacts and create new contacts from one form.
-
Add a new tab to the Contact List Form. Name the existing tab Contact List, then name the new tab Create New Contact.
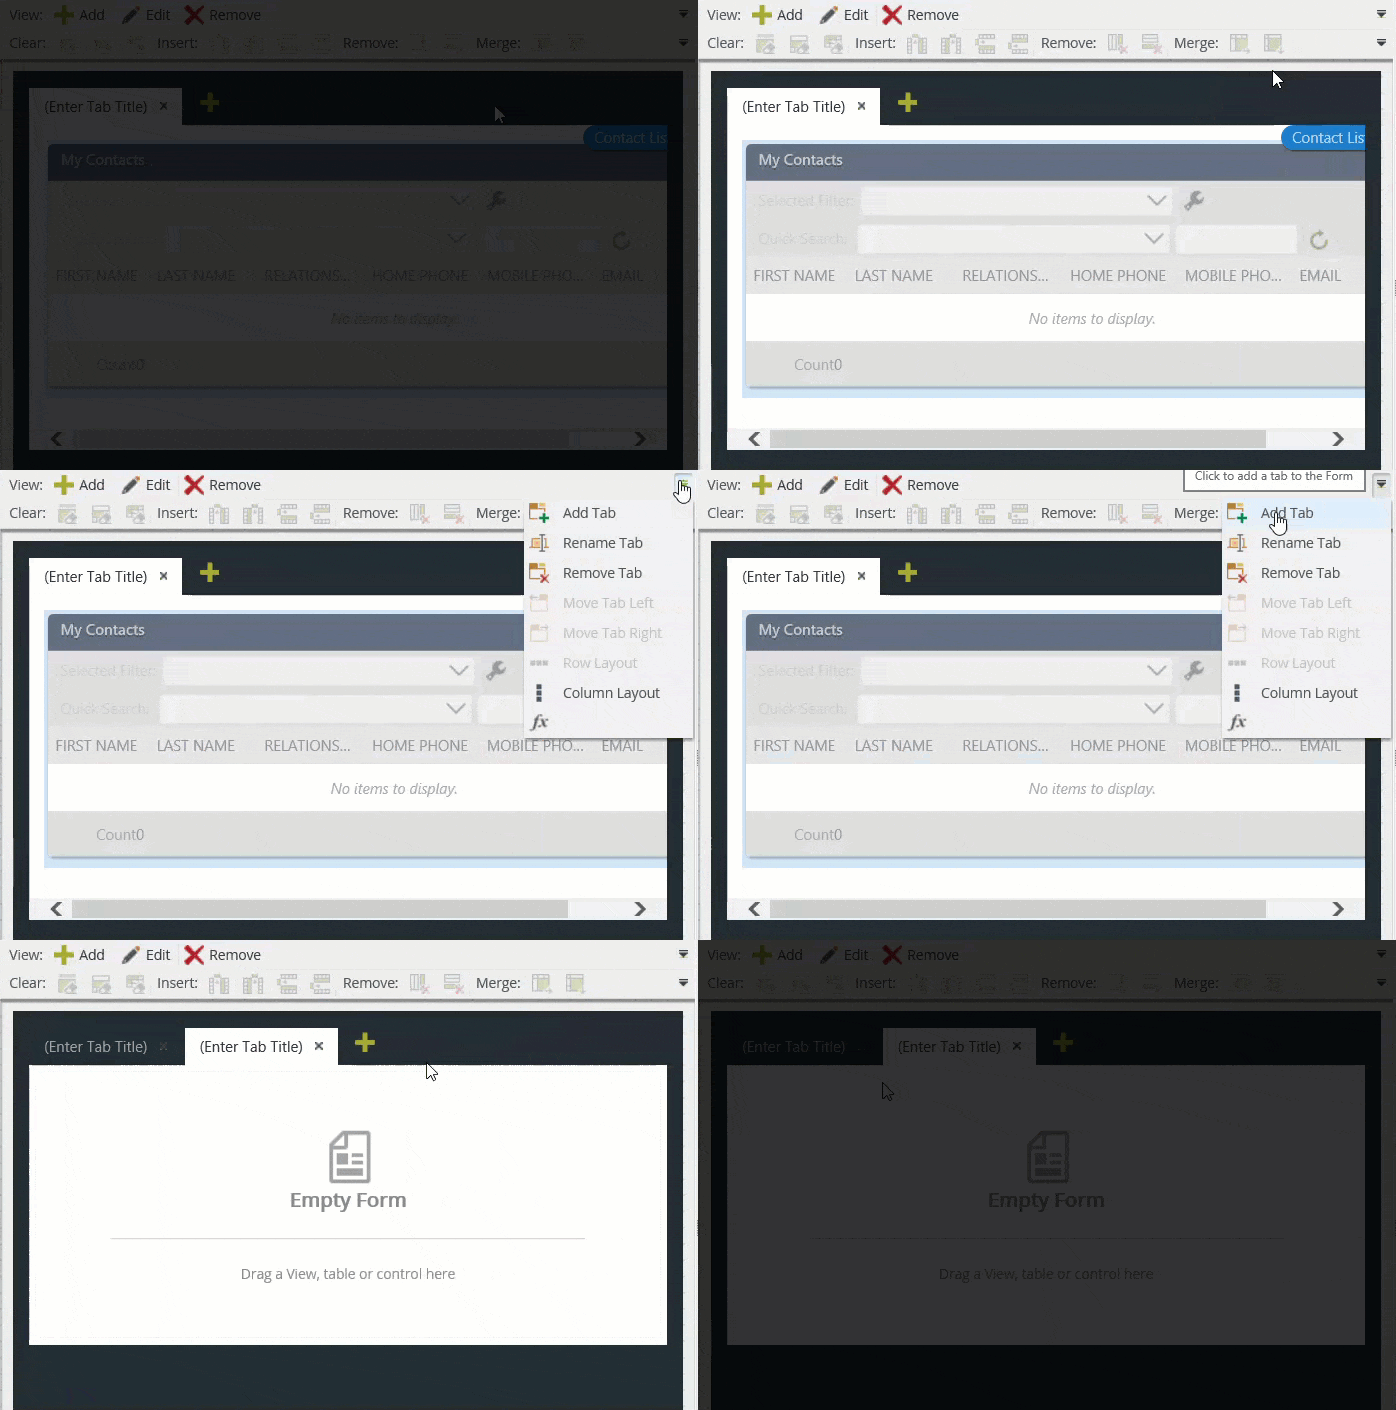
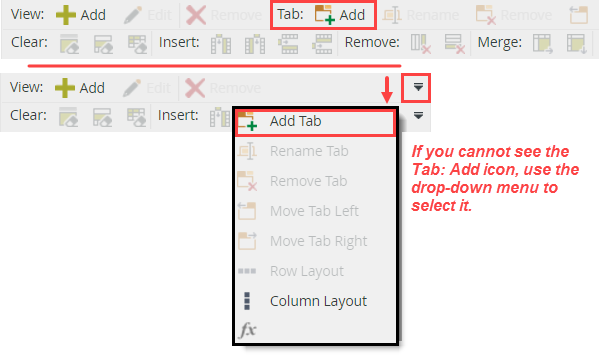
- Begin by adding a new tab that will become the interface for creating new contacts. In the menu ribbon, click the Tab: Add icon. If your screen is small and you cannot see the Tab: Add icon, use the drop-down arrow to the right of the row to select the tab option.
- Change the tab titles so they reflect the forms they contain. Click (Enter Tab Title) and change it to
Contact List
then click the Click to add a tab to the Form icon. Name the new tab
Create New Contact
(In the image below, the first tab, Contact List, has been colored white for clarity. Non-active tabs are normally a dark color.)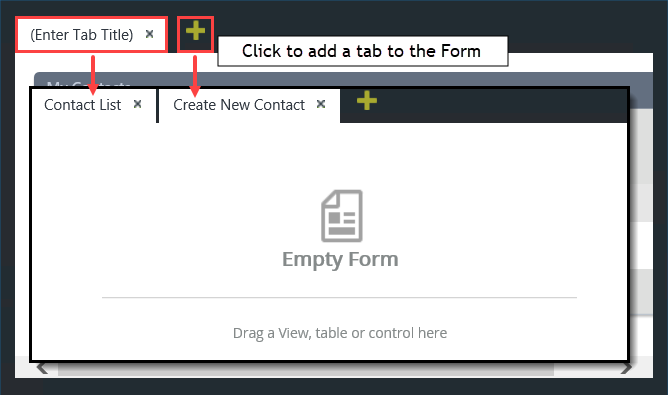
- Begin by adding a new tab that will become the interface for creating new contacts. In the menu ribbon, click the Tab: Add icon. If your screen is small and you cannot see the Tab: Add icon, use the drop-down arrow to the right of the row to select the tab option.
-
Construct the new contact form by adding the header view to the top of the form and the details view at the bottom of the form. Add the Contact Item View and the Contact Notes and Attachments List View to the Create New Contact form.
- Next, you will add the header view (Contact Item View) and details view (Contact Notes and Attachments List View) to the Create New Contact form. Make sure you are on the Create New Contact tab. From the Views tab in the left-side column, drag the Contact Item View onto the design canvas. Change the view name to
Contact Details.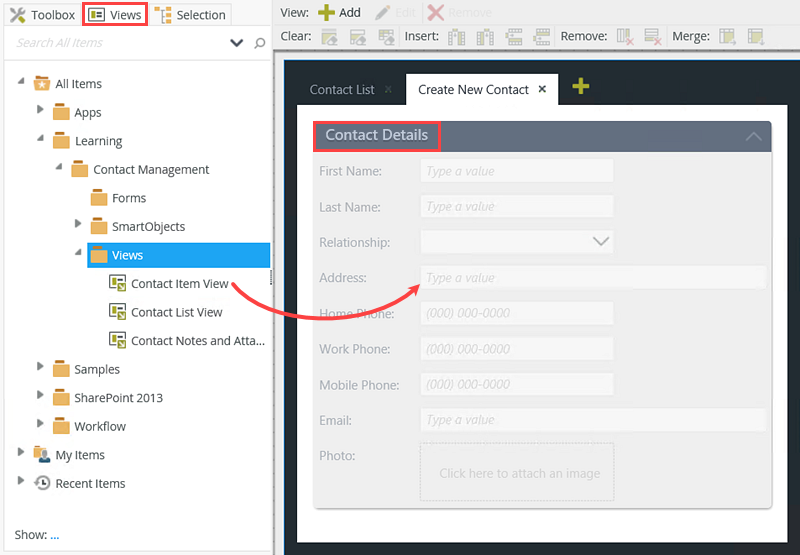
- Next, you will add the details view below the header. Drag the Contact Notes and Attachments List View onto the design canvas, below the item view. You will see a placeholder appear as you drag the list view below the item view. Drop the list view into the placeholder. Name this view
Notes and Attachments.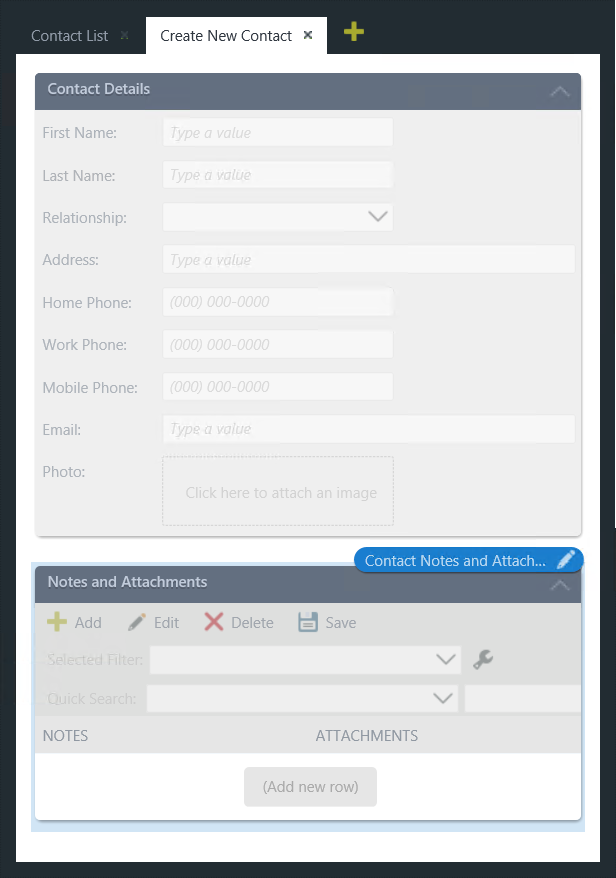
- Next, you will add the header view (Contact Item View) and details view (Contact Notes and Attachments List View) to the Create New Contact form. Make sure you are on the Create New Contact tab. From the Views tab in the left-side column, drag the Contact Item View onto the design canvas. Change the view name to
- Now you will add a layout table and a button control. When clicked, the button control will save the header record first, then save the details records (there may be several). Add a two column, one row layout table below the list view. Add a button control to the second table cell and name it Button Submit, then change the text value to Submit.
Now you add the submit button that will be used to create and save a contact "header" together with its "details". You begin by adding a layout table below the details view, then you add a button control. You will name the control and configure a rule for saving the header and details records after you click the button.
- From the Toolbox, add a Layout > Table below the list view. Configure the table for two columns and one row. (Technically, you could have one column since that's all you will use for the button, but having the extra column gives you a bit more control over the button placement and alignment.)
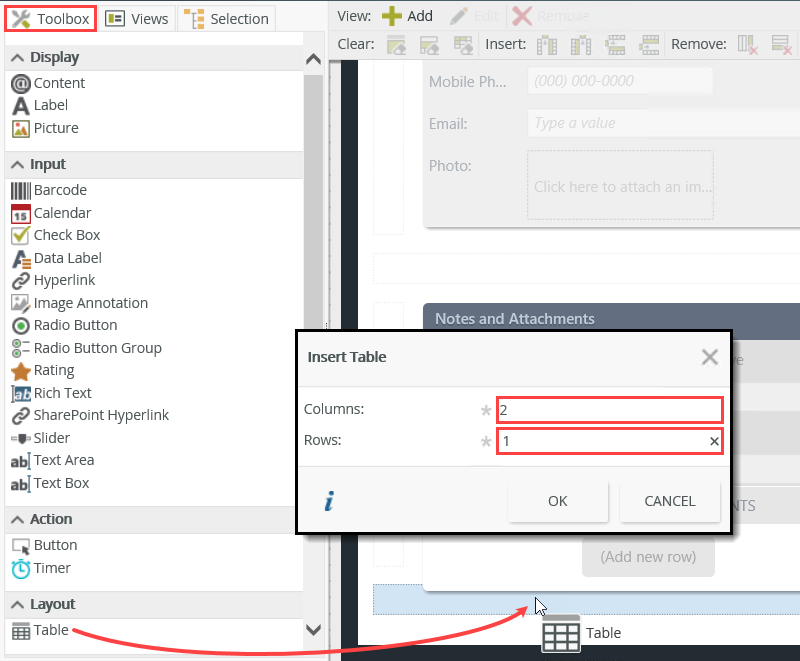
- Add a Button control to the second table cell.

- To make the form flow well, align the button control to the right side of the cell. Click inside the cell (not the control, but inside the cell itself). Click the align-right button in the toolbar.
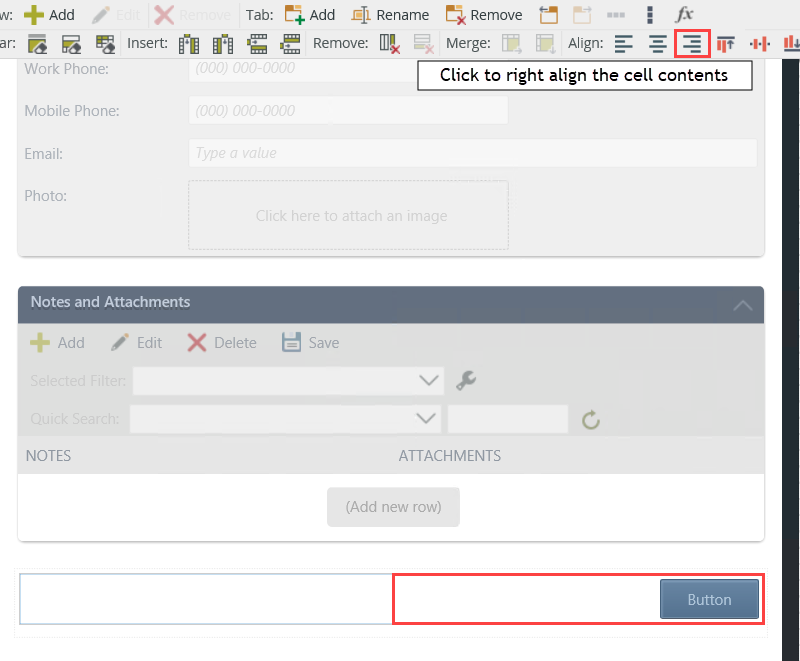
- Click to highlight the button control. In the Properties pane, change the Name of the control to
Button Submit
then change the Text of the control to
Submit.
Many controls have both a name and a text property. The name property is the identity used to reference the control in rules, etc. The text property is what the user sees, for example a control label.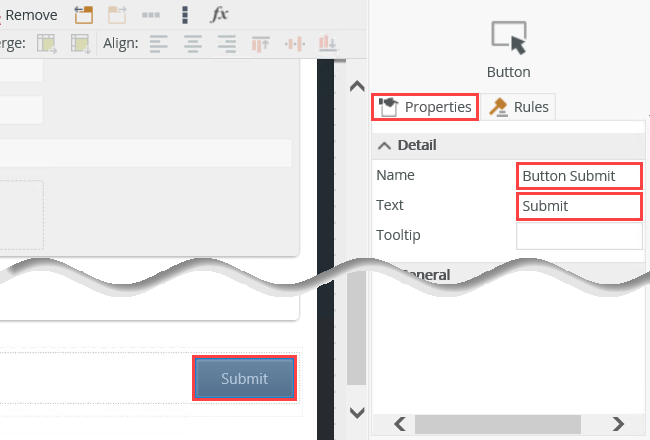
- From the Toolbox, add a Layout > Table below the list view. Configure the table for two columns and one row. (Technically, you could have one column since that's all you will use for the button, but having the extra column gives you a bit more control over the button placement and alignment.)
- Before you begin creating the rule to save your header and details content, you must save this form to make it available for use in rules. Remember, this is a new form that you created from a new tab, so technically, it does not exist until you save it. Save the new form. The save button is not labeled, but is just left of the FINISH button in the upper right corner of you screen. Add a new rule to the Button Submit control. Configure the event for when Button Submit is clicked.
To complete this step, you will add a rule that saves the new contact record. Once again, you are saving the header information, passing that record's ID back to the SmartObject, then saving the details records using the header ID. This "binds" the "details" records together with their "parent".
Begin by saving the Create New Contact form so that it can be referenced in rules.- Click the save button. The save button is not labeled, but is just left of the FINISH button in the upper right corner of your screen.

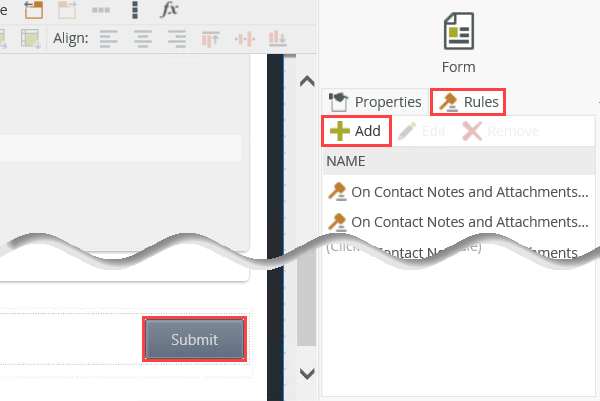
- Next, you will add a new rule to the submit button. Click to highlight the Submit button. Click the Rules tab (next to the Properties tab), then click Add.
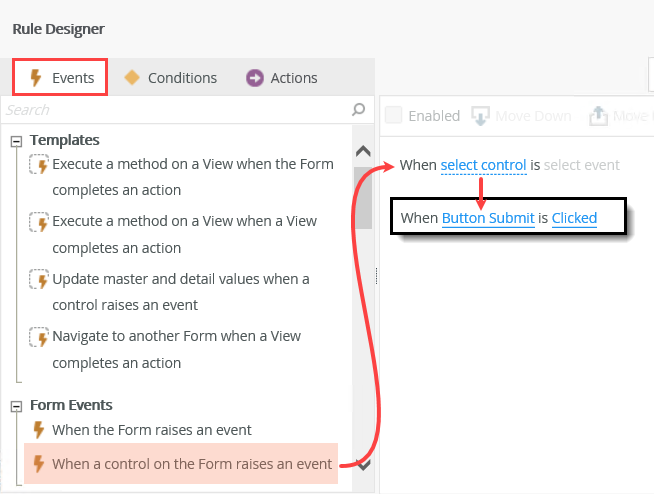
- First, you must add an event. Events are when something happens. In this case, when you click the submit button. Confirm the Events tab is active. Click the When a control on a Form raises an event event to add it to the rule definition pane. Click the select control link and select Button Submit. The "Clicked" event is added for you since this is a button and buttons are... clicked!
- Click the save button. The save button is not labeled, but is just left of the FINISH button in the upper right corner of your screen.
-
To avoid saving empty records, you should require that one or more fields contain an entry. For this application, you will require the first name. Add a condition that checks if the First Name field contains a value.
- Next, you will set a condition. Conditions check to see if criteria are met. In this case, you will require that the first name field contains an entry. This will help to avoid saving empty records. Click the Conditions tab to make it active. You will add a form validation condition to ensure the first name field contains a value. Search for
validation
then click the Form passes validation to add it to the rule definition pane. Click (configure).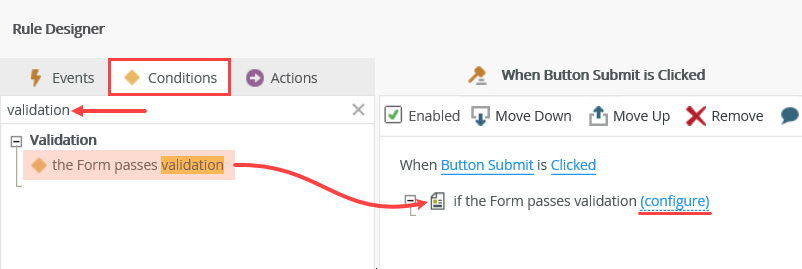
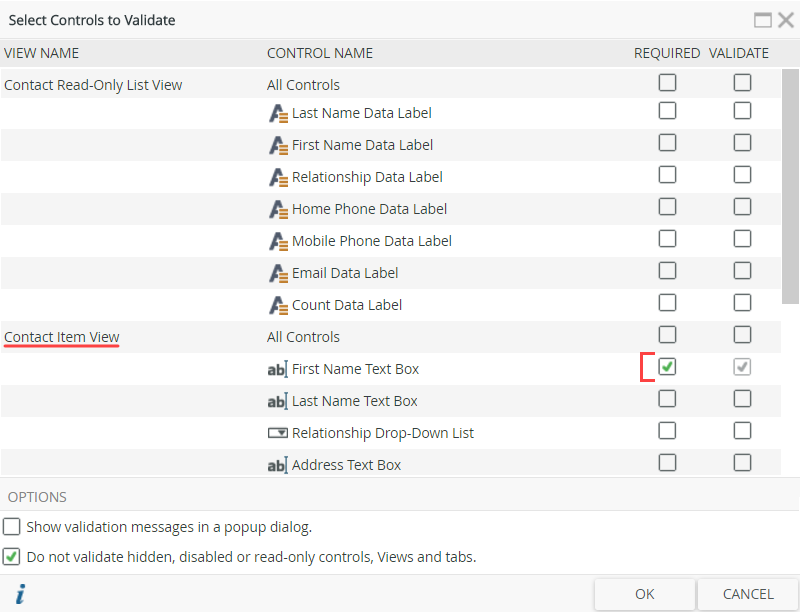
- On the Select Controls to Validate screen, CHECK the REQUIRED box for the First Name control on the Contact Item View. The First Name field will be validated and ensured it contains an entry before moving on to the next action. Click OK.Depending on your Nintex K2 version, your screen may display scroll bars. Use the scroll bars to navigate to the Contact Item View > First Name Text Box row.
- Next, you will set a condition. Conditions check to see if criteria are met. In this case, you will require that the first name field contains an entry. This will help to avoid saving empty records. Click the Conditions tab to make it active. You will add a form validation condition to ensure the first name field contains a value. Search for
-
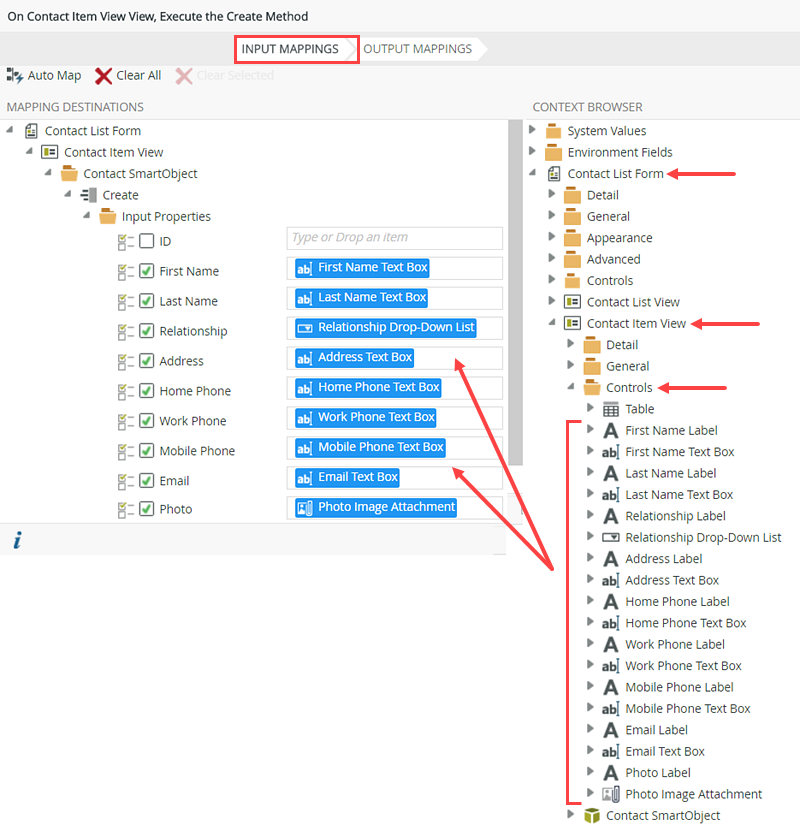
Next, you will save the header content. You will map the ID back to the SmartObject as a return property. You will use this ID to bind the "header" record to the "details" records in a later step. Execute a view method for the Contact Item View, Create method. Map the Contact Item View > Controls to their respective input properties. For the output properties, map the ID return property back to the Contact Item View > Contact SmartObject > ID property.
Continuing with the rule construction, you add an action to save the header content by executing a view method and creating a new SmartObject record with the content from the "header" item view. Then you will map the ID of the newly-created record back to the Contact SmartObject as a return property, which stores the ID of the record for later use. When you create the details records, you map this ID to a property in the details records. In this way, the "header" record is bound to each of the "details" records.
- Click the Actions tab to make it active. Click Execute a View method to add it to the rule definition pane. Click the select View link and select Contact Item View. The select method link becomes active. Click the select method link and select Create. Click (configure).
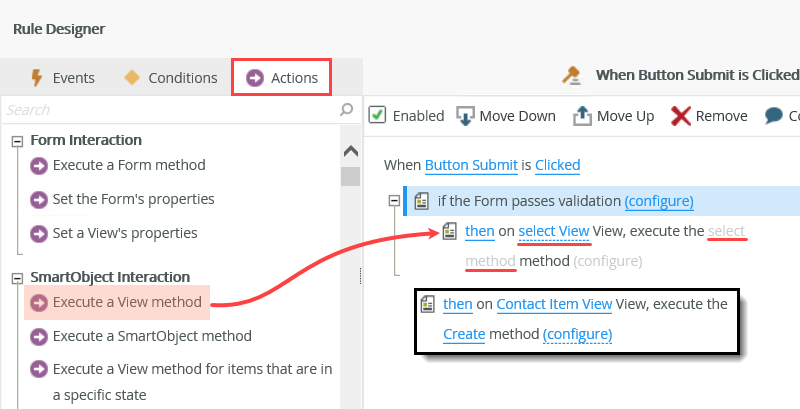
- On the INPUT MAPPINGS screen, expand the Contact List Form > Contact Item View > Controls nodes. Map the controls to their respective input properties. (The ID will be created, so leave that property empty.) Make sure you map the text box controls and not the label controls. Map the Relationship Drop-Down List and not the Relationship Label control. Map the Photo Image Attachment control and not the Photo Label control.
- Click OUTPUT MAPPINGS. Map the Return Properties > ID to the Contact List Form > Contact Item View > Contact SmartObject > ID property. Click FINISH.
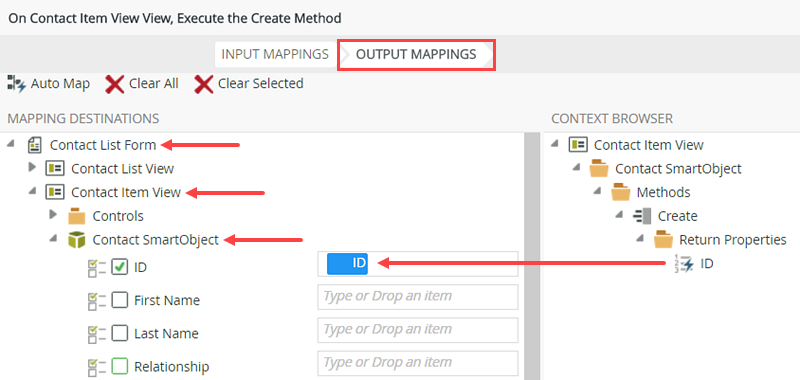
Next, you will map the record ID back to the SmartObject as a return property. The ID of the new "header" record that was just created will be temporarily stored. In a later step, you will use this ID in a common property that binds the header record to the details records.
- Click the Actions tab to make it active. Click Execute a View method to add it to the rule definition pane. Click the select View link and select Contact Item View. The select method link becomes active. Click the select method link and select Create. Click (configure).
-
Create the details records. Use the ID stored in the Contact SmartObject as the ContactID value for each detail record. Execute the Create method for items that have been Added on the Contact Notes and Attachments List View. For the input properties, map the Contact SmartObject > ID to the ContactID input property. Map the remaining input properties from the Contact Notes and Attachments SmartObject properties.
- Now you will create the details records. Remember this is the Notes and Attachments (list) view. A single record is created for each row that contains a note or file attachment.
Click Execute a View method for items that are in a specific state to add the action to the rule definition pane. Click select View and select Contact Notes and Attachments List View. Click select method and select Create. Click select item state and select Added. Click (configure).Use the Execute a View method for items that are in a specific state action to do something with a list of items. For example, you need to update items that are Changed, or create a list of items Added, or one of the other available states (Removed, Selected, Unchanged, Unselected). This action applies to a list of records. If you have items in multiple states, you can configure multiple actions.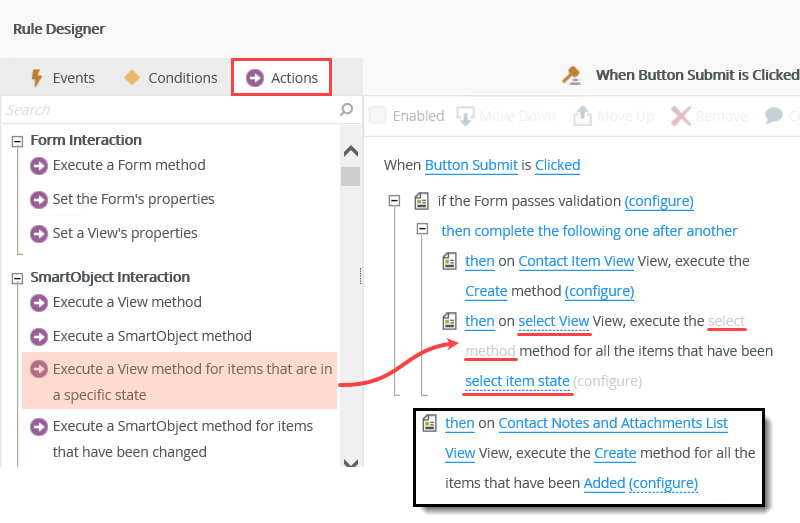
- On the INPUT MAPPINGS screen, map the Contact List Form > Contact Item View > Contact SmartObject > ID property to the ContactID input property. Collapse the item view node. The ID and ContactID are the common properties that bind the "header" record to its "details" records. There will always be one header record, but there can be many details records. This represents a one-to-many relationship in a parent/child record model.
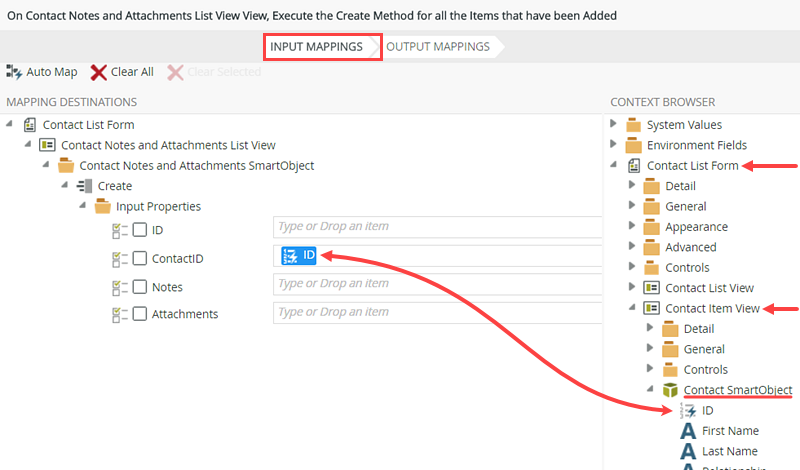
- Expand the Contact List Form > Contact Notes and Attachments List View > Contact Notes and Attachments SmartObject nodes. Map the ID, Notes and Attachments SmartObject properties to their respective input properties. Click FINISH.
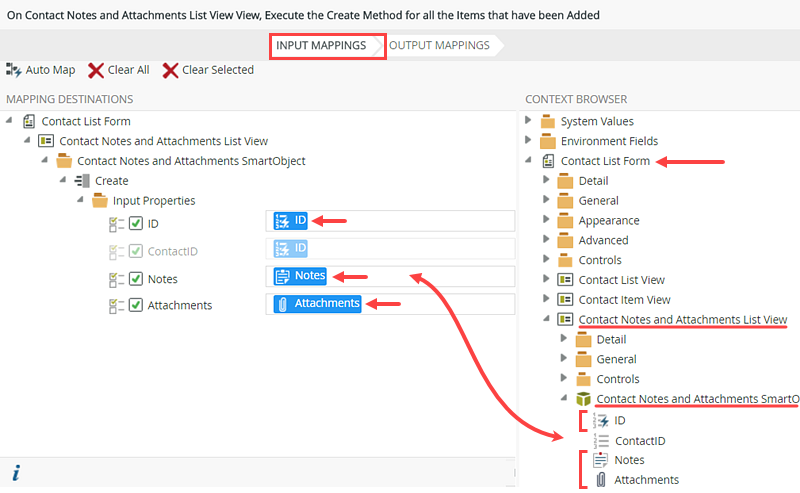
- Now you will create the details records. Remember this is the Notes and Attachments (list) view. A single record is created for each row that contains a note or file attachment.
-
Change the two create actions to run as a batch.
The header record is created, then details records before moving on to any other rule, condition or action.
Before you continue to the final steps in this topic, you will change the processing order so that the two create actions run as a batch action. This completes both create actions before moving on to any other rule, condition or action.
- Locate the first Create action (Contact Item View). Click then. When you see the processing options, select also.
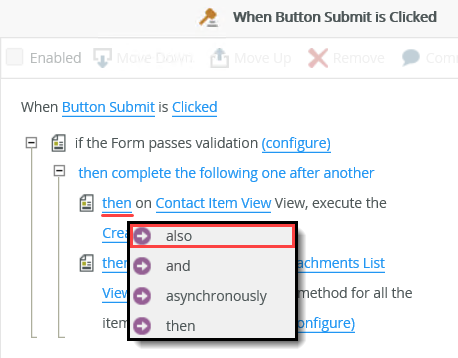
- Repeat this step for the second Create action (Contact Notes and Attachments List View). The two create record actions now run as a batch process.
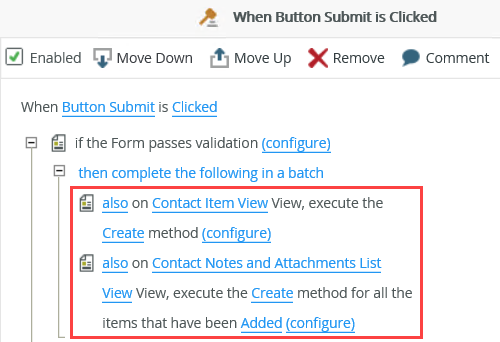
- Locate the first Create action (Contact Item View). Click then. When you see the processing options, select also.
- Add a message action so that you know the create actions are complete. Show a message following the form submit. Enter any content you like to indicate the create actions are complete.
- Let's add a message to tell the user that their save action was completed. On the Actions screen, search for and add the Show a message action to the rule definition pane. Click (configure).
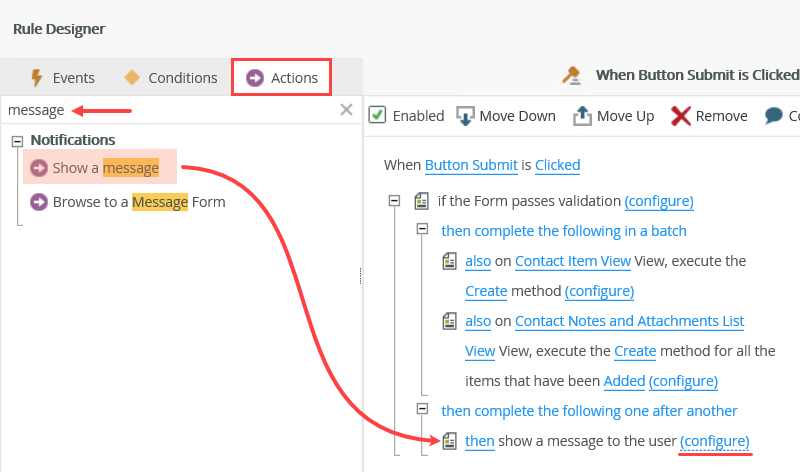
- Change the message size to Medium. For the Title, enter
Success!
then for the Heading, enter
Contact Added.
For the Body, enter
You have added a new contact: [FIRST NAME] [LAST NAME]
replacing the bracketed text with the First Name and Last Name properties from the Contact List Form > Contact Item View > Contact SmartObject. (At runtime, the SmartObject properties are replaced with the actual form field values.) Click OK.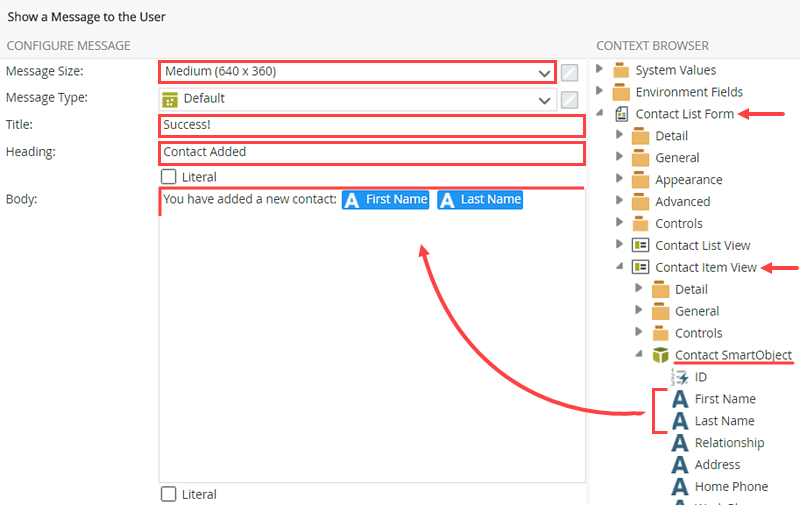
- Let's add a message to tell the user that their save action was completed. On the Actions screen, search for and add the Show a message action to the rule definition pane. Click (configure).
-
Now, we will add actions to navigate back to the contact form and update the list so that the new contact appears on the list. Add an action to navigate back to the Contact List Form and execute the Get List method.
- Last, you will add an action that returns you to the primary contact list, and updates the list with the new contact.
Confirm the Actions tab is active. Search for
navigate
then click the Navigate to another Form and execute a View method action to add it to the rule definition pane. Click the select Form link and select Contact List Form. Click the select View link, then navigate to and select Contact List View. Click the select method link and select Get List.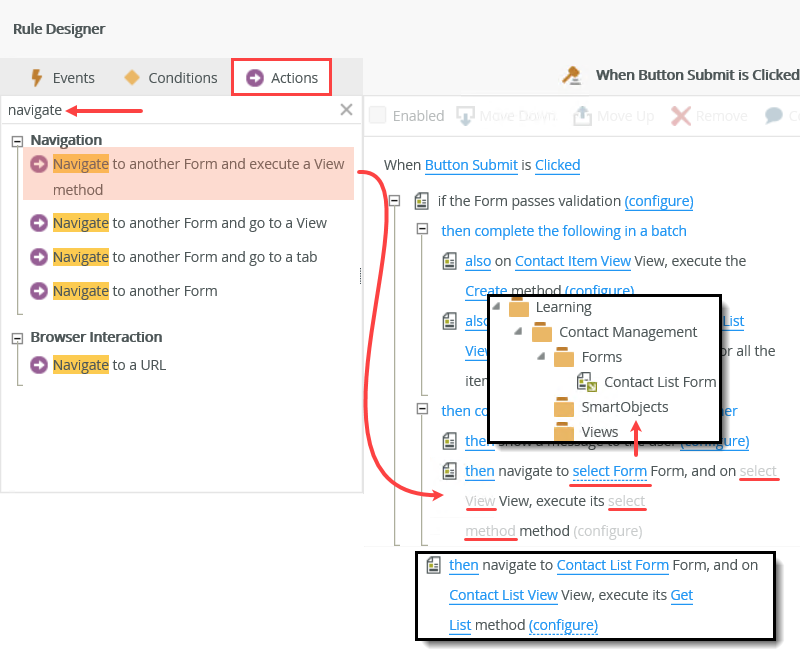
- Click OK to complete the actions for this rule. Click FINISH to save and exit the form.
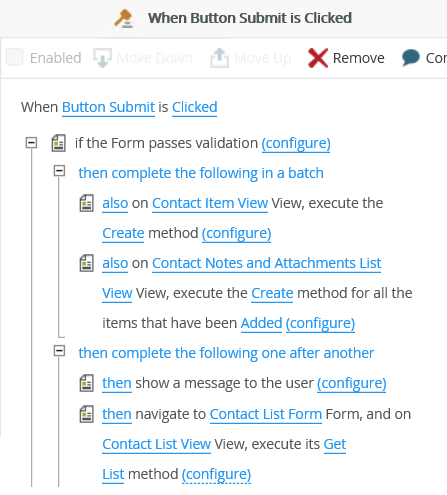
The completed Button Submit rule should look like the image below.
- Last, you will add an action that returns you to the primary contact list, and updates the list with the new contact.
Review
In this step, you added a tab to your form and configured it for creating new contact records. The first tab displays the original list of contacts using the Contact List Form with the Contact List View. The second tab contains an empty form for creating new contact records and contains the Contact Item View and Contact Notes and Attachments List View. You added and configured the Button Submit rule that saves the header record and details records, then shows a message to confirm the completed actions. Finally, you added an action to return to the first tab (Contact List Form) with the updated list. In the next step, you will create the contact details form that you use for editing or deleting existing contacts.