9. Create the Contact Details Form
In this step you will create the Contact Details Form which is used to display existing contact information, then add the Contact Item View and Contact Notes and Attachments List View. You will use this form to edit or delete existing contact records. You will add three button controls: Save, Delete, Cancel. The save rule will update the existing contact record with any changes to the header records and details records. The delete action will remove the header record and any associated details records. The cancel action returns you to the Contact List Form.
The "flow" from the contact management form is as follows:
- From the Contact List Form, the user clicks a row to open the details for that contact.
- When a row is clicked, a rule opens the Contact Details Form and passes the ID of the record that was clicked to the Contact Details view. The view loads the data for the selected contact record.
- You will add a new action to pass the ID (from the Contact Details view) to the ContactID property in the Notes and Attachments view (the view at the bottom of this form), to retrieve any existing notes and attachments for this contact.
-
Add a new form to the Forms category and name it Contact Details Form .
- Begin by adding a new form to the Forms category. Right-click the Forms category and select New Form. Name the form
Contact Details Form
then click CREATE.
- Begin by adding a new form to the Forms category. Right-click the Forms category and select New Form. Name the form
- Add the Contact Item View to the design canvas, then change the title to
Contact Details.
- Begin your form construction by adding the header view to the design canvas. Click the Views tab (in the upper left column of screen). Expand All Items, then navigate to the Contact Management > Views category. Drag the Contact Item View onto the design canvas. Change the title to
Contact Details.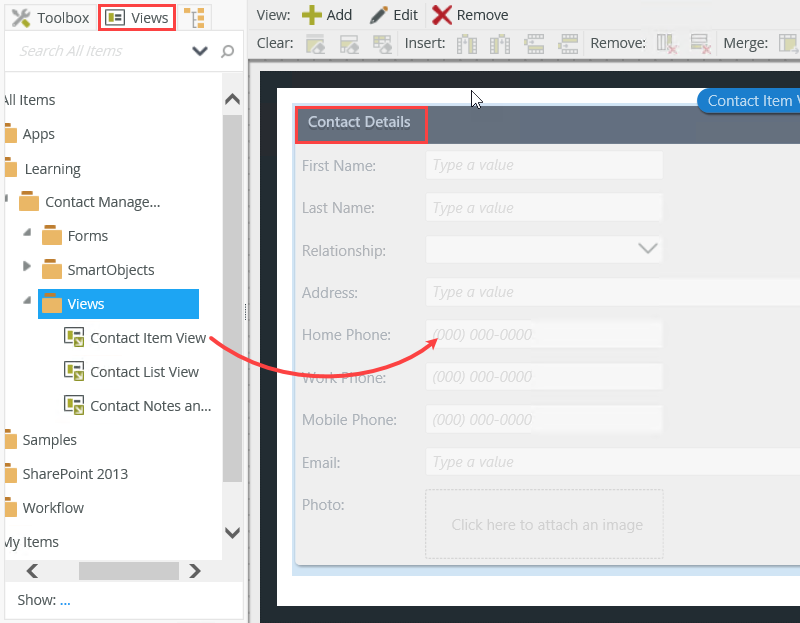
- Begin your form construction by adding the header view to the design canvas. Click the Views tab (in the upper left column of screen). Expand All Items, then navigate to the Contact Management > Views category. Drag the Contact Item View onto the design canvas. Change the title to
-
Add the Contact Notes and Attachments List View below the Contact Details view, then change the title to Notes and Attachments.
- Next, add the details view to the design canvas, below the header view. Add the Contact Notes and Attachments List View to the design canvas, below the item view. Change the title to
Notes and Attachments .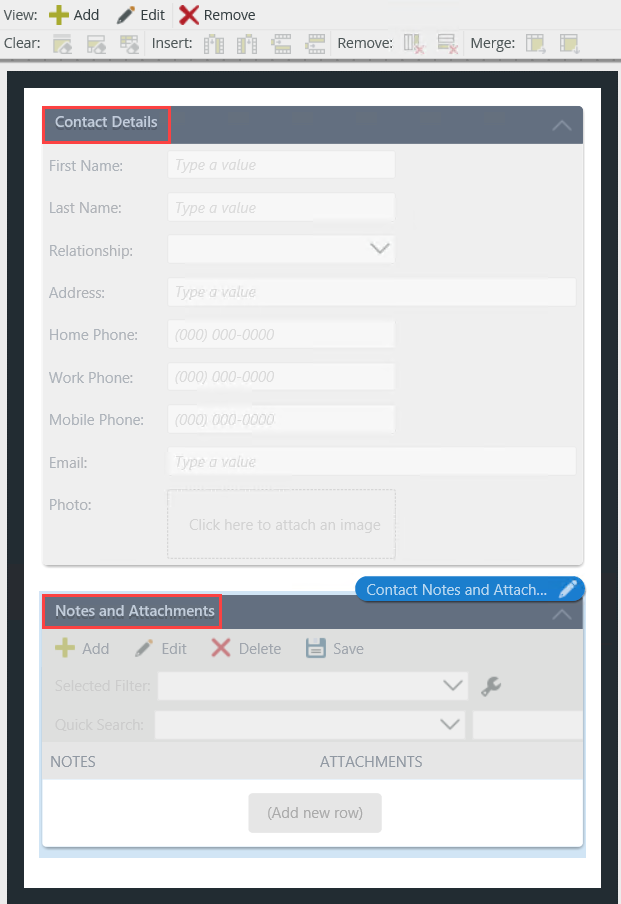
- Next, add the details view to the design canvas, below the header view. Add the Contact Notes and Attachments List View to the design canvas, below the item view. Change the title to
-
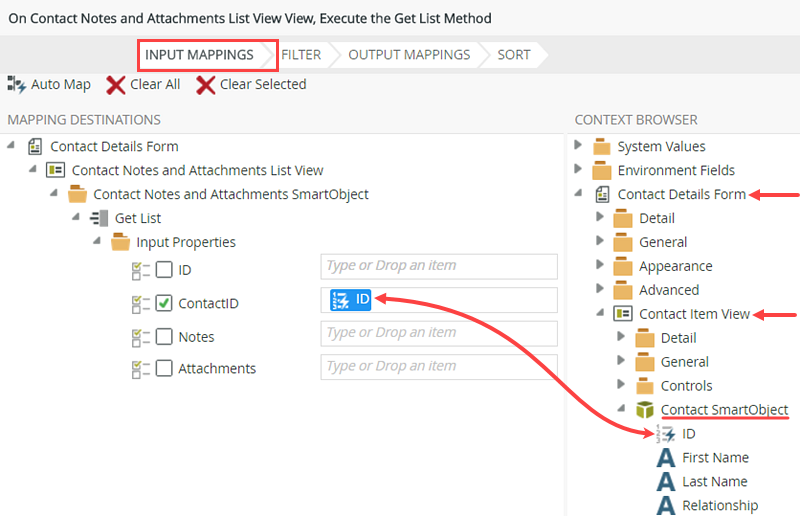
Next, you will edit the rule that fires when the Contact Notes and Attachments List View first loads, or initializes. You will add an action to retrieve the details records, based on the ContactID value. Edit the form initializing rule. Add an action to Execute a View method for the Contact Notes and Attachments List View with the Get List method. Map the Contact Item View > Contact SmartObject > ID
property to the ContactID input property.
This section may seem a bit tricky, but what you are doing here is configuring an action to retrieve the details records based on the Contact Notes and Attachments > ContactID. You will map the Contact SmartObject > ID property to the Contact Notes and Attachments SmartObject > ContactID property. But, you may be wondering where the form is getting the Contact SmartObject > ID property since you haven't configured any rules to load the item (header) view. You will configure that rule for the Contact List View in the next step!
- Begin by editing the rule that fires when the form loads, or initializes. Click the RULES tab at the top. Click to highlight the When the Form is Initializing rule, then click Edit Rule.

- Next, add the action that will retrieve the details records. Click Execute a View method to add it to the rule definition pane. For the view, select Contact Notes and Attachments List View. For the method, select Get List. Click (configure).
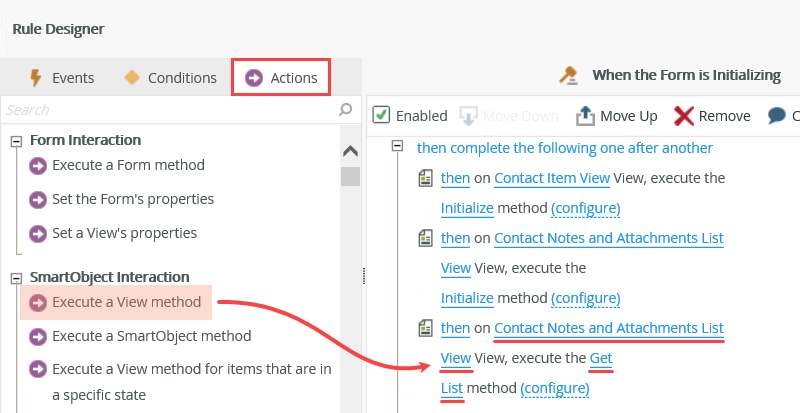
- Now, you are going to map the header record to the details records through a common property, (ID, ContactID). On the INPUT MAPPING screen, expand the Contact Details Form > Contact Item View > Contact SmartObject nodes. Map the ID property to the ContactID input property. Click FINISH. Click OK to exit the rule designer.
- Begin by editing the rule that fires when the form loads, or initializes. Click the RULES tab at the top. Click to highlight the When the Form is Initializing rule, then click Edit Rule.
-
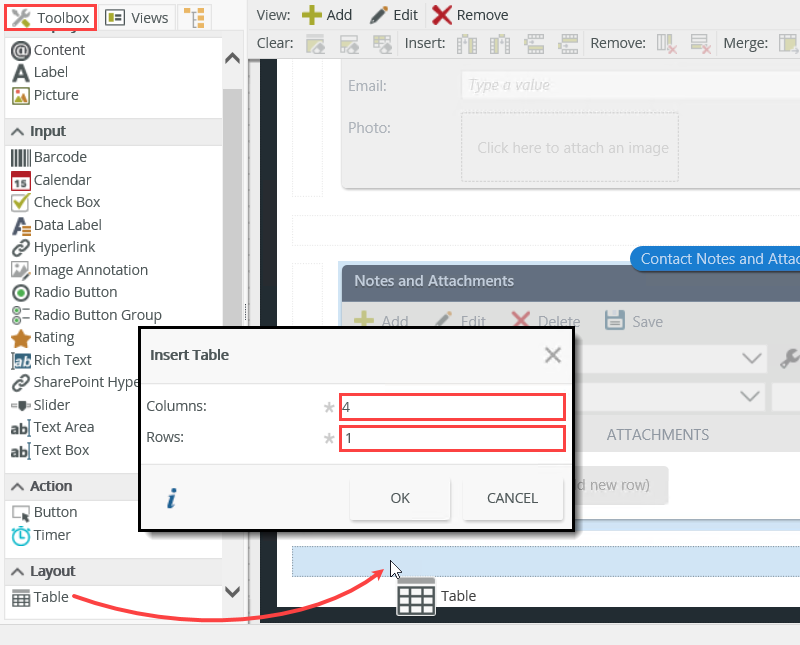
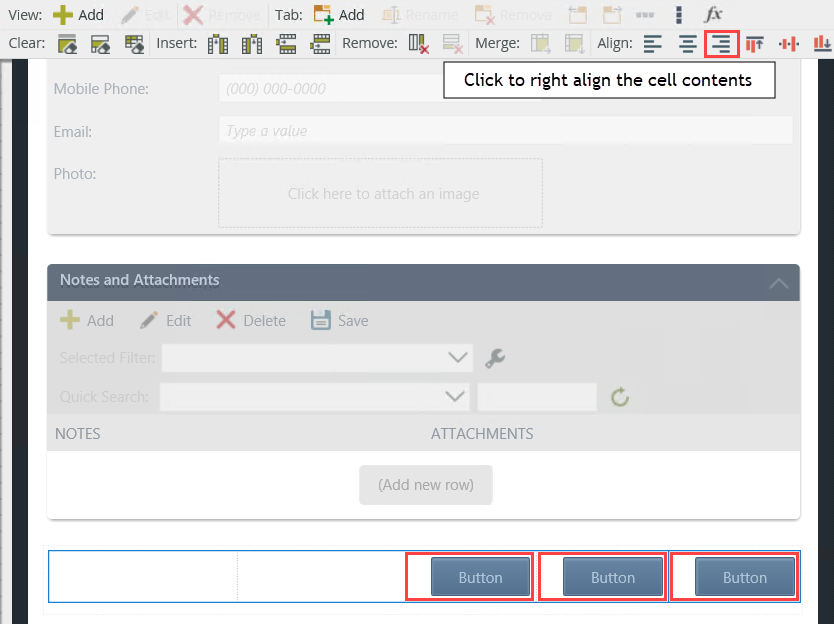
The next step is to add the three buttons for updating or deleting records, or canceling the edits (Save, Delete, Cancel). Add a layout table with four columns and one row. Add button controls to the second, third and fourth cells (three controls). Align the cells to the right. Adjust the column widths so the buttons are closer together.
This form has three buttons. In the next few steps, you will add a layout table, then add the three button controls:
- Save, updates the header and details records with any changes you made.
- Delete, deletes the selected header and details records.
- Cancel, gives you the option to just close the form and return to the Contact List Form without making any changes.
- Click the LAYOUT tab in the breadcrumb bar. From the Toolbox, drag a Layout > Table control onto the design canvas, just below the Notes and Attachments view. Configure the table for four columns and one row.
- Add Button controls to the second, third and fourth table cells. Right-align the cells. Adjust the column widths in the layout table so the buttons are closer to each other.
-
Next, you will set the naming properties for each button. Use the table below to set the button name and text properties:
Button Name Text First Button Button Save Save Second Button Button Delete Delete Third Button Button Cancel Cancel - Using the same process as you did with the Button Submit, give each button control a Name and Text value. Click to highlight the first button. In the Properties pane, Name the button
Button Save
then change the Text to
Save .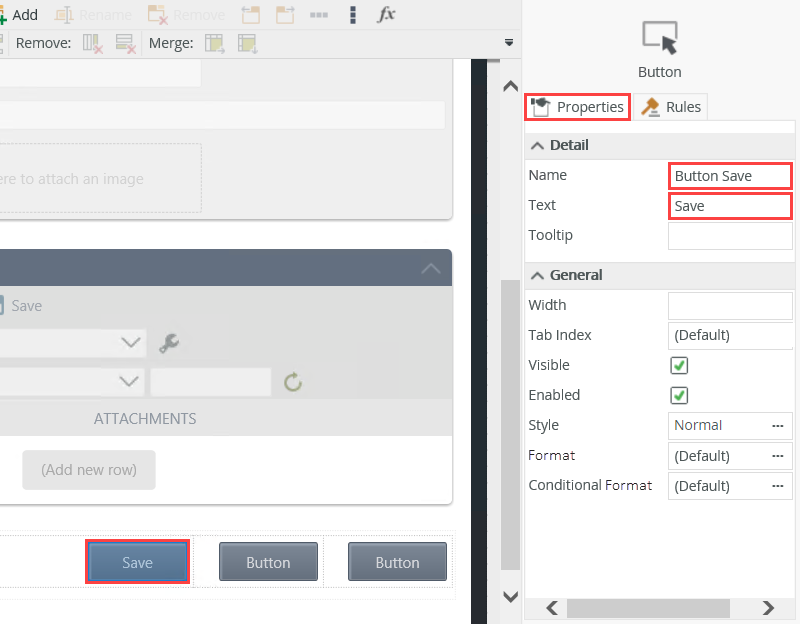
- Second button:
- Name: Button Delete
- Text: Delete
- Third button:
- Name: Button Cancel
- Text: Cancel

Repeat the step above for the second and third buttons as follows:
- Using the same process as you did with the Button Submit, give each button control a Name and Text value. Click to highlight the first button. In the Properties pane, Name the button
Review
In this step, you created the Contact Details Form that displays a selected contact record. This form contains the header (Contact Item View) and the details (Contact Notes and Attachments List View). You added a layout table and three buttons, then configured the name and text properties for the buttons. In the next step, you will add rules to the button controls to save, delete or cancel contact records.