6. Create the Contact Notes and Attachments List View
In this step you will create an editable list view from the Contact Notes and Attachments SmartObject. Remember, the Contact Notes and Attachments SmartObject stores the "details" content for a contact, such as notes and file attachments. One contact can have many notes and file attachments. Unlike the list view you created in the previous step, this list view will be editable, so that users can add, edit or remove rows as needed.
-
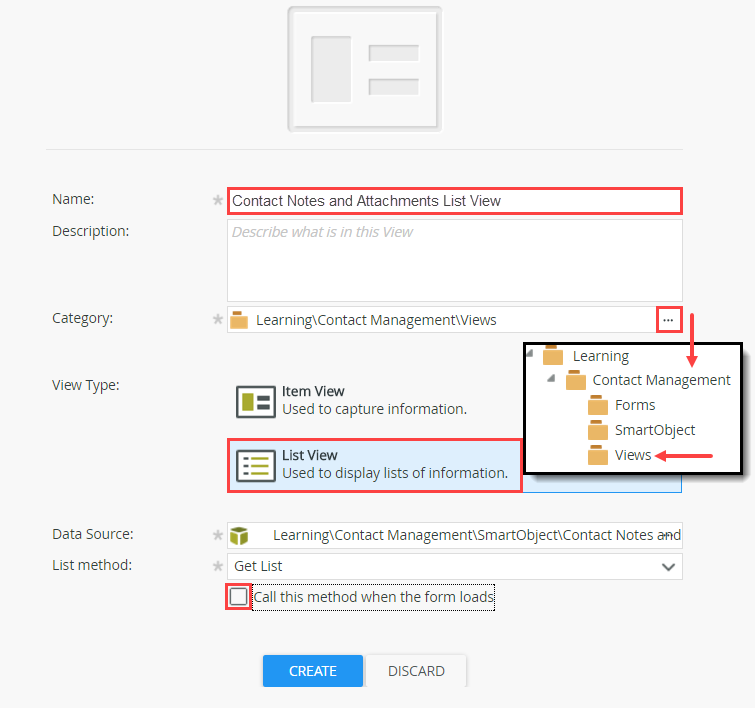
Design a list view from the Contact Notes and Attachments SmartObject. Name it Contact Notes and Attachments List View, then move the view to the Views category. UNCHECK the option to Call this method when the form loads. You do not want to retrieve any records when this view loads by default.
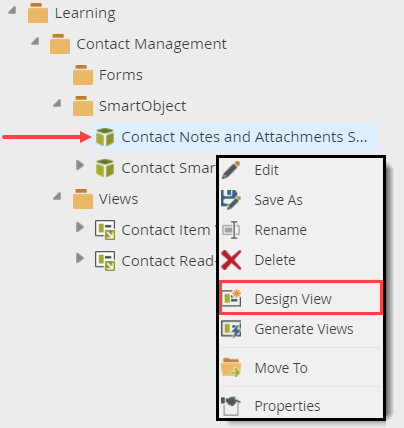
- In the explorer, right-click the Contact Notes and Attachments SmartObject, then select Design View.

- On the GENERAL settings screen, name the view
Contact Notes and Attachments List View
then change the category to Views. Change the View Type to List View. UNCHECK the option to Call this method when the form loads. By default, K2 retrieves all records from the SmartObject and populates the list. When you add a new contact, this list should be empty to start with. If you are editing an existing contact, you will configure this list to retrieve the correct details records. So, for now, you want the view to load empty by default. Click CREATE.
- In the explorer, right-click the Contact Notes and Attachments SmartObject, then select Design View.
-
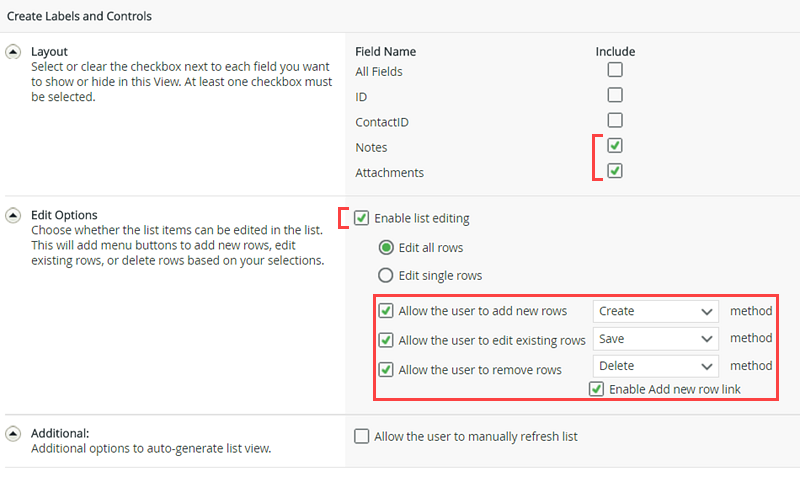
Select Create Labels and Controls. For the fields, select Notes and Attachments. Enable list editing with the Create, Save and Delete methods.
- Once again, select to let the layout table be created for you. Click the Create Labels and Controls link.
- On the Create Labels and Controls screen, select the following fields: Notes, Attachments. Check the option to Enable list editing. Select the Create, Save and Delete methods. The list is now editable; Create, Save and Delete buttons are added to the list and the rules are configured behind the buttons to perform their functions. Click OK.

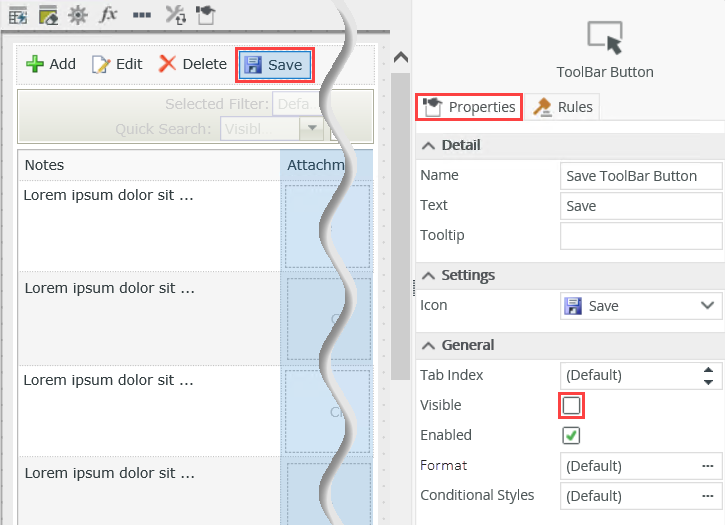
- Hide the toolbar Save button. In a later step, you will add a button control and configure a rule that first saves the header view content, then saves the details view content, therefore the default Save button is not needed.
Ultimately, you want to save the header content first (name, email, etc.) before saving the notes and attachments. After the header record is created, you will pass the record ID back to the Contact SmartObject, then map it to the notes and attachments records. In this way, the notes and attachments "details" records are "bound" to their "header" record, creating the parent/child record model. Since you will configure another button to save the records, you don't need the default Save button that is added for you.
- Click to highlight the Save button. In the Properties pane under the General heading, UNCHECK the Visible setting. The Save button will no longer appear on the view. There is also a dashed border around the control. This tells you the control is not visible.

- Click FINISH to save and exit the view.
- Click to highlight the Save button. In the Properties pane under the General heading, UNCHECK the Visible setting. The Save button will no longer appear on the view. There is also a dashed border around the control. This tells you the control is not visible.
Review
In this step, you designed an editable list view from the Contact Notes and Attachments SmartObject. From this view, you can add multiple notes and files for a single contact record. You hid the Save button because you will add another button in a later step, then configure rule that first saves the header content (name, email, etc.), which saves the details content (notes, attachments) as a batch action. In the next step, you will create the Contact List Form, which is the main point of entry for managing your contacts.