K2 Workflow Designer - Design Workflow Wizard Navigation
When selecting Design Workflow, the Workflow Settings wizard opens. The wizard is context sensitive and will display differently depending on the settings already known by the system. After configuring the wizard, the design canvas is displayed with the information contained in the first step of the workflow. The wizard can be opened for editing or later configuration by double clicking the start event icon
 . Once the workflow is created, saved or deployed it displays under Personal Workflows.
The wizard contains the following steps:
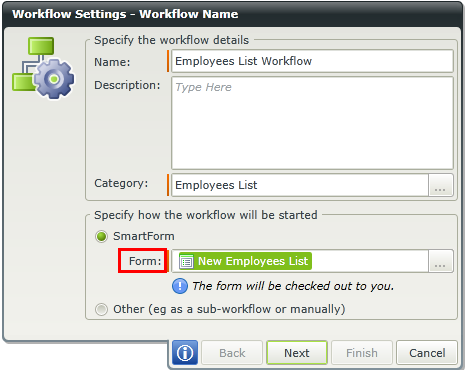
Specify a name, description and how the workflow is started. You can create a workflow without integrating a form by selecting the other (eg as a sub-workflow or manually) option as shown in the image below. This is useful when the workflow is a sub-workflow of a parent workflow and does not require a form, or when you manually design a workflow without a form. This option allows you to create a workflow without integrating a form first. The form can be added at a later stage if required. When integrating a form at a later stage, you have to configure the rules of the start event manually in the form.
| Feature | What it is | How to use it |
|---|---|---|
| Name | The name of the workflow. The red line at the beginning of the text box indicates that the name text box is mandatory | Type a name for the new workflow in the Name text box |
| Description | The description of the workflow | Type a brief description for the new workflow |
| Category | The category text box is automatically populated with the category where the form resides. This can be edited to another user specified category | Type another category. This is a required field |
| Specify how the workflow will be started | The form used to design the workflow will be listed here. Select another form if required to start the workflow with. Select other when the workflow is a sub-workflow of a parent workflow and does not require a form, or when you manually design a workflow without a form. | Select the option. This is a required field |
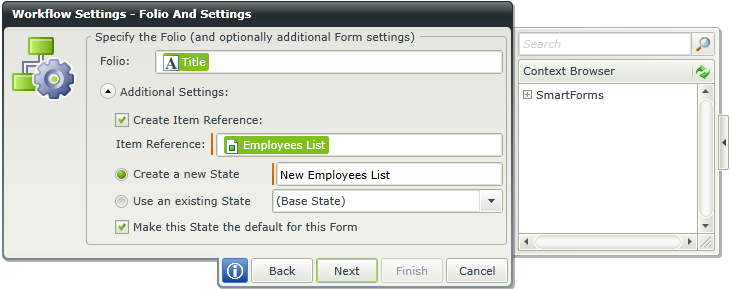
To see more configurable options relating to the form , click the drop-down arrow next to Additional Settings. If a SmartObject is linked to the form through a bound view, an item reference is created for the SmartObject by default. The page displays the following:
| Feature | What it is | How to use it |
|---|---|---|
| Folio | Add static or dynamic information that is used to uniquely identify the running instances of the workflow | Type text or drag and drop a field from the Context Browser |
| Create Item Reference | The Item Reference feature automatically binds the SmartObject data used in a form to the workflow making it easier and quicker to design a workflow. This eliminates the need to manually configure certain rules such as the rule to return data on a form at approval and the need to define each data field. The item reference replaces the Identity Field/Data field configuration as it has expanded upon the previous functionality. | Select the option if a SmartObject should be used to create an item reference |
| Item Reference | The SmartObject used to create the item reference. The default SmartObject that is bound to the form is used by default. If the field is blank, there are more than one view linked to the form and the specific SmartObject to be used to create the item reference should be selected from the Context Browser | Select the SmartObject from the Context Browser if the field is blank or another SmartObject is required. An item reference is created using the SmartObject selected |
| Create a New State |
Creates a new state. For more information on form states, see the following topics: |
Select the option and specify a name for the state |
| Use an existing State | Uses an existing state. The default is Base State . For more information on form states, see the following topics: | Select the option and then required state from the drop down |
| Make this State the default for this Form | Makes the selected state the default for the form. For more information on form states, see the following topics: | Select the option if required |
Existing data fields display and new data fields can be created. Data fields are another form of data that can be used in workflows to view, store or update information. Drag data fields from the Context Browser to the form fields and controls list to bind them together. Fields such as pre-configured data fields, item references or SmartObject Load method property. Note that when a SmartObject Load method property is used, an input property is required for the correct information to load. When the form loads, those data fields are used to populate values in the form.
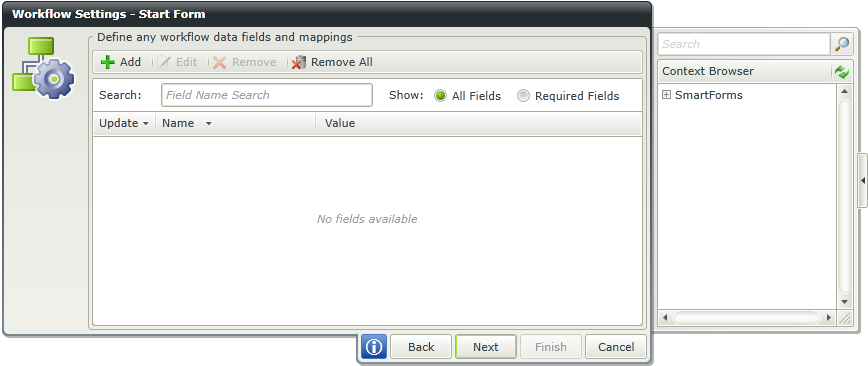
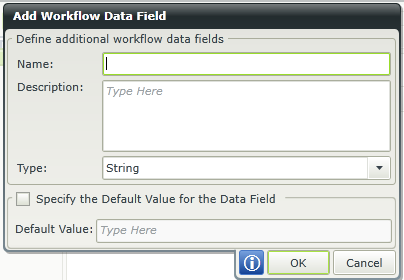
Click Addto open the Add Workflow Data Field screen. Configure the workflow data field on this screen.
| Feature | What it is | How to use it |
|---|---|---|
| Name | Use the name to identify the data field for future use | Type a name in the text box |
| Description | Use the description to identify and describe the data field for future use | Type a description in the text box |
| Type |
The following types are available:
|
Select the type from the drop down list |
| Specify the Default Value for the Data Field | Select this option if a specific default value must be specified | Select the check box |
| Default Value | Specifies a custom default value | Type a value in the text box |
Select the rule to start the workflow from the drop-down list. Rule Actions can also be enabled or disabled here.
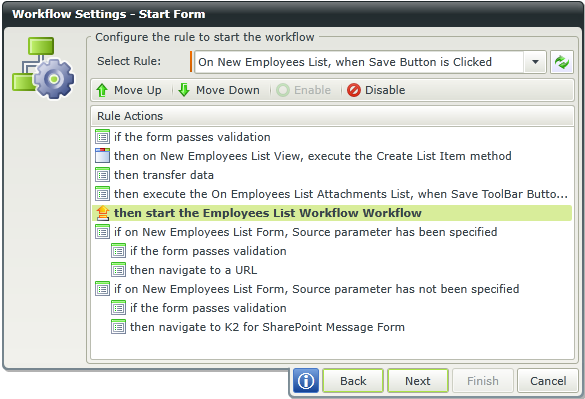
The default outcome is displayed which is a single outcome.
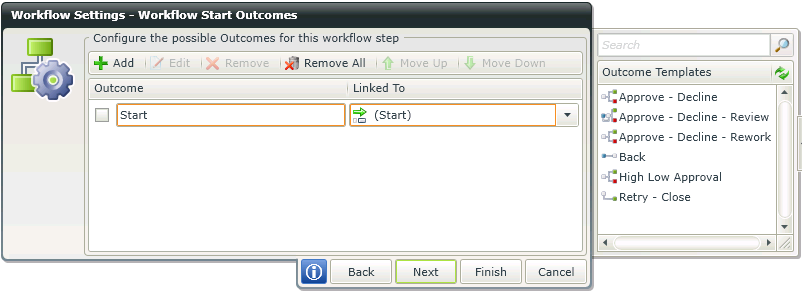
- Click on Add to add a new workflow start outcome or drag a template from Outcome Templates, These outcomes will all be new workflow steps as they are created from the Start Workflow step.
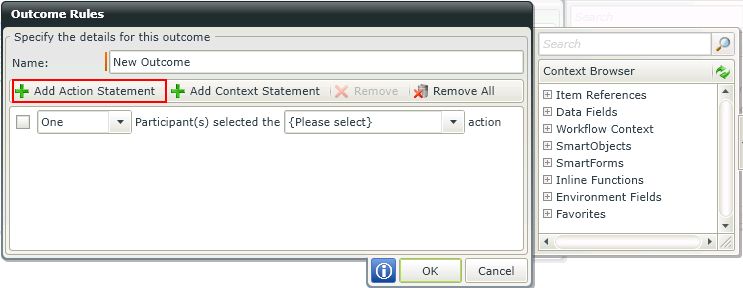
- To add rules to the outcome, select the outcome and click Edit. An action statement can be added by clicking Add Action Statement. Click on the drop-downs to configure the statement.
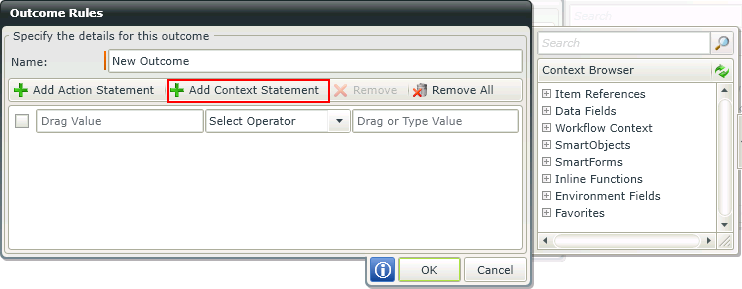
- To add context statements, click on the outcome and click Add Context Statement. Type a value or drag a pre-configured field from the Context Browser such as a Data Field, Item Reference or SmartObject Load method property. Note that when a SmartObject Load method property is used, an input property is required for the correct information to load.
Click OK after adding Action or Context Statements.
The default assigned rights display. Use the User/Group browser to add more users or groups and assign rights.
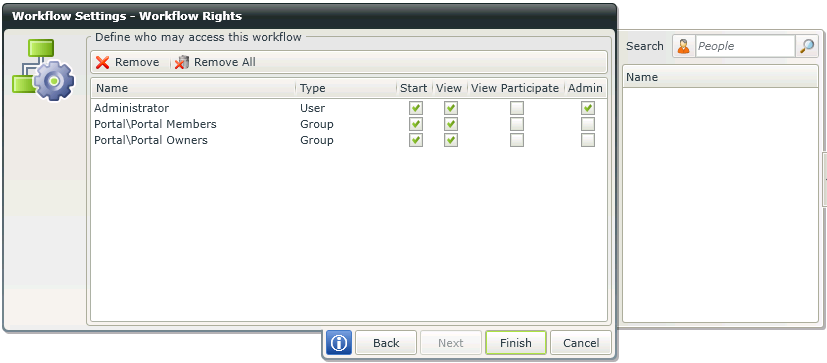
After adding a user or group, assign one or more of the following rights:
- Start: User will be able to start this specific workflow
- View: User will be able to view statistics for all instances of this specific workflow when running reports against the workflow
- View Participate: User will be able to view reporting statistics for only the instances of this workflow where they actually participated in the workflow (e.g. starting the workflow or completing a task in the workflow)
- Admin: User will have Administrator rights to this specific workflow and can Start, View or Manage the workflow
- Remove: Select a User or Group and click Remove to remove only that user or group
- Remove All: Removes all the Users and Groups
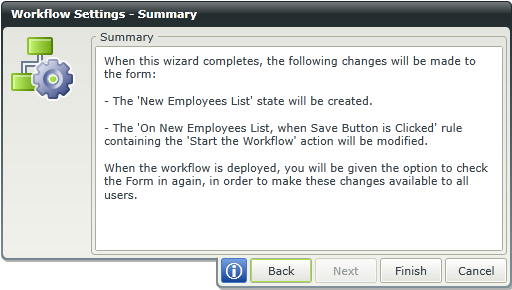
When creating a new workflow, the following page is available listing all changes made to the form that are automatically updated once you complete the wizard. This page does not display when editing the start event.
How to use workflow properties as output mappings
Changes to the wizard-based integration between Workflows and SmartForms