How To: Use a Loop Step with a Loop Index
This article illustrates how you build a workflow to loop through a list of items using a loop index. Use the loop index for the following scenario:
- Prior to the loop step, you have created a reference to your data source
- Your list does not have a key value (otherwise known as a primary key)
Using the loop index in a workflow
Scenario
You work in Sales where you maintain a list of customers. Each month, you email your customers with the latest deals. To accomplish this, you have configured a workflow that sends an email to each customer in your list. You start the workflow manually when you need to. Your customer list resides in a data source list that does not have a primary key.
Steps
Begin by creating a list of customers in a data source that does not have a primary key. This demonstration uses a table in a SQL database. If necessary, create a service instance pointing to the data source, then generate SmartObjects. The first step in your workflow establishes a reference to the SmartObject containing the list of customers. The second step performs the looping action and uses a loop index to determine the number of list items to loop through. In the loop, you send an email to each customer. When the looping completes, you send a final email to yourself to confirm the workflow completed.
Setup Steps
The following steps set up the scenario from start to finish. If you want to skip the setup steps and view the topic step, go to Add and Configure Workflow Steps to Loop Through List Items.
- Create a table in a SQL Server database called ContactDetails with the following columns: ID, Name, Company, Email. Do not create a primary key. Add at least three customers to the table. From the K2 Management site, create an instance of the SQL Server service type that points to the SQL database. Generate SmartObjects.
Instructions for creating a table in SQL is beyond the scope of this article. If you need help, contact your database administrator.
- In a SQL Server database, create a table called
ContactDetails
with the columns shown below. Do not create a primary key.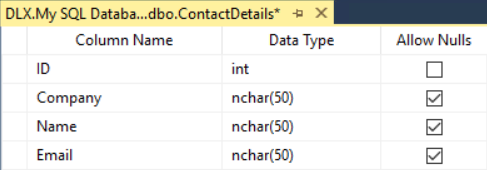
- Add at least three customers.
For ease in testing, use the same email address for each customer.

- Launch the K2 Management site in a new browser tab.If you do not know how to access the K2 Management site, see Accessing K2 Sites.
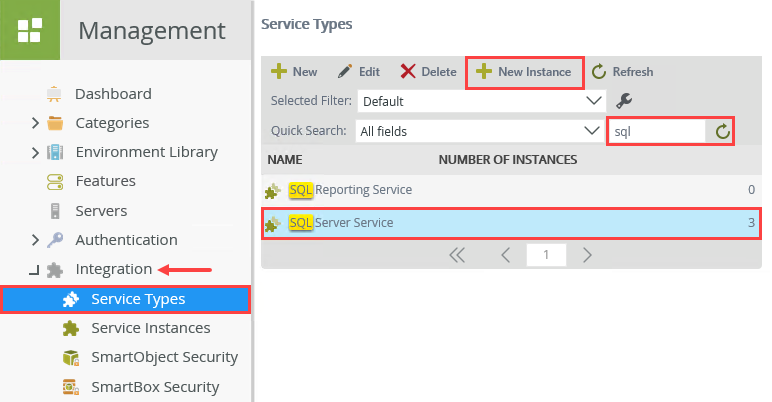
- Expand the Integration node and click Service Types. A list of available service types appears in the central pane. Locate the SQL Server Service type by scrolling through the pages or using the search feature. Select SQL Server Service and click the New Instance button.
- Under the Service Instance heading, enter
My SQL Database
(or any other descriptive name) for the Display Name. For the Description, enter
Sample service instance for demonstrations.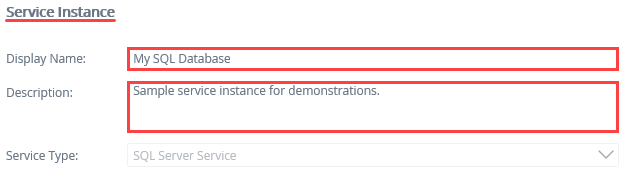
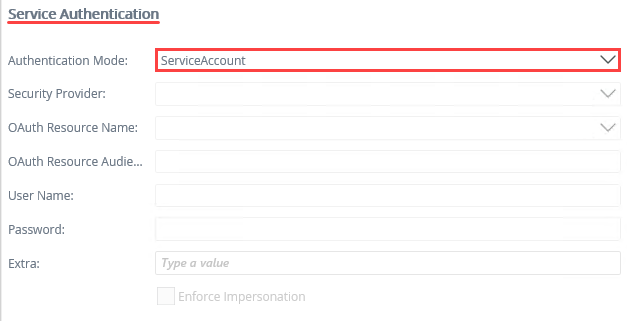
- Under the Service Authentication heading, change the Authentication Mode to Service Account.
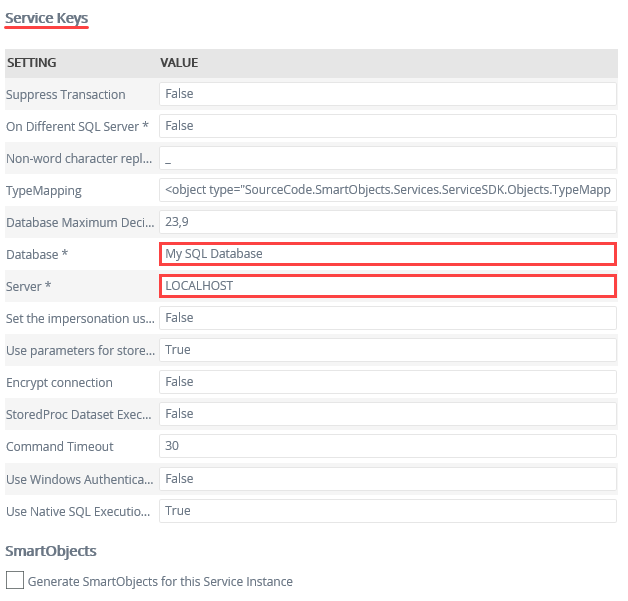
- Under the Service Keys heading, enter the Database name. If your SQL Server is located on a different machine, enter the Server name and change On Different SQL server to true. Click OK. Click OK for the service instance confirmation dialog.
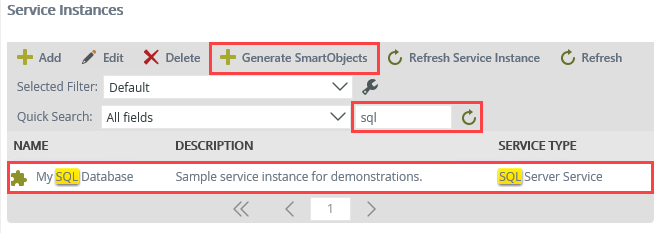
- Still in the Integration category, click Service Instances. Navigate to the My SQL Database service instance and select it. Click the Generate SmartObjects button.
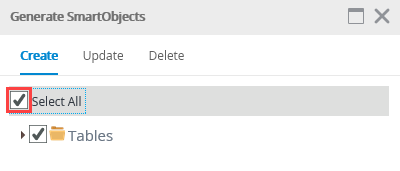
- On the Generate SmartObjects screen, click Select All, then click OK.
- Expand the Categories > SQL Server Service > Tables nodes. Select the [dbo].[ContactDetails] SmartObject. In the central pane, locate the Methods section. Select the List method and click Execute.
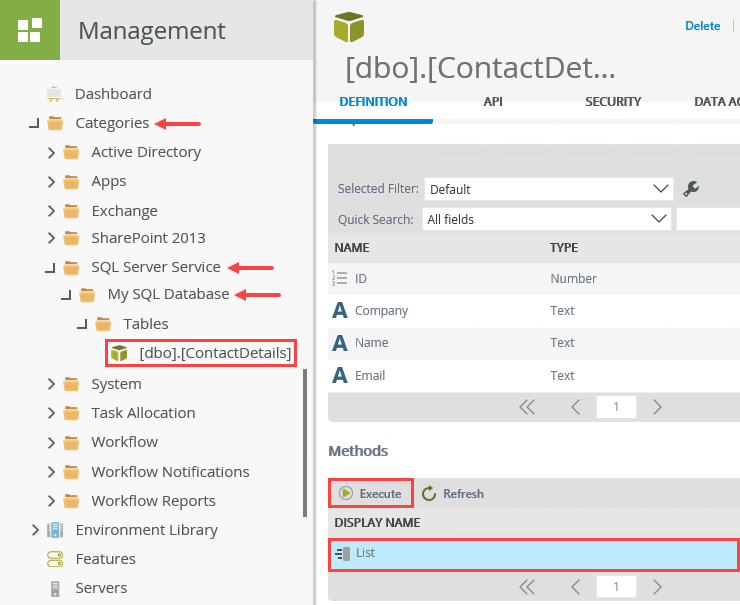
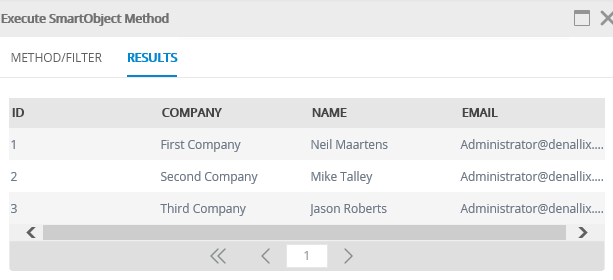
- You want to return all records, so click Execute (without entering any filters). You see a list of customers from your SQL database. Click Done to exit the results window.
Now that you have a data source, you can register it with K2. You do this by creating an instance of the SQL Server service type that points to your SQL Server database. Then you generate a SmartObject based on the ContactDetails table. The SmartObject allows you to use the table's properties and methods in other K2 elements, namely a workflow. Remember, properties are like the columns in a table (such Name, Company, Email) and methods allow you to interact with the data (such as Create, Delete, List).
Point this instance to the SQL database containing the ContactDetails table.
Your settings may not match the following steps depending on your environment, the location of the SQL Server table, and naming conventions. The settings below are based on a K2-provided VM where the SQL Server is running on the same machine as the K2 server. In this demonstration, the database name is My SQL Database and the table name is ContactDetails. If you need assistance with your settings, contact your K2 or database administrator.Finally, you create a SmartObject from the service instance. This exposes the data source properties and methods and allows you to use them in other K2 elements, such as a workflow.
Before moving on, test your SmartObject and confirm it returns customer data.
You now have a SmartObject that points to a data source that does not have a primary key. In the next sections, you build a workflow and configure it to use a loop index to loop through your customers.
- In a SQL Server database, create a table called
- From K2 Designer, create a new workflow called Email Customers. (Optional) Create categories first to keep your work organized.
- Launch K2 Designer.If you do not know how to access K2 Designer, see Accessing K2 Sites.
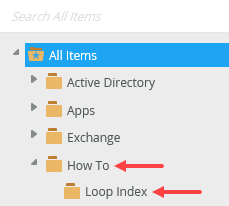
- Create categories to keep your work organized. Right-click All Items and select New Category. Use the image below as a guide if necessary.
- Next, create a workflow. Right-click the Loop Index category and select New Workflow.
- Name the workflow
Email Customers
and click Create.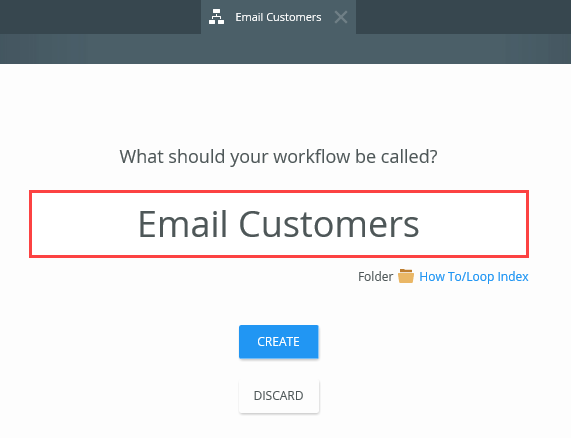
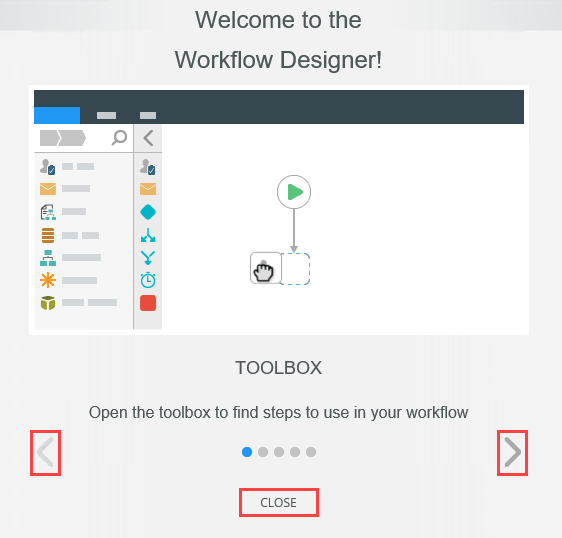
You see a Welcome screen with an interactive panel. You can click the right and left arrows to learn more about the workflow designer. Click Close to proceed to the design canvas.
- Launch K2 Designer.
Add and Configure Workflow Steps to Loop Through List Items
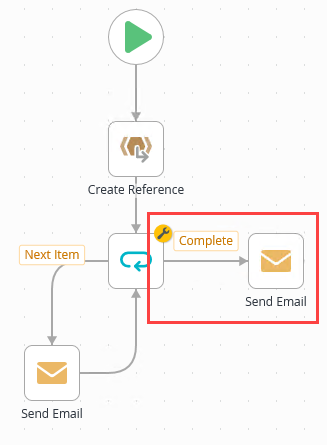
In the next few steps, you create a reference to the list, then add the looping step and its action (sending an email to each customer). The loop step uses a loop index that accommodates a data source that does not have a primary key.
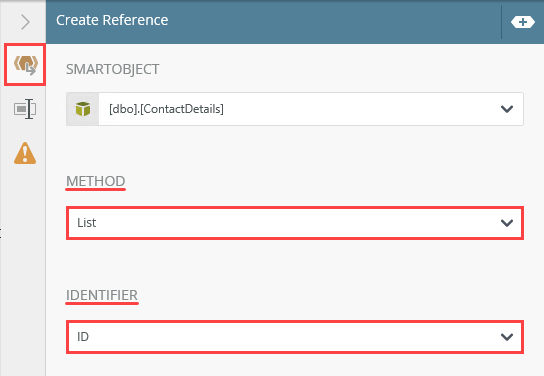
- Add a Create Reference step. Select the [dbo].[ContactDetails] SmartObject and the List method. Select ID for the Identifier. Create Output Mappings, keeping the default name for the reference.
Begin the workflow by creating a reference to the [dbo].[ContactDetails] SmartObject. (Remember, the SmartObject is bound to the SQL Server table containing your customers.) A reference is a pointer to a list, list item, table, or some other object. For example, you create a reference to a list of items in a table so that you can loop through those items in a workflow.
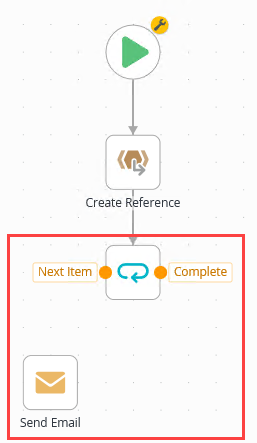
- From the Toolbox > Basic menu, drag a Create Reference step into the empty placeholder below the Start step.
 Notice the red warning badge on the Create Reference step. This badge indicates there are required settings in the Configuration Panel. When you expand the panel, you see the same badge next to the required settings.
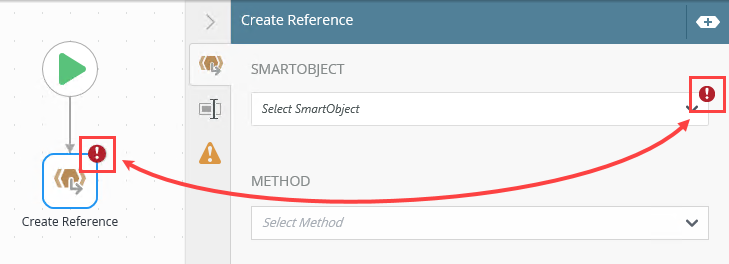
- Select the Create Reference step and expand the Configuration Panel.The Configuration Panel allows you to configure and customize the steps you add to your workflow.

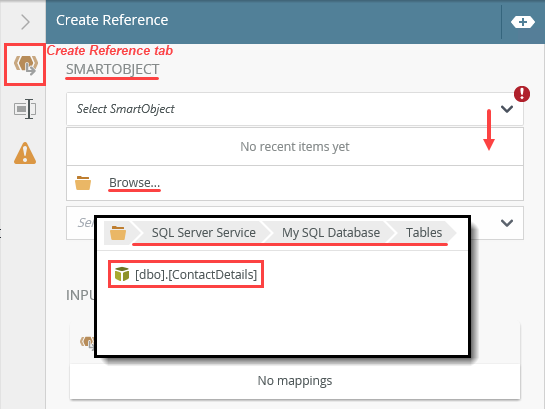
- Select the Create Reference tab if it is not already active. Under the SmartObject heading, click the Select SmartObject bar. Click Browse. Navigate to the [dbo].[ContactDetails] SmartObject. Your path may be different than the image below depending on your environment and your SQL database and table names. Click OK.
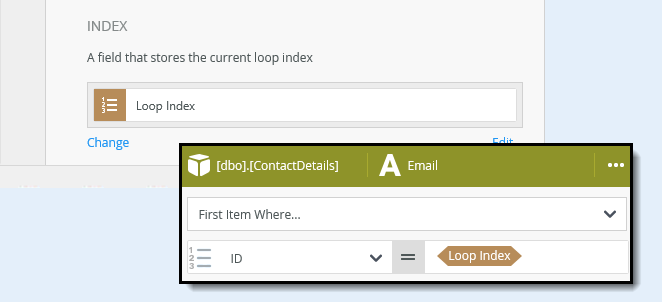
- Under the Method heading, click the Select Method bar and choose List. The Identifier section appears. Select ID as K2 requires a value to continue. However, because this data source does not have a primary key, K2 does not recognize the ID as a unique identifier. You address this by using a loop index that creates a unique identifier for each item found in the data source.
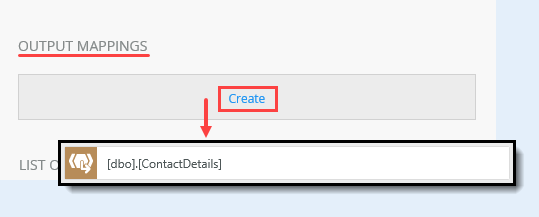
- Scroll down and locate the Output Mappings heading. Click Create. K2 creates a reference to the table needed in the loop step.
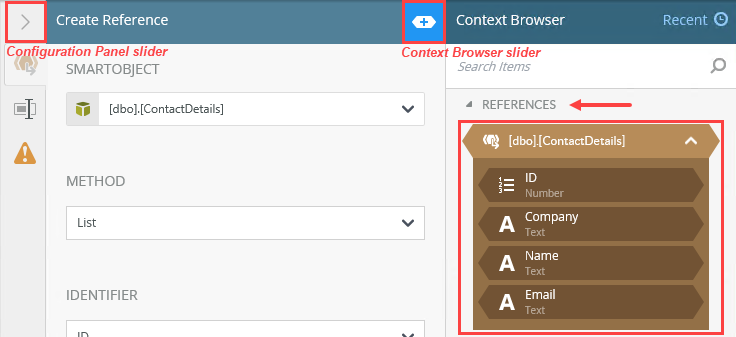
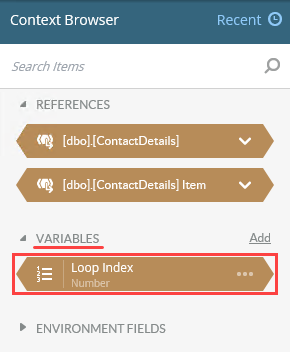
- Expand the Context Browser. (The image below shows two references: [dbo].[ContactDetails] and [dbo].[ContactDetails] Item. You may not see the item reference just yet.)The Context Browser contains references, variables, functions, and SmartObject properties. At runtime, K2 replaces references and variables with live data. For example, K2 replaces the ID reference with the ID of the current record.
Expand the [dbo].[ContactDetails] reference. Notice the properties match your SQL table. Collapse the Context Browser by clicking its slider. Collapse the Configuration Panel by clicking its slider.
- From the Toolbox > Basic menu, drag a Create Reference step into the empty placeholder below the Start step.
- Add a Loop step. Connect it to the Create Reference step. Select [dbo].[ContactDetails] for the List value. Create the Loop Index.
Next, you add a Loop step and configure it so that it points to the [dbo].[ContactDetails] reference. You configure a loop index so that K2 identifies each customer record uniquely.
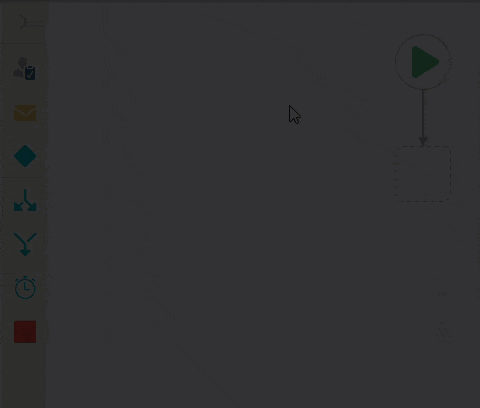
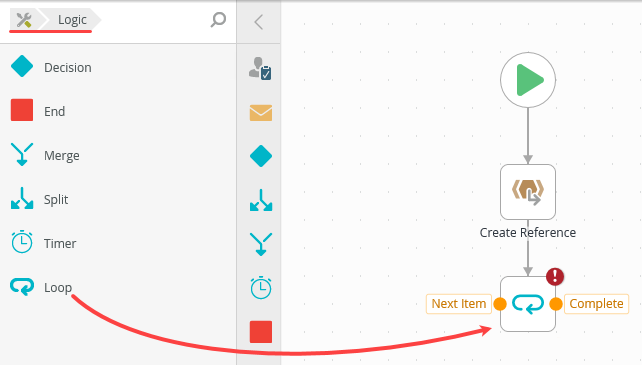
- From the Toolbox > Logic node, drag a Loop step below the Create Reference step. Connect the two steps.To return to the Toolbox main menu, click the Toolbox icon.
 To connect steps, hover over the first step until you see a handle appear. Click and drag the handle into the second step. Click the design canvas to set the line.
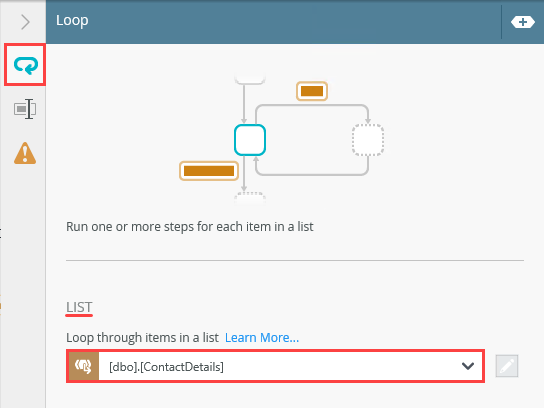
- Select the Loop step and expand the Configuration Panel. Select the Loop tab if it is not already active. Under the List heading, click the Select Reference bar. Select [dbo].[ContactDetails].
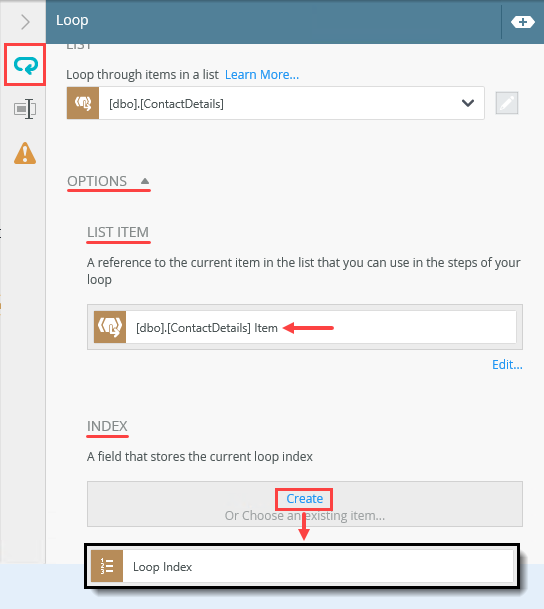
- Expand the Options section. Notice the new reference, [dbo].[ContactDetails] Item. This reference points to the current record (in the looping process) and makes it possible to use properties from this record in other steps. For example, you use the email property in the Send Email configuration later on. You still need to identify the record. Locate the Index heading and click Create. K2 creates a variable called Loop Index. K2 uses this variable to keep track of the current record in the looping process.
- Expand the Context Browser. Notice the Loop Index variable. Collapse the Configuration Panel.
- From the Toolbox > Logic node, drag a Loop step below the Create Reference step. Connect the two steps.
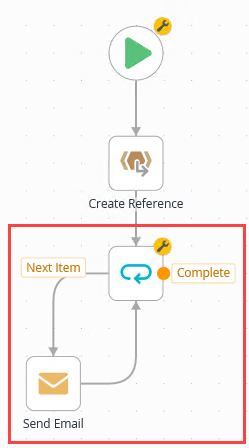
- Add a Send Email step and connect it to the Next Item outcome. Use the Context Browser > SmartObjects > [dbo].[ContactDetails] > Email property for the To value. Map the Loop Index variable to the ID SmartField property. Add your own content for the subject line and message body. Use properties from the reference to personalize your message if you like. Connect the Email step to the Loop step.
Now you need a step that performs an action of some kind. For this demonstration, you send an email to each customer in the list.
- From the Toolbox > Basic node, drag a Send Email step onto the canvas.
- The Loop step generates two outcomes: Next Item and Complete. The workflow loops through steps connected to the Next Item outcome until it reaches the end of the referenced list. At that point, it follows the Complete outcome. Connect the Next Item outcome to the Send Email step. Connect the Send Email step back to the Loop step.
- Select the Send Email step and expand the Configuration Panel. Select the Send Email tab if it is not already active. Expand the Context Browser. In the lower right corner of your screen, click the SmartObjects tab. Navigate to the [dbo].[ContactDetails] SmartObject. In the image below, the path is SmartObjects > SQL Server Service > My SQL Database > Tables > [dbo].[ContactDetails]. Expand the SmartObject. Expand the List method.
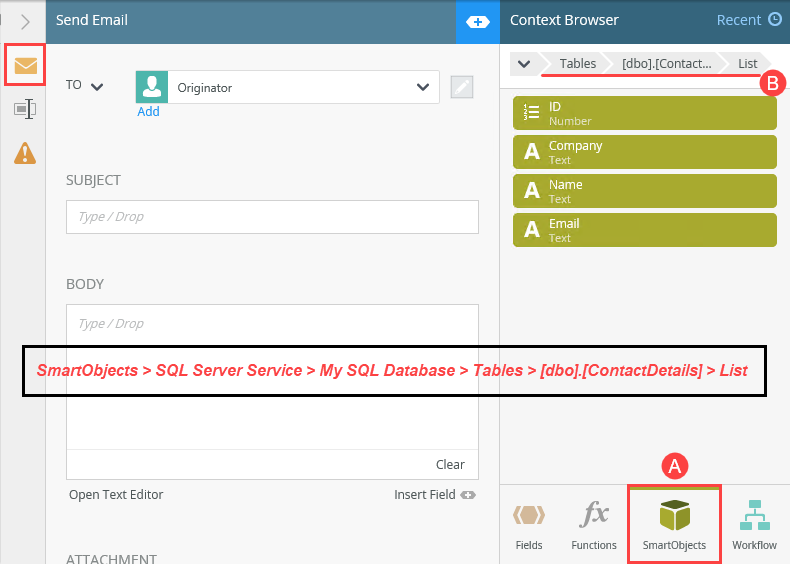
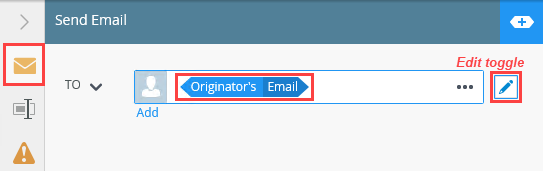
- Click the edit toggle to the right of the Originator bar. Select Originator's Email and delete it.
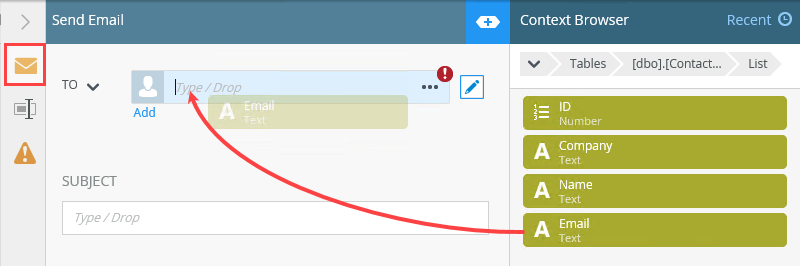
- Drag the Email property from the [dbo].[ContactDetails] SmartObject into the To text box. .
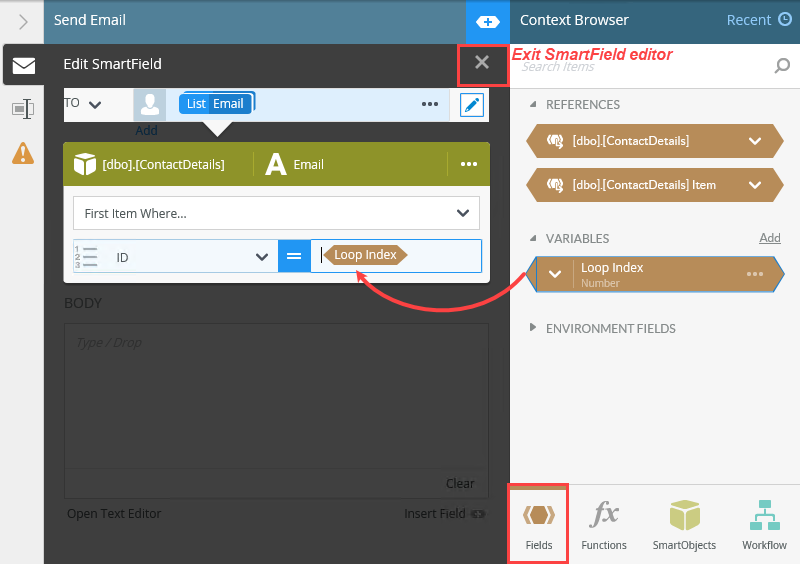
- Click the Fields tab. Drag the Loop Index into the ID text box. Exit the editor.
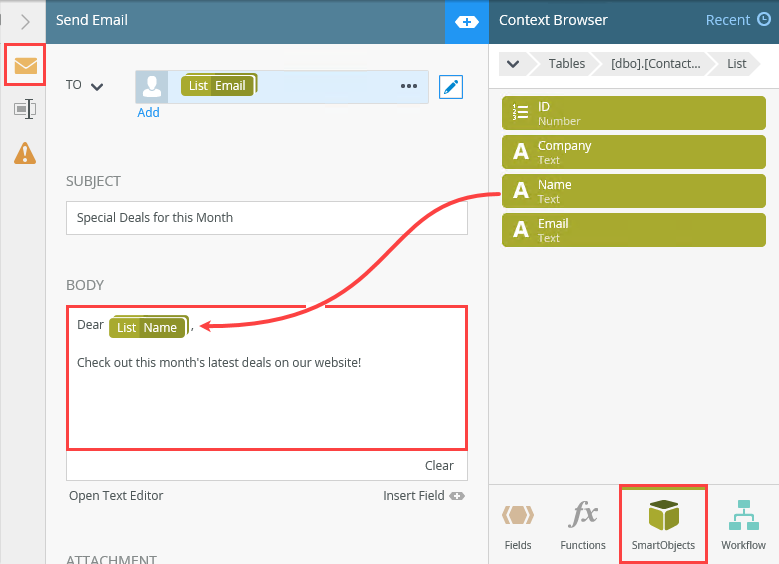
- Configure the Subject and Body sections with your own content. If you like, use properties from the [dbo].[ContactDetails] SmartObject to personalize your message. You must map the Loop Index variable each time you use a SmartObject property. Collapse the Configuration Panel.
By default, the email To value is Originator. This is the person who starts the workflow. You want the email recipient to be the customer in your [dbo].[ContactDetails] table. In the next step, you replace the default value with a reference to the current record's email property.
The SmartField editor launches. You must assign an identifier to the email property so that K2 knows which email address to use. You get that value from the Loop Index variable. Remember that K2 stores a unique value for the current record (during the looping process) in the loop index variable. Now, the recipient value points to the email address for the current record.
- From the Toolbox > Basic node, drag a Send Email step onto the canvas.
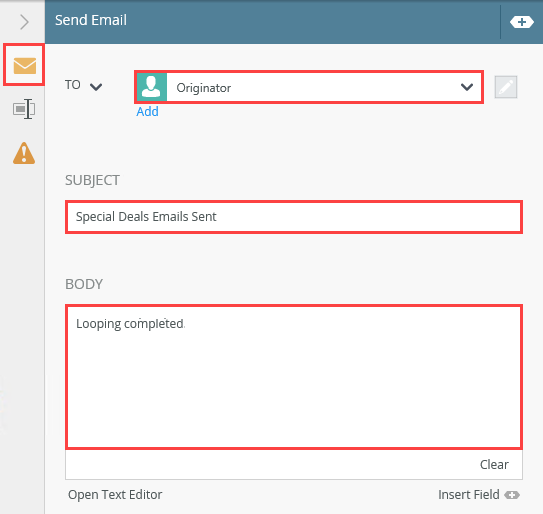
- Add a Send Email step and connect it to the Complete outcome. Keep the default recipient, Originator. Use your own content for the subject line and message body. Add an End step and connect it to the Send Email step.
- Next, you configure an email that lets you know the looping is complete. From the Toolbox > Basic node, drag a Send Email step onto the design canvas. Connect the Complete outcome to the new step.
- Select the new step and expand the Configuration Panel. Leave the To value with its default, Originator. Enter your own content for the subject line and message body. Collapse the Configuration Panel.
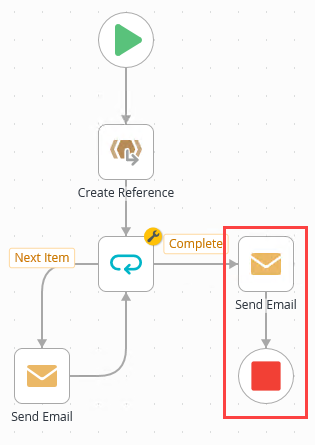
- From the Toolbox > Logic node, drag an End step below the new Send Email step. Connect the two steps.Use End steps to complete workflow outcomes. You can configure End steps to terminate the workflow or use them as visual indicators that there are no more steps to follow. In this demonstration, the End step provides a clean end to the final Send Email path.
- Next, you configure an email that lets you know the looping is complete. From the Toolbox > Basic node, drag a Send Email step onto the design canvas. Connect the Complete outcome to the new step.
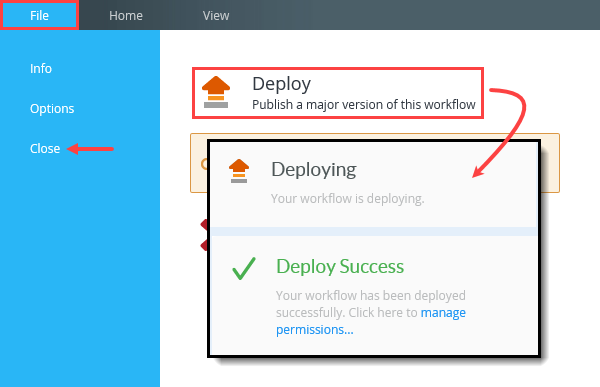
- Deploy the workflow.
- Deploying the workflow publishes it to the K2 server and makes it available for use. If you make any changes to the workflow, you must deploy it again so that K2 has the latest version. Select File > Deploy. When you see the success dialog, click File > Close to return to K2 Designer.
- Deploying the workflow publishes it to the K2 server and makes it available for use. If you make any changes to the workflow, you must deploy it again so that K2 has the latest version. Select File > Deploy. When you see the success dialog, click File > Close to return to K2 Designer.
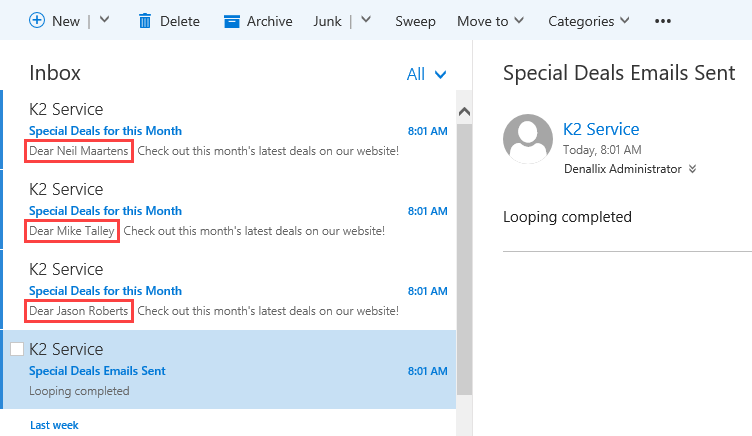
- Test the looping process by starting a new instance of the Email Customers Workflow from the K2 Management site. Open your email client. You should see one email for each customer in your SQL table, along with the final confirmation email.
- Launch the K2 Management site.If you do not know how to access the K2 Management site, see Accessing K2 Sites.
- Expand the Workflow Server > Workflows node. Navigate to and select the Email Customers Workflow. (Your tree may not match the image below depending on your environment and your naming convention.) Click the Start New button located in the central pane.
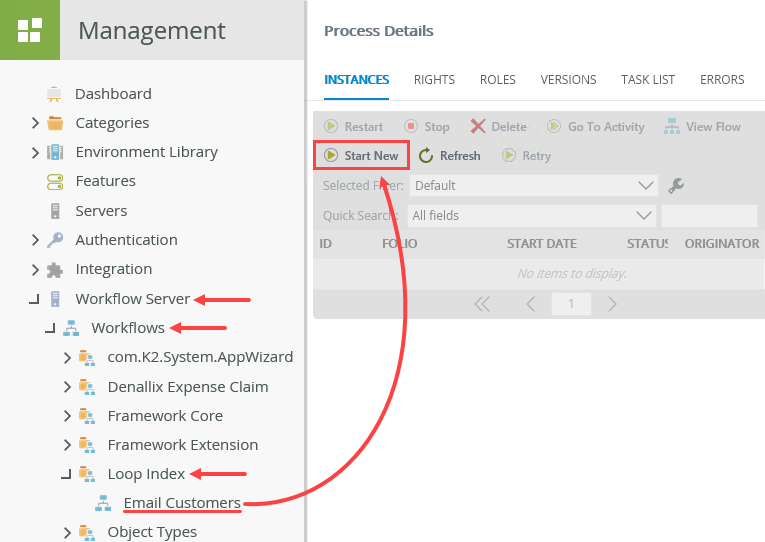
- On the Start Workflow Instance screen, keep the default settings and click Start. Click OK for the confirmation dialog.
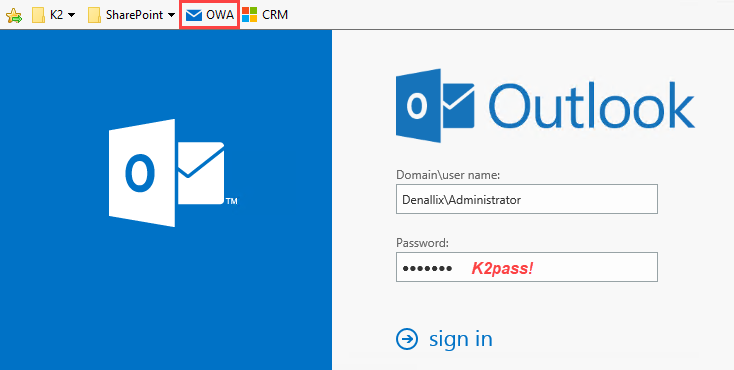
- Open your email client. If working on K2-provided VM, open Outlook in a new browser tab using the OWA link found in the Favorites bar.
You should see an email for each customer in your list. You should see an email indicating the looping process completed. Your email titles and message may not match the image below, depending on the content you entered while configuring the Send Email steps.
- Launch the K2 Management site.
Review
Use the Loop step in a workflow to loop through a list of items. Typically, K2 uses a primary key, such as a list item ID, to identify each item uniquely. When there is no primary key, you can store a unique value on-the-fly using a Loop Index. When there are no more items to loop through, the loop completes.