Register a custom User Manager
This topic covers the steps to register a Custom User Manager on a K2 server. If you use the Sync Service in your environment, the final section of this topic shows how to trigger an identity sync with the sync service.
- Copy the built assembly from your Custom User Manager project to the K2 security providers folder:
"%PROGRAMFILES%\K2\Host Server\Bin\SecurityProviders" - Register the Custom User Manager in the database using the script below:
Copy
Register the Custom User Manager
DECLARE @SecurityLabelName NVARCHAR(20) = 'K2CUSTOM'; -- the label value that will be prepended to users and groups for the user >manager
DECLARE @SecurityLabelID UNIQUEIDENTIFIER = NEWID(); -- GUID of SecurityLabel for user manager
DECLARE @AuthSecurityProviderID UNIQUEIDENTIFIER = NEWID(); -- GUID of SecurityProvider for Authentication Services(IAuthenticationProvider)
DECLARE @AuthInit XML = '' -- XML initialization data for the Authentication Provider e.g. <AuthInit>ADD CONTENT HERE</AuthInit>
DECLARE @RoleSecurityProviderID UNIQUEIDENTIFIER = NEWID(); -- GUID of the SecurityProvider for User and Group Listing services (IRoleProvider)
DECLARE @RoleInit XML = '' -- XML initialization data for the Role Provider
DECLARE @DefaultLabel BIT = NULL; --1 = true, NULL and 0 = false
DECLARE @ProviderClassName NVARCHAR(200) = ''; -- the full .NET name of the Security Provider class e.g. SourceCode.Security.Providers.LdapProvider.Trusted.Ldap
USE K2
-- Add entry into the HostServer.SecurityProvider table if the entry does not already exist.
IF NOT EXISTS(SELECT 1 FROM [HostServer].[SecurityProvider] WHERE ProviderClassName = @ProviderClassName)
BEGIN INSERT INTO [HostServer].[SecurityProvider]
VALUES
(
@AuthSecurityProviderID,
@ProviderClassName
)
END
ELSE
BEGIN
SELECT @AuthSecurityProviderID = SecurityProviderId FROM [HostServer].[SecurityProvider] WHERE ProviderClassName = @ProviderClassName
END
-- Add entry into the HostServer.SecurityLabel table if the entry does not already exist.
IF NOT EXISTS(SELECT 1 FROM [HostServer].[SecurityLabel] WHERE SecurityLabelName = @SecurityLabelName)
BEGIN
INSERT INTO [HostServer].[SecurityLabel]
VALUES
(
@SecurityLabelID,
@SecurityLabelName,
@AuthSecurityProviderID,
@AuthInit,
@RoleSecurityProviderID,
@RoleInit,
@DefaultLabel
)
END
GO - Restart K2 Server service.
- To verify that the user manager was successfully registered, see Testing a Custom User Manager .
Please note it is important that the [AuthInit] and [RoleInit] values in the [SecurityLabels] table are not NULL. The security label must be unique.
In order to be able to log into the K2 Designer with users from the Custom User Manager, the security label must be added to the claim mappings using the built-in WindowsSTS, the FormsSTS or a custom STS.
You cannot search for people from other providers - it is limited to people belonging to the same provider the current users is from.
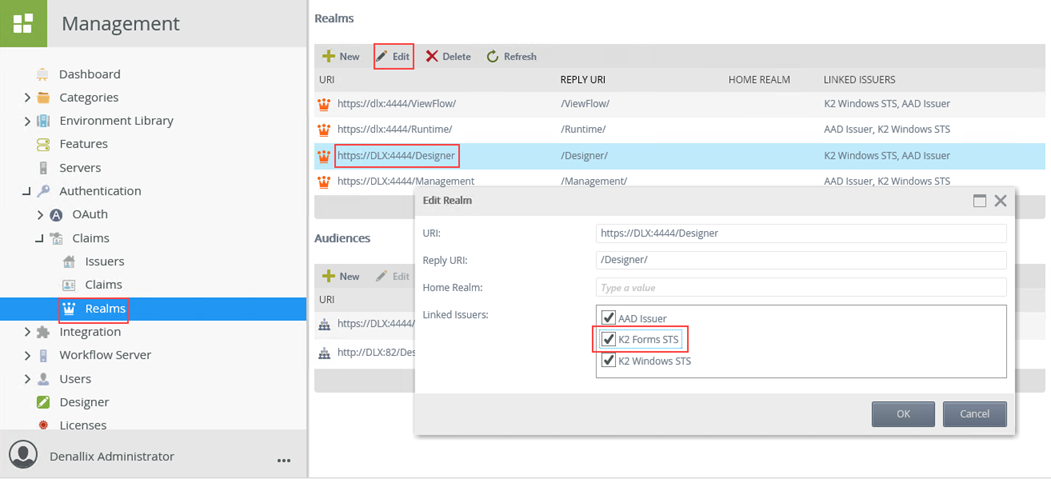
- Configure the K2 Designer realm:
- Open K2 Management and browse to Authentication > Claims > Realms.
- Select and edit the Designer realm and make sure K2 Forms STS is checked in the Linked Issuers then click OK.
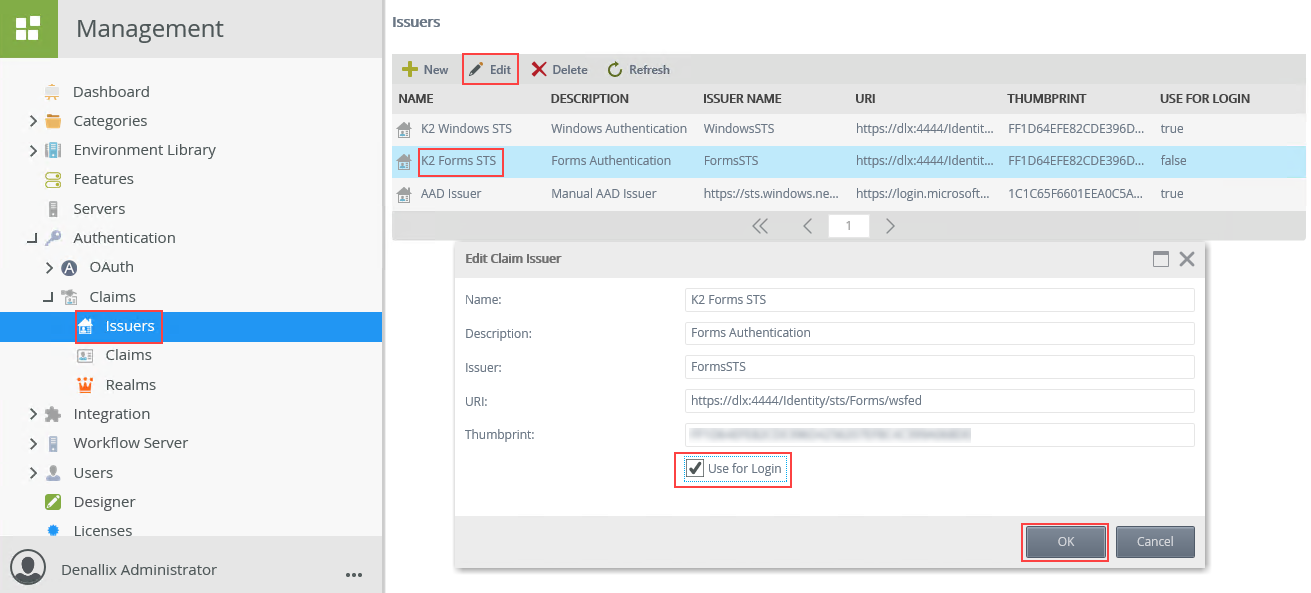
- Configure the K2 Forms STS issuer:
- Still in K2 Management, browse to Authentication > Claims > Issuers.
- Select and edit the K2 Forms STS issuer and check the Use for Login box, then click OK.
- Configure the Claim mapping:
- Still in K2 Management, browse to Authentication > Claims > Claims.
- Click New and select your custom security label, Select K2 Forms STS for issuer, check Claim Type Info, fill in the rest as shown in the table below and click OK
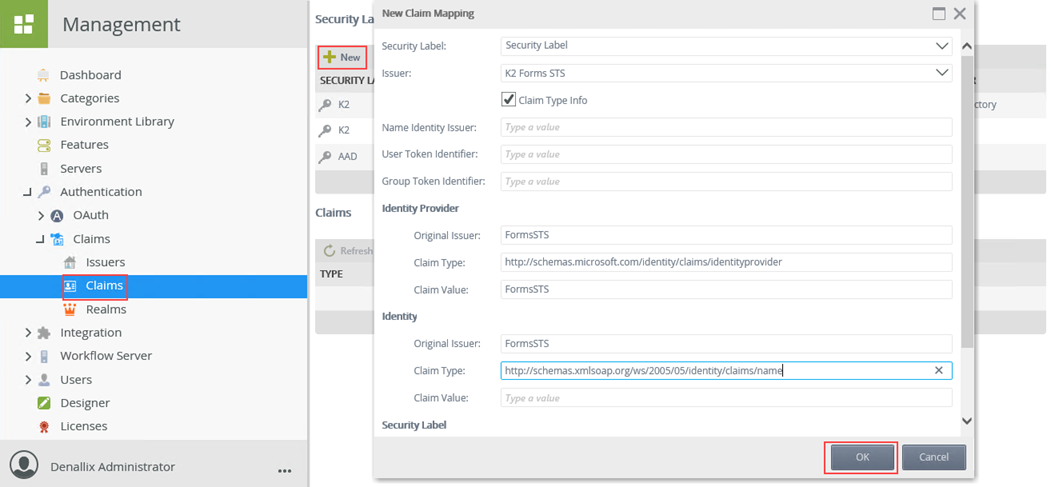
Field Description Expected Value Security Label The security label that the issuer is associated with. Issuer The issuer. Note that if you don't see any issuers in here you either do not have any issuers configured or they are already mapped to a label. K2 Forms STS Claim Type Info The indicator that the label will be used to attempt to resolve users for the SharePoint Group Provider. Check Name Identity Issuer The name identity issuer (NII) associated with the issuer. For example, Windows (AD) is urn:office:idp:activedirectory. User Token Identifier The identifier that SharePoint uses to identify users. For example, Windows (AD) is i:0#.w. Group Token Identifier The identifier SharePoint uses to identify groups. For example, Windows (AD) is c:0+.w. Identity Provider > Original Issuer The original issuer of the claim. Corresponds to the Issuer Name column. For example, Windows (AD) by default is WindowsSTS. FormsSTS Identity Provider > Claim Type The claim type for the identity provider. For example, Windows (AD) is http://schemas.microsoft.com/identity/claims/identityprovider. http://schemas.microsoft.com/identity/claims/identityprovider Identity Provider > Claim Value The claim value for the identity provider. For example, Windows (AD) is WindowsSTS. FormsSTS Identity > Original Issuer The original issuer for the identity claim. For example, Windows (AD) is AD AUTHORITY. FormsSTS Identity > Claim Type The claim type for the identity claim. For example, Windows (AD) is http://schemas.xmlsoap.org/ws/2005/05/identity/claims/name. http://schemas.xmlsoap.org/ws/2005/05/identity/claims/name Identity > Claim Value The claim value for the identity claim. This is typically left blank (null) but may require a value. Security Label > Original Issuer The original issuer for the security label. This is typically only required when using the FormsSTS and when the K2 Designer site is configured to use multiple authentication methods. Security Label > Claim Type The claim type for the security label. Security Label > Claim Value The claim value for the security label.
- Clear browser cache and then refresh the K2 Designer.
If you have enabled the Sync Service in your environment, your custom user provider will not sync identities unless you perform some configuration.
The following code example shows how you could use the API to register a custom user manager and configure the identity sync. After doing this, you still need to set up your first sync and schedule, you can find information on doing this in the User Guide Sync Service topic.
This code example is an alternative method of registering a custom User Manager compared to the code samples earlier in this topic.
Example of custom User Manager including Sync Service
# Step 1
###########################################
# Create a Custom Provider
# - https://help.nintex.com/en-US/k2five/DevRef/current/default.htm#Extend/Svr/UM-Creating.htm
###########################################
# Step 2
###########################################
# Register the Custom Provider for use with K2 using the info in this topic
# - For further reading:
# - https://community.nintex.com/t5/How-To/K2-blackpearl-0807-and-custom-security-providers/ta-p/122863
###########################################
# Step 3
###########################################
# Load K2 Assemblies
[System.Reflection.Assembly]::LoadWithPartialName('SourceCode.HostClientAPI') | OUT-NULL;
[System.Reflection.Assembly]::LoadWithPartialName("SourceCode.SecurityManagementAPI") | OUT-NULL;
$SecurityManagementAPI = NEW-OBJECT -TypeName SourceCode.Hosting.Client.SecurityManagementAPI;
$SecurityManagementAPI.CreateConnection() | OUT-NULL;
$SecurityManagementAPI.Connection.Open("Integrated=True;IsPrimaryLogin=True;Authenticate=True;EncryptedPassword=False;Host=LOCALHOST;Port=5555") | OUT-NULL;
# Get registered Custom Provider ID using Assembly Fullname
$ProviderID = $SecurityManagementAPI.GetSecProviderID('Custom.SecurityProvider');
# Configure Custom Provider
$AuthInit = '<AuthInit></AuthInit>';
$RoleInit = '<RoleInit></RoleInit>';
# Create Custom SecurityLabel
IF ($NULL -ne $ProviderID)
{
####################################################
# The following line triggers the sync propagation #
####################################################
$SecurityManagementAPI.AddSecurityLabel("CUSTOM", $ProviderID, $AuthInit.ToString(), $ProviderID, $RoleInit.ToString()) | OUT-NULL;
}
# Finished
$SecurityManagementAPI.Connection.Close();
$SecurityManagementAPI.DeleteConnection();