Document Review application
This tutorial describes how to create a document review application using SmartStarters. SmartStarters are prebuilt, fully-functional applications that you can install and use in your environment with little to no configuration. Once installed, the applications are ready for immediate use. In this tutorial, you will install the Document Review SmartStarter, then use it by submitting and processing document review requests. When you have a few instances of the application processed, you will explore the reports that are generated based on instance details. Finally, you will learn about the administration functions for this application which include updating values in a drop-down list.
The Document Review application you install in this tutorial includes a one step approval process workflow with rework. After submitting the Document Review request form, the workflow assigns a task to a recipient (who you specify on the request form). The task recipient has three action options: Approve Request, Decline Request, or Query Request. If the reviewer selects Query Request, the workflow assigns a task back to the originator, or person who submitted the request in the first place. The originator must "rework" the request, then resubmit it for review. The originator also has the option to cancel the request. Once the reviewer either approves or declines the request, the workflow completes.
Once installed, there is no configuration necessary and the application is ready for immediate use. You can however, adjust the application post installation. This includes updating the values for a drop-down list and granting administration rights to other users. In this tutorial, you will work with the first option.
The Document Review form installed with this application 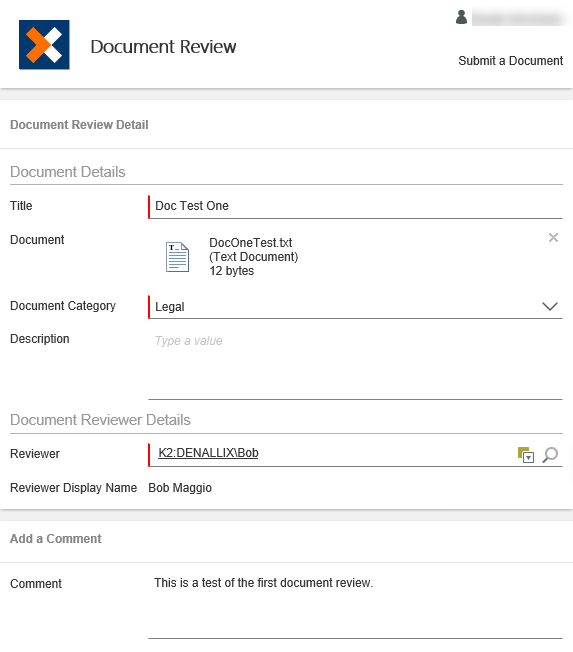
Apps are accessible through Workspace. Workspace is your personal dashboard for managing tasks assigned to you, viewing reports, managing personal settings (such as out-of-office and login credentials), and launching applications.
- Launch WorkspaceIf you are unsure of how to launch the Workspace site, see Accessing Sites.
-
The Workspace launches. You may see a welcome dialog which you can exit. If time allows, explore the Workspace features first, then launch the Apps workspace. To launch the Apps workspace, click the Nintex icon to expose workspace options. Click the Apps link to launch the Apps workspace.
- Workspace launches. In some environments, you will see a welcome dialog box.If you see the welcome dialog and would like to explore its contents, click START. Click NEXT on each screen until you reach the end, then click DONE. Otherwise, exit the dialog.

- You should now see the Workspace dashboard. The left-side column provides access to the workspace features. If time allows, take a few minutes to explore the Workspace. HOME
- The Home button provides quick access to the workspace landing page, or dashboard.
- The Inbox contains a display of tasks currently assigned to you. If the task was not configured to send a task notification email, you will not see it here. Clicking a task opens the associated form where you can complete the task.

- The My Forms page displays the forms (SmartForms) available for you to use.
- The Process Overview report provides a summary of process instances that you are associated with. For example, processes you started, or processes containing a task you actioned.
- The My Overview report displays a summary of your active and completed tasks. From this report, you can action tasks from the Active Tasks list.

- Here you can set your out-of-office controls, set-up auto logins, and set your default workspace.

- Click the Nintex icon to expose other workspace options. Click the Apps option to launch the application wizards menu.
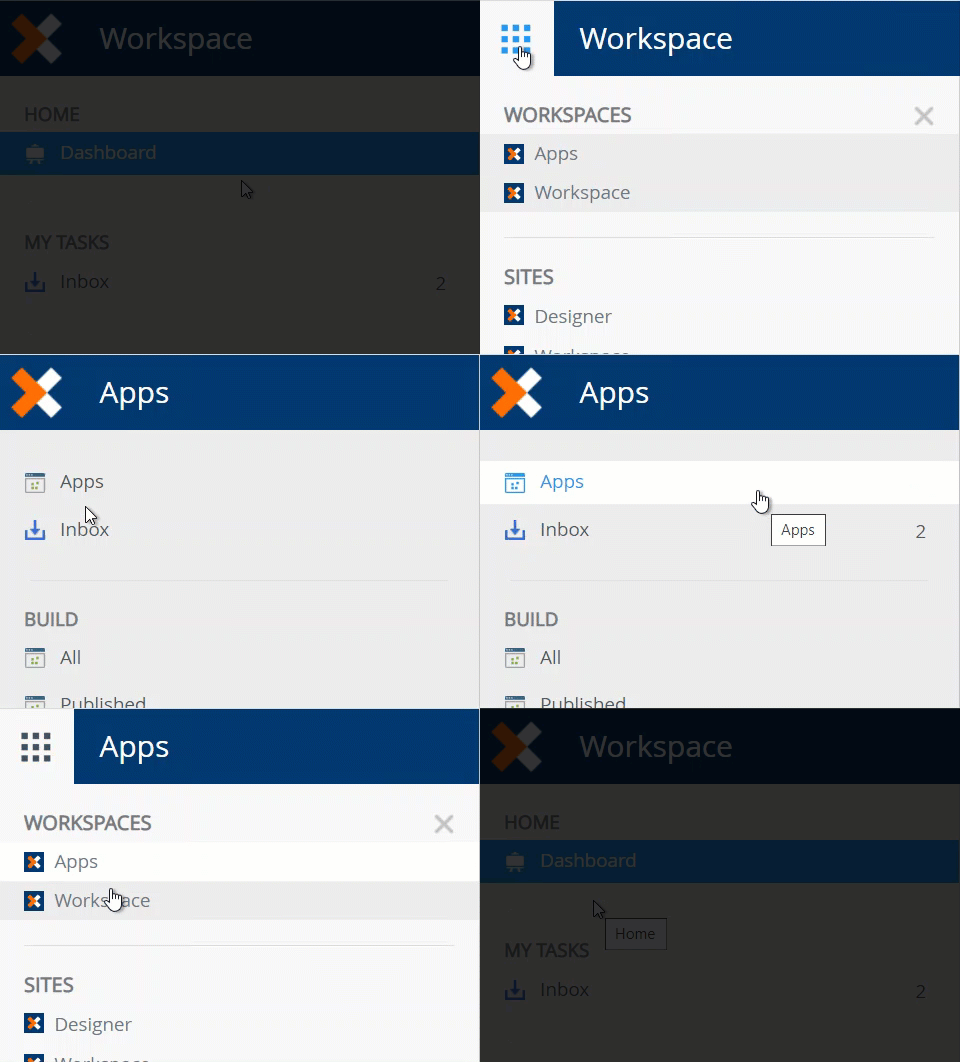
You may not have any apps just yet...
- Workspace launches. In some environments, you will see a welcome dialog box.
-
The first step is to download and install the SmartStarter. There are many SmartStarters to choose from, so you have a wide range of business process applications to get you going in your environment.
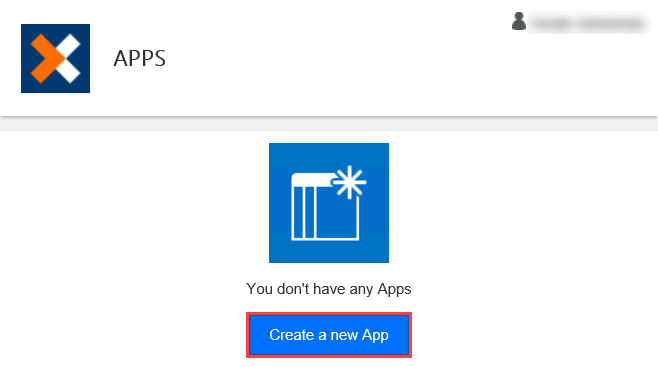
After launching the Apps workspace, navigate to the BUILD > All > ALL APPS landing page. In the central pane, click Create a new App.- First, you will add a new application. In the central pane, click Create a new App. (See the note box below the image if you already have apps displayed in the central pane and don't see the create app link.)
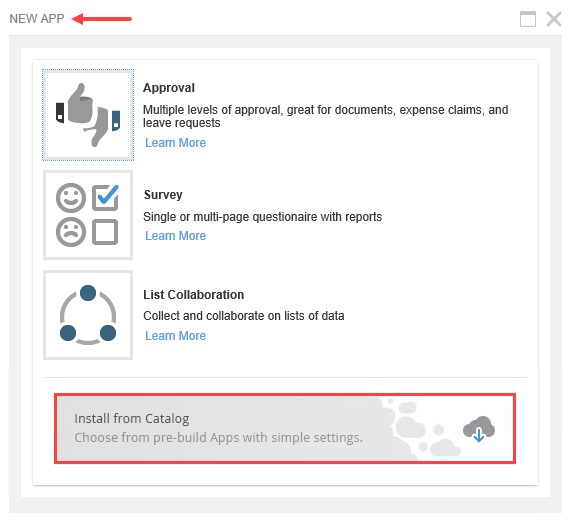
- You are on the NEW APP screen. Here, you can select the app type you want to generate or you can select the option to install an app from the catalog. For this tutorial, click the Install from Catalog option.
If you already have apps displayed in the central pane, you can start a new app from the BUILD > All > ALL APPS screen. Click All, then click the New button.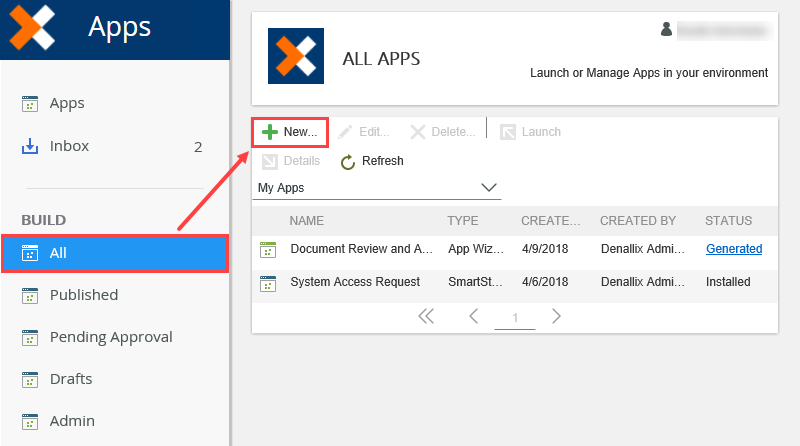
- First, you will add a new application. In the central pane, click Create a new App. (See the note box below the image if you already have apps displayed in the central pane and don't see the create app link.)
- On the APP CATALOG screen, you see a list of available SmartStarters. The right-side INSTALLED column shows you which SmartStarters are already installed. You can only install each SmartStarter one time.
View the details for the Document Review SmartStarter. This is the SmartStarter for this tutorial.- You are now on the APP CATALOG page showing Available SmartStarters. There is a list of available SmartStarters in the left column. Notice the wide range of common business process applications you can choose from. The right column indicates which SmartStarters are already installed. You can install each SmartStarter one time only.
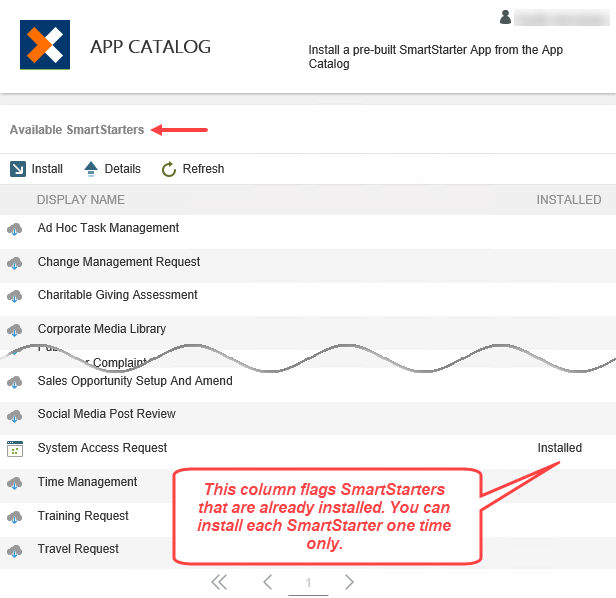
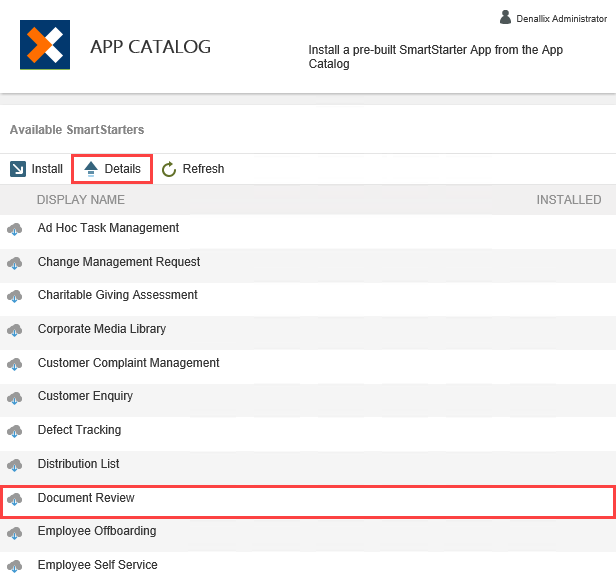
- Next, you are going to view the details for the SmartStarter you will install for this tutorial. Select the Document Review SmartStarter, then click the Details button.
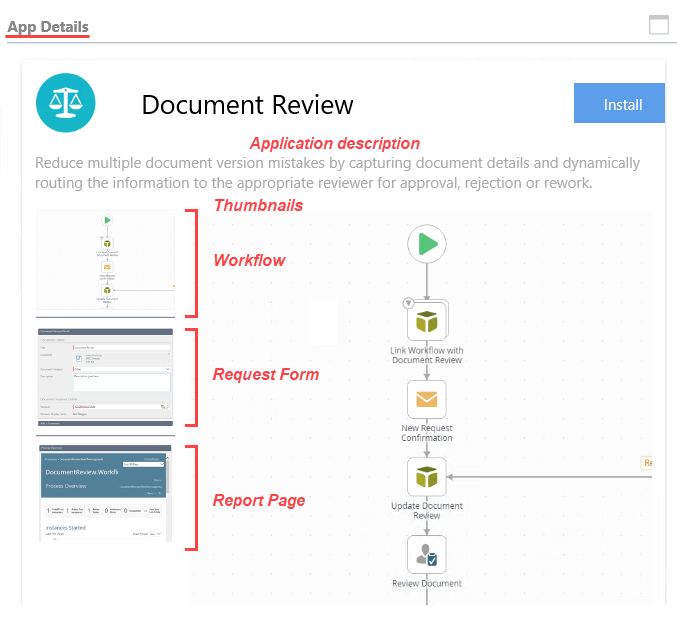
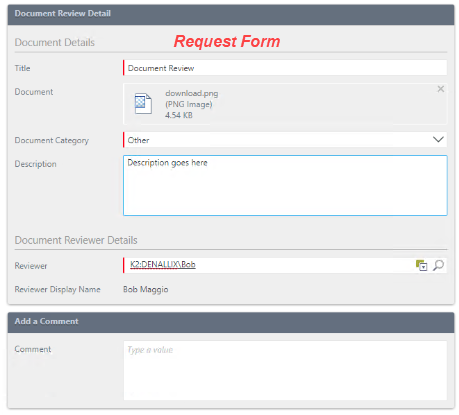
- On the APP DETAILS screen, you can view the primary elements for the application. Typically, this includes snapshots of the workflow, request form, and report page. There is also a description of what the application does just under the title bar. In the image below, notice the application description tells you the workflow contains a reviewer (user) task with three possible outcomes (approval, rejection, or rework). When you click a thumbnail image, the image expands in the center of the screen. Take a minute to click each thumbnail and review the application details for the Document Review SmartStarter. Exit the details screen to continue.
Snapshot of the Document Review request form
Snapshot of the Process Overview Report page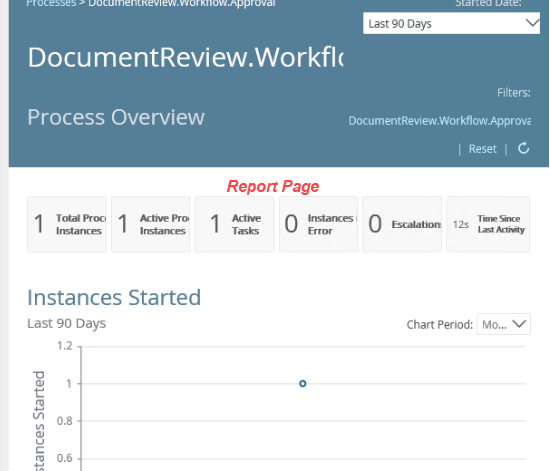
- You are now on the APP CATALOG page showing Available SmartStarters. There is a list of available SmartStarters in the left column. Notice the wide range of common business process applications you can choose from. The right column indicates which SmartStarters are already installed. You can install each SmartStarter one time only.
- You are now ready to install the SmartStarter. Install the Document Review SmartStarter. After the application downloads, installs, and registers, the application is ready to use. After the installation completes, use the BUILD > All link to launch the Document Review (SmartStarter) application from the ALL APPS screen.
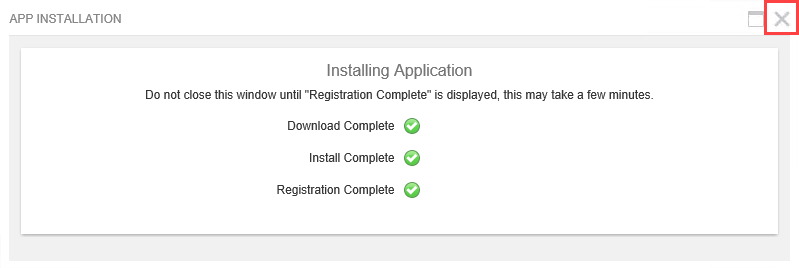
- After you review the application details, you can install the SmartStarter. On the APP CATALOG screen, select the Document Review SmartStarter (if it is not already), then click the Install button.
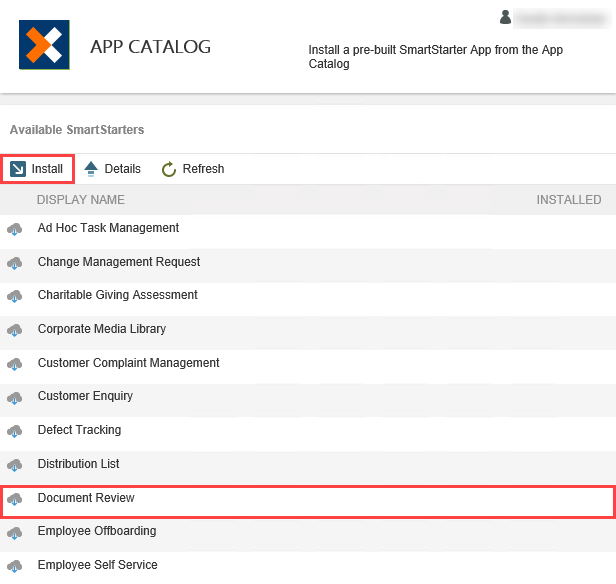
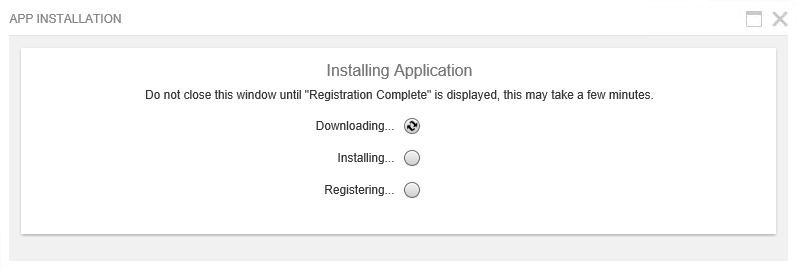
- You can watch the progress of the installation on the APP INSTALLATION screen. First, the application is downloaded, then installed, then registered. As each process completes, a green check appears. After you see all three green checks, exit the installation screen. The installation process may take a few minutes. Do not exit the screen until the process is complete.

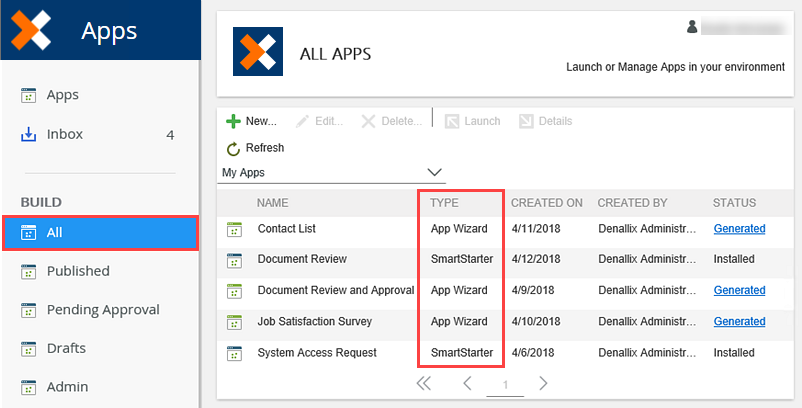
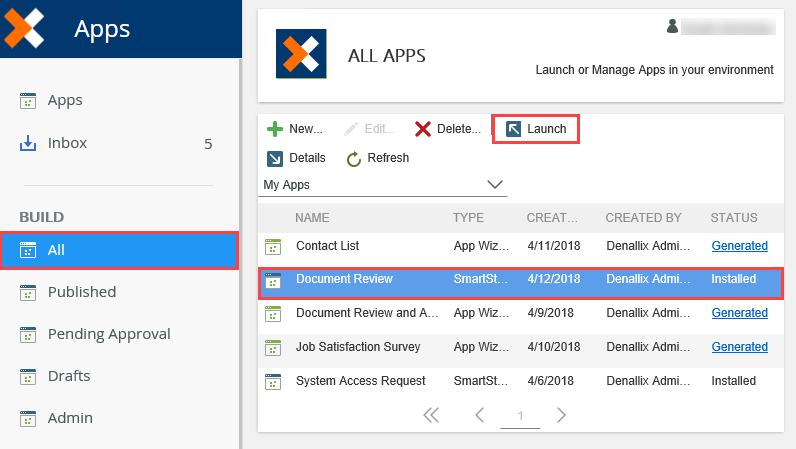
- Now, you will explore the list of App Wizard and SmartStarter applications that have been generated or installed and are available to you for use. Click the BUILD > All link in your left column. On the ALL APPS screen, you see a list of apps that you have access to. Notice the TYPE column displays either App Wizard or SmartStarter. This tells you the app was either generated by an app wizard or installed from a SmartStarter. (If the Document Review app is the only app you see on your screen, refer to the image below for TYPE examples.)
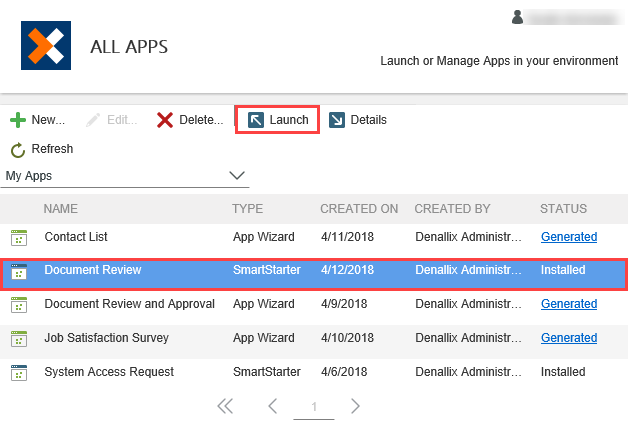
- Select the Document Review (SmartStarter) app, then click Launch.
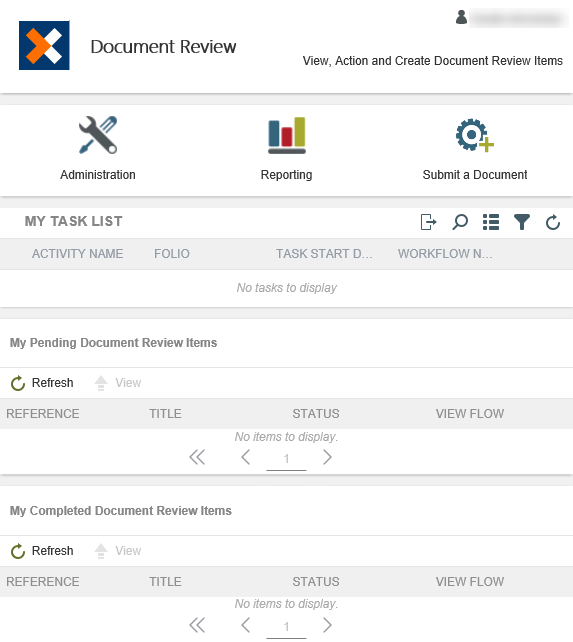
You are now on the Document Review landing page. From here, you can submit a review request, view reports on workflow instances that are both active and complete, and administer the app. Below the toolbar, are the sections for viewing tasks assigned to you, pending document reviews, and completed document reviews.
- After you review the application details, you can install the SmartStarter. On the APP CATALOG screen, select the Document Review SmartStarter (if it is not already), then click the Install button.
- Now that you have installed the Document Review application, it is ready for use! In this step, you will submit and review a new document review request. This particular workflow allows you to select the person you want to review your document. (Some workflow tasks are permanently assigned to a user or group.) After you submit your request, you will log in as the reviewer, then action the request.
From the Document Review landing page, submit a new document review request. Be sure to attach a document, then select another user as the person who must review the request. If time allows, submit several more requests. This gives you content to report on in a later step. If you submit additional requests, select the other user as the request reviewer. This makes testing easier. After you submit your requests, return to the Document Review landing page to continue.Assign your own user account or a co-worker’s account, so that you or they can action the task when testing the application.- Before continuing, you may want to create two or more test documents, then save them to the desktop for example. Use Word or NotePad. This gives you documents to add to your request.
- Next, submit one or more document review requests. Begin by clicking the Submit a Document button.
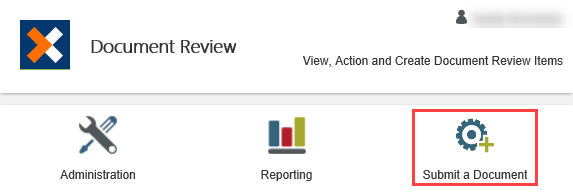
- The Document Review form launches. Complete the Document Details section. Use the table below for reference.
Control Value Notes Title Doc Test One This is the first test document review. Document <test document> Click in the Upload box, then browse to and select your first test document. Click Open to attach the document and return to the form. Document Category Legal The drop-down category menu keeps this value consistent across records. Description Leave blank 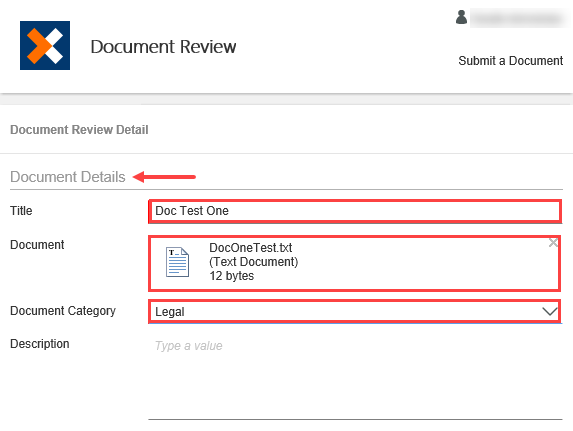
- In the Document Reviewer Details section, add the reviewer. Add a user who can action this task for you. Assign your own user account or a co-worker’s account, so that you or they can action the task when testing the application.

- Add a comment if you like, then click Submit. Click OK when you see the successful submission dialog.

- If time allows, submit one to two more document review requests. Complete the form fields with any content you like. Use a user who can action the task for you. This provides content for the reporting step later on.
- Before continuing, you may want to create two or more test documents, then save them to the desktop for example. Use Word or NotePad. This gives you documents to add to your request.
- The next step in the application process is to respond to the review request. This particular application has three options for the reviewer to select: Approve Request, Decline Request, or Query Request. Querying the request assigns a task back to the originator, or person who submitted the request (you!). After reworking the request, you can resubmit it for review once again or cancel it.
Contact the user you assigned the review task to and ask them to action it for you. Select Query Request for the action, then submit the form to send your decision.- First, you will open an instance of Workspace for your co-worker.
- Once you have his Workspace open, click Inbox to access his task notification emails.
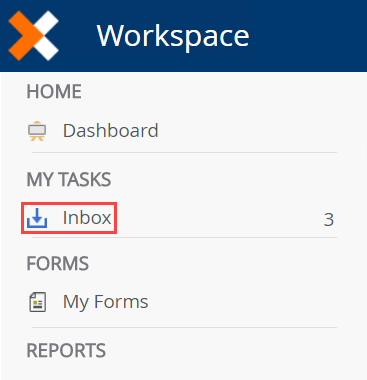
- You should see a Review Document task notification email for each for the review requests you submitted. Click one of the Review Document email titles to open the notification in the central pane. Notice the form you submitted appears, along with the attached document. At the bottom of the screen are two sections for the reviewer. In one section, the reviewer can add comments regarding the request and in the second section, the reviewer selects their decision from the drop-down list (Approve Request, Query Request, Decline Request).
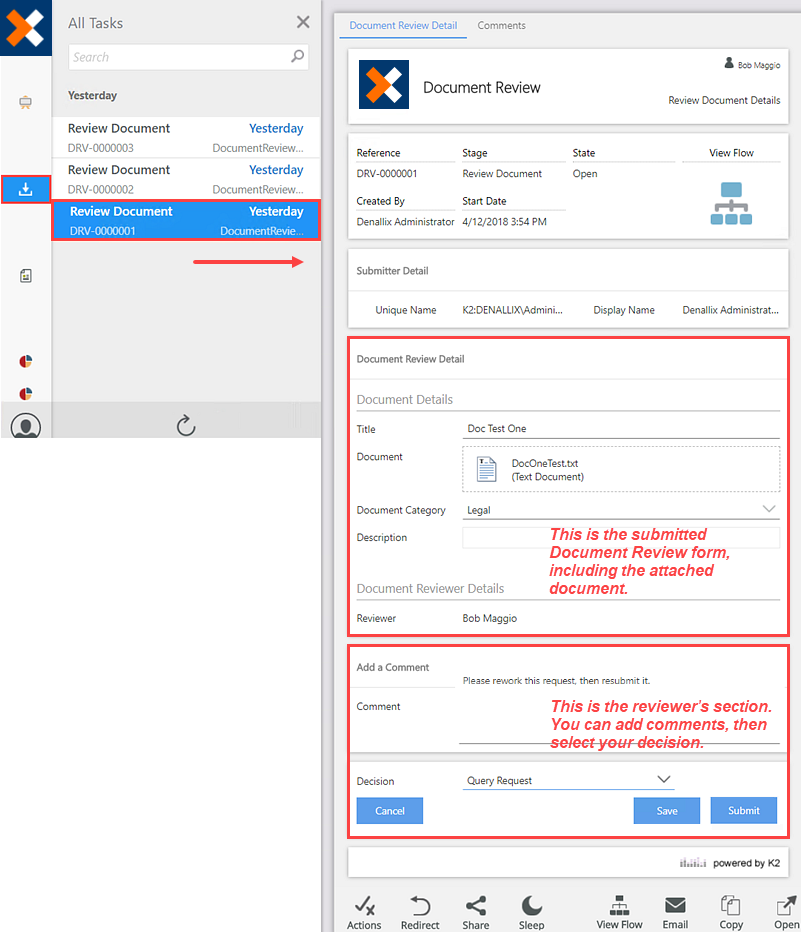
- You are going to send this workflow back to the originator for additional work. In the Comment box, enter
Please rework this request, then resubmit it.
and from the Decision drop-down list, select Query Request. Click Submit. Click OK when you see the successful submission dialog.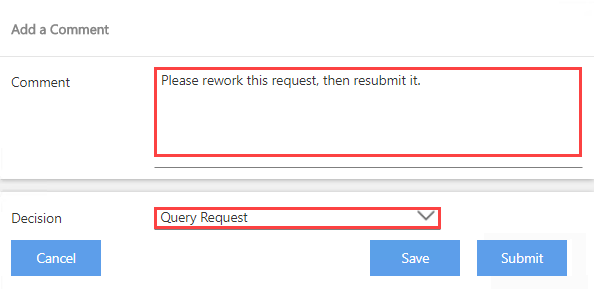
Notice you also have the option to save your work. Any comments you may have entered are saved, along with your decision, if you selected one. This allows you to exit the notification without submitting your decision. You can return to the task any time and submit your decision.
- First, you will open an instance of Workspace for your co-worker.
-
In the last step, your co-worker queried the request, which sent it back to the request originator (you) for rework. In this step, open the form, add some comments and resubmit the request. Return to your Workspace and open the Inbox. Alternatively, you can use the BUILD > All link and launch the Document Review application from the ALL APPS page.
- Return to your Document Review landing page by clicking the BUILD > All link, then launching the Document Review app from the ALL APPS screen.
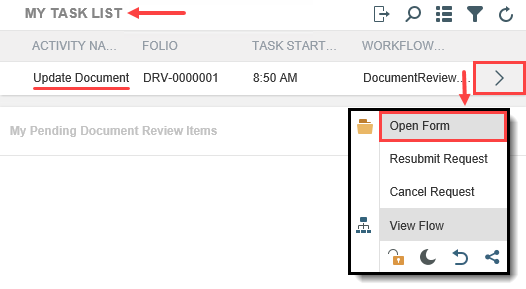
- Now you will take action on the update document task assigned to you. Click the arrow to the right of the task row to expand the context menu. From here, you can action the task by selecting one of the decision options (such as Resubmit Request or Cancel Request). You can also open the form to review the settings before making your decision. Click Open Form.

- To "rework" the request, you will change the category, then add a comment. In the Document Review Detail section, change the category to Customer Service. In the Add a comment section, enter
I have changed categories. The document request is ready for review!
into the Comment box. Then, for the Decision, select Resubmit Request and click Submit. Click OK when you see the successful submission dialog.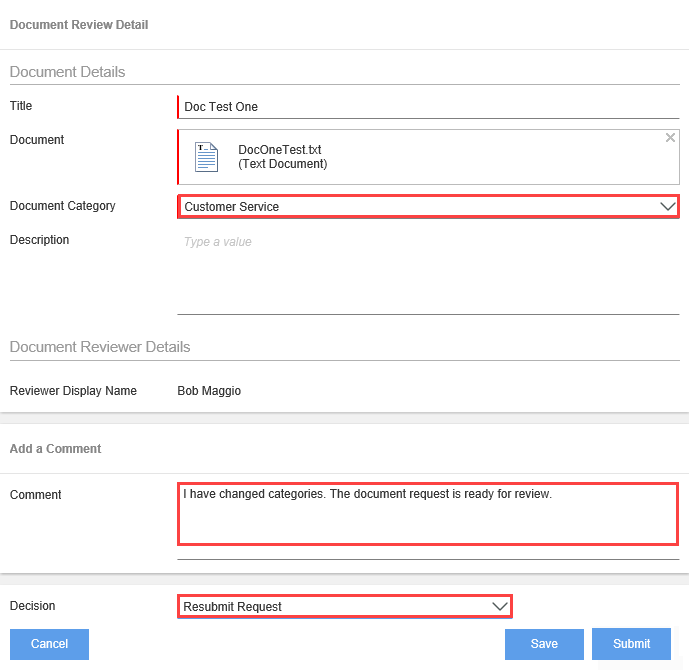
Notice the Update Document task in the MY TASK LIST section. This is the task created by the workflow when the co-worker queried the document review request. The workflow routed the request back to the originator (you) for rework, which is now a task assigned to you.

The My Pending Document Review Items section displays open document review process instances. In this case, there are three open processes. Looking at the STATUS column, you see that two processes are at the Review Document step. This is the step for the document reviewer (co-worker). There is one process at the Update Document step. This is the step for the originator (you) to rework the request. (So, in this image, there are currently three active instances of the Document Review application.)
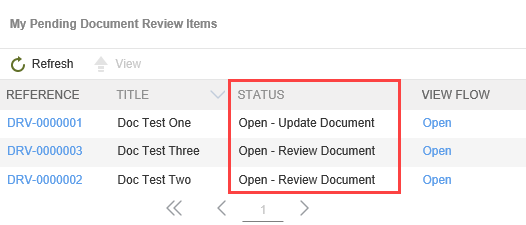
Behind the scenes, the workflow routes the request back to the Review Document step and assigns a task once again to the co-worker. This creates a looping effect between the Review Document step (co-worker's task) and the Update Document step (originator's rework task). This loop can repeat itself as many times as necessary until either the reviewer or the originator chooses a different decision.
- Return to your Document Review landing page by clicking the BUILD > All link, then launching the Document Review app from the ALL APPS screen.
- In this step, you will complete the document review process by taking action on the co-worker's task. Return to his workspace, then either approve or decline the request. Do not select query as this will only loop the request back to the originator. If time allows, review the task recipient comments on the Comments page.
- Return to the co-worker's Inbox in his Workspace. Notice there is a new Review Document task notification email. Click the email title to open the notification in the central pane. At the top of the central pane, click the Comments tab. (It may be very light in color, it's right of the Document Review Detail tab.)
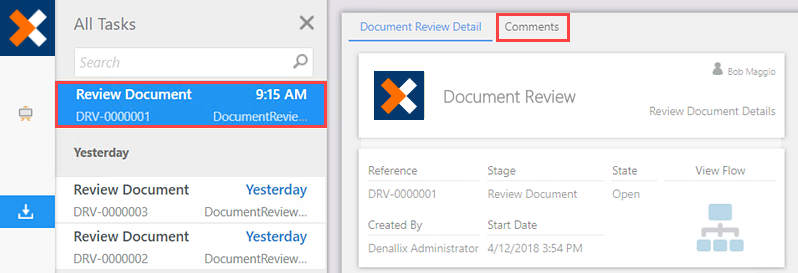
- At the top of the central pane, click the Document Review Detail tab to return to the task form. Notice the Document Category reflects the change to Customer Service.
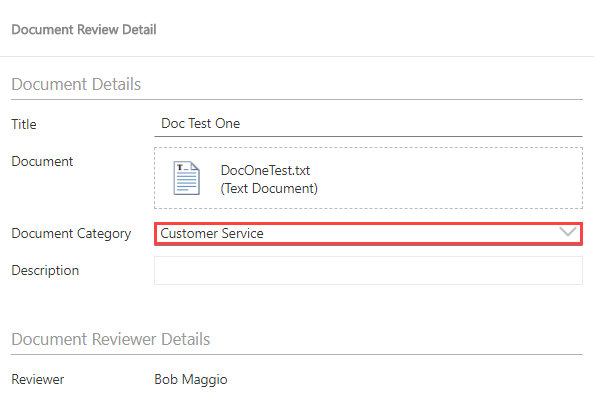
- Select either Approve Request or Decline Request, then click Submit. Click OK when you see the successful submission dialog.

The Comments page is where you will find both the reviewer's comments and the originator's comments. This allows you to review the notes for both task recipients in a single location, in chronological order.
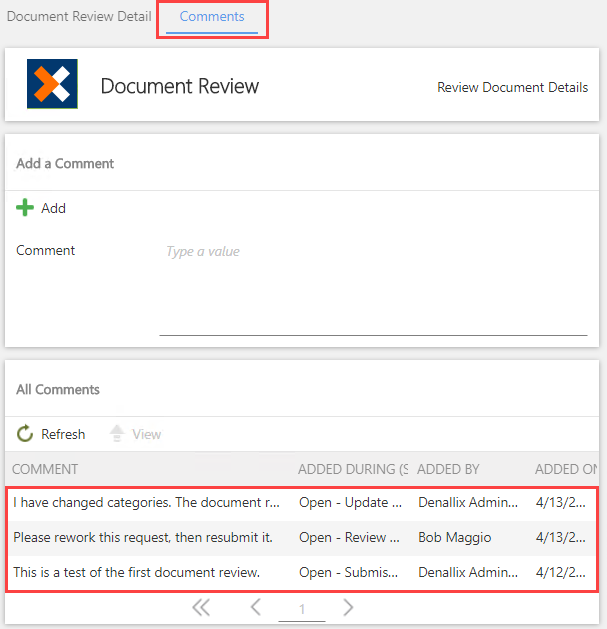
This completes the Using the Document Review Application steps. Next, you learn how to access reports for the application.
- Return to the co-worker's Inbox in his Workspace. Notice there is a new Review Document task notification email. Click the email title to open the notification in the central pane. At the top of the central pane, click the Comments tab. (It may be very light in color, it's right of the Document Review Detail tab.)
- Now that you have submitted a few Document Review requests, you have content for reports. Reports provide analysis of process instance data. Workflows are also known as processes. Each time you start a workflow (by submitting a document review request, for example), an instance of the process is created. Data is then gathered on the process instances and results output in a report.
In Workspace, launch the Document Review application so that you are the application landing page. If you are already on the landing page, you can jump to the next step.- If you are not on the Document Review landing page, use the BUILD > All link, then launch the Document Review application from the ALL APPS screen.

- If you are not on the Document Review landing page, use the BUILD > All link, then launch the Document Review application from the ALL APPS screen.
- Open the Reporting options. On the Process Overview page, notice the overview bar. The overview bar provides a summary of the instance activity, including the number of processes, active processes, the number of errors and the time that has lapsed since the last activity. You also have an Instances Started chart that displays the number of instances started by day, week, or month. Locate the All Instances section, then review the active and completed instances. Click the ID of a completed instance (or any ID if there are no completed instances). Review the data returned at the instance level. If time allows, drill down once again in the Activities section to view data from the activity level. Return to the Document Review landing page to continue.
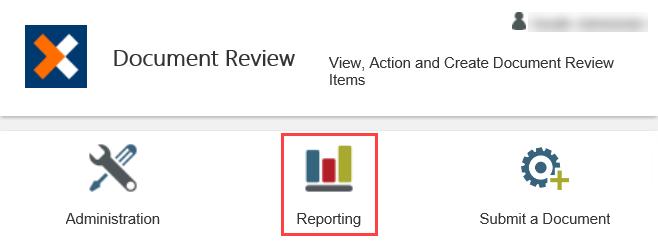
- On the Document Review landing page, click Reporting.
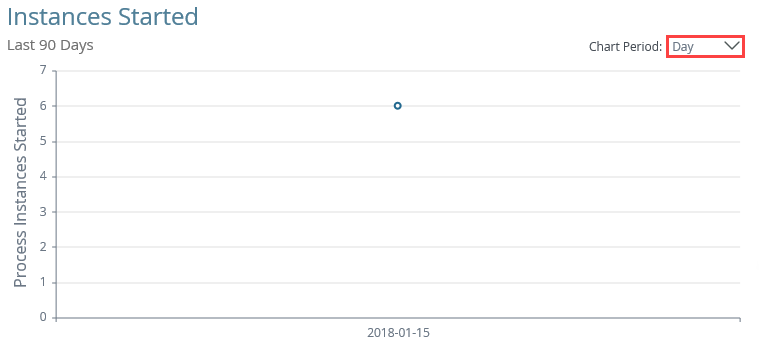
- Take a minute to explore the overview bar and the Instances Started chart.
- Scroll down to the All Instances section. Here, you see a summary of the Document Review process instances and their current status. Notice that one of the instances shows a Completed status. This is the process that the co-worker just actioned, which completed the workflow.
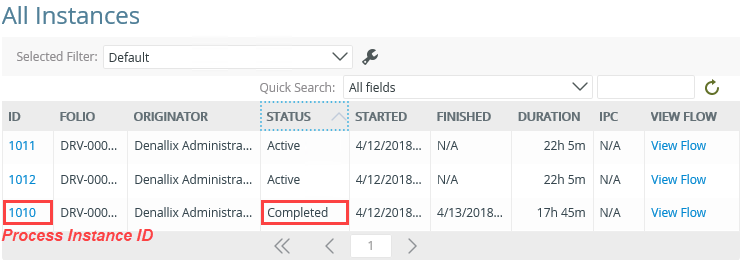
- Click the Process Instance ID for the process that has the completed status. (See image above for reference.)
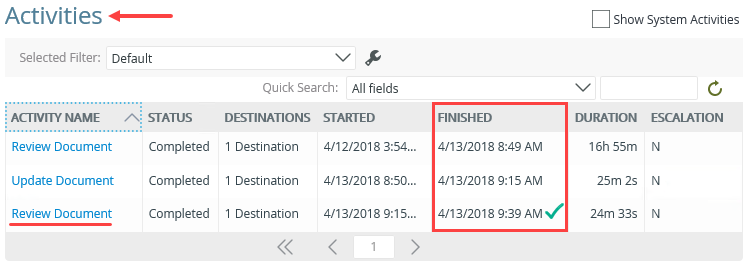
- You are drilling down into the report details. Now, you are viewing the details for this single instance of the approval workflow. Scroll down to the Activities section. Here, you see a breakdown of the task steps. You can determine the processing order of the steps by the FINISHED times. If you recall the task emails, the two Review Document steps were tasks assigned to the co-worker. The Update Document step was a task assigned to the originator (for reworking the request). Click the most recent Review Document link. This is the second review task assigned to the co-worker, after you reworked and resubmitted the request.
- Drilling down further, you can view the participant, or recipient, for this task. Notice in the Participants section, Bob Maggio completed this task with a Approve Request decision.

- Click Close at the bottom of the page to return to the Document Review landing page.
The Process Overview report gathers data for all instances of the document review application. At the top of the report is an overview bar that provides a summary of instance activity. You can tell at-a-glance the total number of process instances, number of active instances, number of active tasks and instances that are in error. Some tasks have escalations configured for task steps. Escalations are reminders that a task is past due and can be as simple as an email, or more complex where the task is redirected to another user.

Instances Started: This is a chart that you can view in day, week, or month blocks. As you build more workflows and this report has more content, you should be able to see trends for when users are starting instances of the Document Review application.
- On the Document Review landing page, click Reporting.
- In the final section of this tutorial, you learn about administering the Document Review application. This application has two sections for administration. The first, Document Categories, allows you to add, edit, and remove lookup values for the Category drop-down list that appears on the request form. The second section, Application Administration and Settings, allows you to grant full control (administrator) rights to other users for this application (that you installed). In this tutorial, you will work with the Document Categories administration tool.
Begin by accessing the Administration page, then add Learning Tutorial to the Document Categories list. Change the SORT BY order so that Learning Tutorial appears in alpha order.- Begin by accessing the Administration page for the Document Review application. On the Document Review landing page, click Administration. (Use the BUILD > All link to launch the Document Review application from the ALL APPS screen, if necessary.)
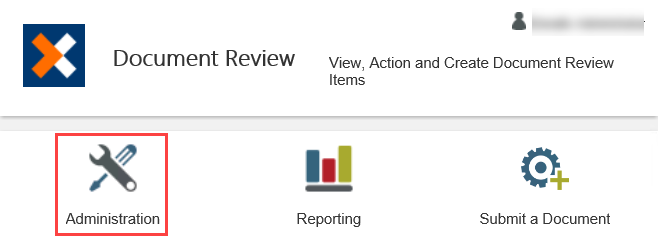
- You will add a new category to the Document Categories list. In the central pane, click the Add button. For the SORT BY value, enter
4
then for the TITLE, enter
Learning Tutorial.
Enter any text you like for the DESCRIPTION (or just leave it blank), then click Save.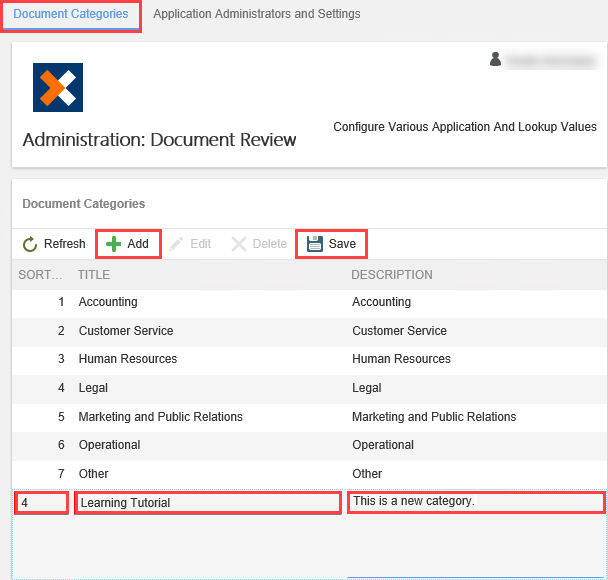
- Click the Learning Tutorial row to select it. Click Edit.
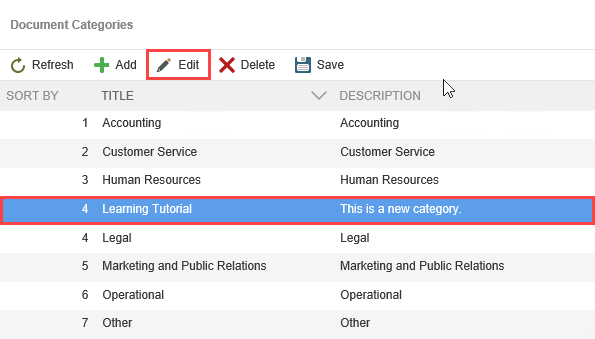
- Change the SORT BY value to
1
then click Save. Click Refresh to reset the list.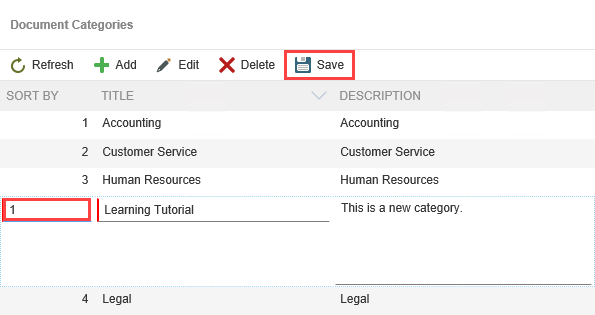
Notice that Learning Tutorial is now at the top of the list. You might question why the two categories with the same sort order are not listed alphabetically. Priority is given to the latest list entry added. Therefore, Learning Tutorial has greater priority than Accounting.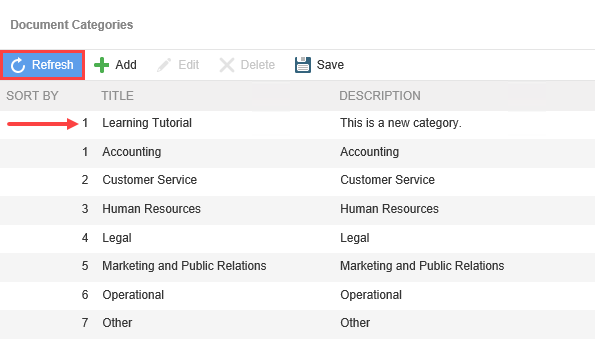
- (Optional) If time allows, edit the remaining categories and change the sort by values. Feel free to move categories around, so that they are not in alpha order.
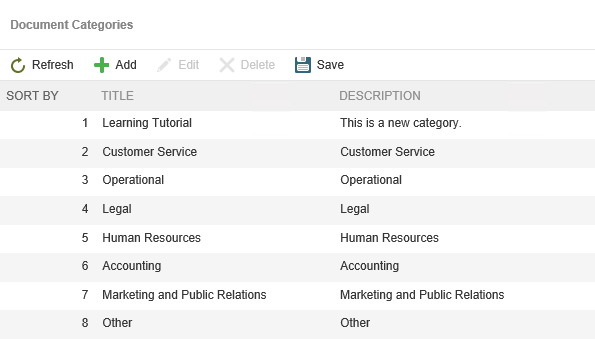
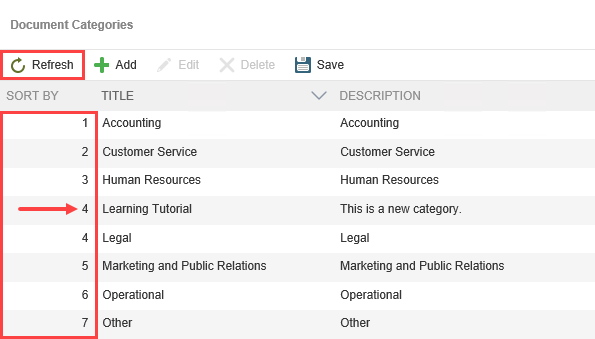
Notice the SORT BY values. (Click the Refresh button to reorder your list by SORT BY values if necessary.) The SORT BY value is the order that the categories are displayed in the drop-down list on the Document Review form. Typically, you display values in alpha order, but you don't have to. You can force the display order by altering the SORT BY value. For example, you may want to sort values by most popular. In the image below, notice there are two '4' values. You entered '4' previously to place the Learning Tutorial category just above the existing Legal category (thus, maintaining the alpha order). In the next few steps, you edit the SORT BY values so that Learning Tutorial is at the top of the category list.
- Begin by accessing the Administration page for the Document Review application. On the Document Review landing page, click Administration. (Use the BUILD > All link to launch the Document Review application from the ALL APPS screen, if necessary.)
- Now you will test the application to verify the new category structure. From the Document Review landing page, submit a new request. When completing the form, confirm you can see the new category, Learning Tutorial, at the top of the category drop-down list. Use your own account for the Workflow Approver value.
- From the Document Review application landing page, click Submit a Document. (Click the BUILD > All link to launch the Document Review application from the ALL APPS screen, if necessary.)

- Complete the form fields and upload a test document. Confirm the new category, Learning Tutorial, appears in the Document Category drop-down list. For the Reviewer value, use your own account. Submit the request. Click OK when you see the successful submission dialog.
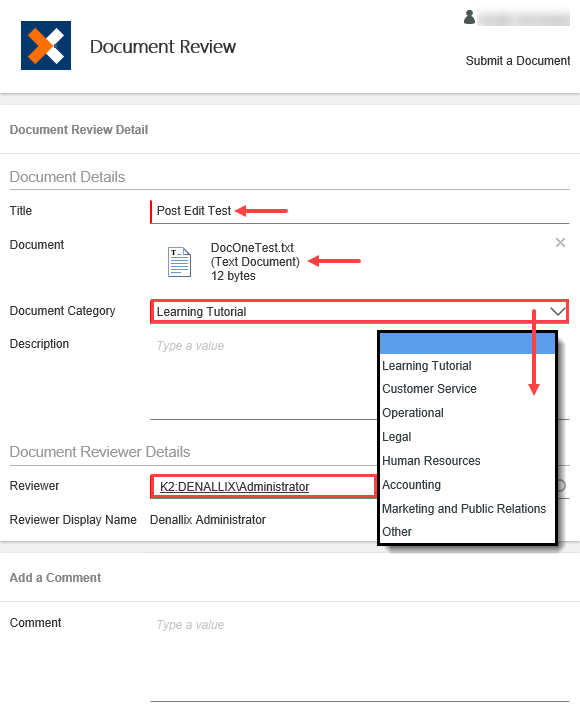
- (Optional) Complete the process by approving the request. Click the Inbox icon in the left column. You should see the Review Document task notification email. (If you don't see the new email right away, wait a few minutes for the workflow to catch up.) Click the email title to expose the task form in the central pane. Approve the request, then submit the form. Click OK for the successful submission dialog.

- From the Document Review application landing page, click Submit a Document. (Click the BUILD > All link to launch the Document Review application from the ALL APPS screen, if necessary.)
Review
In this tutorial, you installed the Document Review SmartStarter application. SmartStarter applications are prebuilt, fully-functional applications that require very little configuration. Once installed, they are ready for use. You use the application by submitting a new document review request. This application allows you to upload a document and attach it to the process instance. The reviewer must then review the request and approve, decline, or query it. Querying the request sends it back to the originator, who must "rework" the request, then resubmit it. Reporting options include the Process Overview report which provides details on each instance of the Document Review process. This report allows you to drill down into event-level details, including participants and the action decisions they made. Administration options are limited via the Workspace interface. In this tutorial, you added a new value to the Category list.
This concludes the Document Review SmartStarter tutorial. Explore other tutorials to learn more about App Wizards and SmartStarters!
- (Optional) In this step, you delete the Document Review SmartStarter application from your Workspace environment. For example, if you are working in a shared environment where there are multiple builds of the same application, you may want to delete your applications after use to keep the environment neat and tidy.
From the Build > All > All Apps screen, delete the Document Review application.- In Workspace, click Build > All to open the All Apps screen.
- Select the Document Review application and click the Delete button. Click OK for the confirmation.
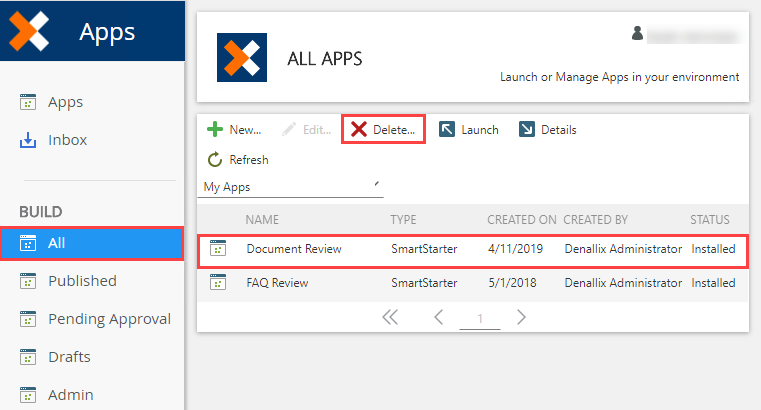
- If the app doesn't immediately disappear, you may see the status change to Pending Delete. Wait a few minutes and click the Refresh button. The application is no longer displayed in the All Apps list.