SCIM integration with an Identity Provider: Manual/Custom approach
This topic discusses integrating the product with an Identify Provider (IdP), using your own code to integrate the IdP with the product via SCIM. This approach may be required when there is no specific App or extension available for the SCIM 2.0-compatible IdP that you want to integrate with, or if you want to build your own custom app or service to synchronize identities from your IdP with the product, perhaps because your organization requires only certain identities to be synchronized with the product via SCIM.
Before you begin, take a moment to review the Identity Providers Architecture topic to understand how the product leverages SCIM and OpenID Connect to integrate with IdPs. You should also have the configuration values and keys at hand, which you would have received from the K2 Cloud operations team. The values should look something like the sample below (the values in square brackets will be specific to your environment). The client information is used to obtain the OAuth token using an Authorization Code Grant flow from the K2 IdentityToken Service, while the scim information is used to communicate with the SCIM API.
Manual approach to SCIM integration with an IdP
"client": {
"authority": "https://login.onk2.com/[TENANT_ID_GUID]",
"clientId": "[SCIM_CLIENTID]",
"redirectUri": "[YOUR_PROVIDERS_REDIRECT_URI]",
"scope": "openid profile https://scim.onk2.com/write offline_access"
},
"scim": {
"baseUrl": "https://scim.onk2.com",
"token": "[SCIM_TOKEN_GUID_FOR_SCIM_URL]"
}
To authenticate against your environment's SCIM endpoint so that you can call SCIM operations, you will need to retrieve a Bearer Token from the K2 IdentityToken service (for example using the identityModel.OidcClient class) to perform Authorization Code Grant Flow with Proof Key for Code Exchange (PKCE). You will then use the returned Bearer Token to authenticate against your environment's SCIM endpoint.
Once your code has successfully authenticated against your environment's SCIM URI, you can call the various SCIM Endpoints to perform operations such as adding new users or updating existing users. See the SCIM API Reference topic for documentation on the various endpoints that are available to you. You will need to pass in the scim:token value for certain methods; for example when calling POST /tokens/{token}/Users, replace the value of {token} with the scim:token value that you received from the Nintex K2 Cloud operations team. Note that the token and the URL will be unique for each IdP and each domain within the IdP that you are integrating with the product.
OAuth Refresh token expiry
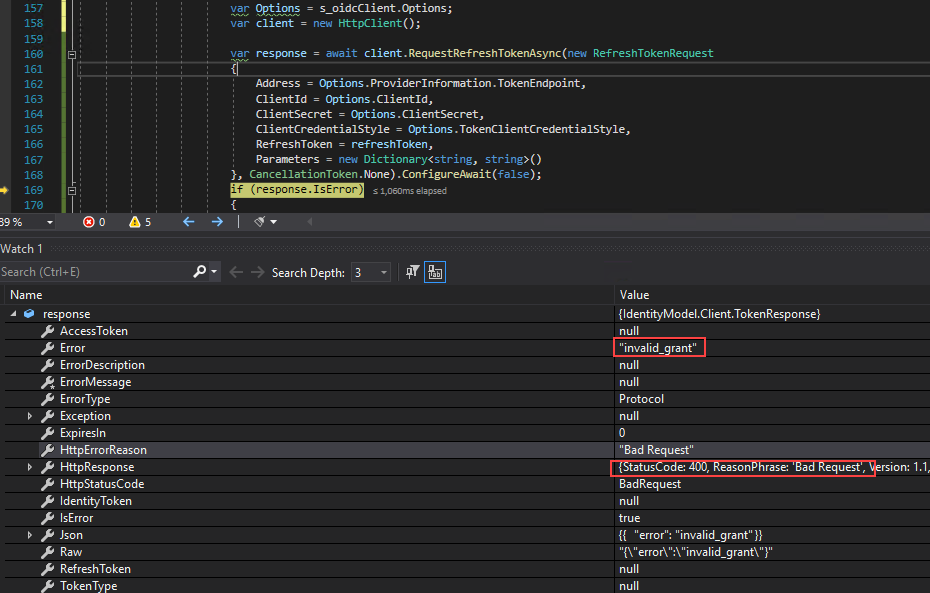
Standard OAuth operation is that your access token expires in a given time, usually 60 minutes, and your refresh token allows you to get a new access token. By default, the refresh token expires every 30 days. If you have a custom SCIM implementation, like described in this topic, it stops working when the refresh token expires and you get an error message.
Here you can see an HTTP response 400, Bad Request with the invalid_grant message when you call the RequestRefreshTokenAsync directly from an HttpClient:
To get a valid token, sign in again to perform the consent flow so that the IdentityTokenService can issue you a new refresh token.