How To: Configure and use the "Wait for External System" option in a workflow
This topic explains how to configure and use the Wait for external system option in a SmartObject workflow step.
The Wait for external system option (sometimes also called an asynchronous server event) provides a way to pause a workflow and wait for an external application to finish doing something. Essentially, it is like assigning a task to a system, and the workflow will wait for that system to finish its work before continuing. The duration of external system events is often unpredictable; by using this option you can configure your workflow step to wait until the external system confirms that it is finished.
As an example, you might have a sales order process, where the workflow calls an external service to place an order. The external service can take hours to complete its part of the order request before sending back a confirmation. It would be inefficient to poll the external system to determine if the order is processed; the "Wait for External System" option would be more efficient. You would configure the Wait for external system option on the SmartObject that represents the external service, which pauses the workflow until the external system confirms the order is processed by calling back to the server with the serial number. The Sales Order workflow continues once it has received confirmation from the external system that the order was processed.
To configure this feature in the workflow, check the Wait for external system check box in the Options section of the configuration panel on a SmartObject step. You will use the SmartObject input mappings to pass the workflow step's unique serial number (SN) to the external system. The external system needs to use this Serial Number to connect back to the system and tell it which workflow instance to carry on with. The external system can also use the SN to open the workflow and set workflow variables values, before telling the system to complete the SmartObject event.
Configuring the "Wait for External System" option
Scenario
This example contains a few basic components: a SmartObject to represent the external system interface, a workflow that calls the SmartObject with the Wait for External System option enabled, and some sample code that will complete the SmartObject step as if it was the external system calling back to the system. For the purposes of this example, the SmartObject will store the serial number, and the code will require the user to enter the serial number of the specific workflow instance step to complete. (Normally, you would pass the serial number to the external system so that the external system can use the serial number again to complete the workflow step.)
You can follow the steps below that describe how to implement the sample scenario, or you can download and deploy the WaitForExternalSystemSample.zip solution. The solution includes the following:
- External system Sample App is the compiled ExternalSystemSample application that you can run to simulate the external system calling back to the system.
- External System Sample Source is the source code for the application that a developer can edit and recompile, if needed
- External system Sample Package is the deployment package that contains the SmartObject and the workflow
After downloading the solution, deploy the package to your environment, enable the REST API, and then continue from the Test the Solution step to test the solution. (This sample solution is based on the standard Denallix environment, so you might need to edit the application's configuration file or edit the sample code for it to work in your environment.)
Steps
In the following steps you create a SmartObject, Workflow and code that completes a SmartObject step in the workflow and tests out the solution.
Setup Steps
The following steps set up the scenario from start to finish. If you want to skip the setup steps and view the topic step, go to Create the Workflow Step.
-
Create the SmartObject that will act as the external system and will store the serial number
- Launch the Designer and create a new category for your application.
- Using the Designer, create the External System SmartObject SmartObject as shown below.
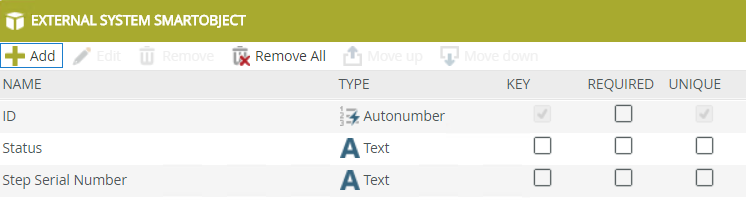
Properties
Type Key Required Unique ID Autonumber Yes No Yes Status Text No No No Step Serial Number Text No No No
Create the Workflow
In this step, you create and configure a workflow called Sample External System Workflow and configure workflow permissions.
- Create the Workflow and configure the Wait for External System step
- Launch the Designer and choose a category for the workflow. (Our example uses the category K2 Documentation). From the the Designer locate All Items > K2 Documentation and right click the Workflows category. From the menu, select New Workflow.

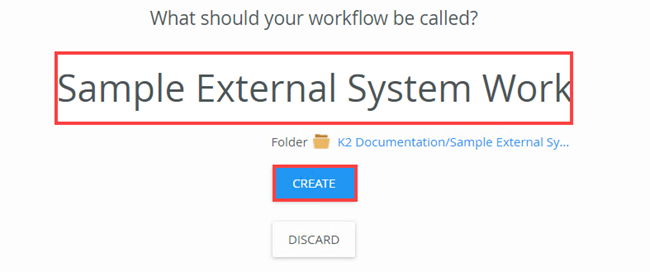
- Name this workflow Sample External System Workflow and click Create.
- You start this workflow manually, so no configuration is required on the Start step.
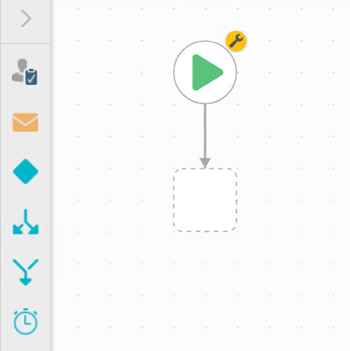
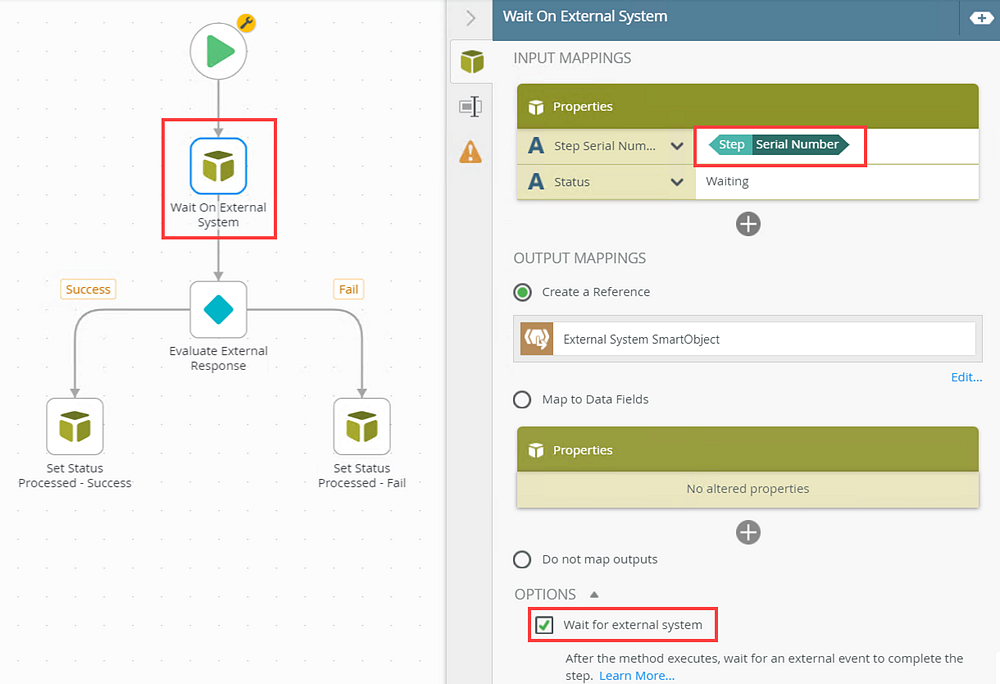
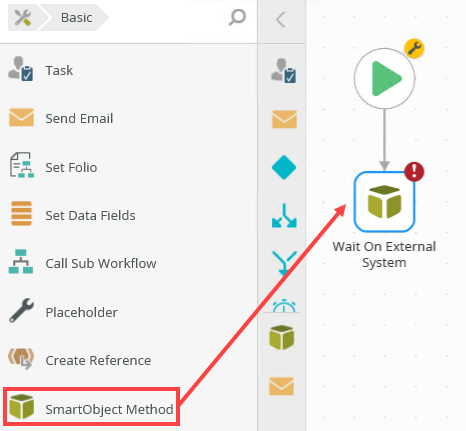
- From the Toolbox, click the Basic category and drag the SmartObject Method step onto the canvas. Change the step name to Wait On External System. This SmartObject sends information to the external system and waits for the external system to send a message back to continue with the workflow.
- Select the SmartObject Method step, and then select External System SmartObject. This SmartObject contains the ID, Status, and the Step Serial Number information that the external system will use to complete the workflow. From the Method menu, select the Create option.

- In the Input Mappings section, add the Step Serial Number and Status properties. Expand the Context Browser and from the Workflow Step properties, drag and map the Serial Number property to the Step Serial Number property. Type Waiting as the Status property value.
Serial Number is the important part here: remember that this is the unique value that the external system will have to use to connect back to the system and tell the workflow instance to continue.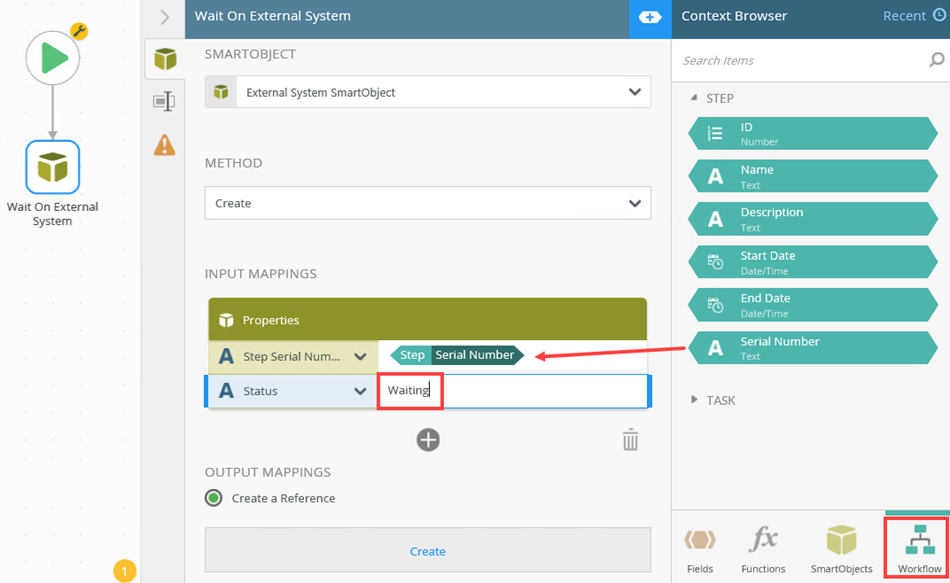
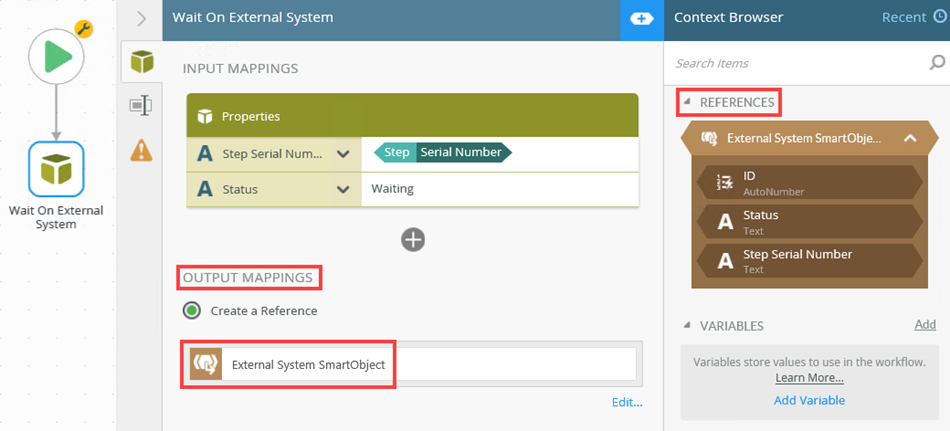
- In the Output Mappings section, select the Create a Reference option and click Create. This creates the External System SmartObject reference which you can then use later on in the workflow.
-
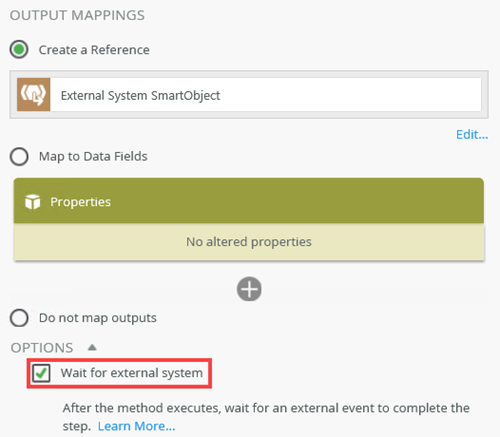
Scroll down and expand the Options section. Check the Wait for external system check box. When the workflow reaches this step, the Status changes to Waiting and the workflow waits for the external system to complete and send back a success status to the workflow.
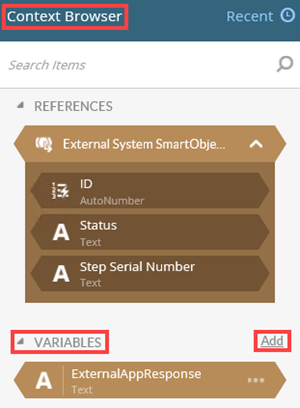
- You can create variables in the workflow to capture data returned from the external system. Here we will just add one sample variable that the external system will set. From the Context Browser, click Add and add a text variable called ExternalAppResponse.
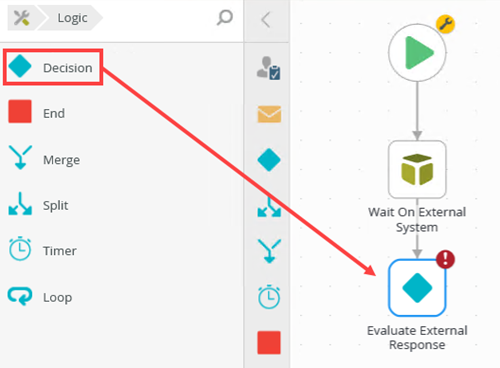
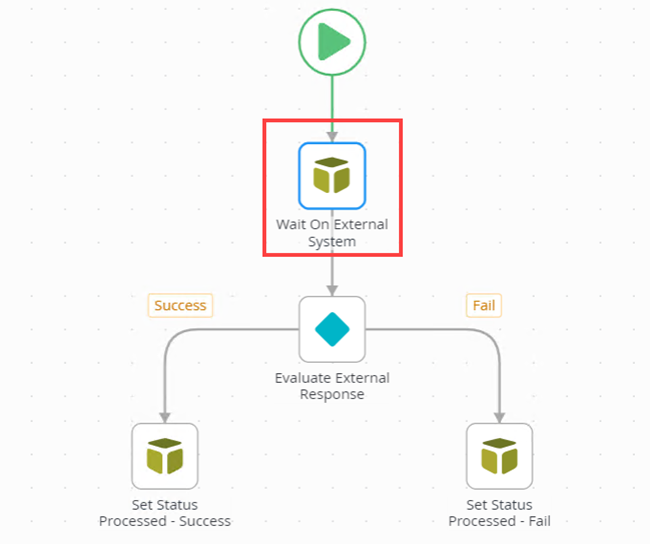
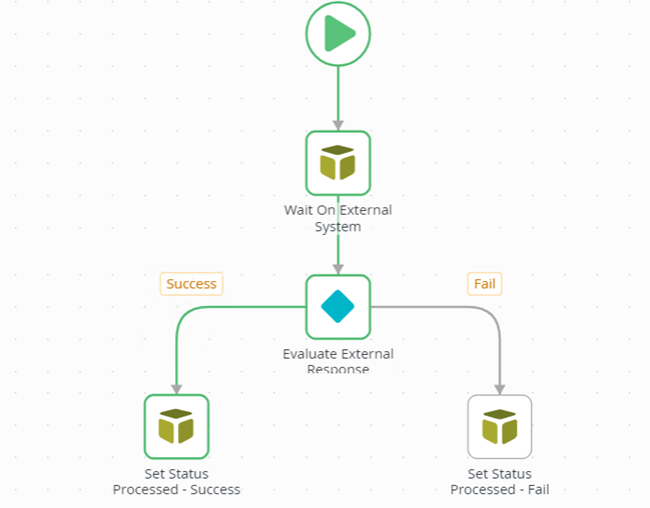
- Now you add workflow logic to follow a different path, based on the variable that was set by the external system. From the Toolbox, click the Logic category and drag the Decision step onto the canvas and connect it to the Wait On External System SmartObject step. Change the step name to Evaluate External Response. After the external system sends the message to finish the Wait On External System SmartObject step, it passes back a response through the variable called ExternalAppResponse. The decision step then sends the workflow either in the Success or Fail path, based on the response from the external system.
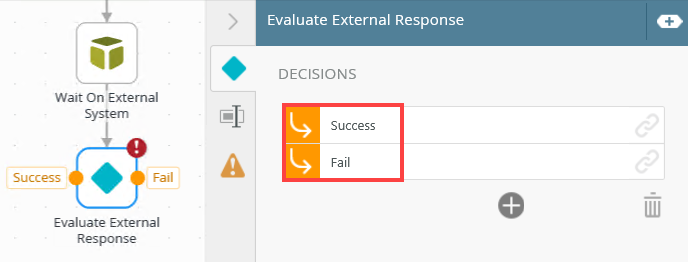
-
Select the Decisions step and expand the Configuration Panel. Add Success and Fail as the two decisions paths.
-
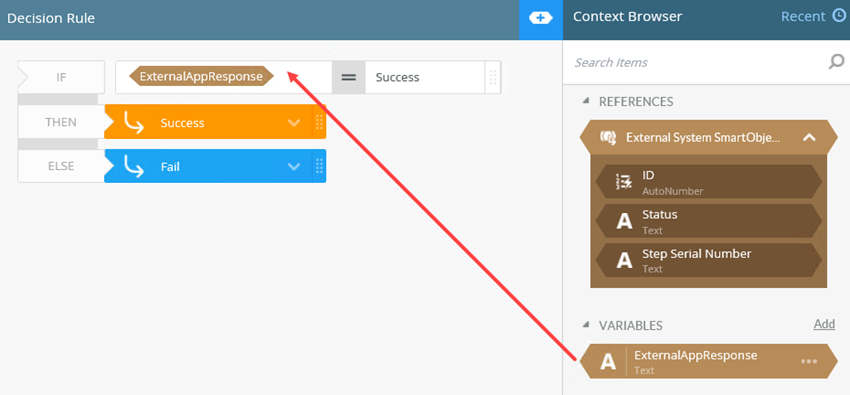
Select Custom Rule and click Edit Decision Rule.
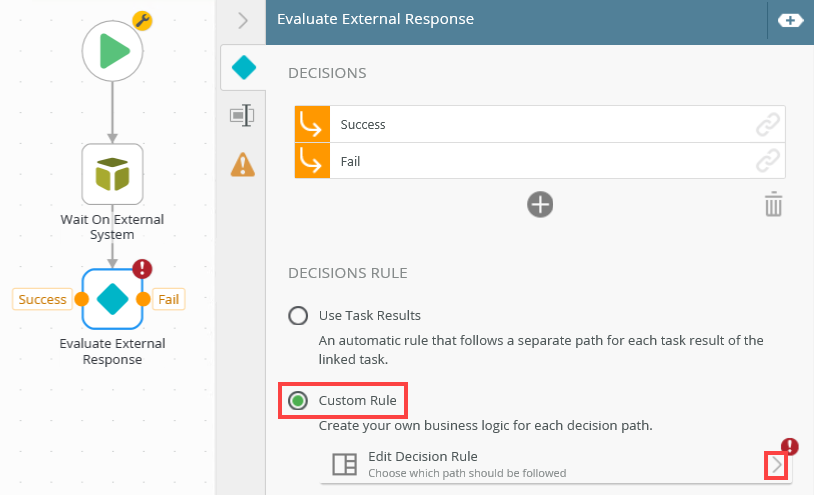
- Use the ExternalAppResponse variable to specify which path is followed based on the data received from the external system. In this example, the workflow follows the Success path if the value from the external system is Success.
- Now you will add steps to update the SmartObject based on the external system response. (This is not required for implementing the Wait for External System option. We are just adding these steps to show that the workflow is executing correctly based on the external system's response.)
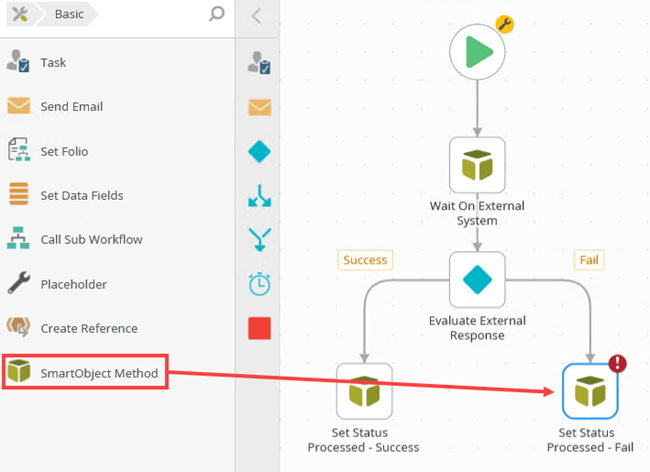
From the Toolbox, click the Basic category, drag the SmartObject Method step onto the canvas and connect it to the Success path. Change the step name to Set Status Processed - Success. This SmartObject sets the Status property to Processed - Success.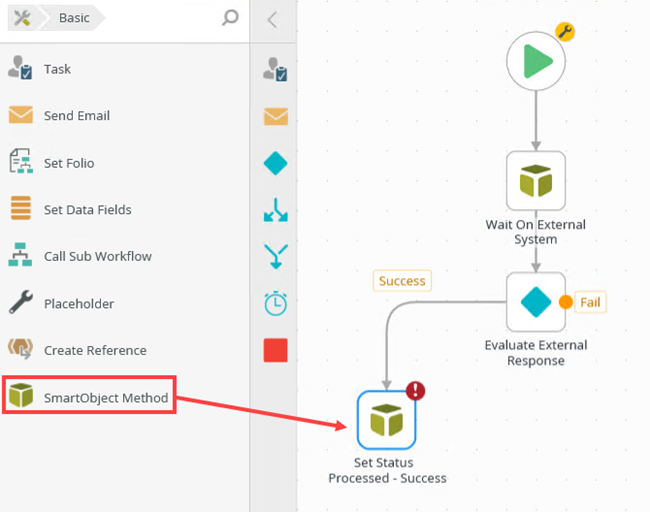
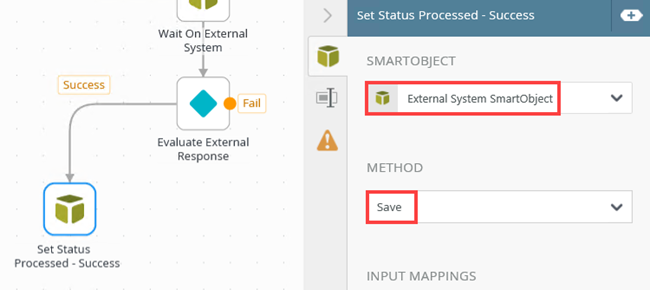
- Select the SmartObject Method step, and then select External System SmartObject. From the Method menu, select the Save option.
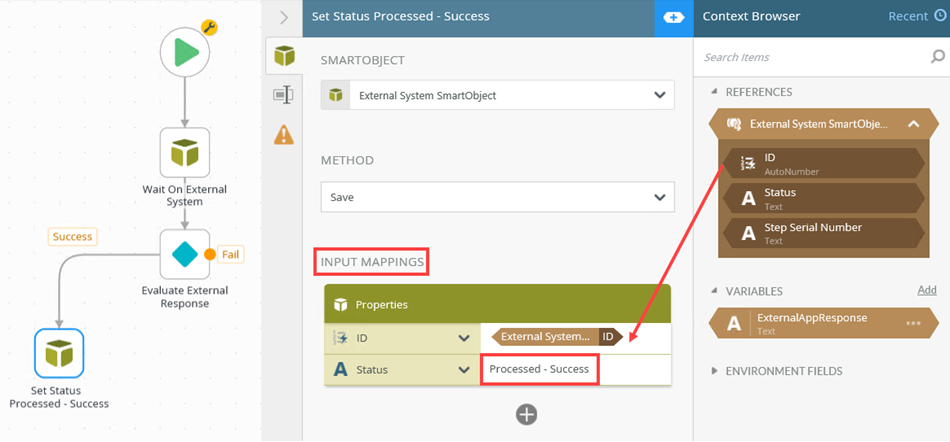
- In the Input Mappings section, add the ID and Status properties. Expand the Context Browser and the External System SmartObject Reference. Drag the ID reference into the ID property. Type Processed - Success as the Status property value.
-
From the Toolbox, click the Basic category, drag the SmartObject Method step onto the canvas and connect it to the Fail path. Change the step name to Set Status Processed - Fail. This SmartObject sets the Status property to Processed - Fail.
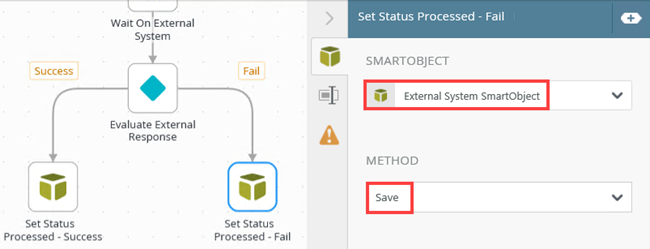
- Select the SmartObject Method step, and then select External System SmartObject. From the Method menu, select the Save option.
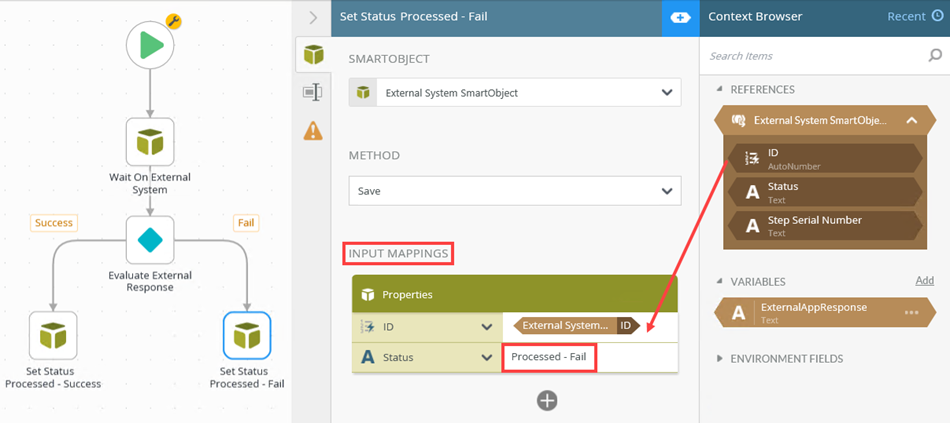
- In the Input Mappings section, add the ID and Status properties. Expand the Context Browser and the External System SmartObject Reference. Drag the ID reference into the ID property. Type Processed - Fail as the Status property value.
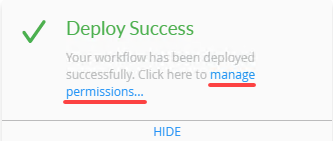
- Select the File menu and Deploy the workflow.

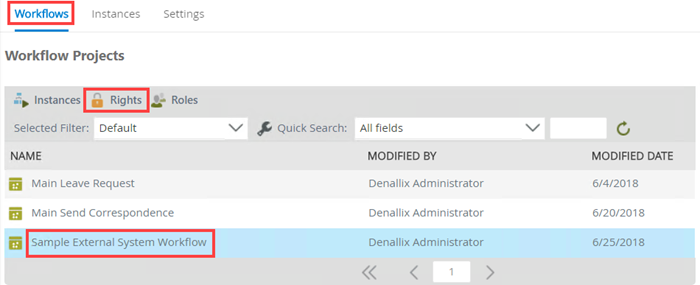
- After successful deployment use the manage permissions... link and navigate to Management to set the workflow rights.
- On the Workflows tab select the Sample External System Workflow and click Rights.
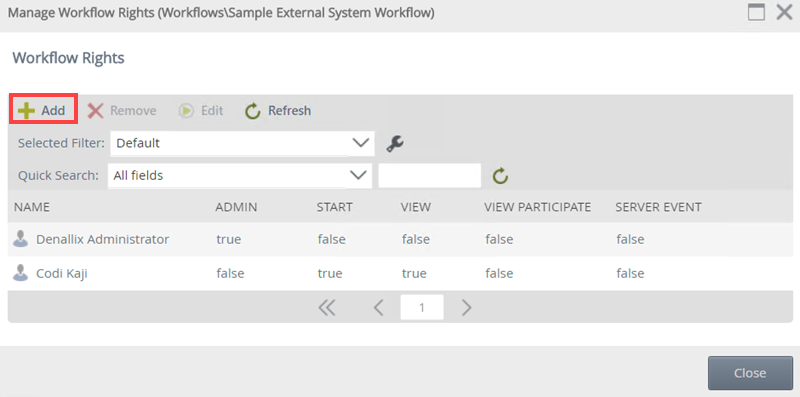
- Click Add to add more users and set workflow rights for the added user. In this example Codi Kaji is added and granted Start and View rights on the Sample External System Workflow. For more information on workflow rights, see the Workflow Designer Permissions topic.
- Launch the Designer and choose a category for the workflow. (Our example uses the category K2 Documentation). From the the Designer locate All Items > K2 Documentation and right click the Workflows category. From the menu, select New Workflow.
-
Create the code that completes the SmartObject workflow step
In this step, you create the code that tells the system to complete the waiting SmartObject step. You add code to enable the communication between the external system and the workflow. After the external system gets the call to perform whatever it needs to do from the SmartObject, and it completes its work, it must tell the workflow that it is done. It does this by using the SmartObject step serial number (SN).
Using the Workflow REST API
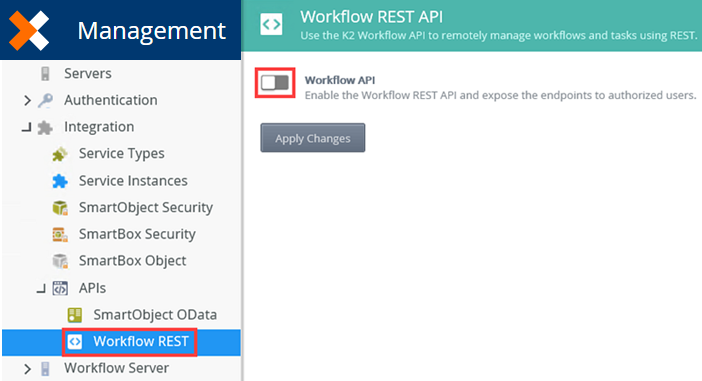
Knowledge of Visual Studio, JSON, and the REST API is required to fully understand and implement the steps in this part. It contains illustrations for how to enable the workflow REST API endpoints and the code necessary from the external system to communicate back to the system- If you want to use the Workflow REST API to write code that tells the system to complete the waiting event, you will first need to enable the Workflow REST API if it is not yet enabled. You enable this feature to expose the endpoints to manage workflow, workflow instances, and tasks. (For more information on configuring the Workflow REST API, see Configure the Workflow REST API.) From Management browse to Integration > API's > Workflow REST. Click the slider to enable the Workflow REST API.
- The enabled Workflow API shows.
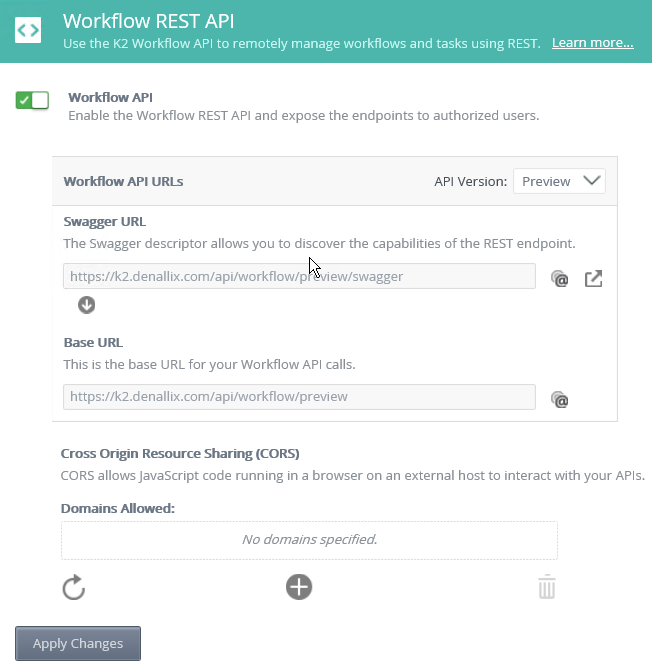
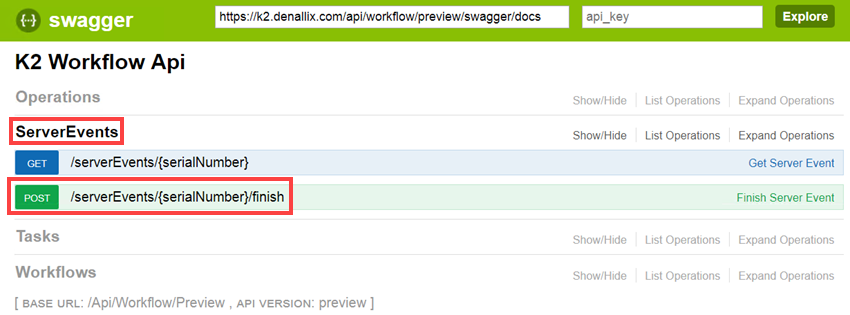
- Click Open Link to open the workflow API Swagger page and access the list of operations, tasks, and workflow functions.

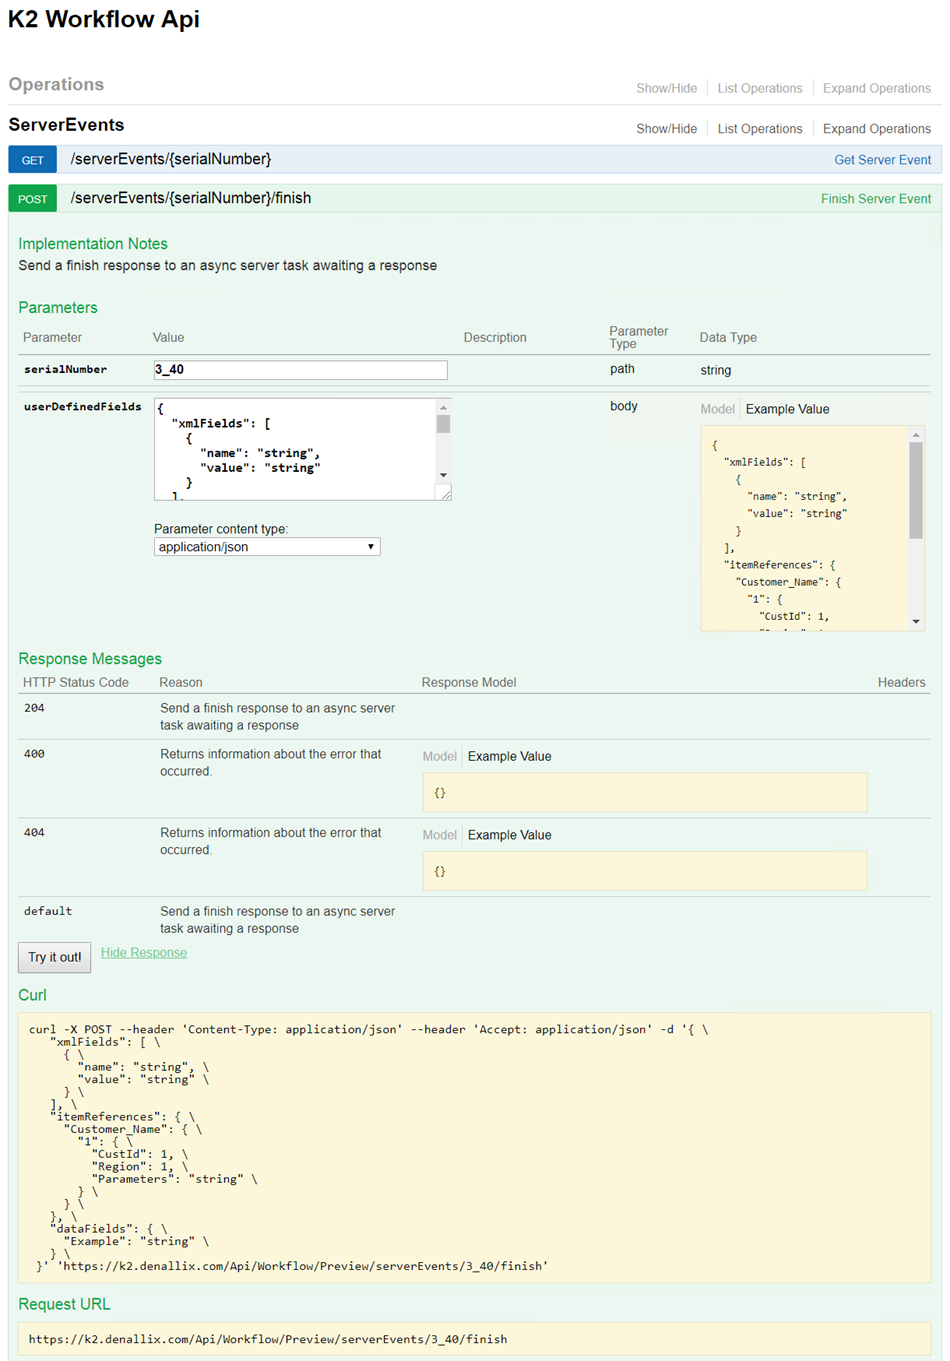
- To successfully integrate a workflow with an external system and pass data back into your workflow, use the POST serverEvents/{serialNumber}/finish method of the ServerEvents operation. This function completes the server event using a serial number. You can also supply values for data and XML fields, or Item References, using JSON.
- Use the Try It Out! button on the Swagger page to familiarize yourself with the endpoint functions.
For more information on the Swagger URL, see the Swagger URL section in Configure the Workflow REST API.
Now you can write the code that actually calls the REST API to complete the waiting event, You must include the step's serial number within the finish endpoint path.
Example: https://[server URI]/api/workflow/[VERSION]/serverEvents/" + stepSerialNumber + "/finish
- [server URI] is the URI to your environment. You can get this value from the page where you enabled the Workflow REST API.
- [VERSION] is the REST API version (typically "v1" but can be something else depending on your version of Nintex K2). This is found in the Management site in the REST integration settings. For more information see the Workflow REST API Version section in Configure the Workflow REST API.
- stepSerialNumber is the serial number of the workflow step that is waiting on the external application to complete. Use this in the URL path for the REST endpoint.
You can also set the value of a workflow variable. In this example, the URI part datafields is used to send a response back to the workflow using a variable named ExternalAppResponse. The values is either Success or Fail.
CopySend a response back to the workflow
/// <summary>
/// This method uses the serverEvents REST endpoint to finish an Asynchronous SmartObject event. Include the Step serial number within the
/// "finish" endpoint path.
/// e.g. https://[server DOMAIN]/api/workflow/[VERSION]/serverEvents/" + stepSerialNumber + "/finish"
/// - [VERSION] is the REST API version, which may be something like "v1" or "preview". This is found in the Management site under the REST
/// integration settings.
///
/// NOTE: it also returns a "Success" or "Fail" message back to the workflow through the datafield called "ExternalAppResponse" using JSON.
/// </summary>
/// <param name="stepSerialNumber">Serial number of the workflow step(SmartObject Event) that is waiting on this external application to finish. Use this in the
/// URL path for this REST endpoint.</param>
/// <param name="appResponse">Pass in a response with this parameter to send back to K2 using a workflow defined variable named "ExternalAppResponse". Values will either be "Success" or "Fail"</param>
/// <param name="baseURL">Base URL for the REST endpoint. Build the full REST endpoint URI with either V1 or Preview version of the REST serverEvents endpoints.</param>
///
protected async void FinishK2StepbyREST(string stepSerialNumber, string appResponse, string baseURL) {
HttpResponseMessage rm;
// Build the JSON string to send back datafields with data, if necessary. In this example, we're passing back a response from this external application of "Success" or "Fail"
// through a datafield called "ExternalAppResponse", which corresponds to a variable defined in the running instance of the workflow.
string userDefinedFields = "{\"dataFields\": { \"ExternalAppResponse\": \"" + appResponse + "\"}}";
// Example: "https://[server DOMAIN]/api/workflow/preview/serverEvents/" + stepSerialNumber + "/finish";
string requestUri = baseURL + stepSerialNumber + "/finish";
System.Net.Http.StringContent httpContent = new StringContent(userDefinedFields, Encoding.UTF8, "application/json");
try {
rm = await k2CloudClient.PostAsync(requestUri, httpContent);
if (rm.StatusCode == System.Net.HttpStatusCode.Unauthorized) {
// Unauthorized user account making the event Finish call.
// TODO: Ensure external application is running under an account with access to complete the workflow step in K2.
} else if (rm.StatusCode == System.Net.HttpStatusCode.BadRequest) {
// Could be badly formed JSON string with datafield sent back to K2.
// TODO: Ensure datafields sent back, exist as variables in the workflow.
}
} catch(Exception ex) {
// handle errors accordingly
}
} - If you want to use the Workflow REST API to write code that tells the system to complete the waiting event, you will first need to enable the Workflow REST API if it is not yet enabled. You enable this feature to expose the endpoints to manage workflow, workflow instances, and tasks. (For more information on configuring the Workflow REST API, see Configure the Workflow REST API.) From Management browse to Integration > API's > Workflow REST. Click the slider to enable the Workflow REST API.
-
In this step you test the solution by manually starting an instance of the Sample External System Workflow. Keeping with the sales order scenario, an external application represents the external system and processes the order confirmation. The workflow starts and sends order information to the external system through the Wait On External System SmartObject step. In this example it sends the Step Serial number to the external system and the Status property gets set as Waiting. The SmartObject waits for the external application to send a message back, identifying the workflow task with the Step Serial number, and the workflow continues. A decision rule then send the workflow either in the Success or Fail path based on the response from the external system.
You can use the View Flow to track the progress of the workflow, or use a SmartForm to track how the Status property changes on the SmartObject.
Test by using the View Flow to track the progress
In this test you start the workflow manually and use the instance view flow to track the progress.
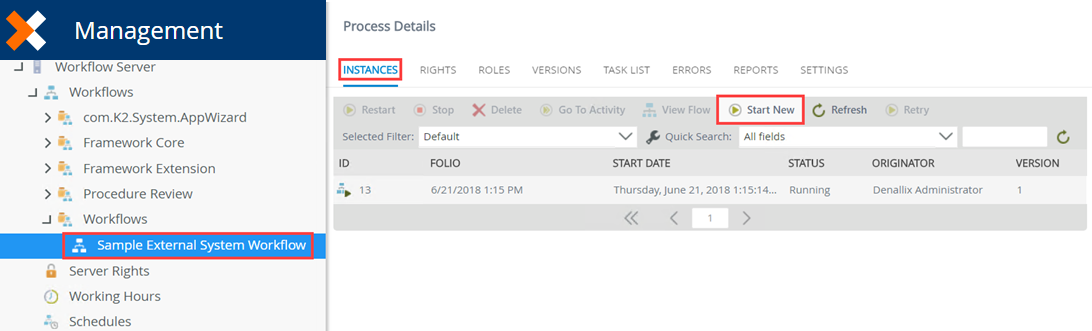
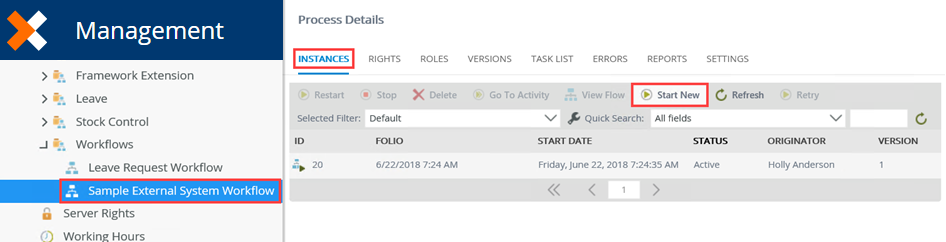
- Using Management, manually start an instance of Sample External System Workflow.
- From Management, select the Reports tab. Scroll down to the All Instances section, select the workflow and click the View Flow link.
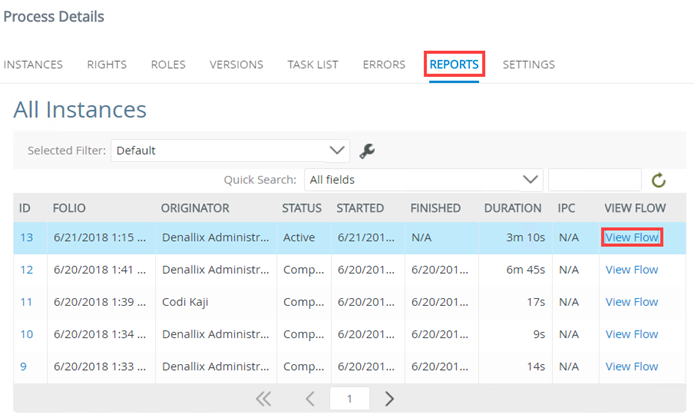
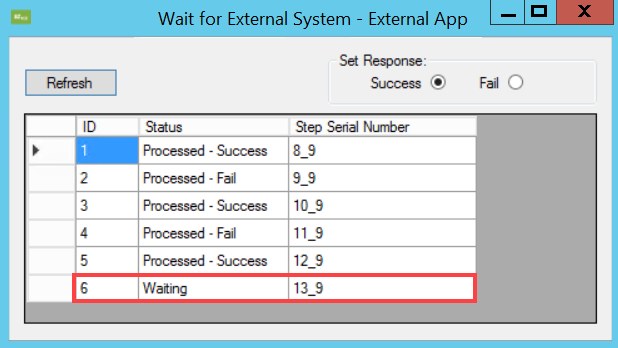
- At this stage, the workflow is active and currently at the Wait On External System step. The Step Serial Number was sent to the external system and the Status property is set as Waiting.
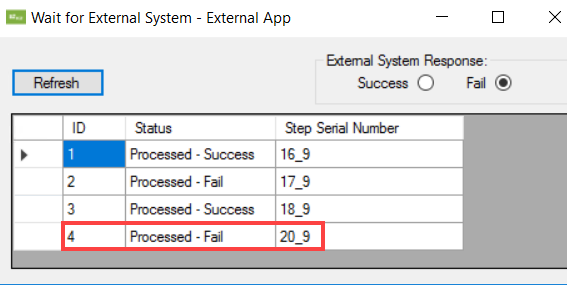
- To illustrate the external process, open the Wait for External System - External App by running the ExternalSystemSample.exe. This simulates the external order confirmation process, but is a simple app that you can download as proof of concept. Notice the order is currently in a Waiting state.
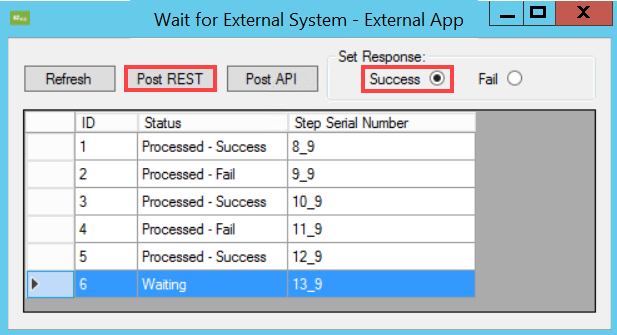
- To simulate and finalize the external event, select the order confirmation and set the response to Success. Click Post REST. This response is sent back to the workflow.
- Refresh the external app to show the Processed - Success status.
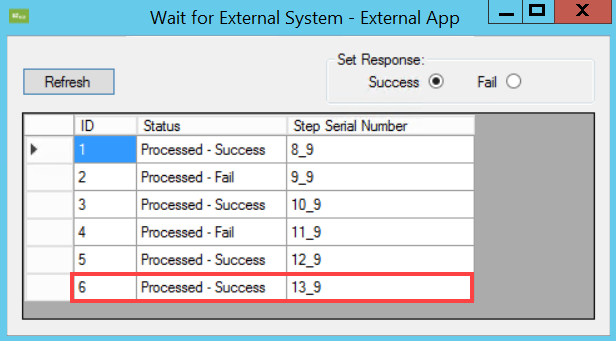
- Refresh the View Flow. At this stage, the Wait On External System SmartObject step in the workflow received the Processed - Success status message from the external system and the step went from waiting to moving on to the next step. The value passed back from the external system into the variable was evaluated by the custom decision rule and the Success path was followed.
Test by using a view to track the SmartObject Status property changes
In this test, you generate a list view on the SmartObject and track how the process updates.
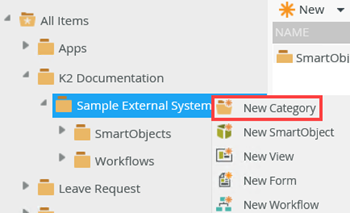
- From the the Designer locate All Items > K2 Documentation and right click and select Sample External System Async category. From the menu, select New Category.
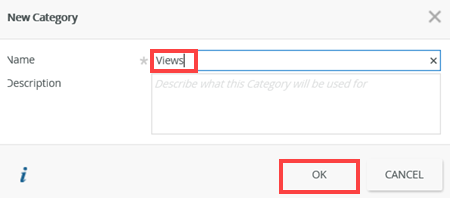
- Name this category Views. Click OK.
- From the the Designer right click External System SmartObject and select Generate Views.

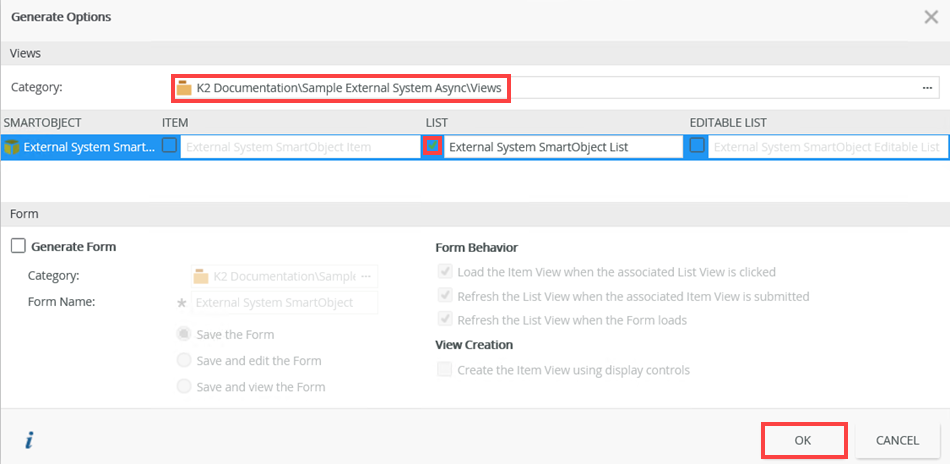
- On the Generate Options page, make sure that the list view is generated in the correct category. In this example, it is generated in the Views category. Check the List check box and then click OK.
- From Management manually start an instance of Sample External System Workflow.
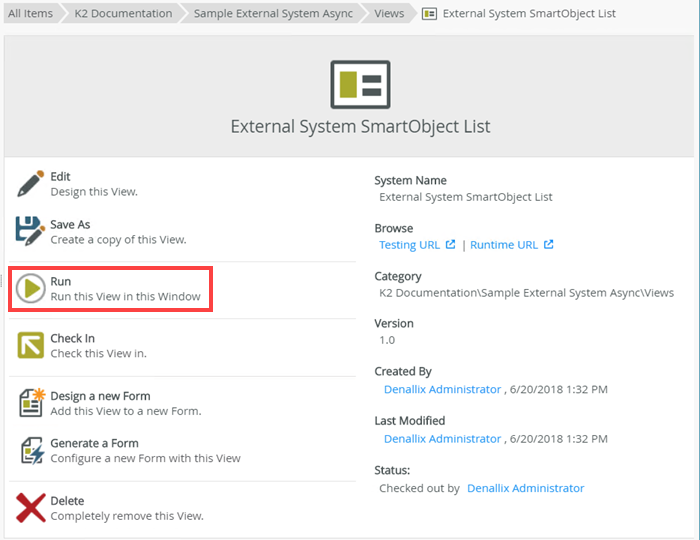
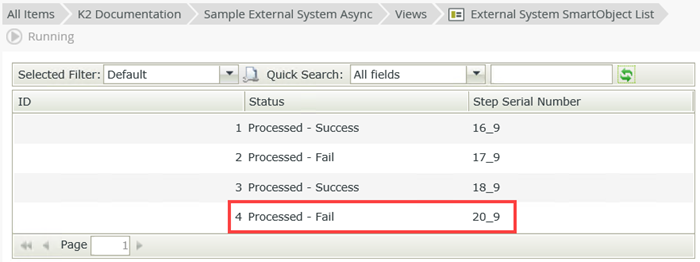
- From the Views category select the External System SmartObject List view and click Run.
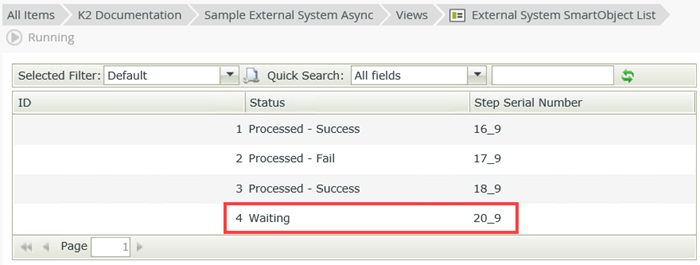
- With the workflow started and active, the status is Waiting.
- To illustrate the external process, open the Wait for External System - External App by running the ExternalSystemSample.exe. This simulates the external order confirmation process, but is a simple app that you can download as proof of concept. Notice the order is currently in a Waiting state.
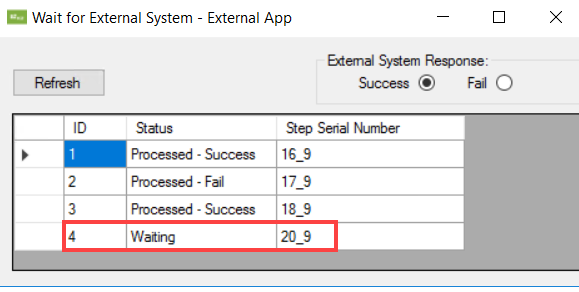
- To simulate and finalize the external event, select the order confirmation and set the response to Fail. Click Post REST. This response is sent back to the workflow.

- Refresh the external app to show the Processed - Fail status.
- Refresh the External System SmartObject List view. Notice the Status property updated and shows Processed - Fail. The step waited for a reply from the external system (in this case Fail) and then updated the SmartObject Status property accordingly. The workflow continued and finished successfully.
- Using Management, manually start an instance of Sample External System Workflow.
Review
In this how-to, you created a solution with a SmartObject, Workflow and code to demonstrate the Wait for External System feature.