How To: Create a composite SmartObject
This article illustrates how to build a composite SmartObject. Composite SmartObjects combine data and methods from different data sources, much like a join statement in SQL. You can use data sources from different systems, such as a web service and a SharePoint list. This demonstration combines data from a SmartBox SmartObject and Active Directory (AD).
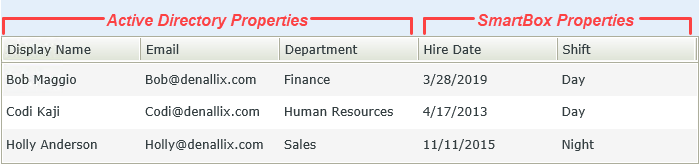
A list view based on a composite SmartObject
Scenario
You work in Human Resources where you maintain employee accounts in Active Directory. You have a SmartBox SmartObject that contains additional information about each employee, including their hire date and shift. Each month you run a report that includes data from Active Directory and the SmartBox SmartObject. To accomplish this, you build a composite SmartObject that joins data from both sources and shows it in a list view.
Steps
For this scenario, you create a SmartBox SmartObject for the additional employee details, then populate the list with data. You create a composite SmartObject and add the Get Users method from the Active Directory service object. Next, you add a second method, Get List, from the SmartBox SmartObject and bind two properties (AD.Name = SmartBox.UserName) to create the join. Finally, you design a list view from the composite to display your reporting data.
Setup Steps
The following steps set up the scenario from start to finish. If you want to skip the setup steps and view the topic step, go to Create a Composite SmartObject.
- From the Designer, create a SmartBox SmartObject called Employee Details. Use the table below as a guide for adding properties. (Optional) Add categories to keep your work organized. From the Management site, add three list items to the SmartObject.
Property Name Type Notes UserName Text You assign this property to the AD.Name property which creates the link between data sources.
HireDate Date Shift Text List Item Values UserName HireDate Shift Denallix\Bob 03-28-2010 Day Denallix\Codi 04-17-2013 Day Denallix\Holly 11-11-2015 Night - Launch the Designer.If you do not know how to access the Designer, see Accessing Sites.
- Create categories to keep your work organized. Right-click All Items and select New Category. Use the image below as a guide if necessary.
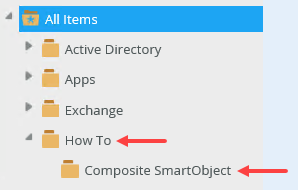
- Right-click Composite SmartObject and select New SmartObject.
- Keep the default SmartBox option. Name the SmartObject
Employee Details
and click Create.You have two options for the SmartObject type. A SmartBox SmartObject allows you to create the data source from scratch, defining the properties (think columns in a table) and methods (methods for interacting with data such as create, update, and delete) that you need. The system creates your SmartBox as a table in the K2 database on SQL Server. The Advanced SmartObject option allows to you use properties and methods from existing service objects, such as connectors to Active Directory, Azure SQL Databases, CRM, and SharePoint to name a few.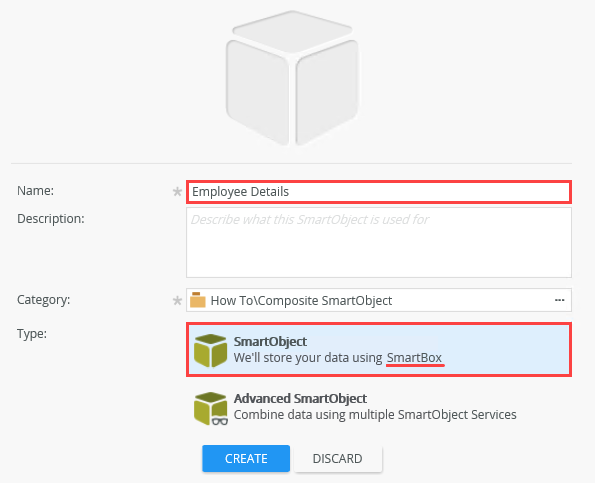
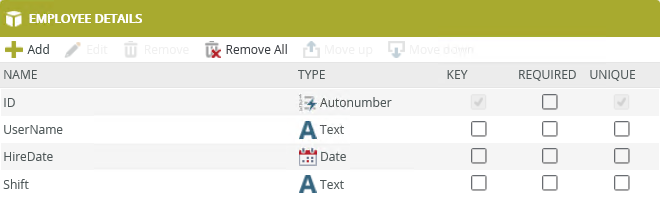
- Add the following properties: UserName (Text), HireDate (Date), and Shift (Text). Click Finish (in the upper right corner of your screen) to save and exit.
- Before moving on, add several items to your SmartObject. Launch the Management site in a new browser tab. Expand the Categories > How To > Composite SmartObject nodes. Select Employee Details. You see the SmartObject details in the central pane. Locate the Methods section. Click Create and then Execute.

- Add at least three items to your SmartObject. For the UserName, enter
Denallix\Bob
then for the HireDate, enter
03-28-2010
and finally, for the Shift, enter
Day
then click Execute. Click Done to close the results screen and return to the details.
(You can also enter your own date and shift, just make sure the user name matches AD user names. This is the property that links the SmartBox data with data from Active Directory.)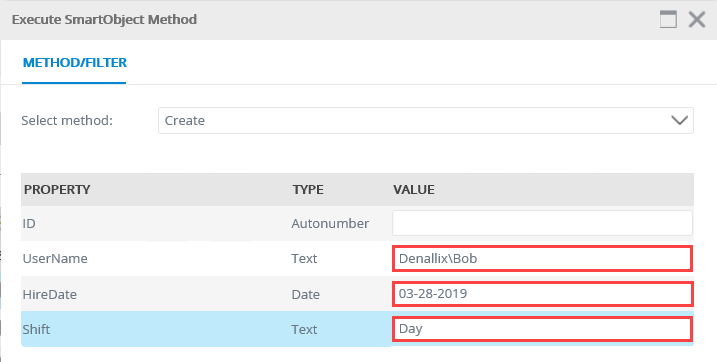
- Add at least two more items. Use the table below as a guide if necessary (be sure the user names match exactly.) Note that you can only add one item at a time; from the details screen, click Create > Execute. Click Done to return to the details screen.
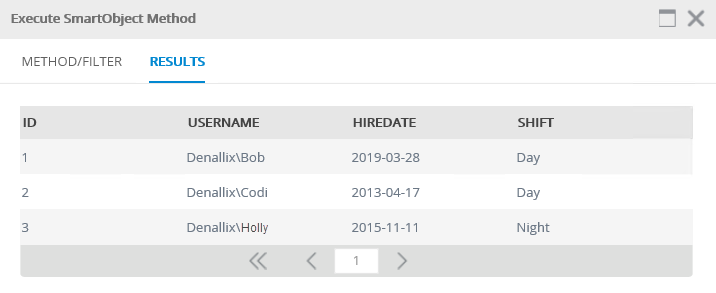
UserName HireDate Shift Denallix\Codi 04-17-2013 Day Denallix\Holly 11-11-2015 Night - Before you continue, execute the SmartObject and confirm you see your data. From the details screen, click the Get List method, then Execute. Click Execute once again (you want to return all records, so you don't need a filter). You see the list items you just entered. Click Done to close the results screen.
- Launch the Designer.
Create a Composite SmartObject
In this step, you create the composite SmartObject that forms a link between two data sources: Active Directory and the Employee Details (SmartBox) SmartObject. The result is a single data source that combines data from two different sources.
- In theDesigner, create an advanced SmartObject called Composite Employee Details. Use the table below as a guide for configuring the service object bindings.
Screen Setting Notes Landing screen Methods (tab) > Add Select a ServiceObject Method Active Directory Service2 > AD User > GetUsers You are retrieving items from Active Directory. Details There are no changes to this screen. Inputs & Outputs Create All This action creates properties in the composite SmartObject and links them to the AD data source properties. ServiceObject Methods > Add SmartBox Service > Employee Details > Get List
You are retrieving items from your SmartBox SmartObject. Add ServiceObject method bindings Create All This action creates properties in the composite SmartObject and binds them to the SmartBox properties. ServiceObject Methods You should see both data sources. - In the Designer, right-click the Composite SmartObject category and select New SmartObject.
- This is the composite SmartObject that binds two data sources into one. Name the SmartObject
Composite Employee Details
and for the Type, select Advanced SmartObject. Click Create.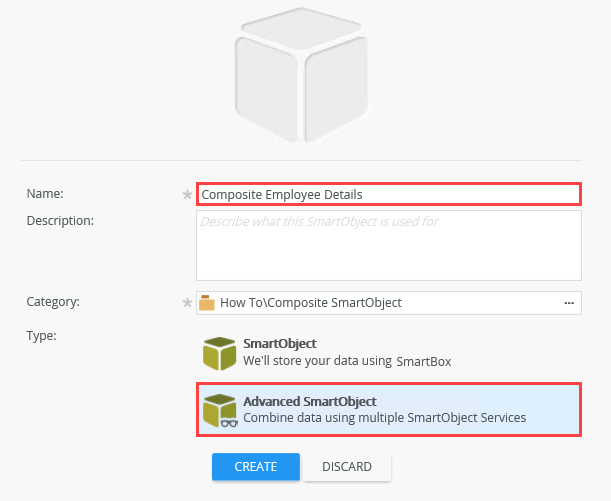
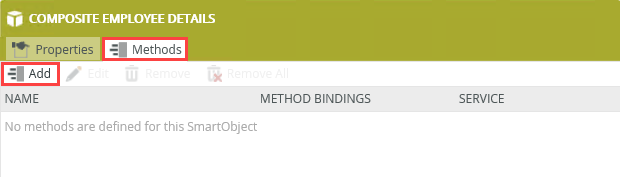
- Next, you add the first data source, Active Directory. Click the Methods tab and click Add.
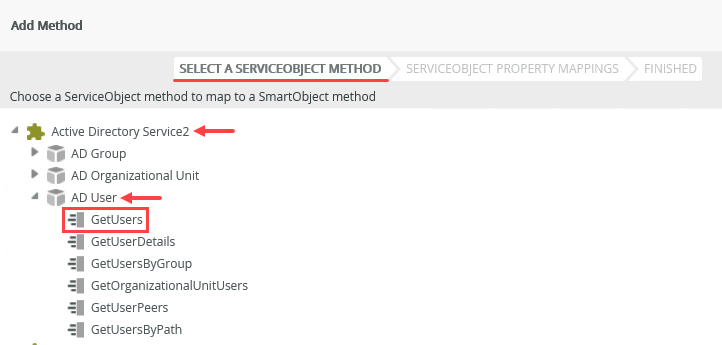
- You are on the Select a ServiceObject Method screen. Navigate to and select Active Directory Service2 > AD User > GetUsers. Click Next. The first method retrieves users from Active Directory.
- You are on the Details screen. There are no changes, click Next.
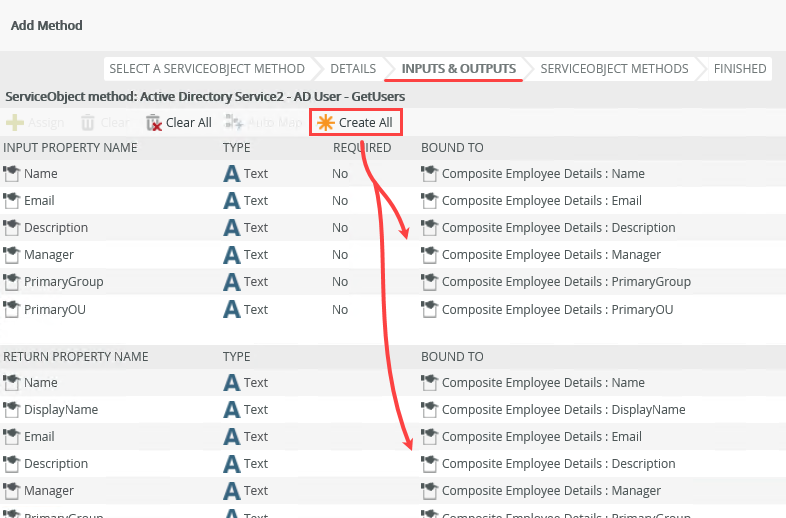
- You are on the Inputs & Outputs screen. Click Create All. This action creates properties in the composite SmartObject and binds them to the AD properties. Input properties filter the data source records, for example, filter by Name. Return properties show the data, for example, you show the Name, Email, and Department as columns in a list view. Creating all saves you time, but you can choose to only include some properties if you prefer. Click Next.
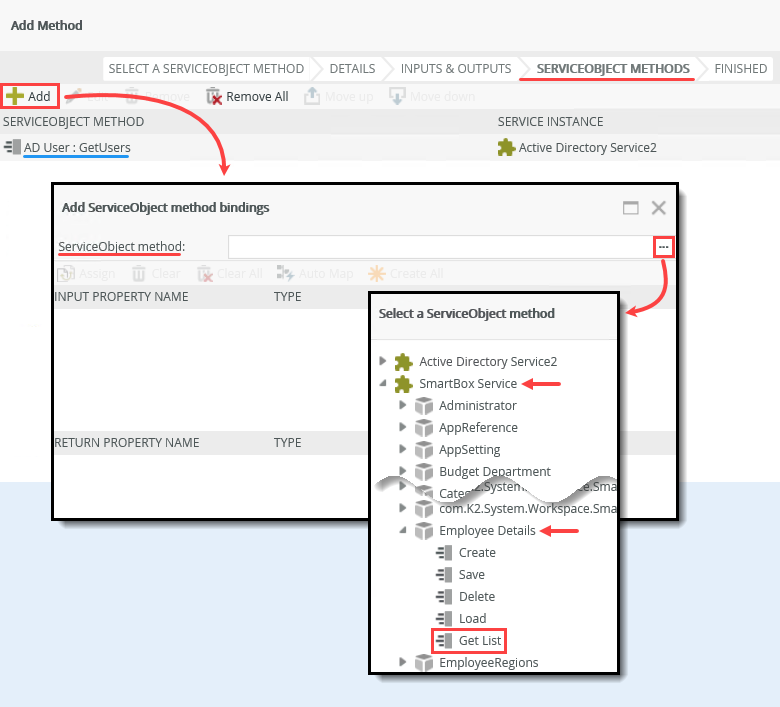
- You are on the ServiceObject Methods screen. You see one method, AD User: GetUsers. Now you add the second data source method from your SmartBox SmartObject. Click Add. Click the ellipses for the ServiceObject method text box. Navigate to and select SmartBox Service > Employee Details (SmartObject) > Get List (method). Click OK.
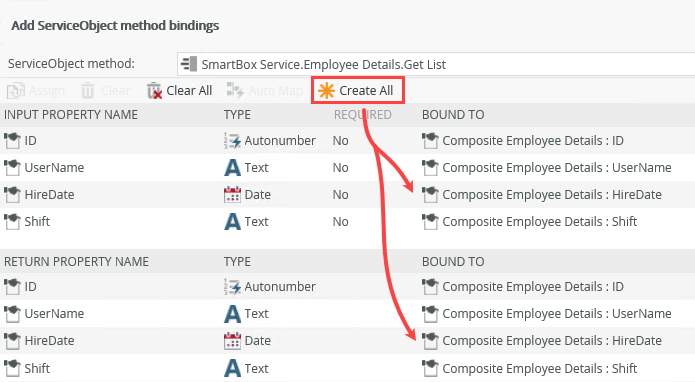
- Click Create All. This action creates properties in the composite SmartObject and links them to the SmartBox properties. Click OK. Click Next.
- Click Add. Select the AD User > Name property and click Assign. From the Property Name drop-down list, select UserName. Click OK.

- The Employee Details > UserName is bound to the AD User > Name property. Notice too that the link type is an inner join. You can change the link type to outer join, left, or right join. Click OK. Click Finish to complete the service object method bindings. Click Finish to save and exit the composite SmartObject.
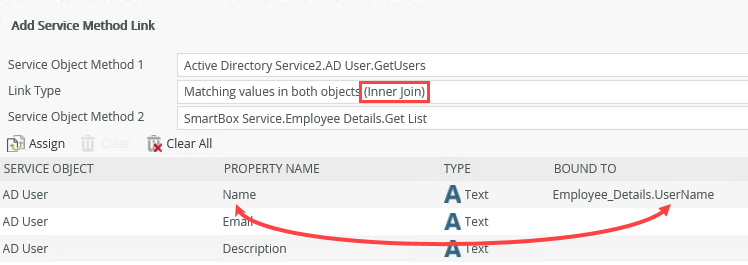
You are on the Service Method Links screen. From this screen, you bind the Employee Details > UserName property to the AD > Name property, forming a join between the two data sources.
- Design a list view from the Composite Employee Details SmartObject and name it Employee Details List View. Select the following fields (only): Email, DisplayName, Department, HireDate, Shift. (Optional) From the design canvas, rearrange the column order so that the display name is first.
Next, you design a list view that shows your composite data.
- Right-click the Composite Employee Details SmartObject and select Design View.
- Name the view,
Employee Details List View
and select the List View option for the type. Keep the box checked to Call this method when the form loads. Click Create.Call this method when the form loads. When you check this box, the system retrieves the items from the associated data source as the form (or view) loads. If you don't want items loaded automatically, uncheck this option. You can configure rules later that specify which items to load and when.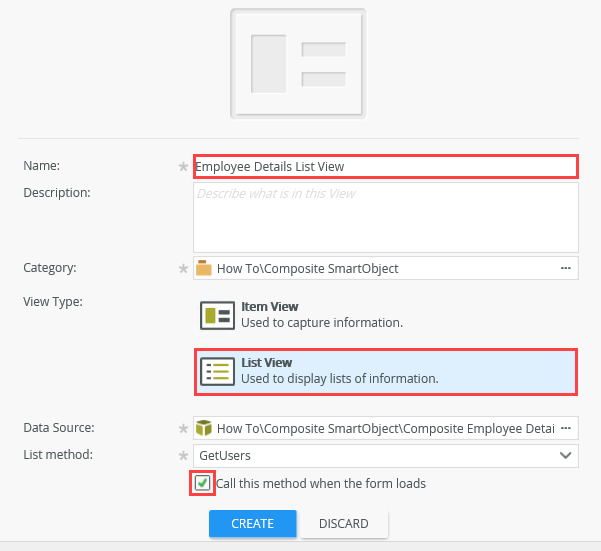
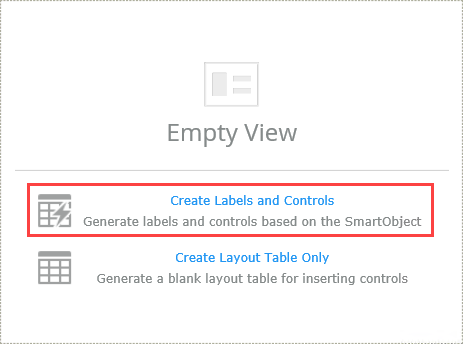
- Click the Create Labels and Controls link.With the Create Labels and Controls option, the system creates a basic layout for you with the controls you select (next). The Create Layout Table Only results in a basic layout table where you add the controls you need. The first option saves you time.
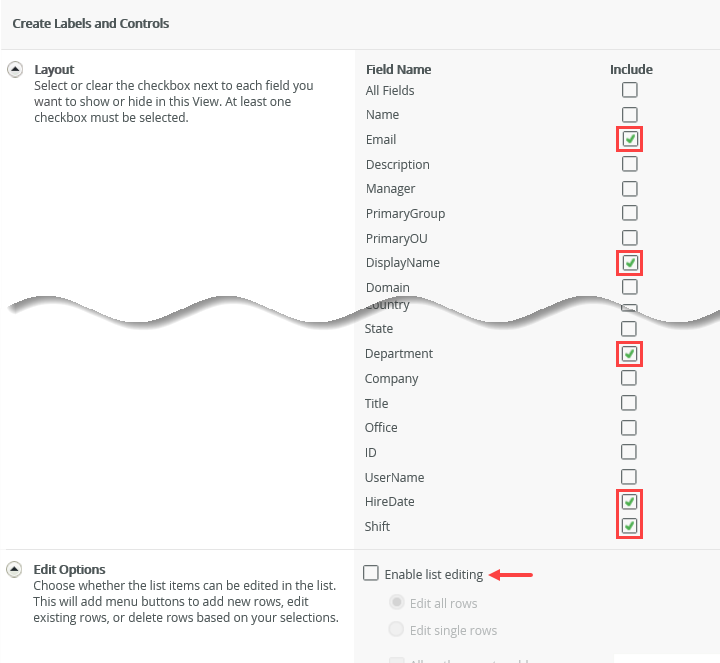
- Include the following fields: Email, DisplayName, Department, HireDate, and Shift. (Email, DisplayName, and Department are coming from AD, while HireDate and Shift are coming from your SmartBox SmartObject. Do not enable list editing. Click OK.
- (Optional) Select the Display Name column and move to the left so that it is the first column in the list.

- Click Finish to save and exit.
Now you see for the first time, the results of your composite SmartObject. You have a list of fields (properties) that you can select to add as columns in your list view. Notice that you see the properties from both data sources.
- Run the Employee Details List View. You see a list containing data from Active Directory (Email, Display Name, Department) and the Employee Details SmartObject (Hire Date, Shift).
- Right-click Employee Details List View and select Run. Notice the list content contains data from both data sources.
- Right-click Employee Details List View and select Run. Notice the list content contains data from both data sources.
Review
Use a composite SmartObject when you want to combine data from multiple sources into one list. There must be a common property between data sources that contains a unique value. This property forms the link that associates the data from one system with another.