Use the SmartObject hyperlink property to navigate to a URL
This article illustrates how to create a SmartObject that stores hyperlinks, and how to show the SmartObject Hyperlink property on a view.
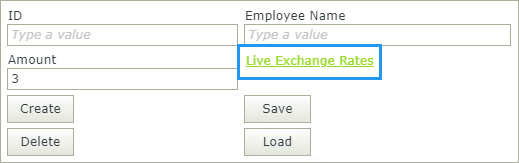
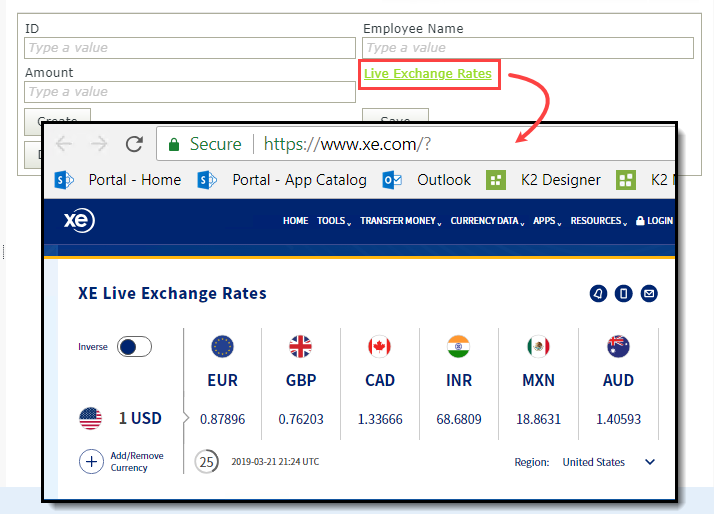
A view with a SmartObject Hyperlink
Try it yourself!
- Configure the navigate To URL action
Use the Navigate to URL action when you want to open a URL or web page. You can open the target URL in the same browser window, a new tab in the same browser, or a model dialog window (similar to a pop-up dialog). - Add an expression to a hyperlink control using SmartObject properties for the expression parameters
Use a Hyperlink control with an expression containing parameters.
Scenario
You work in Human Resources where you maintain an online form for employees to submit expense claims. Your company has a global presence and employees often submit claims for more than one country. As a convenience, you provide a link to an exchange rate website for employees to reference since all amounts must be in US dollars. The link to the exchange site is stored in a SmartObject and you retrieve it by using the load method. Additionally, you can create conditional logic to load a different URL based on the value of another control.
Steps
In this scenario, you build two SmartObjects: Hyperlinks and Expense Details. You generate an Item view based on each SmartObject. Finally, you work with rules on the details view to use a hyperlink when the view loads. In an optional step, you apply an advanced condition that loads a different hyperlink based on the amount of the expense.
Setup steps
The following steps set up the scenario from start to finish. If you want to skip the setup steps and view the topic step, go to Configure the hyperlink control on a view.
- In the Designer, create a SmartBox SmartObject called Hyperlinks. Add one property, SmartObject Hyperlink with a Hyperlink data type. Create a SmartBox SmartObject called Expense Details. Add three properties, Employee Name (Text), Amount (Number), and HyperlinkID (Number). (Optional) Create categories first to keep your work organized.
- Launch the Designer.If you do not know how to access the Designer, see Accessing Sites.
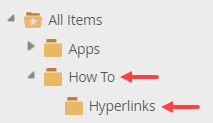
- Create categories to keep your work organized. Right-click All Items and select New Category. Use the image below as a guide for category names.
- Right-click the Hyperlinks category and select New SmartObject. Name the SmartObject
Hyperlinks
and confirm the SmartBox type. Click Create.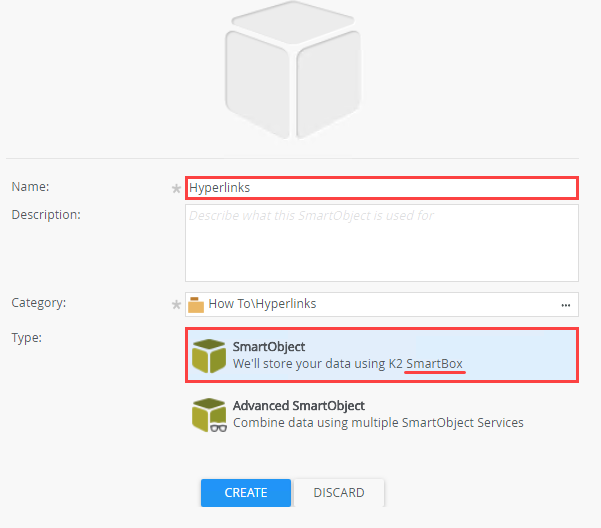
- On the Hyperlinks screen, click Add. For the name, enter
SmartObject Hyperlink
and assign the Hyperlink data type. Click OK. Click Finish to save and exit the SmartObject.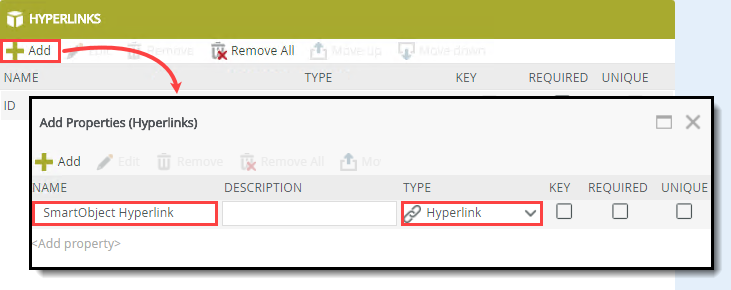
- Create the expense details SmartObject. Right-click the Hyperlinks category and select New SmartObject.
- Name the SmartObject
Expense Details
and confirm the SmartBox type. Click Create.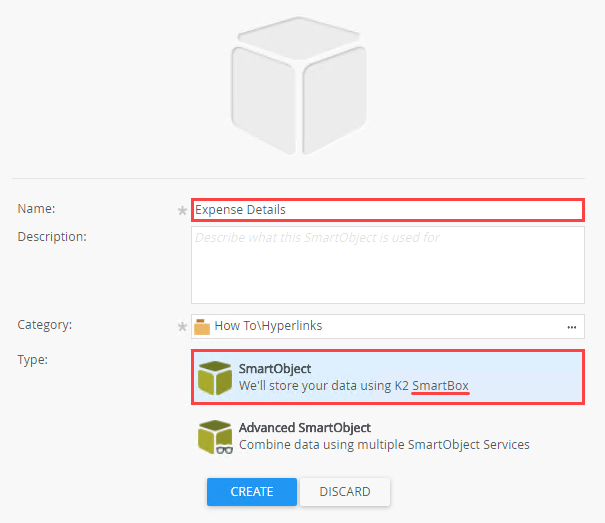
- On the Expense Details screen, click Add. Name the first property
Employee Name
and keep the default Text data type. Add a second property called
Amount
and change the data type to Number. Click OK. Click Finish to save and exit the SmartObject.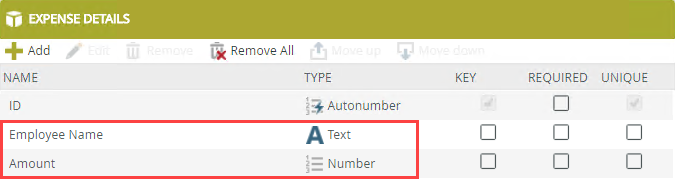
- Launch the Designer.
- Generate an Item view based on the Expense Details SmartObject. Keep the default name, Expense Details Item. Generate an item view based on the Hyperlinks SmartObject. Keep the default name, Hyperlinks Item. Edit the Hyperlinks Item view. Enable the SmartObject Hyperlink control (by default, it is read-only). Run the Hyperlinks Item view and create at least two items using the table below as a guide.
URL Display https://www.xe.com/?
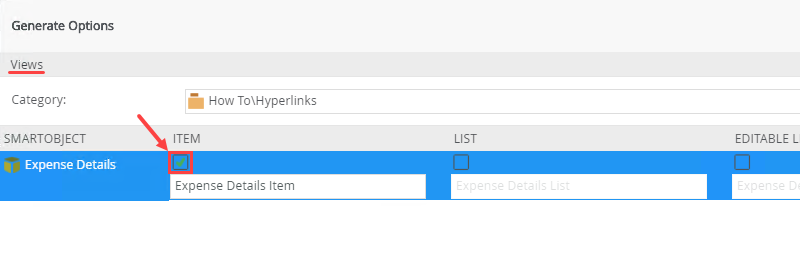
Live Exchange Rates https://help.nintex.com/ Nintex help documentation - Right-click the Expense Details SmartObject and select Generate Views. In the Views section, check the Item view option. Keep the default name, Expense Details Item. Click OK.
- Right-click the Hyperlinks SmartObject and select Generate Views. In the Views section, check the Item view option. Keep the default name, Hyperlinks Item. Click OK.

- By default, the SmartObject Hyperlink property is read-only. You must enable the control so you can enter hyperlinks and save them to the SmartObject. Right-click the Hyperlinks Item view and select Edit.
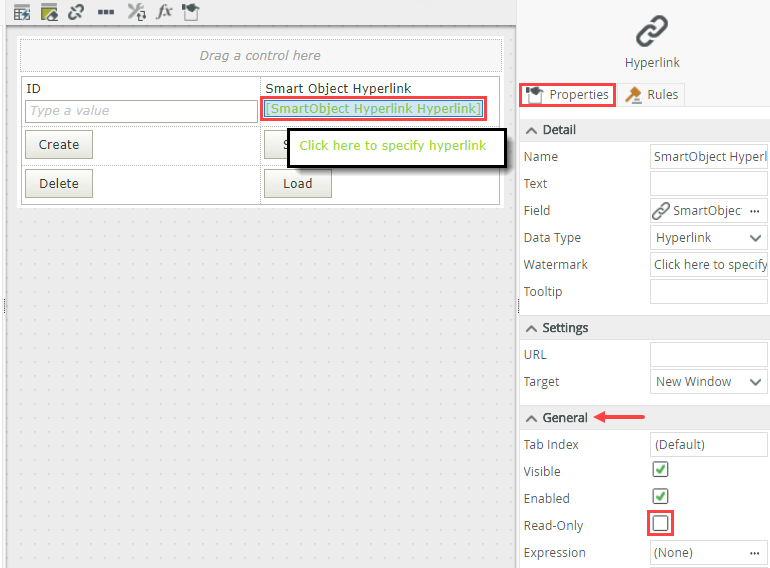
- Select the [SmartObject Hyperlink Hyperlink] control. In the Properties panel on the right side of your screen, locate the General heading. Uncheck the Read-Only property. The control converts to a clickable link. Click Finish to save and exit the view.
- Next, you run the view and add hyperlinks so you have content to work with. Right-click the Hyperlinks Item view and select Run.
- Click the Click here to specify hyperlink link.
- On the Configure Hyperlink screen, enter
https://www.xe.com/?
for the URL and for the Display, enter
Live Exchange Rates
and click OK.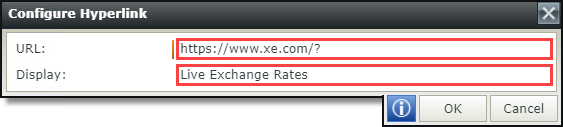
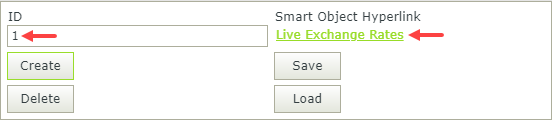
- Click Create to save the item to the SmartObject. Notice the ID text box shows 1. This value is an autonumber that increments with each item you create a record in the SmartObject. The link text for the control reflects the display name value.
- There are no rules in place that clear the view controls after you create a new item, so you must close the view and reopen it to add another hyperlink.
- Run the view again. Click the Click here to specify hyperlink link. For the URL, enter
https://help.nintex.com/
and for the Display, enter
Nintex help documentation
and click OK. Click Create.
- Right-click the Expense Details SmartObject and select Generate Views. In the Views section, check the Item view option. Keep the default name, Expense Details Item. Click OK.
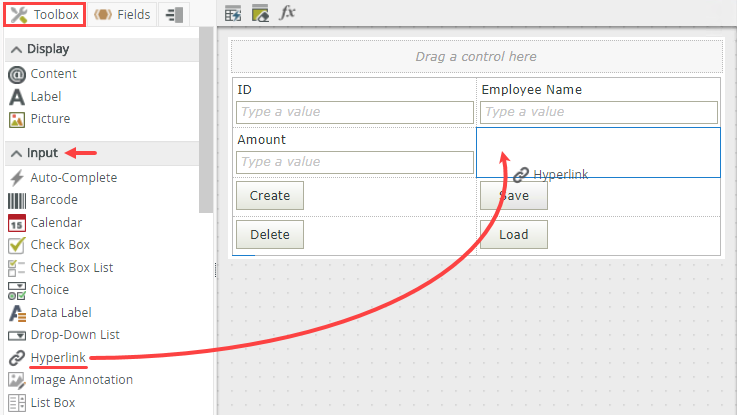
- Edit the Expense Details Item view. From the Toolbox, add a Hyperlink control to the canvas in the second row, second column cell. You use this control to display the hyperlink that you load from the Hyperlinks SmartObject.
The next step is to add a hyperlink control to your details view.
- Right-click the Expense Details Item view and select Edit.
- From the Toolbox on the left side of your screen, drag a Hyperlink control into the second row, second column cell.
Configure the hyperlink control on a view
In the next step, you add a rule that loads the Live Exchange Rates link when you open the view. The link loads in the hyperlink control you added in the previous step. Using rules, you map the ID of the Live Exchange Rates hyperlink to the control.
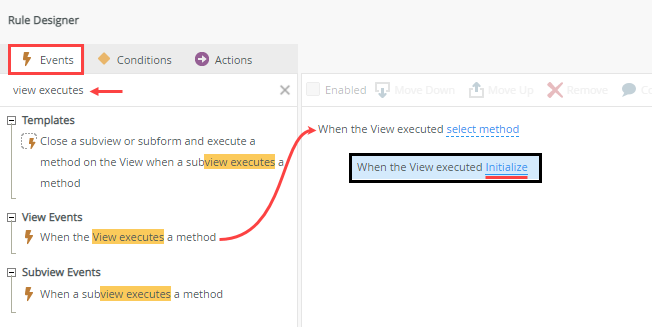
- Add a rule with a view Initialize event. Call the load method of the Hyperlinks SmartObject. Enter 1 for the ID mapping destination. For the output mappings, map the SmartObject Hyperlink return property to the Hyperlink control. Run the view and test the link.
- Right-click the Expense Details Item view and select Edit.
- Click the Rules tab and click Add Rule.
 Rules consist of events, conditions, and actions. A valid rule contains at least one action.
- Events define when the rule should run, such as when a button is clicked, or when the form loads. (Events are optional, you can define "event-less" rules that you can call from other rules.)
- Conditions define whether the rule should run. If the criteria are true, continue the rule, and if the criteria are not met, stop the rule. For example, a condition might evaluate a form to confirm that required fields have content. (Conditions are optional - not all rules will require conditions.)
- Actions define what the rule should do. For example, show a message, start a workflow, or enable a form field. Rules can contain multiple actions that are run in sequence or in parallel.
- With the Events tab active, click When the View executes a method to add it to the rule definition pane. You can also search for keywords instead of scrolling through all the events, conditions, and actions. Click the select method link and select Initialize. The event occurs when the view loads.
- Click the Actions tab. You want to use the load method of the Hyperlinks SmartObject. The load method returns one record (one hyperlink). Click Execute a SmartObject method, then select the Hyperlinks SmartObject and Load.
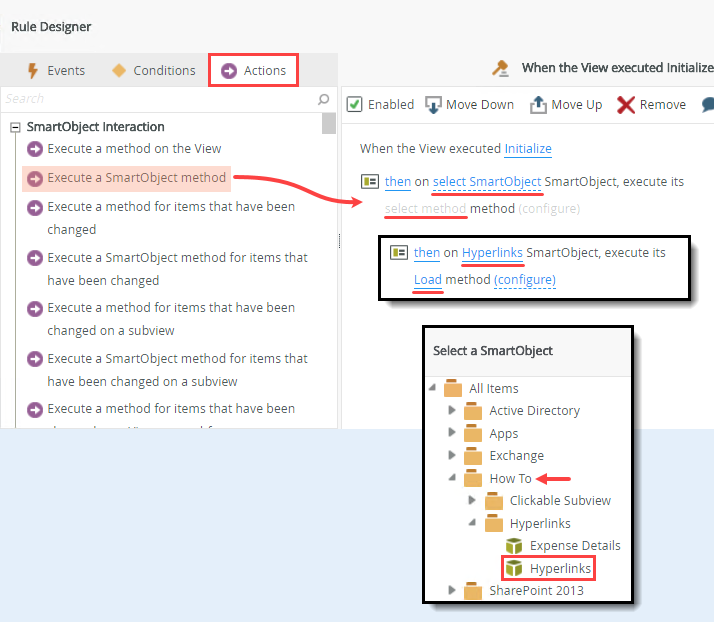
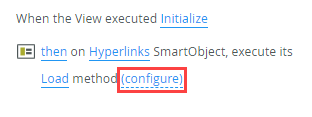
- Next, you need to specify which record to load. Click configure.
- On the Input Mappings screen, enter
1
in the ID text box. You load the SmartObject record that has an ID of 1. This is the Live Exchange Rates record.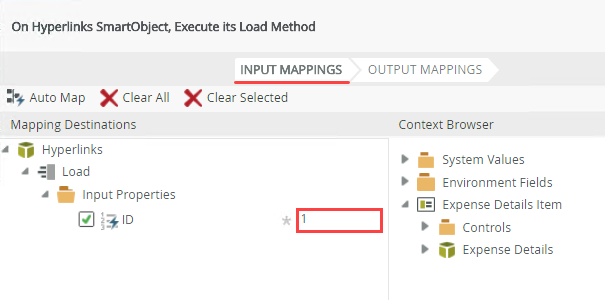
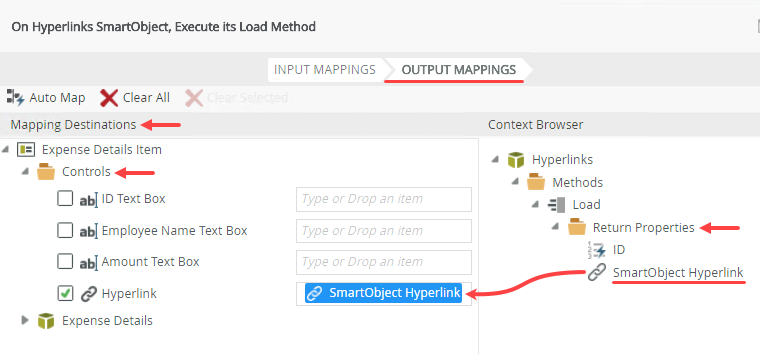
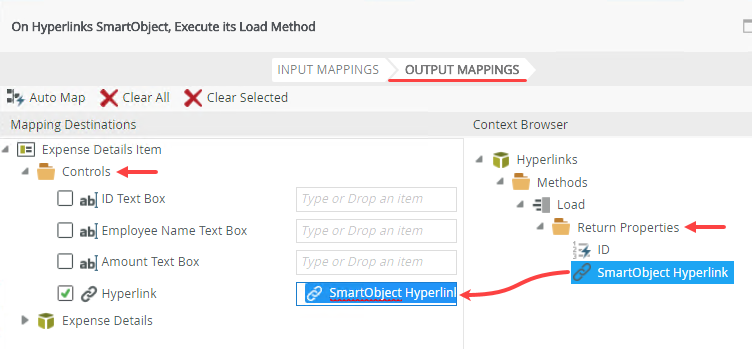
- Click the Output Mappings tab. Map the Context Browser > Return Properties > SmartObject Hyperlink to Mapping Destinations > Controls > Hyperlink. Click Finish to save the configuration. Click OK to save the rule. This rule loads the hyperlink (that has an ID of 1) from the Hyperlinks SmartObject into the hyperlink control you added to the view canvas. Click Finish and OK to save the rule. Click Finish to save and exit the view.
- Next, test the hyperlink. Right-click the Expense Details Item view and select Run.
- The view opens. Notice the hyperlink control displays Live Exchange Rates. Looking at the rule you configured, the load method (of the Hyperlinks SmartObject) is called when the view opens. The load method uses the ID value (of 1) to retrieve the correct record. The display attribute of the hyperlink property is Live Exchange Rates, while the URL attribute is https://www.xe.com/?. Click the Live Exchange Rates hyperlink. The exchange rates site opens in a new browser window.
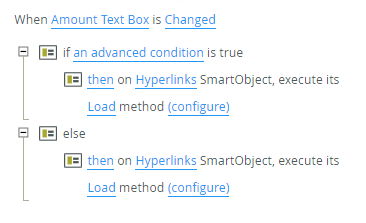
- (Optional) Use a condition to dynamically load a hyperlink. Add a new rule for when the Amount Text Box changes. Add an advanced condition that loads the Live Exchange Rates hyperlink if the amount is less than or equal to 5, or load the Nintex help documentation hyperlink if the amount is greater than 5. Test the condition by entering numbers into the Amount text box, then confirming the hyperlink control reflects the condition outcome.
In the previous step, you manually entered the ID for the hyperlink record that loads when the view opens. In this optional step, you configure a rule that loads a hyperlink based on an advanced condition. In this case, the value in the Amount text box determines which hyperlink to load. This additional logic is to illustrate how to dynamically change the hyperlink based on other values in the form and is not designed to be a valid scenario.
- Edit the Expense Details Item view.
- Add a new rule.

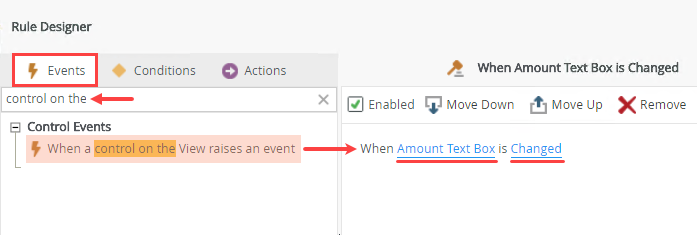
- You want the rule to execute each time the value in the Amount text box changes. With the Events tab active, click When a control on the View raises an event and select Amount Text Box and Changed.
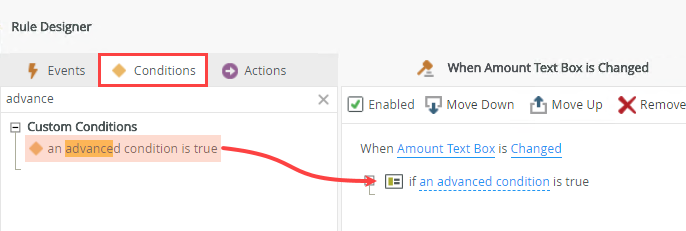
- Next, you add an advanced condition that looks at the current value in the Amount text box. Click the Conditions tab, click When an advanced condition is true, and then click the an advanced condition link.
- Click Add. From the Context Browser, drag the Controls > Amount Text Box into the left parameter. Change the Operator to Less Than Equals. Enter
5
into the right parameter. Click OK to save the condition.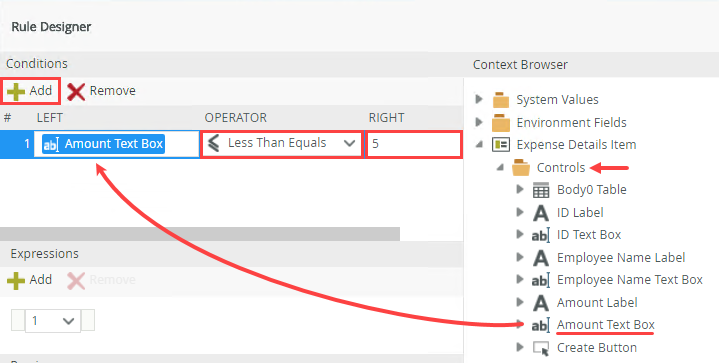
- Next, you need to add an action that executes if the condition is met. Click the Actions tab. Click Execute a SmartObject methodand select the Hyperlinks SmartObject and the Load method. Click configure.

- On the Input Mappings screen, enter
1
for the ID input property.
- On the Output Mappings screen, map the Return Properties > SmartObject Hyperlink to the Controls > Hyperlink mapping destination. Click Finish to save the configuration.
- Switch back to the Conditions tab. Click Else to add it to the rule definition pane.
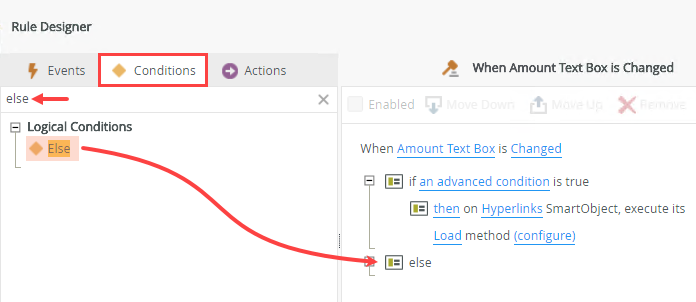
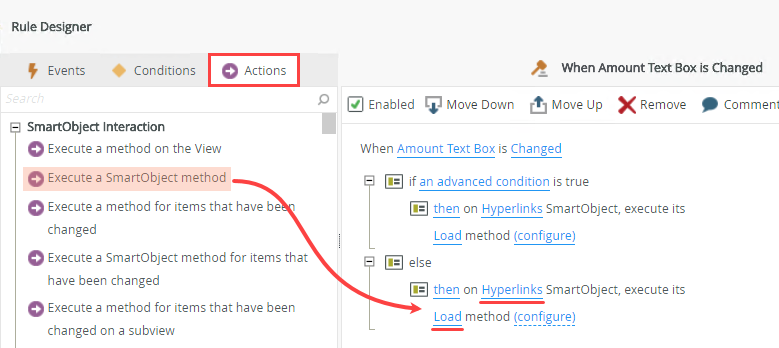
- If the amount is greater than 5, you load the Nintex help documentation hyperlink. Click the Actions tab, click Execute a SmartObject method, select the Hyperlinks SmartObject and the Load method. Click configure.
- On the Input Mappings screen, enter
2
for the ID input property.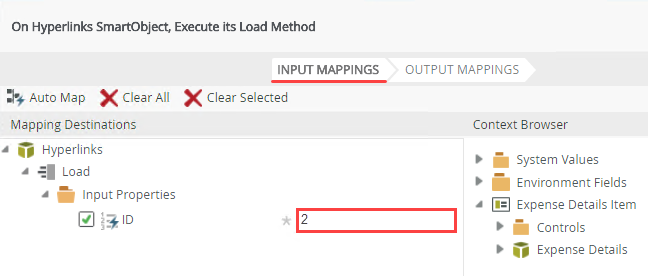
- On the Output Mappings screen, map the Return Properties > SmartObject Hyperlink to the Controls > Hyperlink mapping destination. Click Finish to save the configuration.
- Your rule should look like the image below. Click OK to save the rule. Click Finish to save and exit the view.
- Test the conditional statement. Right-click the Expense Details Item view and select Run. The hyperlink control should display Live Exchange Rates since this is the hyperlink you configured for when you open the view.
- Enter
3
into the Amount text box and press <ENTER>. The hyperlink does not change because the amount is less than or equal to 5.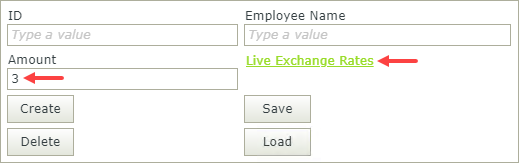
- Enter
8
into the Amount text box and press <ENTER>. The hyperlink changes to Nintex help documentation because the amount is greater than 5.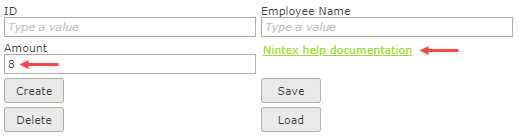
In the rule designer, you add conditions based on operators. In this case, your condition is when Amount Text Box is less than or equal to 5.
So far, your rule is: when the value in the Amount text box changes, check if the value is less than or equal to 5. If it is, then load the Live Exchange Rates hyperlink. Now, you need to complete the condition for values that are greater than 5.
Review
Use a SmartObject to store hyperlinks when you need to maintain URLs outside of your form or for conditional logic in the form. For example, you might apply an advanced condition and then load a specific hyperlink based on the condition. The SmartObject Hyperlink property has two attributes: URL and Display. The SmartObject uses the default methods: Create, Delete, Get List, Load, and Save.