How To: Attach Multiple Files to a Form using the Attachment Control
This topic describes how you can attach multiple files to a form using the File Attachment control with an Editable List view.
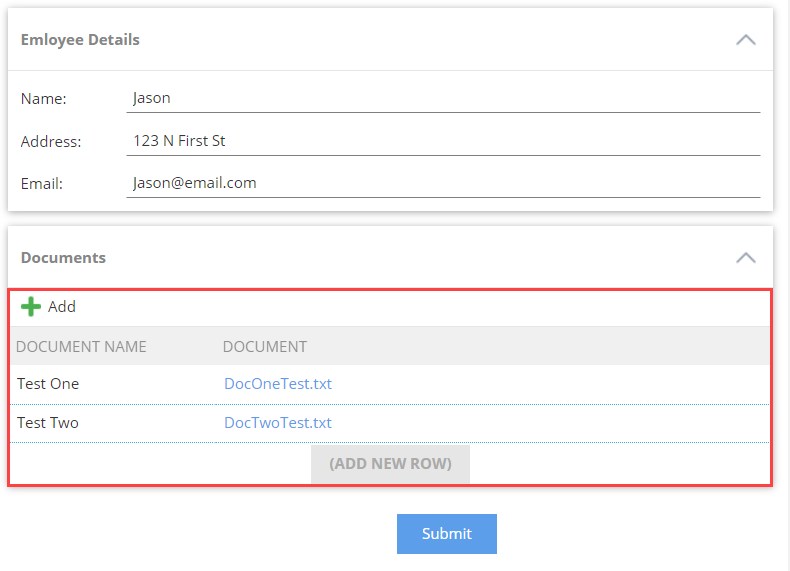
Multiple files attached to a form in an Editable List view
Scenario
In this example, you build a form that contains an Item view and an Editable List view. The list view has a File Attachment control that you use to attach one or more files. You configure a submit button that, when clicked, saves the Item view content to one SmartObject, then saves the attached files in the list view to another SmartObject. This is similar to the Parent-Children/Header-Detail approach, where one record (the parent) is associated with many other records (the children). For more information on using the header/details model see How To: Create a Form where you can enter data in a “header/detail” or “primary/line items” style..
Steps
For this scenario, you build two SmartObjects: Employee Details and Documents. The Employee Details SmartObject stores information about the employee and the Documents SmartObject stores attached files for that employee. You design an Item view based on the Employee Details SmartObject. You design an Editable List view based on the Documents SmartObject. After you add the views, you create a form containing the views. Finally, you add a button control, then configure rules to save the employee's details to the Employee Details SmartObject and any attached files to the Documents SmartObject.
Setup Steps
The following steps set up the scenario from start to finish. If you want to skip the setup steps and view the topic step, go to Configure the Rules for the Submit Button.
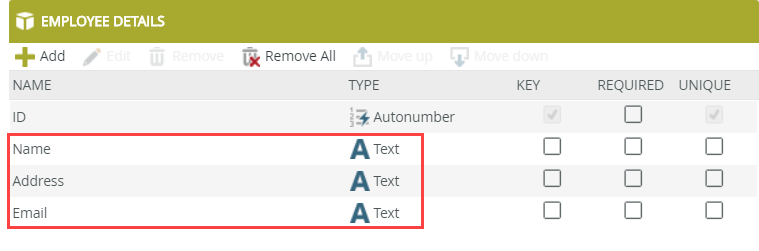
- Create a SmartBox SmartObject called Employee Details with the following properties and data types:
- Name (Text)
- Address (Text)
- Email (Text)
- EmployeeDetailsID (Text)
- Document Name (Text)
- Document (File)
- From the Designer, create a new category called Employee Onboarding to store your work.
- Create a Smartbox SmartObject in your category and name it
Employee Details
and add the following properties (and data types):- Name (Text)
- Address (Text)
- Email (Text)
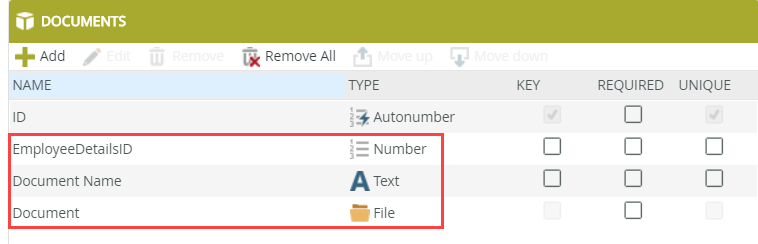
- Create a Smartbox SmartObject in your category and name it
Documents
and add the following properties (and data types):- EmployeeDetailsID (Number)
- Document Name (Text)
- Document (File)
- Edit the Employee Details SmartObject and click the Associations tab.
- Click Add. On the Add Association screen, select the Documents SmartObject. Click Next.
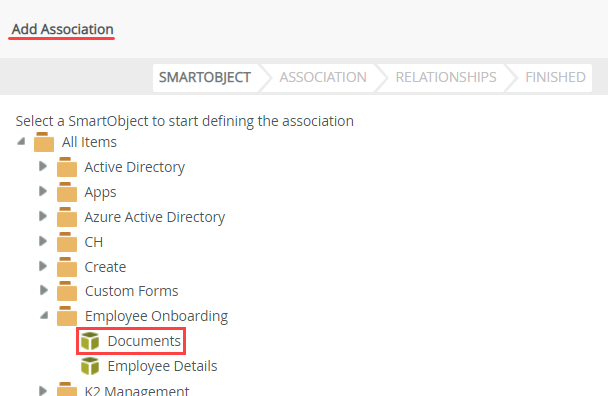
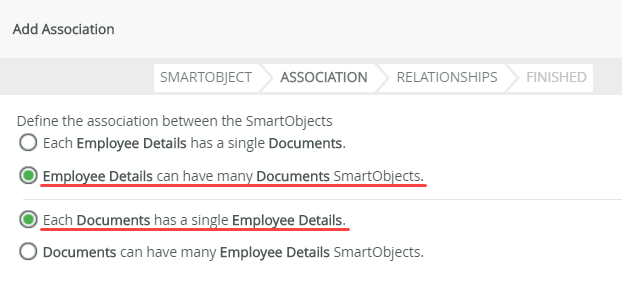
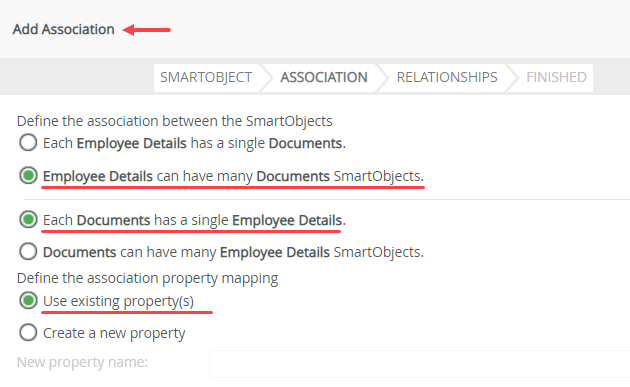
- On the Association tab, make sure the associations are defined as shown below. The Many-to-One association allows you to associate multiple rows on the Documents Editable List view (that contain file attachments) to a single record in the Employee Details item view (that contains the employee's basic information). Click Next.
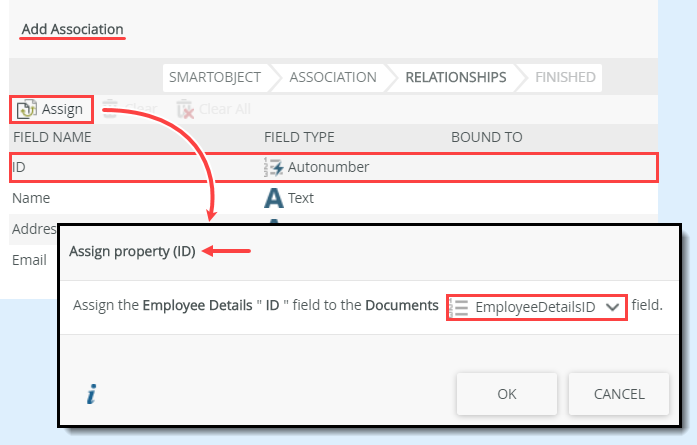
- Select the ID field and click Assign. Select EmployeeDetailsID from the drop-down list and click OK. Click Finish to save the SmartObject association.
- Click Finish to save and exit the SmartObject.
In the next few steps, you add an association between the Employee Details SmartObject and the Documents SmartObject. Essentially, you are linking the Employee Details > ID property to the Documents > EmployeeDetailsID property. If you are familiar with SQL, this is very similar to a JOIN statement, where you are creating a relationship between two data sources.
- Design two views using the settings in the tables below as a guide.
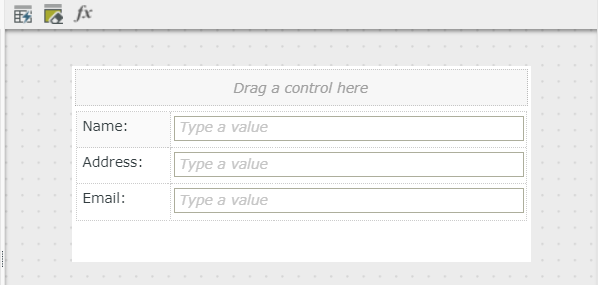
Name View Type Settings Employee Details Item view - Click Create Labels and Controls
- Include all fields except ID
- Change the label position to left
- Check the box to include the colon suffix
- Do not include any buttons
Name View Type Settings Documents List view - Uncheck the option to Call this method when the View loads
- Click Create Labels and Controls
- Include the Document Name and Document fields
- Enable list editing
- Include the Save button
- When the view loads, hide the Save button
- Right-click the Employee Details SmartObject and select Design View.
- Name the view
Employee Details
and confirm the view type is Item View. Click Create.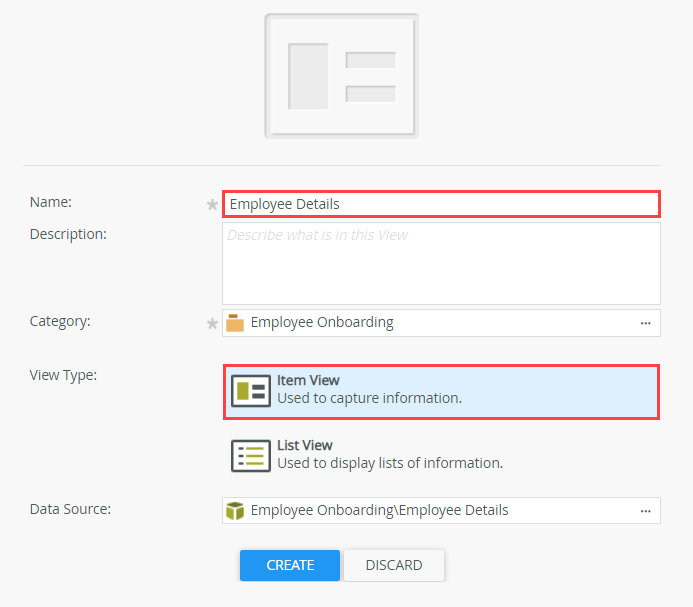
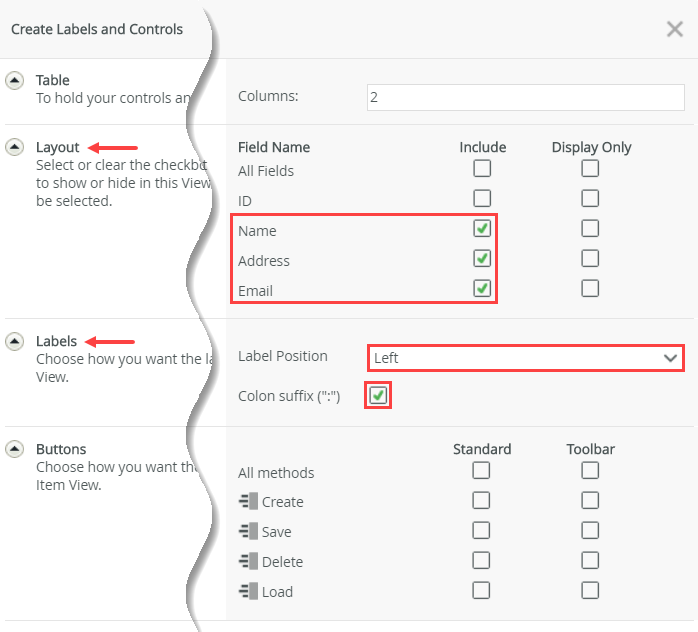
- Click Create Labels and Controls.
- Include all the fields except ID (in the Layout section). In the Labels section, set the label position to Left and check the box to include the colon suffix. Do not include any buttons. Click OK.
- Your screen should look like the image below. (Optional: adjust the column widths so the controls are closer to their labels.) Click Finish to save and exit the view.
- Right-click the Documents SmartObject and select Design View.
- Name the view
Documents
and select the view type of List View. Uncheck the option to Call this method when the View loads. You are only using this view to attach and save files for new records, so you don't need to load existing files from the Documents SmartObject each time you open the view. Click Create.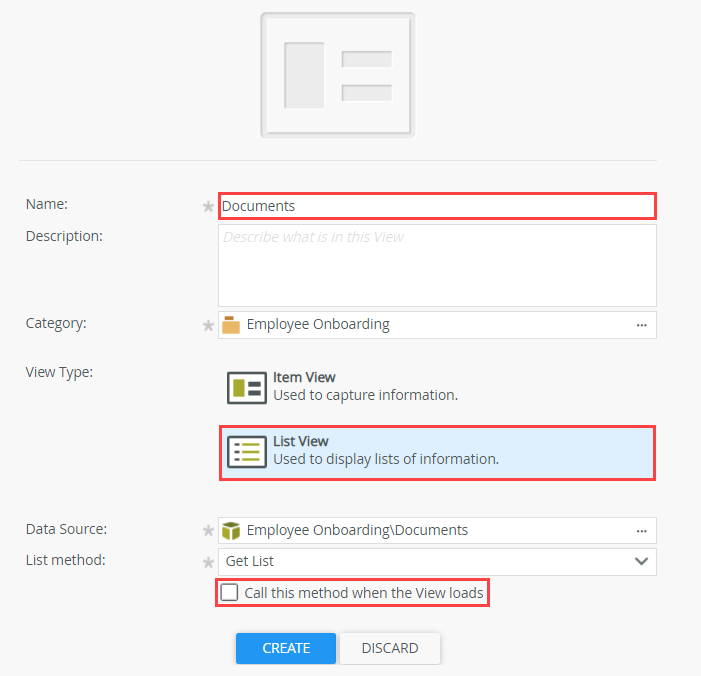
- Click Create Labels and Controls.
- Include the Document Name and Document fields (in the Layout section). Enable list editing and allow the user to add new rows (Create method). Click OK.
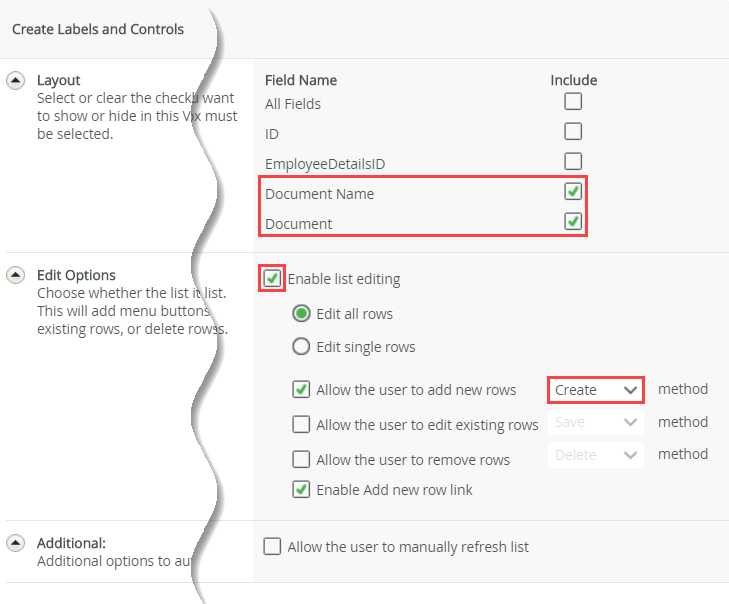
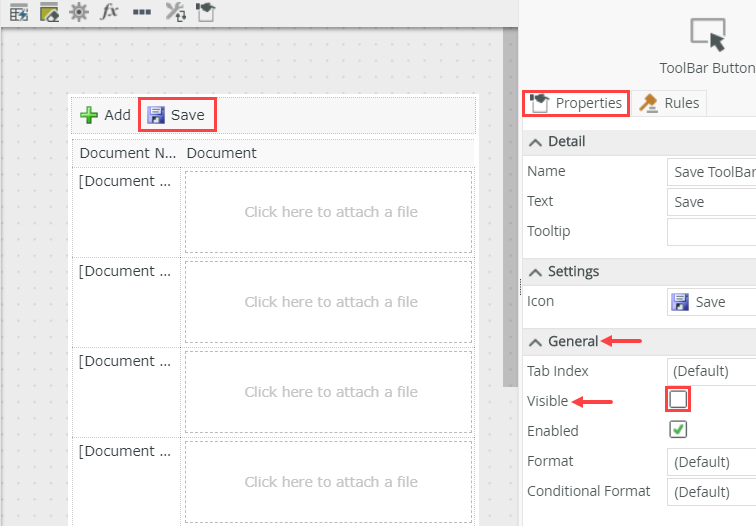
- Select the Save button, then uncheck the Visible property (in the General section) of the Properties pane.
- Your screen should look like the image below. (Optional: adjust the column widths so the controls are closer to their labels.) Click Finish to save and exit the view.
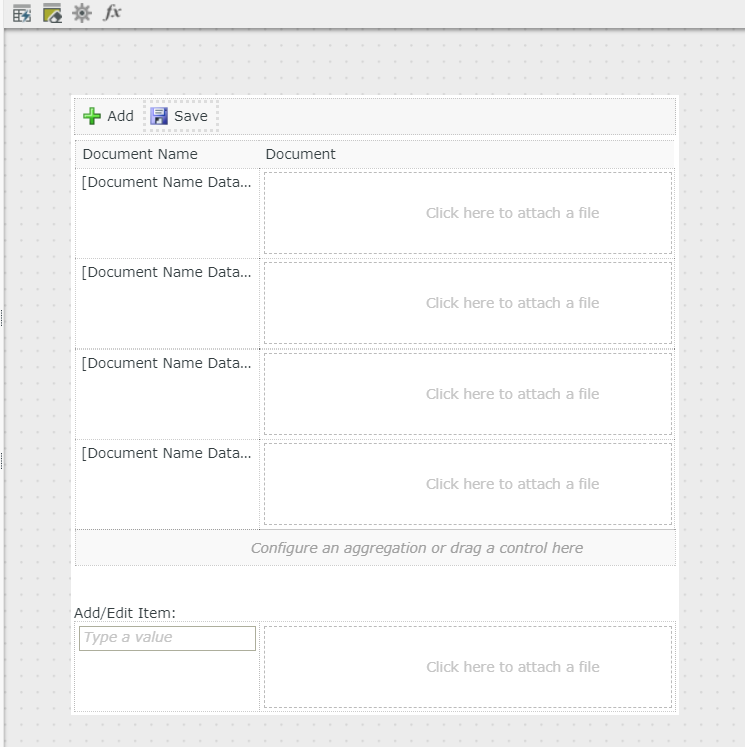
Notice the Save button. This button is added because you selected the create method. This allows you to add a row, or several rows, then save the records to the underlying SmartObject. However, because you have two views (the Item view and the list view), you will add a save button to the form that contains both views. This button saves the information from the Item view to the Employee Details SmartObject and the information from the Documents list view to the Documents SmartObject, both at the same time. Therefore, you don't need the Save button on the list view.
-
Create a new form and name it Employee Onboarding. Add the Employee Details and Documents views to the form.
Your form may have a different style applied, depending on your environment.
- In your category, create a new form and name it
Employee Onboarding. - Select the Views tab, and drag the Employee Details view onto the design canvas.
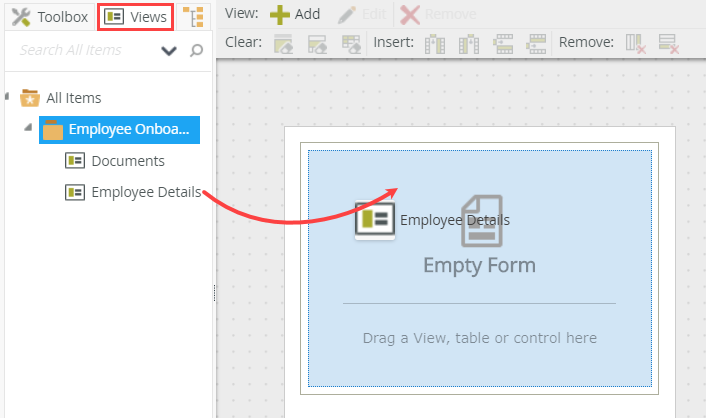
- Drag the Documents view onto the design canvas, below the Employee Details view.
- Change the title of the Employee Details view to
Employee Details
and the Documents view to
Documents.
(To change the view title, click (Enter View Title) and type the new name.)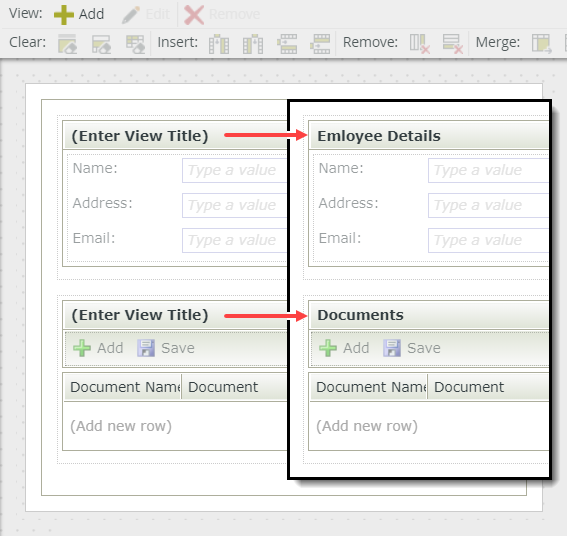
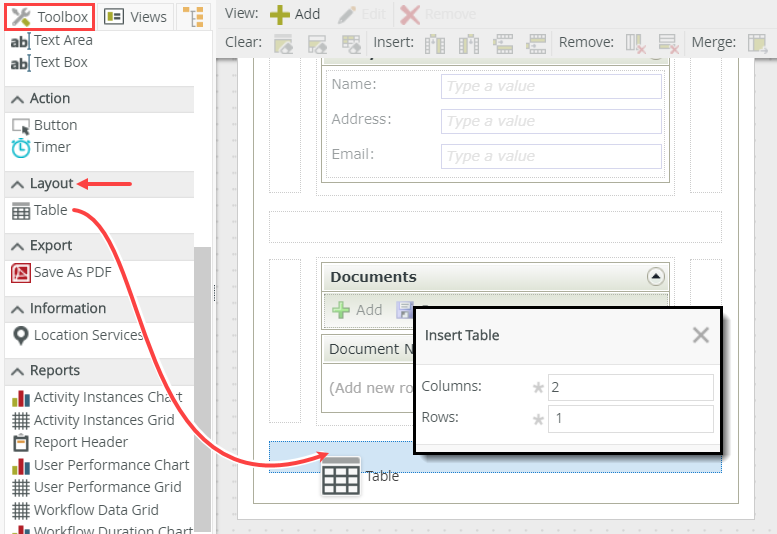
- Click the Toolbox tab. Drag a Table control just below the Documents view. Configure the table for one row and two columns.
- Add a Button control to the second cell in the table. Select the control. In the Properties pane, change the Name value to
Button Submit
and the Text value to
Submit.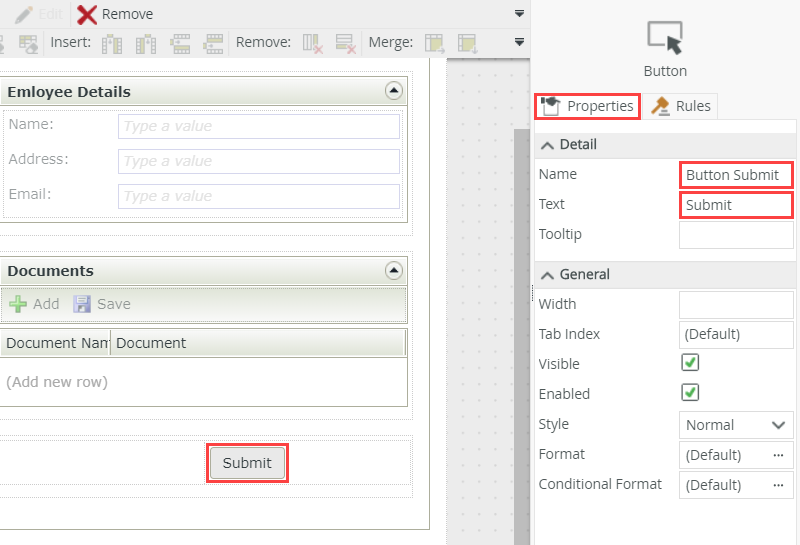
In the next step, you add a button control. Later, you configure a rule that executes when someone clicks the button. First, the content entered on the Employee Details view is saved to the Employee Details SmartObject. Then, any files attached in the Documents view are saved to the Documents SmartObject.
- In your category, create a new form and name it
- Configure a rule that executes when someone clicks the Button Submit control. From the Rules screen, add a rule. Use the table below as a guide for configuring the event and subsequent actions.
Event/Action Name Notes Event When a control on the Form raises an event Control: Button Submit Action Execute a View method View: Employee Details
Method: Create
(configure):- Input Mappings: Use Auto Map to set the input mappings
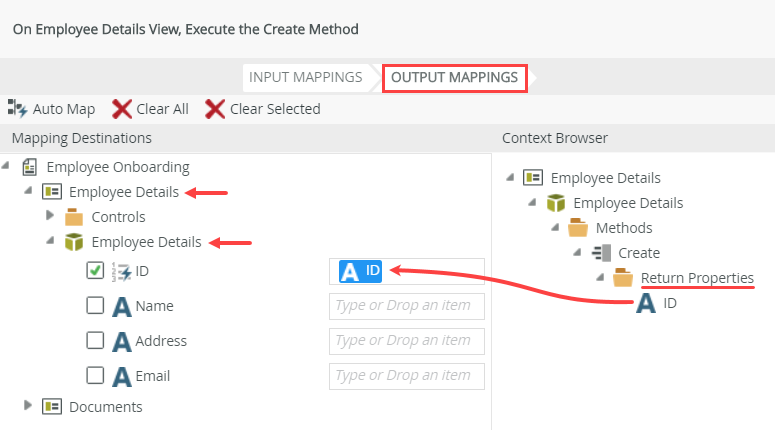
- Output Mappings: Map the Return Properties > ID back to the Employee Details (view) > Employee Details (SmartObject) > ID
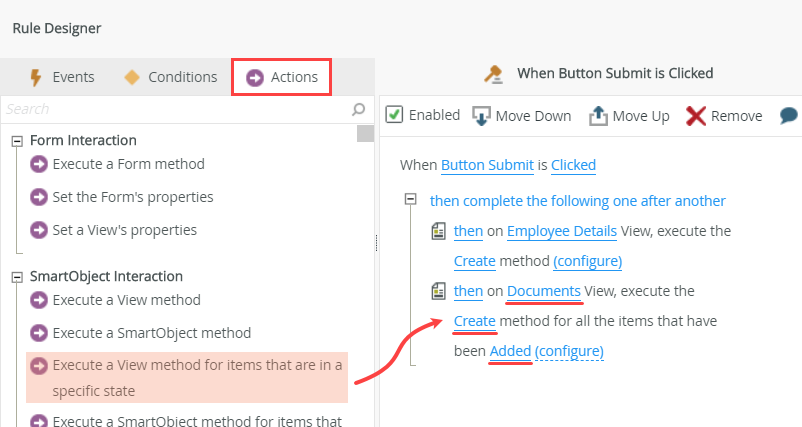
Action Execute a View method for items in a specific state View: Documents Method: Create
(configure):
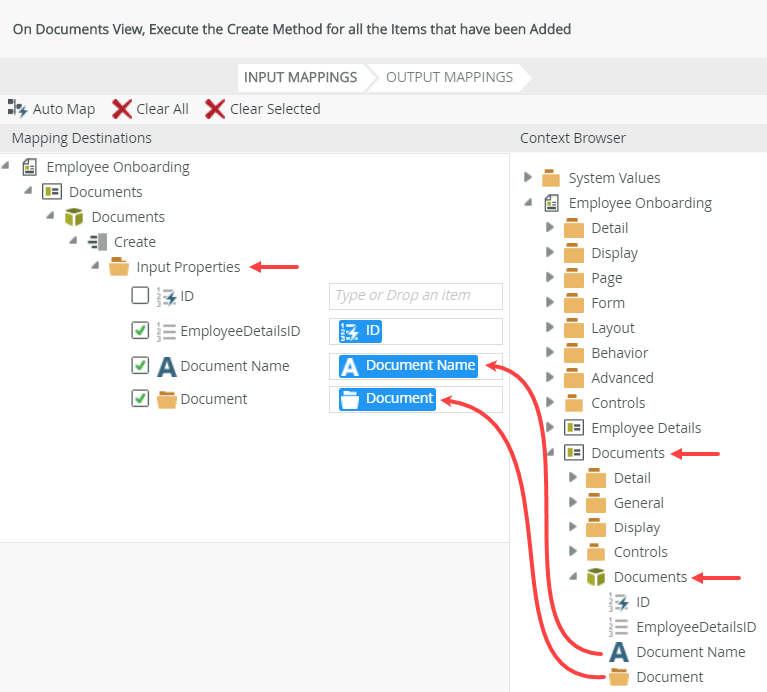
Item State: Added- Input Mappings:
- Map the Employee Details (view) > Employee Details (SmartObject) > ID property to the (Input Properties) Documents (view) > Documents (SmartObject) > EmployeeDetailsID property
- Map the Documents (view) > Documents (SmartObject) > Document Name to the (Input Properties) Documents (view) > Documents (SmartObject) > Documents Name property
- Map the Documents (view) > Documents (SmartObject) > Document to the Documents (view) > Documents (SmartObject) > Document property
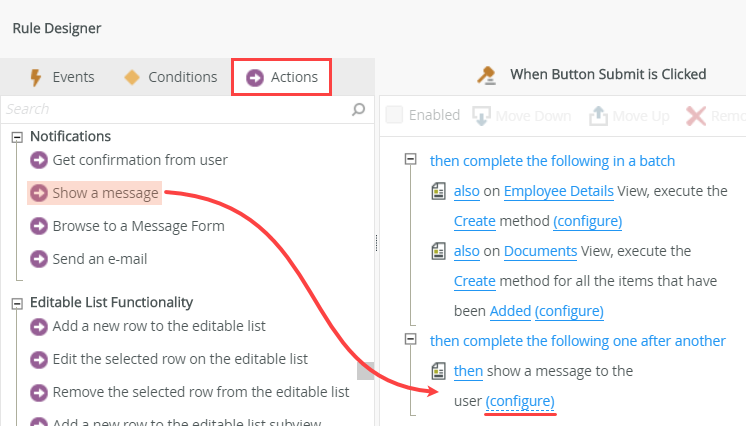
Action (Optional) Show a message Configure the message with any content you like. This is just to give you a visual sign the form submitted and the records were created without error. - Click the Rules tab, then click Add Rule.

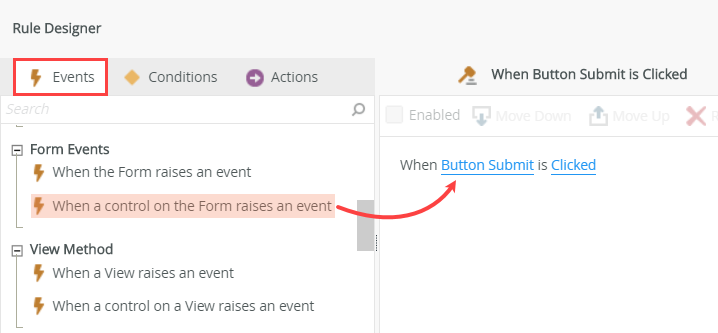
- With the Events tab active, click When a control on the Form raises an event (under the Form Events heading) to add it to the rule definition pane. Because there is only one control on the form, Button Submit is selected by default.
- Select the Actions tab. The first action you add saves the content from the Employee Details view to the Employee Details SmartObject. This is the parent record. Click Execute a View method (under the SmartObject Interaction heading) to add it to the rule definition pane. Click select View and select Employee Details. Click select method and select Create. Click (configure).
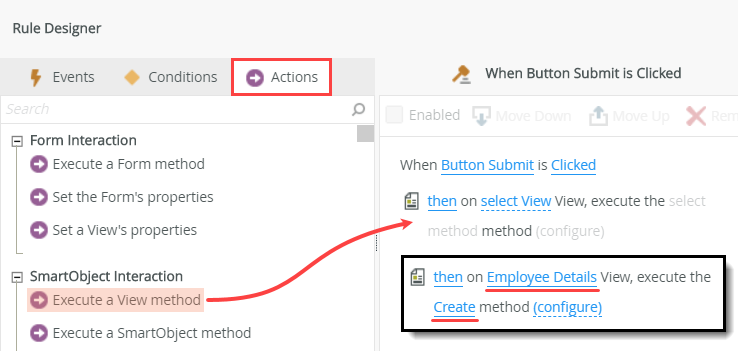
- On the Employee Details View, Execute the Create Method screen, confirm the Input Mappings tab is active. Click Auto Map. Auto map creates the links between the view controls and their corresponding SmartObject properties. (The ID value is assigned for you, which is the unique number that identifies each record.)
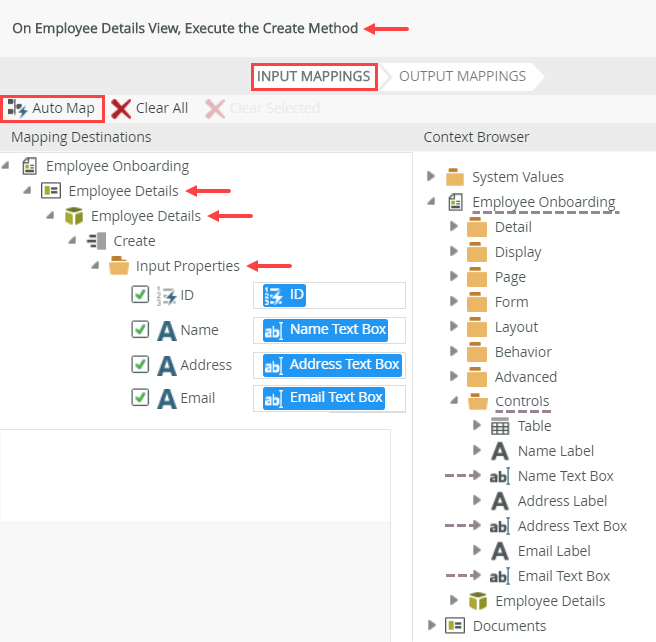
- Click the Output Mappings tab. Map the Return Properties > ID to the Employee Details (view) > Employee Details (SmartObject) > ID property. Click Finish to save the action settings. In this step, you mapped the Employee Details (view) control values to their corresponding Employee Details SmartObject properties. Then, you saved the ID of the SmartObject record that was just created, back to the view SmartObject, so that you can use it in the next step (when you create the child records in the Documents SmartObject).
- With the Actions tab still active, click Execute a View method for items that are in a specific state (under the SmartObject Interaction heading). This is the action that loops through a list, in this case, the editable Documents list. Click select View and select Documents. Click select method and select Create. Click select item state and select Added. Click (configure).
- First, you map the property that links the parent record with each of its child records. Recall in the previous step, you saved the parent record ID back to the view SmartObject. You use this value for the child records, EmployeeDetailsID value. Confirm you are on the Input Mappings screen. In the Context Browser, expand the Employee Details (view) > Employee Details (SmartObject). Map the ID to the Documents (view) > Documents (SmartObject) > Input Properties > EmployeeDetailsID property.
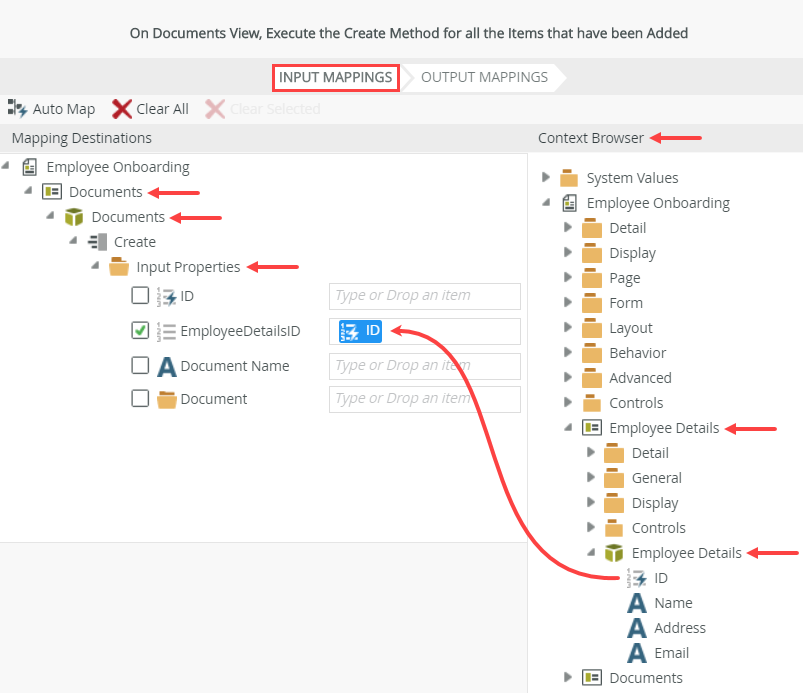
- Now you can map the Document Name and Document properties. You don't need to map the ID, as once again, this number is assigned when it creates the record. Collapse the Employee Details view. Expand the Documents view. Expand the Documents SmartObject. Map the Document Name and Document (file) properties to their corresponding Input Properties. Click Finish to save the action settings.
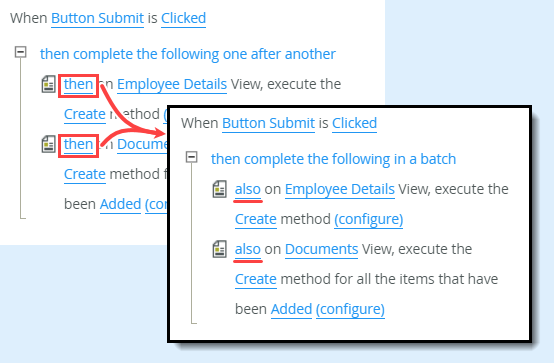
- For both actions, click then and change them to also. Your screen should look like the image below.
- (Optional) Show a message so that you have a visual indication your form submitted and the records were created. With the Actions tab still active, click Show a message (under the Notifications heading) to add it to the rule definition pane. Click (configure).
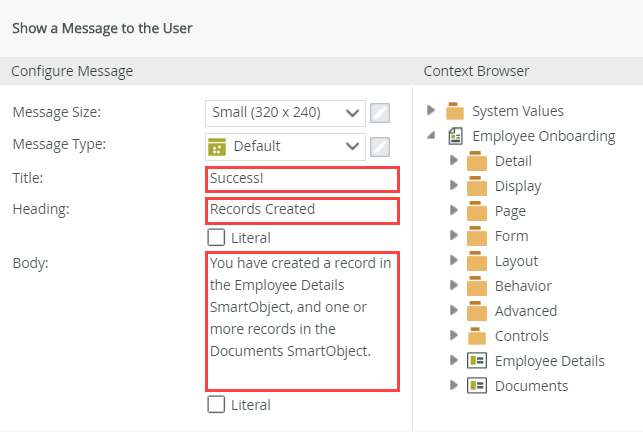
- Configure the message using the image below as a guide. Click OK to save the message.
- Click OK to save the rule. Click Finish to save and exit the form.
Next, you configure an action to save the child records in the Documents SmartObject. You may have more than one attachment. The product loops through the editable list and creates a record for each row, or line item.
The last step to configuring this rule is to change the two actions so they run as a batch. This groups the two actions together and forces the completion of the actions back-to-back, before executing any other rules.
Configure rules for the Submit button
The steps below illustrate how to configure a rule that saves the values from the Employee Details view, then saves the values from the Documents view.
-
To test the file attachment control, Run the form. Complete the details view fields, then add one or more rows to the documents view, attaching files to each row. Submit the form and close the confirmation message (if you added one). Confirm you see the file attachment records displayed in the Documents list.
- Run the Employee Onboarding form.
- Complete the fields on the Employee Details view.
- On the Documents view, click Add. Enter a document name (of your choice), and click inside the attachment box (Click here to attach a file). Browse to and select a file, then click Open. (If your form has a different style than the images below, it's OK to continue. Most likely, you have the form set to a different theme than the images.)
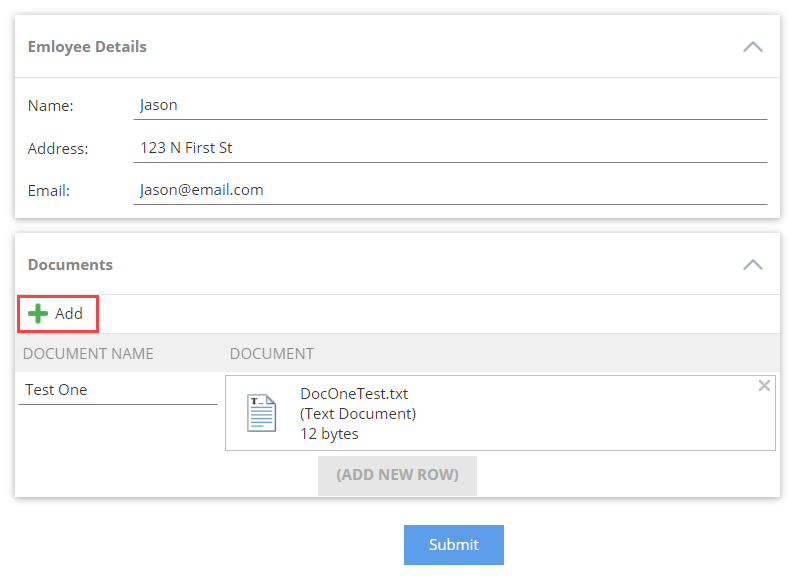
- Add at least one more row on the Documents view and attach a file. Click Submit.
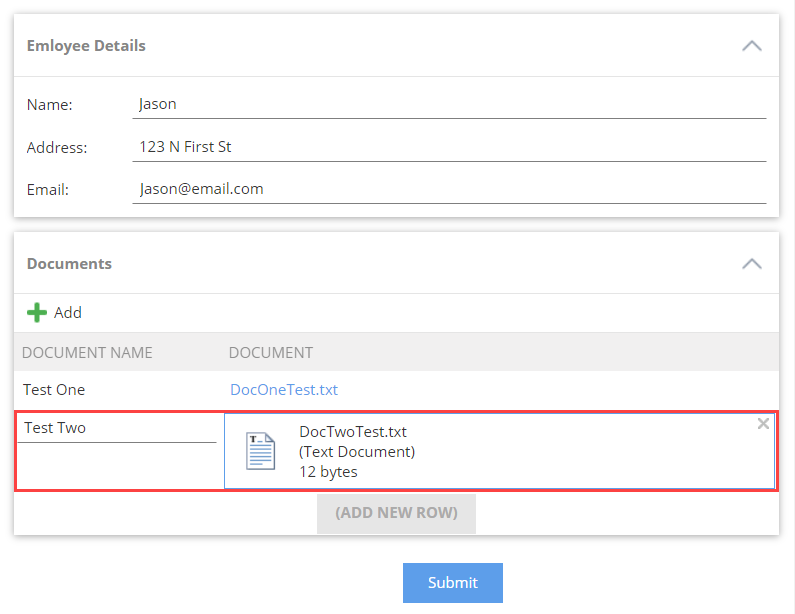
- Click OK on the confirmation message (if you added one). Confirm you see the files attached to the rows in the Documents view.
- Run the Employee Onboarding form.
Review
In this how-to, you learned how to configure and use the File attachment control in an Editable List view. You learned how to associate two SmartObjects, creating a link between the data sources with one header (or parent) record linked to one or more details (or child) records.