Example: Creating a custom workflow step
This example demonstrates creating and using a custom step in a workflow. In this example you create a custom step to add comments to the current workflow instance as a step in the workflow.
In this example, we will be using the Workflow Comment System Service Object, and specifically the Add Comment method. This SmartObject is associated with the Workflow Service Service Type, one of the standard service types available in environments.
While we are using a standard Service Type for this example, you can follow the same procedure to expose custom Service Object Methods as Custom Steps.
Follow the steps below to create a sample Custom Step
- Create or identify the Service Type, Service Instance, Service Object Method that you want to use for your Custom Step. If necessary, create a SmartObject for the Service Object. In this example we will use the existing Service Object for Workflow Comments, and generate a new SmartObject for it.
Service Type: Workflow Service
Service Object: Workflow Comment
Service Object Method: Add Comment
SmartObject: Workflow Comment (generated through Management)- Open Management
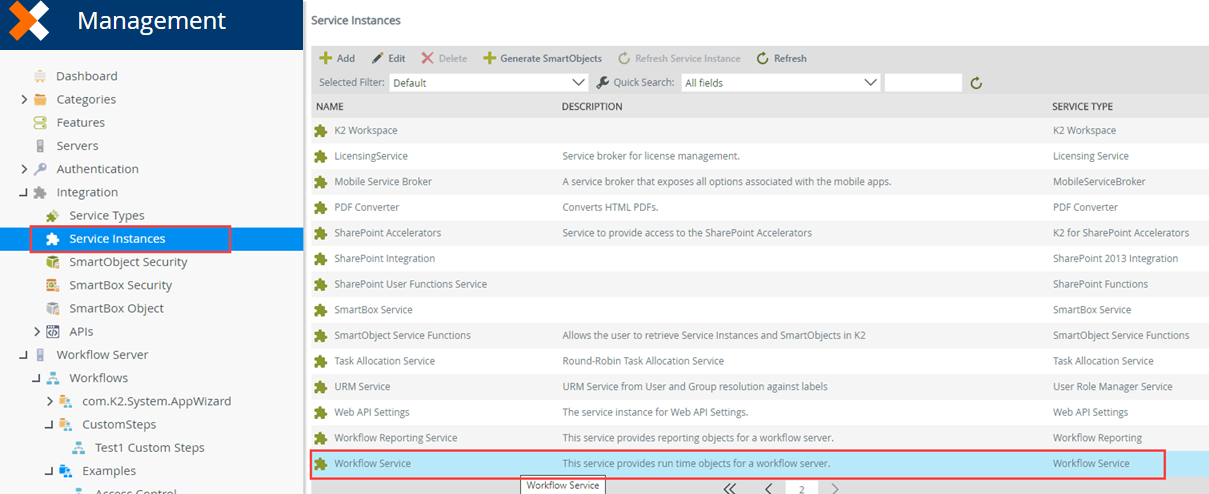
- Browse to Integration > Service Instances
- Use the Service Type column to find an instance of the service type you will create a SmartObject for. In this case, we will use the Workflow Service Service Instance of the Workflow Service Service Type:
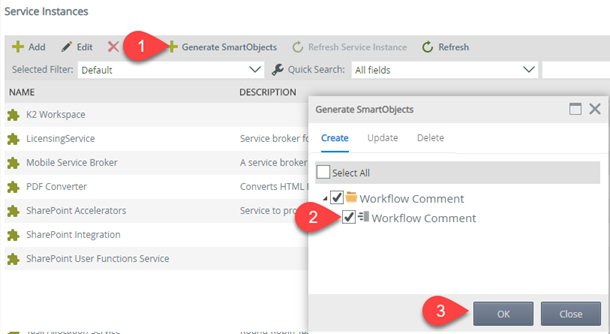
- Use the Generate SmartObject button to generate a new SmartObject for the Workflow Comment Service Object. (You could also manually create a SmartObject using the Designer. If you use this approach, ensure that the name of the SmartObject you use is consistent for the environments where the custom step will be used by workflows)
-
Use the Custom Step Administration form to register the new custom Step. The form is located at
https://[servername]/Runtime/Runtime/Form/com__K2__System__Management__Workflows__CustomStep__Forms__Main
Replace the [servername] placeholder with the name of your environment)- Using a web browser, open the Custom Steps administration form located at
https://[servername]/Runtime/Runtime/Form/com__K2__System__Management__Workflows__CustomStep__Forms__Main
Replace the [servername] placeholder with the name of your environment). You must be a member of the Package and Deployment Role to use this form to register new custom steps. - Once the form loads, open the Create tab
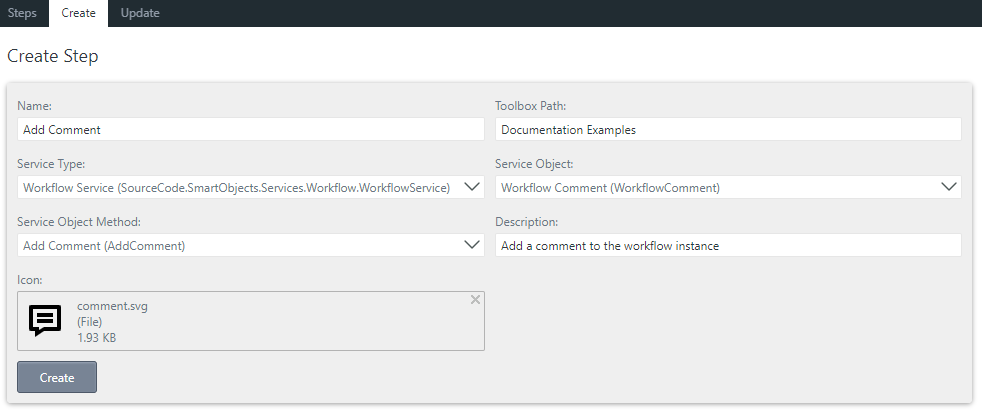
- Specify/select values for your new custom step. In this example:
Field Description Name Add Comment Toolbox Path Documentation Examples Service Type Workflow Service (SourceCode.SmartObjects/Services.Workflow.WorkflowService) Service Object Workflow Comment (WorkflowComment) Service Object Method Add Comment (AddComment) Description Add a comment to the workflow instance Icon Upload a 32x32 .svg file. Sample: 
- Click Create to register your new custom step
- Using a web browser, open the Custom Steps administration form located at
-
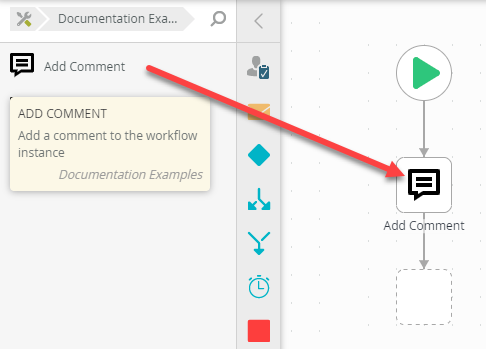
Create a new workflow, drag the Add Comment custom step into the workflow design
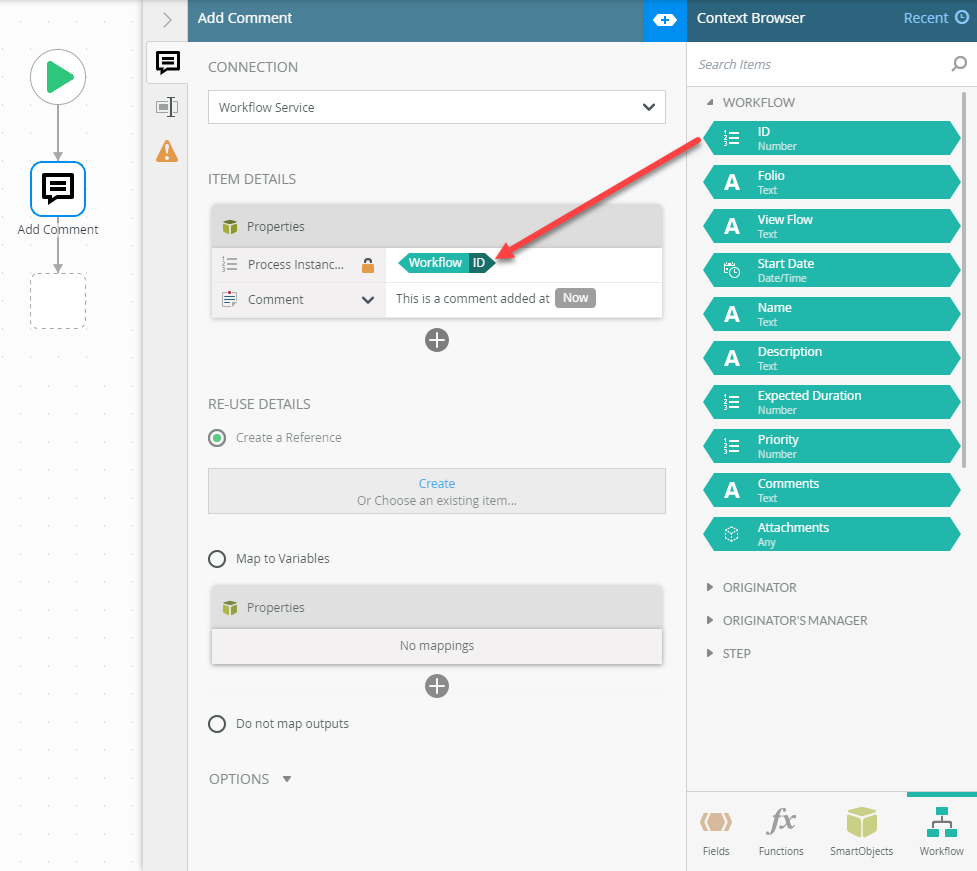
and configure the step with the current Workflow ID as the input for Process Instance ID, and a value of your choice for the comment.
- Launch the Designer and create a new workflow. Our example workflow is called Test Custom Steps but you can call your workflow anything you like.
- When the workflow designer loads, locate your new custom step in the toolbox. In this example, you can find the custom step in the Documentation Examples group.

- Drag and drop the custom step into the workflow.
- Expand the configuration panel for the step. Drag and drop the Workflow ID property from the context browser into the Process Instance ID field, and type some value for the Comment field. (In this case we also included the Now function from the Functions tab, but you can enter any value you like)
- Add additional steps to your workflow, if desired.
- Deploy your workflow
-
Set up your environment for additional rights and permissions. In this example, give the Service Account View rights to the workflow.
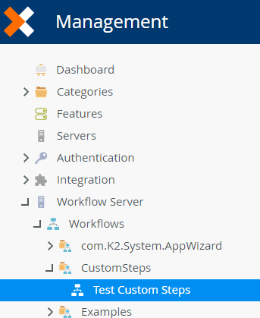
- Remember that workflow steps execute in the context of the Service Account. To add comments to the workflow instance, the Service Account requires View permission on the workflow. Launch Management and navigate to the workflow you just deployed. In this example, the workflow is located at Workflow Server > Workflows > CustomSteps > Test Custom Steps
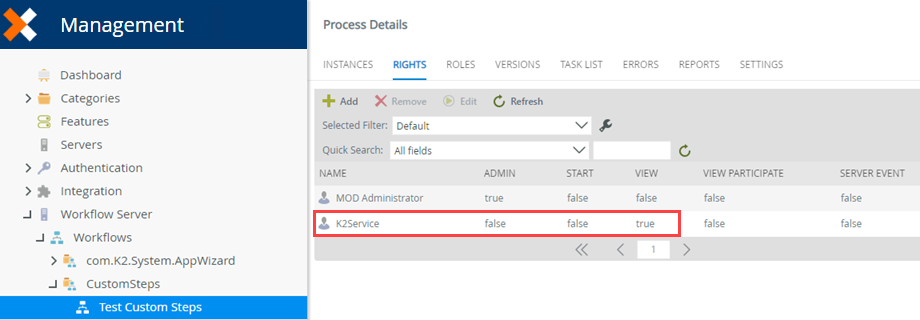
- Using the RIGHTS tab, give the Service Account VIEW rights to the workflow.

- Remember that workflow steps execute in the context of the Service Account. To add comments to the workflow instance, the Service Account requires View permission on the workflow. Launch Management and navigate to the workflow you just deployed. In this example, the workflow is located at Workflow Server > Workflows > CustomSteps > Test Custom Steps
-
Test your custom step by starting a new instance of the workflow. Execute the GetList method of the Workflow Comments SmartObject to verify that a comment was added.
- In Management, use the Start New button in the INSTANCES Tab to start a new instance of the workflow. Use any value for the Folio and click Start. Make a note of the ID of the workflow.

- Navigate to the Workflow Comments SmartObject, located in Workflow Service > Workflow Service > Workflow Comment and Execute the Get List method. Enter the value of the Process Instance ID that you made a note of the previous step.

- You should see a comment entered by the Service account for the workflow instance. This concludes the test.

- In Management, use the Start New button in the INSTANCES Tab to start a new instance of the workflow. Use any value for the Folio and click Start. Make a note of the ID of the workflow.
Review
In this how-to, you created a custom workflow step to make it easier for workflow designers to call a SmartObject method when they are building a workflow. In this example, we created a custom step to add comments to a workflow instance as the workflow progresses.