Example: Using JSSP and Custom Workflow Steps together
By using the JavaScript Service Provider (JSSP) and custom workflow steps together, you can create powerful and easy to use features for your application designers to integrate their applications with other systems. This topic demonstrates combining JSSP and custom workflow steps to implement a solution that allows workflow designers to add random string generation steps to their workflow. They could use the random string to generate a unique code to confirm registration of an account or to issue one-time codes for access to a secure site. While this example is deliberately simple and self-contained, the same principles apply if you want to build more complex integration with third-party systems.
This example consists of two parts. In Part One we create the JSSP service type, which contains a single Service Object that generates a random string with options for setting the string format and length. In Part Two we create a Custom Workflow Step to generate the random string, and include the step in a workflow that sends an email containing the random string.
Part One: Create the custom JSSP service type
In part one you write the JavaScript code the product uses to create the service type and then configure an instance of that service type. You generate a SmartObject for the instance, which exposes the Method used in Part Two - Creating a Custom Workflow Step. You should be familiar with the JSSP documentation and the template project and have your environment ready to start coding your service type before you start this exercise. Read the topics in the Extending integration with the JavaScript Service Provider section to familiarize yourself with JSSP before you work through this example. Pay special attention to the Setting up your development environment section, as this example uses the same configuration.
-
Browse to GitHub and clone the K2Documentation.Sample.JavascriptBroker.Template project to start with the file structure of the project for this exercise. The template project is the recommended 'skeleton' project to use when creating your own JSSP service type and to do this exercise.
- Browse to the public Github repository K2Documentation.Sample.JavascriptBroker.Template either click on the Use this template button if you are signed-in to Github, or the Clone or download button to start.
- The Use this template button takes you to the Create a new repository page, follow the instruction on the page to create the repository and clone the template project.
- The Clone or download button allows you to clone the template project to your computer and open it in GitHub Desktop or download a copy of the project as a zip file.
- Browse to the public Github repository K2Documentation.Sample.JavascriptBroker.Template either click on the Use this template button if you are signed-in to Github, or the Clone or download button to start.
- The next step is to edit the index.ts file of the cloned template project and start writing the broker code. The main parts of the JavaScript you write are the metadata, ondescribe and onexecute sections of the index.ts file. Start with the metadata section. Name the service type and provide information about the service key. In this example we want a service key that defines the format of the string returned when the SmartObject method is executed. The string format must be Alphabetic, Numeric or Alphanumeric.
- The metadata section defines the service type's system name, display name, description, as well as a service key called stringFormat as shown below:Copy
JSSP metadata
import '@k2oss/k2-broker-core';
metadata = {
systemName: "com.k2.randomstring",
displayName: "Random Unique String Broker",
description: "An example broker that returns a random string as text, formatted as alphabetic, numeric or alphanumeric, using a Generate Access Code method.",
"configuration": { //configuration values (service keys)
"stringFormat": {
displayName: "String Format",
type: "string",
value: "Alphabetic" // valid values are Alphabetic, Numeric, Alphanumeric
}
},
};
- The metadata section defines the service type's system name, display name, description, as well as a service key called stringFormat as shown below:
-
The next part of the JavaScript code to write is the ondescribe function to describe a Service Object called randomstring. The object must have a return property called returnString and a single method to generate the random string. Call the randomstring object's method generateCode with a single parameter, pCharacters, which represents the number of characters in the returned string. See the code snippet in the Show Me How section for the code.
- Write the ondescribe function and implement the following (you can copy and paste the code snippet at the end of these steps if you prefer).
- Define the object. Enter the system name of the object as randomstring, with the display name of Random String and description Utility for generating random strings as shown in the code block below.
- Define the object return property. Enter returnString as the system name and Return String as the display name of the property. In this example we want the access code returned to be a string, so enter the data type as string.
- Define the method available to the service object. Use generateCode as the system name for the method and Generate access code as the display name. The method has a required input parameter called pCharacters of type number, with a display name of Length and description as The number of characters in the returned string.
CopyJSSP ondescribe
ondescribe = async function ({ configuration }): Promise<void> {
postSchema({ // this section is the schema describing the K2 service
objects: {
"randomstring": { //service object system name
displayName: "Random String", // service object display name
description: "Utility for generating random strings", // description for the service object
properties: {
"returnString": { // system name for the service object property
displayName: "Return string", // display name for property "returnString"
type: "string" // data type for the property
}
},
methods: { // the methods available to the service object (only 1 in this case)
"generateCode": {
displayName: "Generate access code", // display name of the method
type: "execute", // type of method: CRUD, List, Execute
parameters: { // required input parameters for this input method
"pCharacters": { // input parameter for the length of the string to return
displayName: "Length",
description: "The number of characters in the returned string",
type: "number"
} // data type of the paramter
},
requiredParameters: ["pCharacters"], // parameter required to execute this method (can be a collection)
outputs: ["returnString"] // properties that the method will return
},
}
}
}
});
}
- Write the ondescribe function and implement the following (you can copy and paste the code snippet at the end of these steps if you prefer).
-
The final part of the JavaScript code is to implement the onexecute function. This is where you generate a random string of characters based on the format described by the service key, and on the number of characters entered by the user for the length of the string (the method's input parameter). See the code snippet in the Show Me How section for the code.
- Write the onexecute function and implement the code that generates the random string, based on the input parameters passed at runtime. Copy and paste the code snippet at the end of these steps if you prefer.
In the code block shown below, the first part of the function determines which characters the return string should contain, based on the service key. Then we use a 'for' loop to generate the random characters with the number of characters based on the input property of the system object method, and assign the string to a variable. Finally, we assign the string variable's value to the property of the Service Object and post the result back to the product
CopyJSSP onexecute
onexecute = async function ({ objectName, methodName, parameters, properties, configuration, schema }): Promise<void> {
return new Promise<void>((resolve, reject) => {
var strType = ''; // the switch statement defines the character set to use for the return string,
// based on the service key defined in the metadata section (stringFormat)
switch (configuration["stringFormat"]) {
case "Alphabetic":
strType = "ABCDEFGHIJKLMNOPQRSTUVWXYZabcdefghijklmnopqrstuvwxyz";
break;
case "Numeric":
strType = "0123456789";
break;
case "Alphanumeric":
strType = "ABCDEFGHIJKLMNOPQRSTUVWXYZabcdefghijklmnopqrstuvwxyz0123456789";
break;
default:
strType = "ABCDEFGHIJKLMNOPQRSTUVWXYZabcdefghijklmnopqrstuvwxyz0123456789";
}
var passw = '';
var stringlength = parameters["pCharacters"];
for (let i = 1; i <= stringlength; i++) { // the for loop to generate characters
var char = Math.floor(Math.random()
* strType.length + 1);
passw += strType.charAt(char) // the characters that make up the returned string
}
postResult({ // the string that gets passed back to K2
"returnString": passw
});
});
} - Write the onexecute function and implement the code that generates the random string, based on the input parameters passed at runtime. Copy and paste the code snippet at the end of these steps if you prefer.
- Now build the bundled .js file that the product uses to create the service type, and commit the resulting bundled .js file to your GitHub project (or alternatively upload the bundled .js file to a location on the internet where the product can reach it)
- To build your JSSP project, run the NPM build command as shown below. This generates a bundled .js file in the /dist folder, which is the file you use to create a service type in the product.
To build a compact bundled file, execute the command:
npm run build
You can use the following command syntax to build a more readable .js file:
npm run build:dev - Commit the bundled .js file in the /dist folder to your repository (or alternatively upload the bundled .js file to a location on the internet where the product can reach it)
- To build your JSSP project, run the NPM build command as shown below. This generates a bundled .js file in the /dist folder, which is the file you use to create a service type in the product.
- Use the Create from URL mechanism in the Management Site to register the JSSP Service Type in the product, and specify the location where you uploaded your bundled .js file to. For this example, we uploaded the project to a Github site and used the following URL: https://raw.githubusercontent.com/K2Documentation/K2Documentation.Samples.JavascriptBroker.RandomString/master/src/index.ts. Make the name JSSP Random String Generator, the description Random string generator using the JavaScript Service Provider, and enter the URL to your uploaded bundled .js file, or use the URL above. (If you are using GitHub, use the Raw view of your bundled .js file's URL.)
- Open Management and browse to the System > Management > SmartObjects > SmartObjects category.
- Select the JavaScript Service Provider SmartObject and execute the Create from URL method.
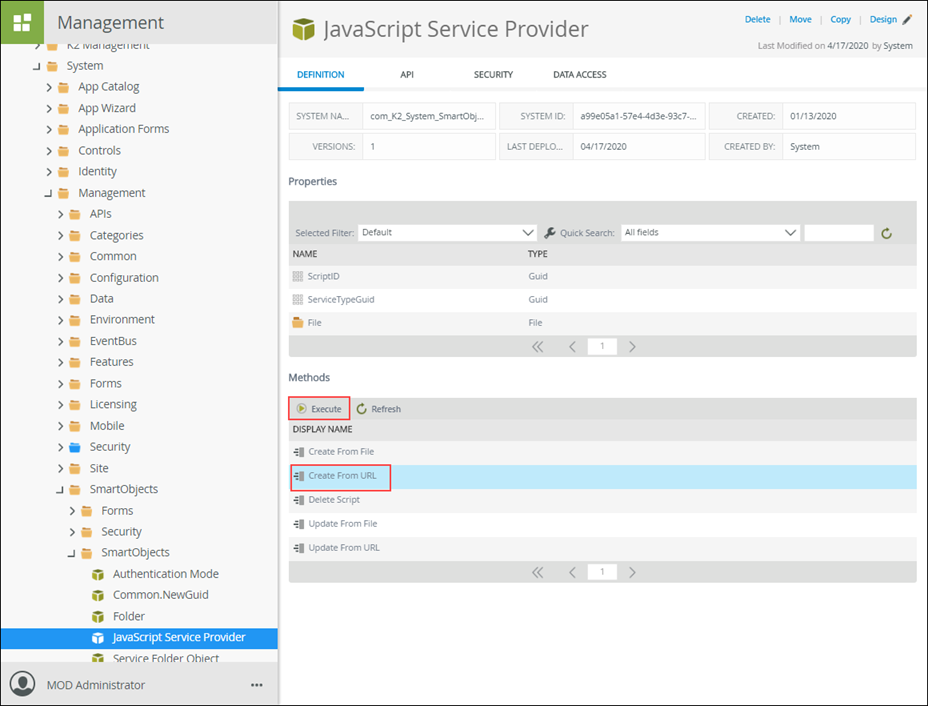
- Fill in the form as shown in the image below, then Execute the method. The screenshot shows the location of a sample .js file (https://raw.githubusercontent.com/K2Documentation/K2Documentation.Samples.JavascriptBroker.RandomString/master/dist/index.js), but you can enter the URL of your own bundled .js file as well. (If you are using GitHub, use the Raw view of your bundled .js file's URL.)

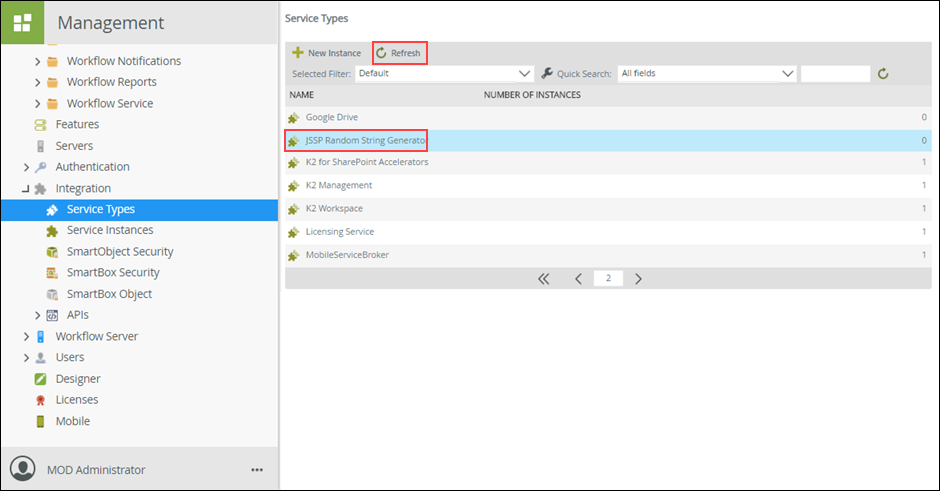
- The product creates the Service Type and it appears in the list of Service Types after you refresh the list.
- The final step in Part One is to configure an instance of the new service type and generate a SmartObject, which you use in part two of this example. Enter a Display Name, Description and a valid value (Alphanumeric, Numeric or Alphabetic) for the Service Key you created in the JavaScript code.
- With the JSSP Random String Generator service type from the previous step still selected, click New Instance.
- Enter Random Alphanumeric String for the Display Name and make sure you select the JSSP Random String Generator as the Service Type. Find the Service Key you created in the configuration section of the metadata in your code in Step 2 point a above. This example used stringFormat. Enter one of the valid choices defined in your code (Alphanumeric, Numeric or Alphabetic) . Make sure you select the Generate SmartObjects for this Service Instance checkbox. Click OK to continue.

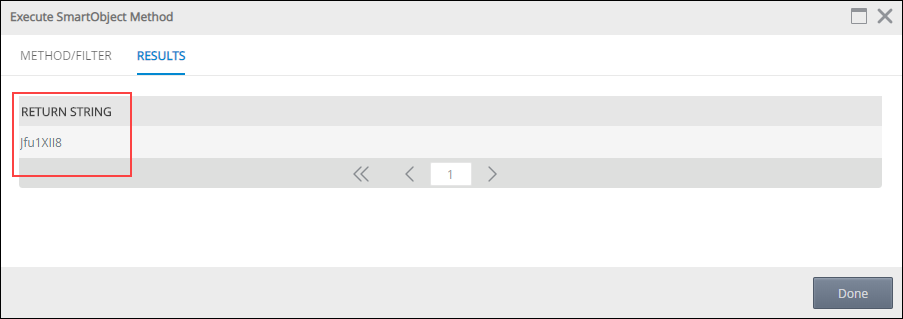
- Refresh your browser to find the new SmartObject in the Categories list. To test the SmartObject, select and execute the Generate access code Method.

- Enter a number for the length of the string and click Execute. The Generate access code Method and the property named Length show in the image is the Method name and pCharacters parameter shown in the code in Step 3a, point iii above.

- The results page shows the returned string of alphanumeric characters.
Part 2: Create and use the Custom Workflow Step
In part two you first register the new custom step with workflow designer. Then you will build a small application with a SmartObject, Form and workflow to test the custom step. Eventually, you want the workflow to use the custom step to send an email with a unique access code to an email address that you specified. See Custom workflow steps for more information on creating and using custom workflow steps.
- Register the new custom workflow step by browsing to the custom step management form at: https://<your K2 server>/Runtime/Runtime/Form/com__K2__System__Management__Workflows__CustomStep__Forms__Main and filling in the form.
- Open a browser window and browse to the custom step management form at: https://<your K2 server>/Runtime/Runtime/Form/com__K2__System__Management__Workflows__CustomStep__Forms__Main. Any existing custom steps in your environment are listed under the Steps tab. Click the Create tab to create a new custom step.
- Name your step Generate Access Code and enter the toolbox path to group your step with others in your system (if there are any). In this example you add the custom step to the Utilities folder in the toolbox.
In the Service Type box select the JSSP Random String Generator you created earlier. The Service Object selection updates based on the Service Type you selected.
Select Random String in the Service Object drop down. The Service Object Method list updates based on this selection.
In the Service object Method drop down, select the Generate access code method.
Enter a Description like Generate an access code. and add a SVG image to use as the Icon. Click Create to continue.
- Now that the custom step is registered with Workflow designer, you can build an application that will use the custom step.
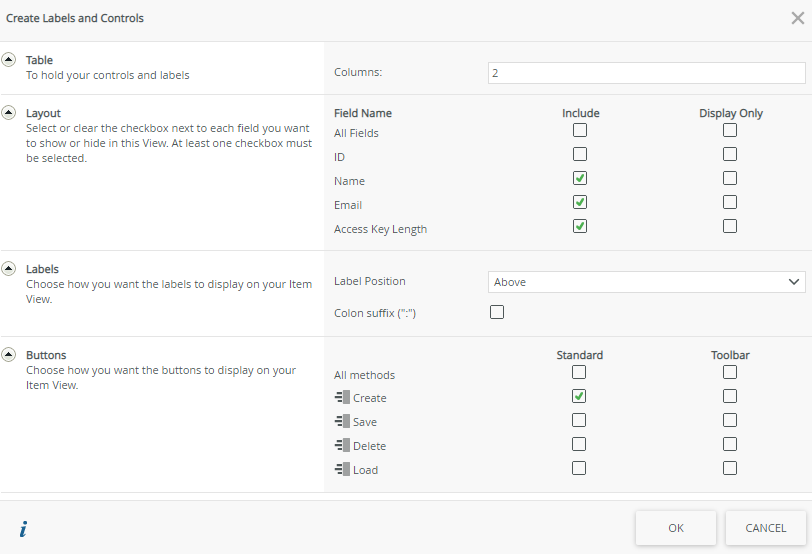
From the Designer, create a SmartObject called Registration. This is the SmartObject that stores the name, email and access key length for your access request. Use the table as a guide for adding properties.
Property Data Type Key Required Unique ID Autonumber Yes No Yes Name Text No No No Email Text No No No Access Key Length Number No Yes No If you are not familiar with creating a SmartBox SmartObject, see How To: Create A SmartBox SmartObject. - In this step you create an Item View and generate a Form to capture the information stored in the Registration SmartObject. The Item View allows you to enter a persons name, email address, and the number of characters you want the access code to be.
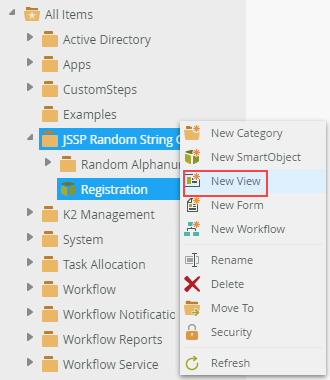
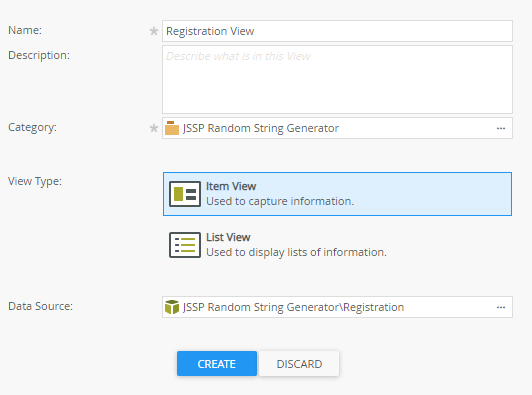
- Right-click on the category you saved your Registration SmartObject in and select New View.
- Enter Registration View for the name of the view and make sure the correct category is selected. Then select Item View as the View Type and the Registration SmartObject as the Data Source. Click Create to continue.
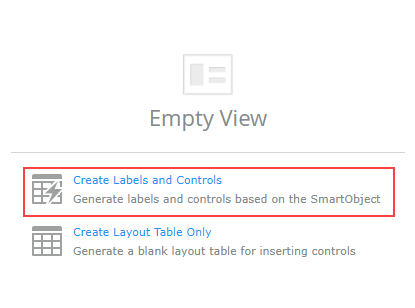
- Click Create Labels and Controls then select the checkboxes as in the image below and click OK to continue.
- On the LAYOUT tab select Toolbox and drag a label to the top of the view. Enter a description for the view in the label's Text box, for example:
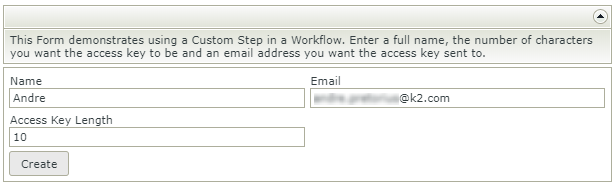
This Form demonstrates using a Custom Step in a Workflow. Enter a full name, the number of characters you want the access key to be and an email address you want the access key sent to.
Select Wrap Text then click FINISH to continue.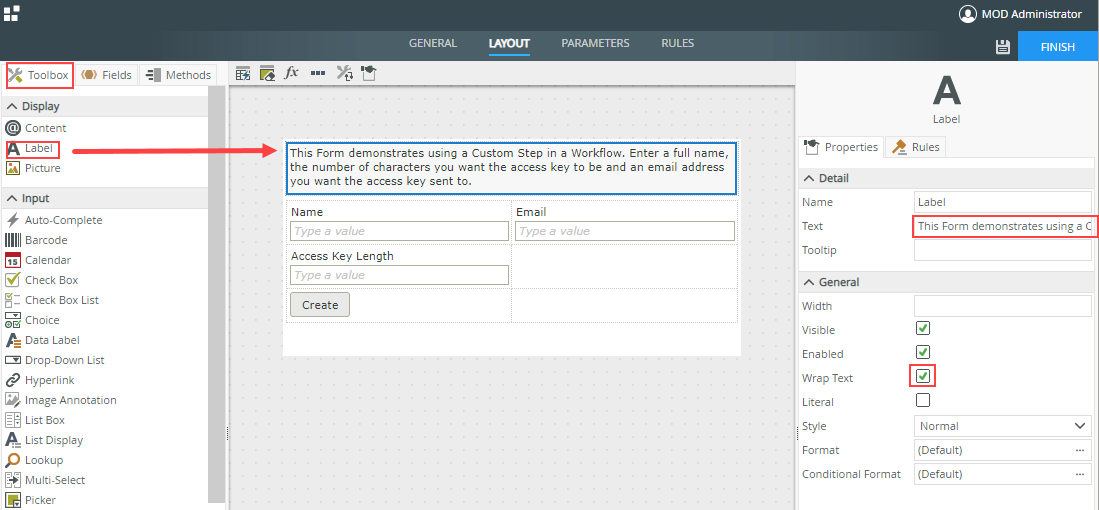
- Right-click on the new view and then click Generate Forms. The new form is created in the same category as the view it was generated from.
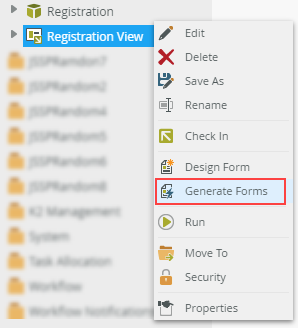
- Right-click on the category you saved your Registration SmartObject in and select New View.
Next you will create the workflow where we will use the new custom step.
-
Create a workflow based on the Registration Form you created earlier. Add the following steps to the workflow:
- Start
- Access code generator
- Send Email
- Stop

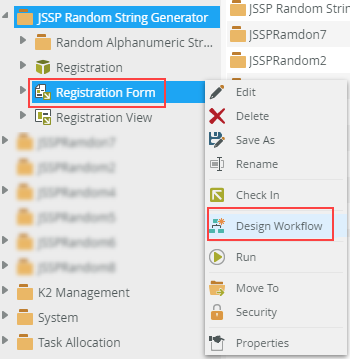
- Right-click on the Form you generated earlier and click Design Workflow.
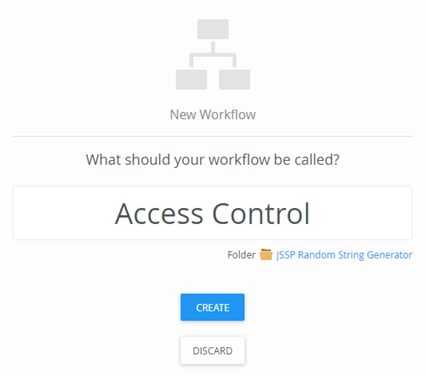
- Name your workflow and select an appropriate folder, then click Create to continue.
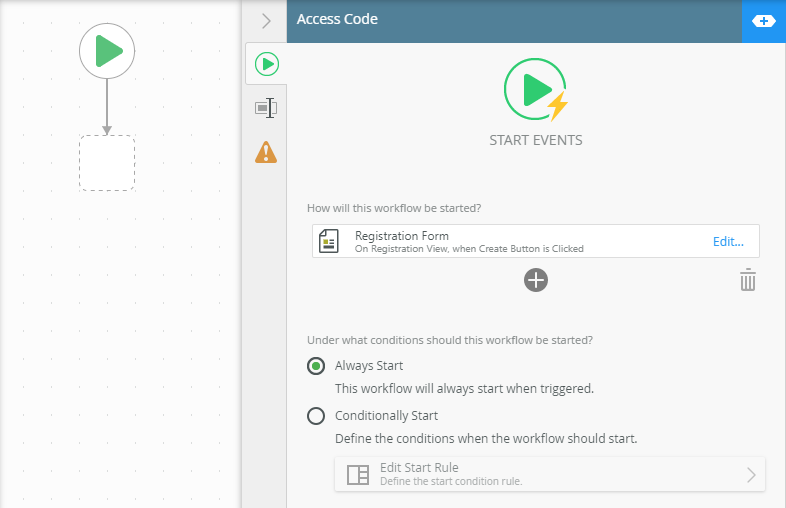
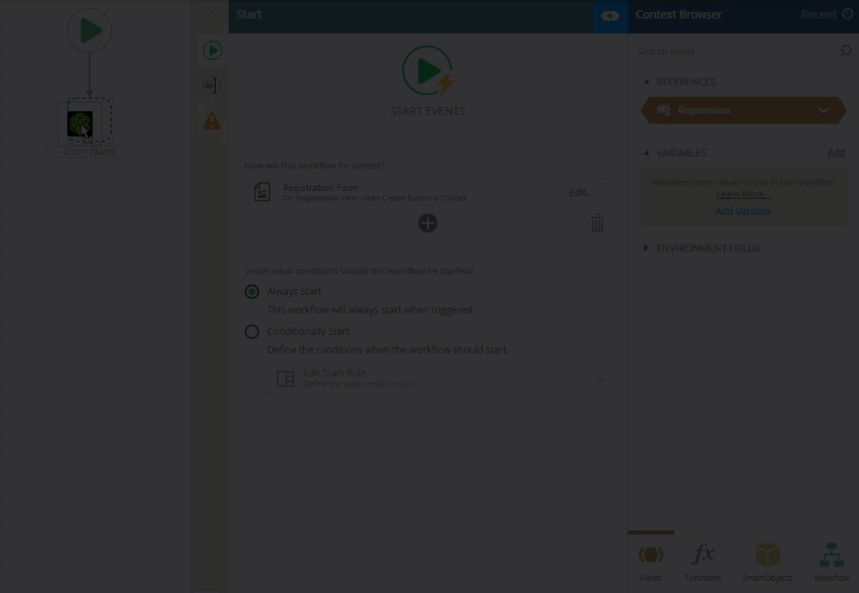
- Configure the start step. Set the workflow to be started when the Create button is clicked on the Registration Form. Do this by clicking the Edit... link, and then click Next and OK on the wizard to finish.
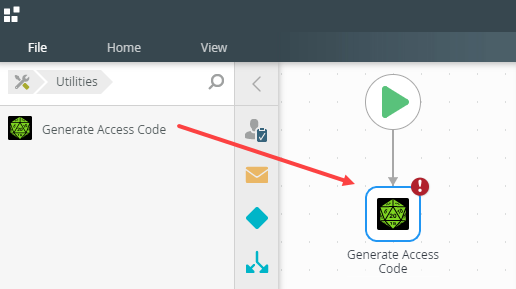
- Drag the custom step into the workflow by clicking Utilities in the Toolbox and dragging the Generate Access Code step onto the canvas.
- Configure the Generate Access Code step by choosing the Random Alphanumeric String in the Connection drop down box. Then drag the Access Key Length property from the Registration SmartObject to the Length property of the item. Create a variable called ReturnString and map the item's Return String property to the variable, you will use this variable in a later step.
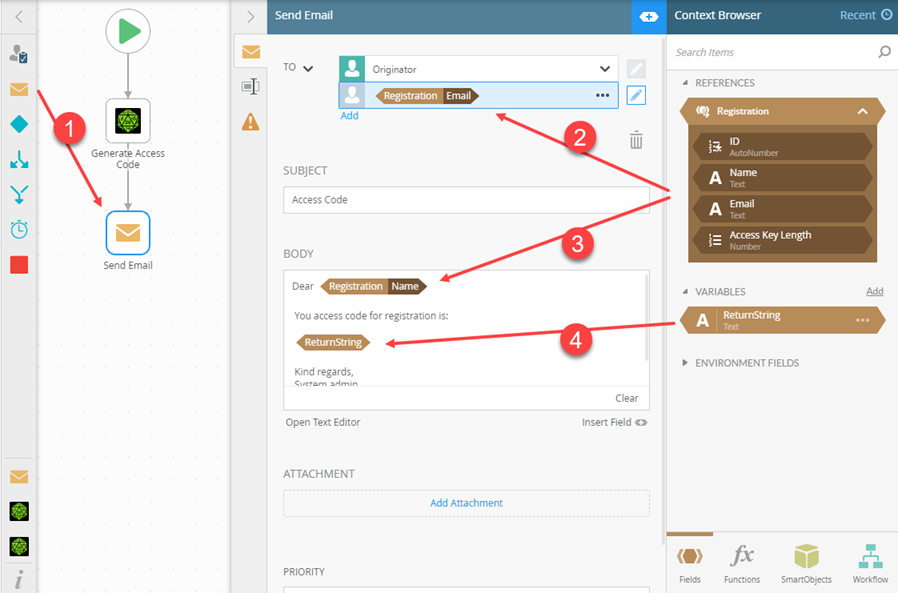
- Drag a Send Email step onto the canvas and draw a line from the custom step to it. Configure the email step as in the image below.
- Drag the Send Email step onto the canvas and link it to the custom step.
- Set the email To field to the Originator and add the Email field of the Registration SmartObject by dragging the field as shown.
- Type the subject and body of the email and drag the Name field from the SmartObject to the email body.
- Drag the variable that holds the Return String you crated earlier into the email body.
- Finish off your workflow with an End step and link it to the Send Email step.
- Finally, deploy your workflow and check in any items still checked out.
-
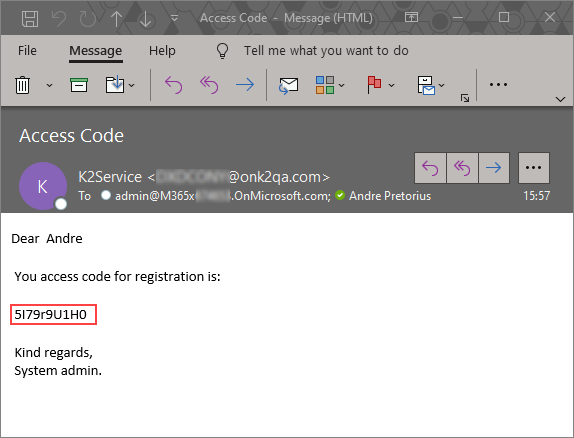
Test you work by running the Registration Form, filling in the details and click Create. If you use your own email address in the form, you should receive an email with the randomly generated code. The originator that started the workflow should also receive the email with the access code.
Summary
This tutorial demonstrated how to use the JSSP feature to extend the product's integration capabilities, and then how to create a custom workflow step to make it easier for workflow designers to use integration extensions in the product.