How to: Create a tabbed form and show data between tabs
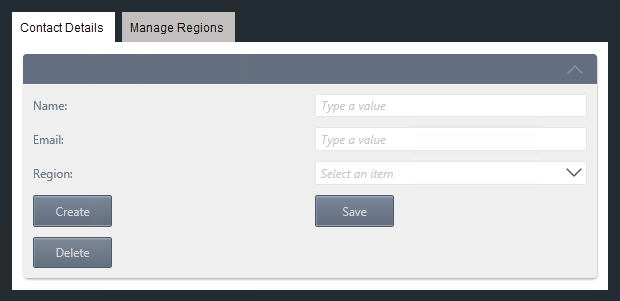
This article illustrates how to build a tabbed form. The form has two tabs: Contact Details and Manage Regions. The first view includes a drop-down list of regions. If you do not see the region you need, you can add it by clicking the second tab on the form to manage regions.
A form with multiple tabs
Try it yourself!
Scenario
You work in Sales where you maintain an online form for other sales reps to update their contact details, including the region they cover. Because you base reports on regions, it is essential the region value is consistent across records. To do this, you use a drop-down list of regions that sales reps can select from. However, there may be regions that are not in the list. You provide a tab on the form so they can enter new regions.
Steps
You create two SmartObjects: the first for contact details and the second for regions. You create an item view based on each SmartObject. You create a form with two tabs: the default tab loads the contact details view and a second tab loads the regions view. You configure a drop-down list on the contact details view to display the records from the regions SmartObject.
Setup Steps
The following steps set up the scenario from start to finish. If you want to skip the setup steps and view the topic step, go to Add tabs to the form.
- From the Designer, create a SmartBox SmartObject called Regions. Add one property called Region Name (Text). (Optional) Create categories first to keep your work organized. Design a list view from the SmartObject and name it Edit Regions View. Include the Region Name field and enable editing to create, save, and delete list items.
- Launch the Designer.If you do not know how to access the Designer, see Accessing Sites.
- Create categories to keep your work organized. Right-click All Items and select New Category. Use the image below as an example for category names.

- Right-click the Tabbed Forms category and select New SmartObject. Name the SmartObject
Regions
and confirm the SmartBox option. Click Create.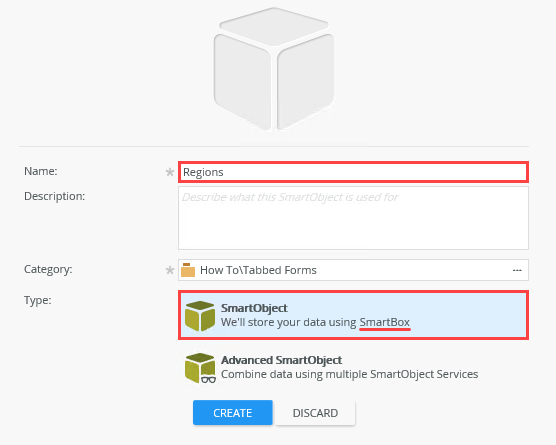
- You add one property to store region names. On the Regions screen, click Add. Name the property
Region Name
and click OK. (Keep the default data type, Text.) Click Finish to save and exit the SmartObject.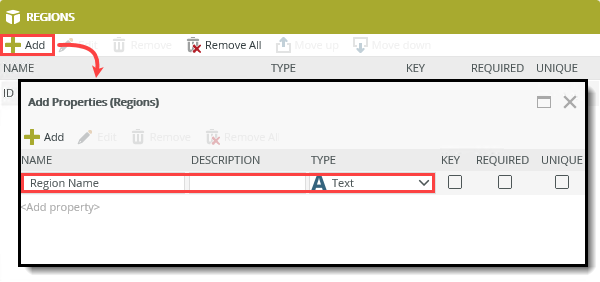
- Right-click the Regions SmartObject and select Design View.
- Name the view
Edit Regions View
and change the view type to List View. Click Create.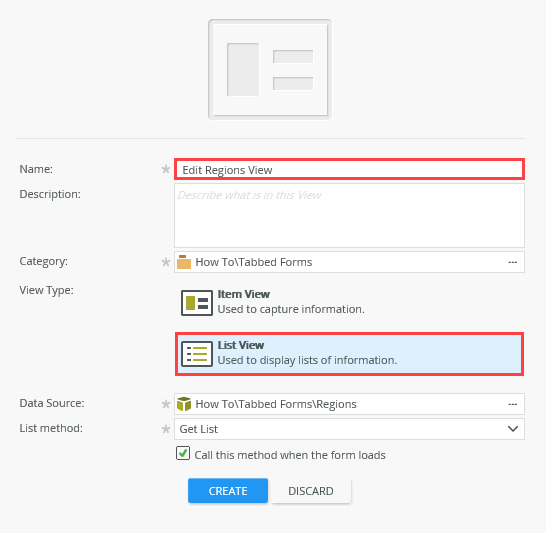
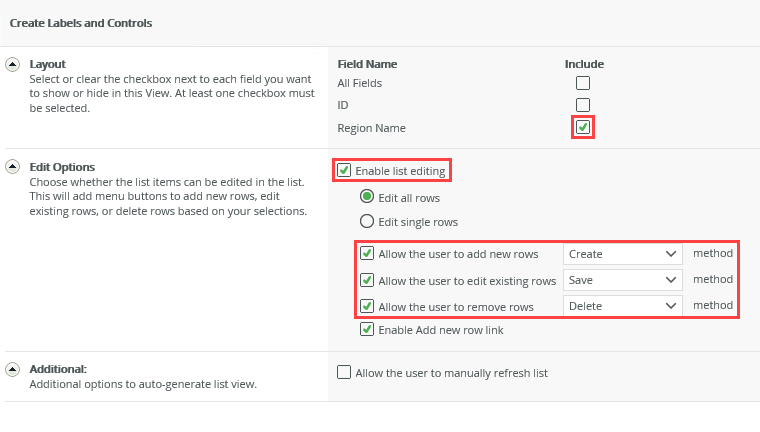
- Click Create Labels and Controls. With this option, you choose the fields you need and enable editing.
- Include the Region Name and enable list editing. Allow users to Create, Save, and Delete rows. Click OK.
- Click Finish to save and exit the view.
Before moving on to the next SmartObject, create a List view to manage regions. From this view, you can create, save, and delete regions.
- Launch the Designer.
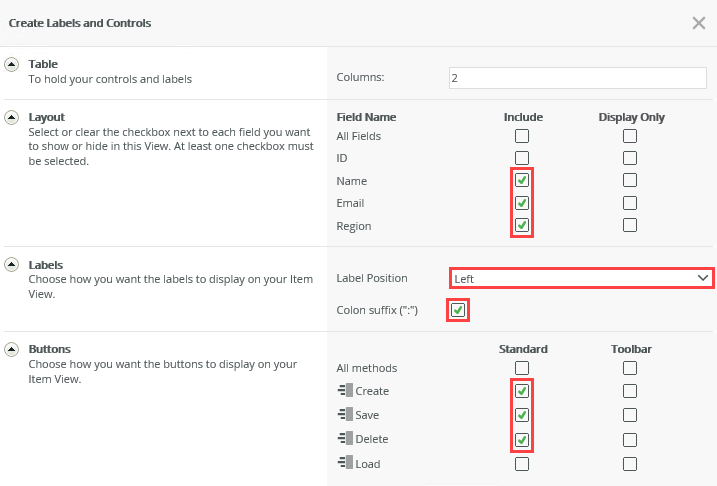
- Create a SmartBox SmartObject and name it Sales Contacts. Add the following properties: Name (Text), Email (Text), and Region (Text). Create an item view from the SmartObject called Sales Contacts Item. Include the Name, Email, and Region fields. Set the labels to left align and include the colon suffix. Select the standard Create, Save, and Delete methods.
- Right-click the Tabbed Forms category and select New SmartObject. Name the SmartObject
Sales Contacts
and confirm the SmartBox option. Click Create.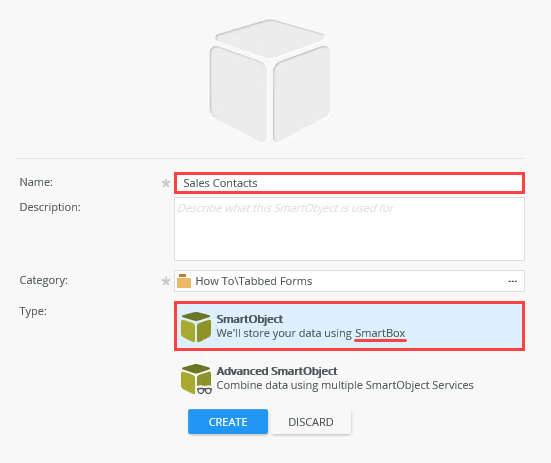
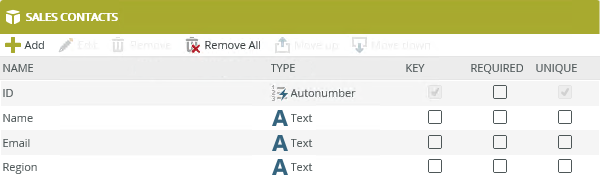
- Add the following properties: Name (Text), Email (Text), and Region (Text). Click OK. Click Finish to save and exit the SmartObject.
- Design an item view from the Sales Contacts SmartObject. Name the view
Sales Contacts Item
and click Create.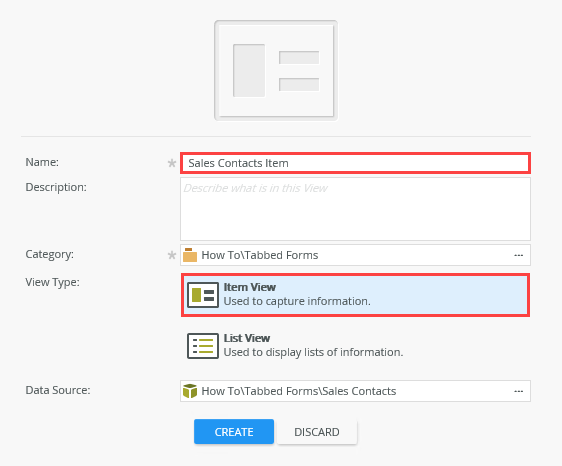
- Click Create Labels and Controls.
- Include the Name, Email, and Region fields. Set the label position to left and include the colon suffix. Select the standard Create, Save, and Delete methods. Click OK.
- Right-click the Tabbed Forms category and select New SmartObject. Name the SmartObject
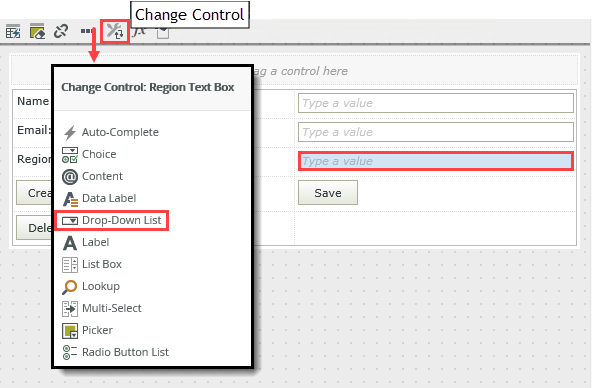
- Change the Region text box to a drop-down list and link it to the Regions SmartObject. Display the Region Name and use the ID for the value. Use the Get List method.
Next, change the Region text box control to a drop-down list control. You link the control to the Regions SmartObject. The SmartObject list items become the drop-down list control's values.
- Select the Region text box. Click the Change Control icon in the menu bar and select Drop-Down List.
- With the control still selected, locate the Type property in the Data Source section of the Properties pane. Click the ellipses to open the data source editor.
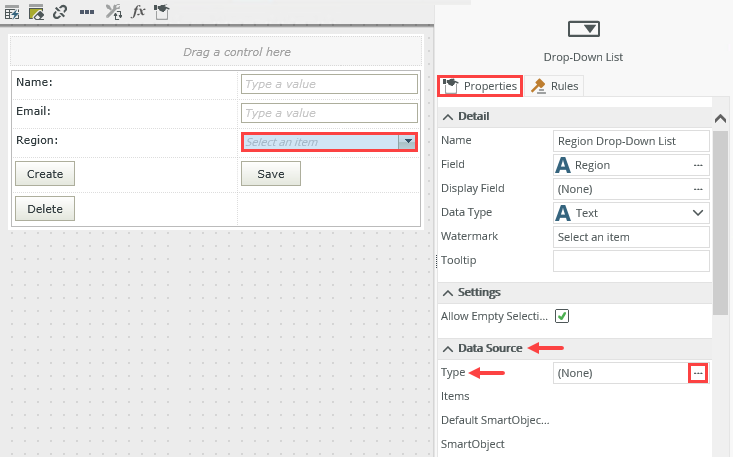
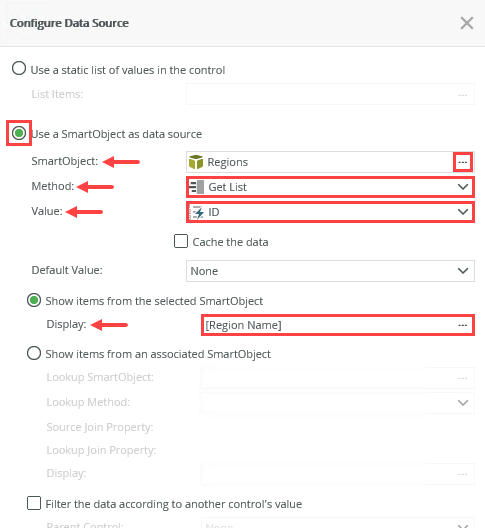
- Select Use a SmartObject as a data source, if it is not already active. Click the ellipses for the SmartObject property, then navigate to and select the Regions SmartObject. Click OK. Keep the defaults for Method (Get List), Value (ID), and Display ([Region Name]). Click OK.
- Click Finish to save and exit the view.
- Select the Region text box. Click the Change Control icon in the menu bar and select Drop-Down List.
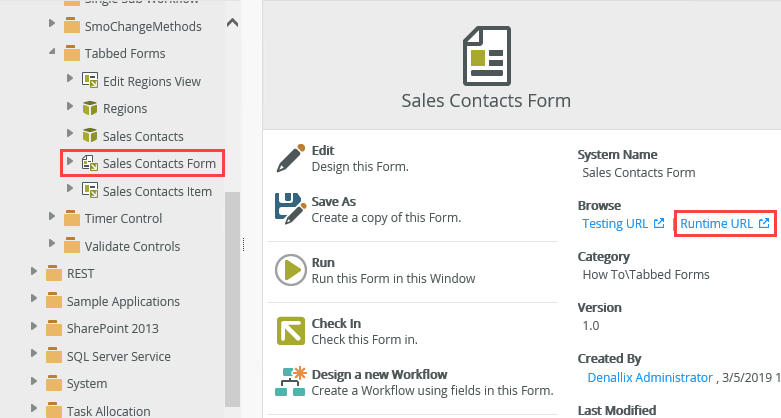
- Next, you create a form that contains the two views. Sales Contacts Item is the default view with the Regions view on a second tab. From the Sales Contacts Item view, design a form called Sales Contacts Form.
- Right-click the Sales Contacts Item view and select Design Form. Name the form
Sales Contacts Form
and click Create.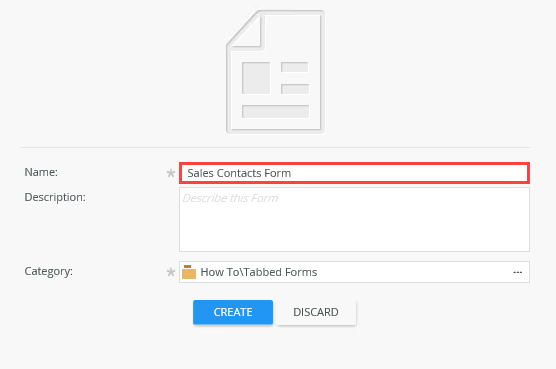
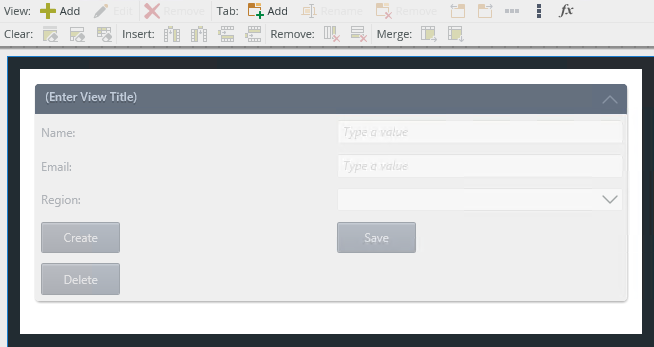
Notice the form already contains the Sales Contacts Item view (because you created the form based on the view). In the next step, you add a tab to the form and link it to the Edit Regions View.
- Right-click the Sales Contacts Item view and select Design Form. Name the form
Add tabs to the form
In the next step, you work with tabs. Tabs replicate the form's canvas and you can add views, tables, and controls. You still have one form in terms of rules and workflows.
- Add a tab to the form and add the Edit Regions View to the new canvas.
- Click the Tab: Add icon. If you do not see the icon (depending on your browser width), click the drop-down arrow to the right of the menu bar to expose the options.
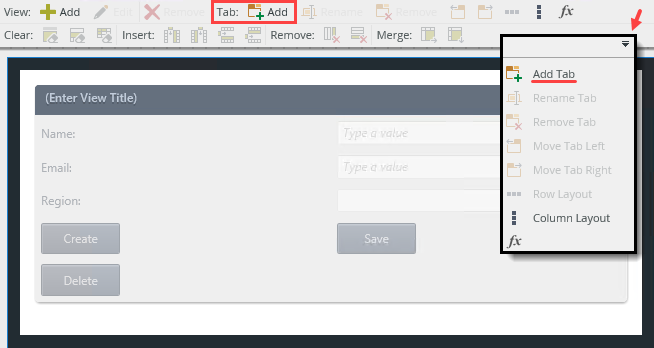
- The form converts to tabs. Click (Enter Tab Title) and enter
Contact Details. This is your default view.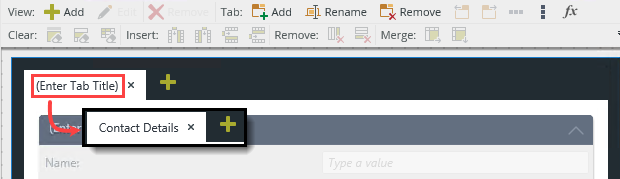
- Click the Add(+) icon. Name the new tab
Manage Regions.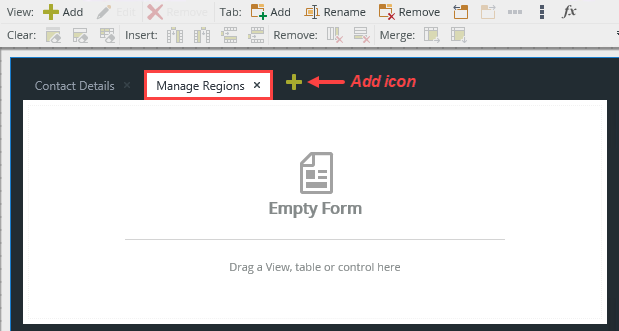
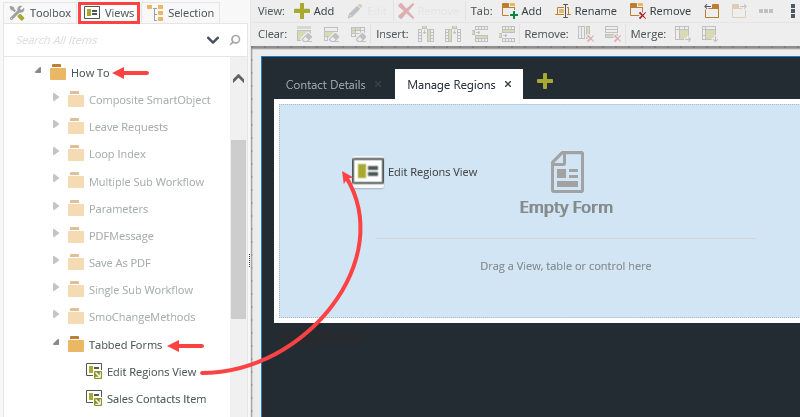
- Notice you have a new form canvas where you can add views, tables, and controls. From the Views menu on the left side of your screen, drag the Edit Regions View onto the canvas.
- Click Finish to save and exit the form.
You now have a form with two tabs. In reality, you have one form displaying two views on separate tabs (and not two forms). You could have both views stacked in the same canvas, but tabs provide a clean separation of views and makes them easy to access without the need to scroll.
- Click the Tab: Add icon. If you do not see the icon (depending on your browser width), click the drop-down arrow to the right of the menu bar to expose the options.
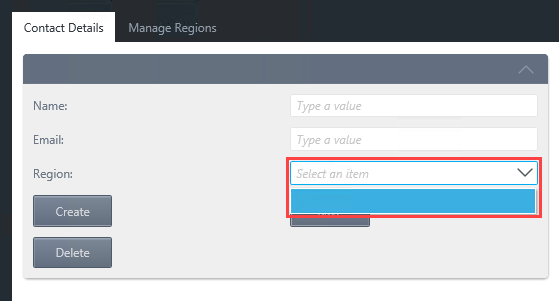
- Use the Runtime URL to open the Sales Contacts Form. Confirm there are no list items in the Region drop-down control. Switch to the Manage Regions tab and add several regions. Ensure to click Save to save the entries. Refresh the browser. Confirm you now see regions in the drop-down list (on the Contact Details tab).
- Select the Sales Contacts Form and click the Runtime URL found in the central pane. The Runtime URL opens the form in a new browser window. This is the URL you use to access the form outside of the Designer.
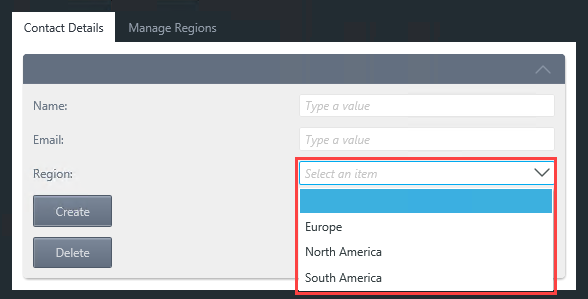
- The form opens with the Contact Details view. Click the Region drop-down list. Notice there are no list items. This is because you have not added any regions to the SmartObject.
- Click the Manage Regions tab. Click Add. Enter a region name and click Save.
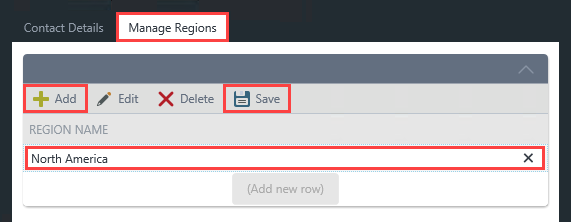
- Add at least two more regions, clicking Save after each addition.
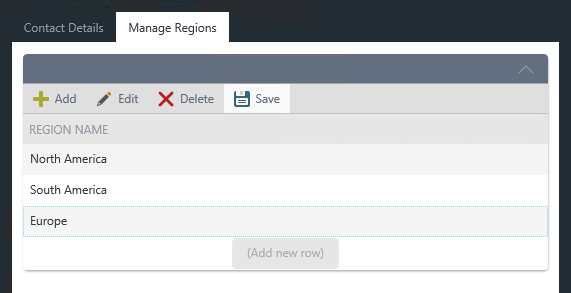
- Switch back to the Contact Details tab. Refresh your browser screen. Click the Region drop-down list. You should now see the regions.Add a rule action that initializes the Contact Details view after you click Add, Edit, or Delete (on the Manage Regions view). This action results in the drop-down control updating list items without having to refresh the browser.
- Select the Sales Contacts Form and click the Runtime URL found in the central pane. The Runtime URL opens the form in a new browser window. This is the URL you use to access the form outside of the Designer.
Review
Use tabs to break up complex forms into logical sections or provide additional information without having to leave the default interface. Each tab provides a form-like canvas which contains one or more views, tables, and controls. One form can have many tabs. Be aware, however, that you may impact performance if you have multiple tabs loading content when the form opens. Consider using rules and filters to load content as you need it, such as when you click a tab. See Configure Tab Navigation To Optimize Performance for information about configuring rules to optimize performance when using tabs.