Building Advanced Composite SmartObjects with K2 Studio and the K2 Management Site
In this tutorial, you will create a composite SmartObject which joins data from a SQL database and a web service using the K2 Management site.
Context
Topics that will be covered in this tutorial include:
- How to create a service instance to retrieve data based from an Endpoints web service
- How to create a composite SmartObject using K2 Studio
- Testing composite SmartObjects from the K2 Management site
Duration
This tutorial should take around 20 minutes to complete.
The Endpoints service brokers enable you to expose data from multiple sources, such as traditional .asmx web services, WCF endpoints and .NET assemblies, as SmartObjects. These are "generic" brokers in that they are not written to expose a specific web service, but rather use a generic discovery approach to discover the methods exposed by any .asmx web service as SmartObjects. Of course, as a generic broker, it may not be able to integrate with all possible implementation of a technology, and you may choose to write a custom broker to integrate with a specific web service if you prefer, but the generic brokers can be used quite often to easily expose services and APIs as SmartObjects.
In this step, you will create a service instance of the Endpoints Web Service (Service Object) to retrieve data from a sample web service. You will connect to a sample web service that returns a list of regions using the EndPoints WebService service broker. The ListDenallixRegions service instance will later become part of the composite SmartObject that you will build in Step 2.
Step 1 Tasks
- Launch the K2 Management site.
- Add a new Endpoints WebService service instance.
- Use the values in the table below to configure the Endpoints WebService. If a field is not indicated in the table, assume the default value. There is an image below the table to use as a reference, if necessary.
- Generate a SmartObject from the Regions Web Service.
- Select only the ListDenallixRegions() object for your SmartObject.
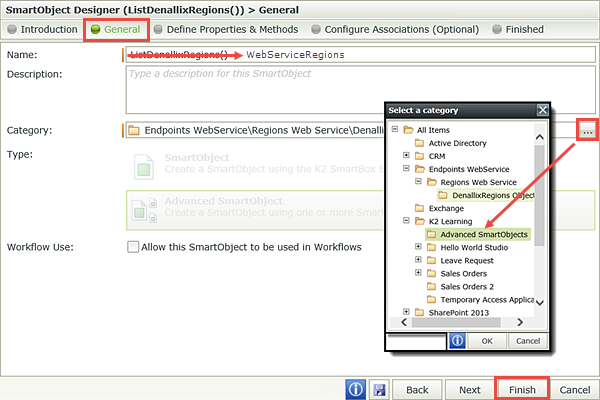
- Locate the new SmartObject in the Categories (Endpoints WebService > Regions Web Service > DenallixRegions Objects) nodes, then edit the SmartObject by clicking the Design link.
- Change the name of the SmartObject to
WebServiceRegions
then move it to the K2 Learning > Advanced SmartObjects category. - Execute the List method from the K2 Management site to confirm the connection is working propertly. (You may need to scroll down in the central pane to see the Methods section, with the execute command.)
| Name | Value | |
|---|---|---|
| A | Display Name: | Regions Web Service |
| B | Description: | Returns a list of regions. |
| C | Service Type: | Endpoints WebService |
| D | Authentication Mode: | ServiceAccount |
| E | WebService URL: |
http://k2learning.azurewebsites.net/DenallixRegions.asmx |
| F | Generate SmartObject for this Service Instance | UNCHECKED |

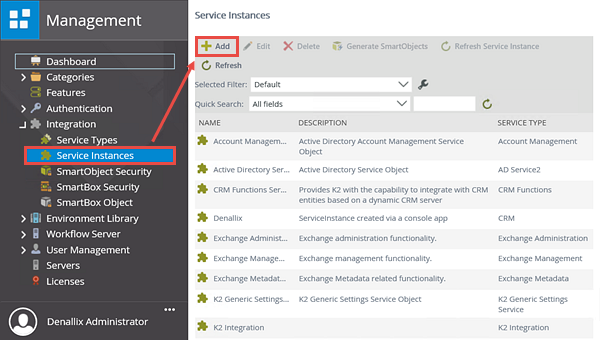
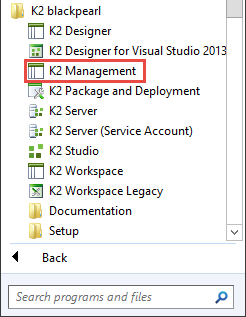
- Launch the K2 Management site. (Start > All Programs > K2 blackpearl > K2 Management)
- The K2 Management site will open with the dashboard view. In the Management menu, expand the Integration node, then click on Service Instances. The Service Instances screen is displayed in the central pane. Click the Add button located in the toolbar.
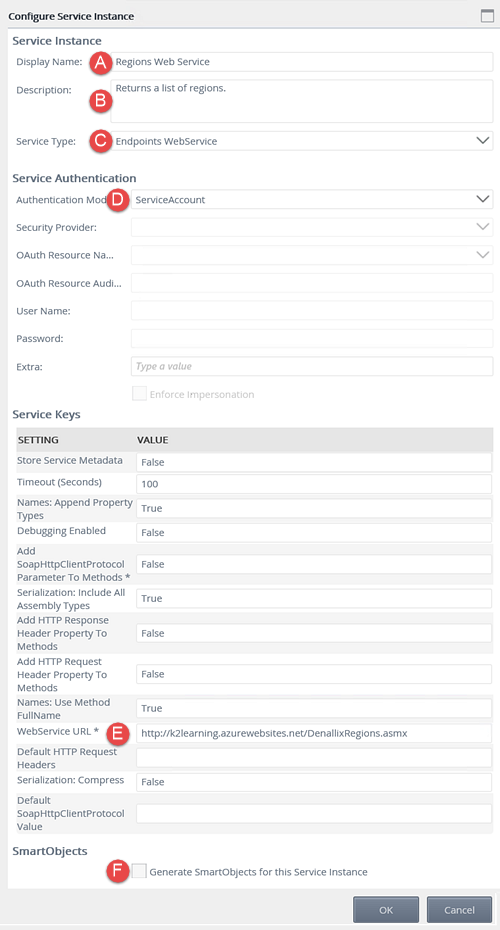
- On the Configure Service Instance screen, configure the Endpoints WebService service instance using the table values below. If a field is not indicated in the table below, assume the default value. Use the image below the table as a reference, if necessary. Click OK to create the service instance. Click OK to close the confirmation dialog.
| Name | Value | |
|---|---|---|
| A | Display Name: | Regions Web Service |
| B | Description: | Returns a list of regions. |
| C | Service Type: | Endpoints WebService |
| D | Authentication Mode: | ServiceAccount |
| E | WebService URL: |
http://k2learning.azurewebsites.net/DenallixRegions.asmx |
| F | Generate SmartObject for this Service Instance | UNCHECKED |
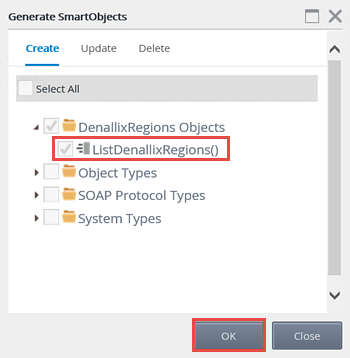
- On the Service Instances screen, locate and select the Regions Web Service service instance. Use the Quick Search option, if desired. Click the Generate SmartObjects button located in the toolbar.
- Expand the DenallixRegions Objects node, then select the ListDenallixRegions() object. Click OK.
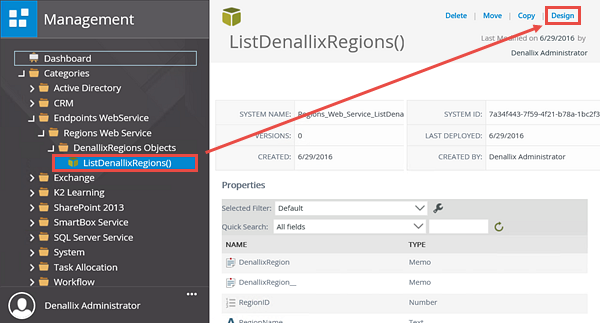
- To make room, collapse the Integration node. Expand the Categories node.
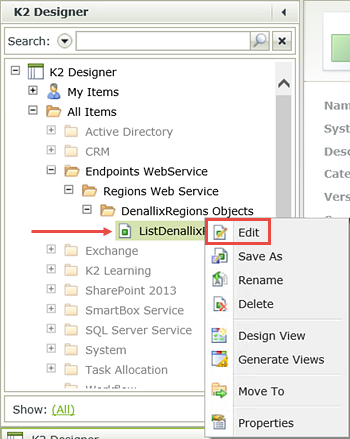
- Expand the Endpoints WebService > Regions Web Service > DenallixRegions Objects nodes, until you locate the ListDenallixRegions() SmartObject. Select the SmartObject, then click the Design link found in the central pane toolbar.
- Expand (if necessary) the Endpoints WebService > Regions Web Service > DenallixRegions Objects nodes, then select ListDenallixRegions(). Right-click the SmartObject and select Edit.
- Click the General button in the breadcrumb bar to open the general settings screen. Change the Name to
WebServiceRegions
then change the category to the K2 Learning > Advanced SmartObjects category. Click Finish to save the SmartObject changes.
Now you will create a SmartObject from the new service instance which you will use for the composite SmartObject in the next step.
Notice that K2 has discovered a number of objects returned by this web service. You will be working with the DenallixRegions Objects to build your composite SmartObject.
In the next few steps, you will rename the new SmartObject to a more friendly name, then move it into a new category.
You are redirected to K2 Designer. You will use the categories created int he Managing SmartObjects in the K2 Management site tutorial for the next steps.
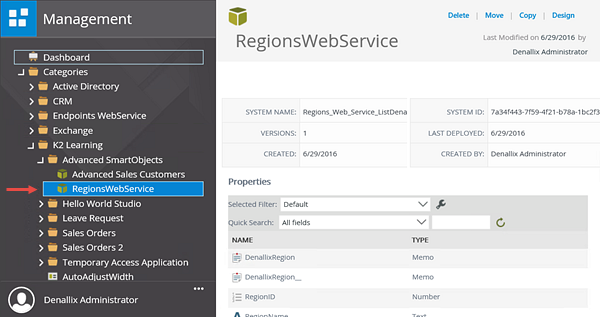
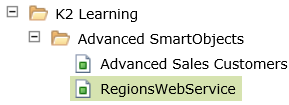
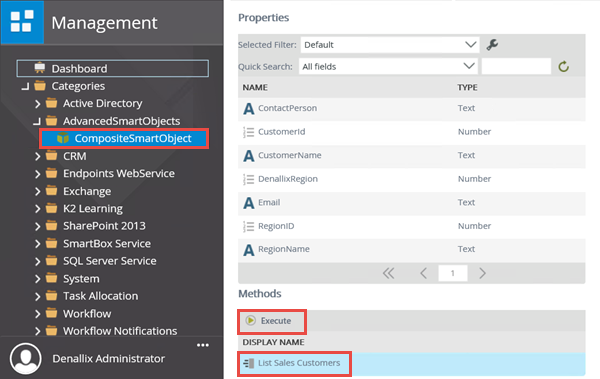
- Switch back to the K2 Management site tab in your browser. Expand the Categories > K2 Learning > Advanced SmartObjects node. Then click the RegionsWebService SmartObject. The properties and methods for the SmartObject will be displayed in the central pane.
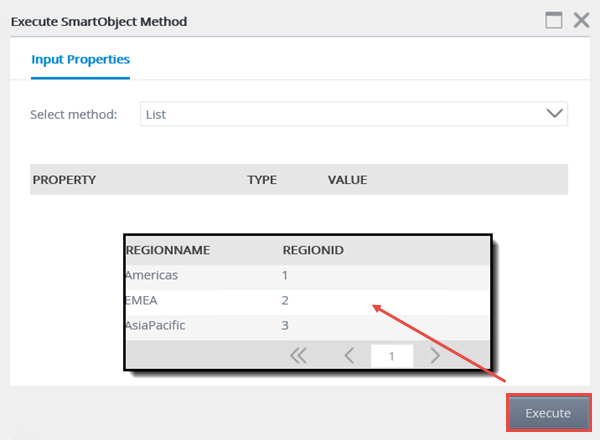
- In the central pane, scroll down to the Methods section. Click the List method for this SmartObject, then click Execute.
- There are no input properties, so click Execute once again. The properties discovered are returned. This confirms that the connection to this web service is functioning correctly. Exit the Execute SmartObject Method screen.
Your category browser should now look similar to the image below. (You should also see the Advanced Sale Customers SmartObject that was created in the Managing SmartObjects in the K2 Management Site tutorial.)
Before you move on to create the composite SmartObject, you should test the RegionsWebService SmartObject to confirm data is being returned.

Step 1 Review
In this step, you learned how K2 can interact with another data source provider, a web service. You created a new service instance of the Endpoints Web Service and then a SmartObject from the service instance. In the next step, you will create a composite SmartObject that combines data from a SQL-based SmartObject and our new, web service-based SmartObject.
In this step, you will create a composite SmartObject that combines the data from two different systems. Composite SmartObjects create a single data source where users can find data from multiple sources in one place. A real-world example of a composite SmartObject might be combining employee information from Active Directory and perhaps a different Human Resources database to output detailed payroll or leave history.
Step 2 Tasks
- Launch K2 Studio, then create a new project. Name the new project
AdvancedSmartObjects - Add a new SmartObject and name it
CompositeSmartObject - Remove all of the default SmartBox methods. Add a new method and run the wizard in advanced mode. Name the new method
List Sales Customers
and provide a description similar to
Displays a list of sales customers.
Make sure the method type is List. - Add the Sales Customers [Sales].[Customers] List method.
- Create new properties for the following return properties: CustomerId, CustomerName, ContactPerson, Email, DenallixRegion.
- Add the Regions Web Service.ListDenallixRegions().List. Create all of the properties.
- Link the Sales Customers List method to the Regions Web Service List method, using the option to match values in both objects.
- Assign the DenallixRegions property to the RegionID property.
- Deploy the SmartObject to the K2 server.
- Launch K2 Studio. (Start > All Programs > K2 blackpearl > K2 Studio)
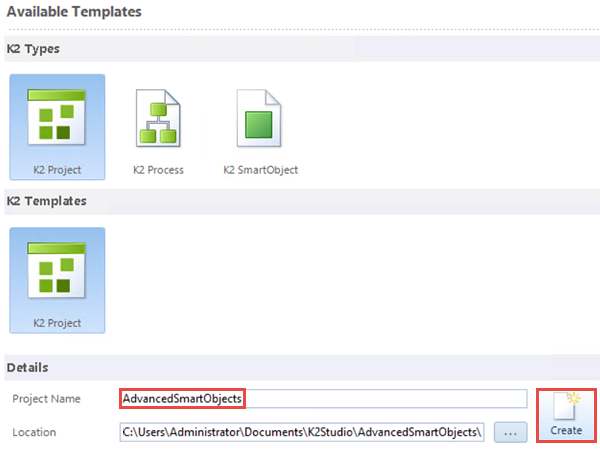
- Create a new project (File > New) Use K2 Project for both the type and template options. Name the project
AdvancedSmartObjects
then click Create. - Next, you will add a new SmartObject. Right-click the AdvancedSmartObjects project name and select Add > New project item. Select the K2 SmartObject for the K2 Types option and select SmartObject for the K2 Templates option. Name the new SmartObject
CompositeSmartObject
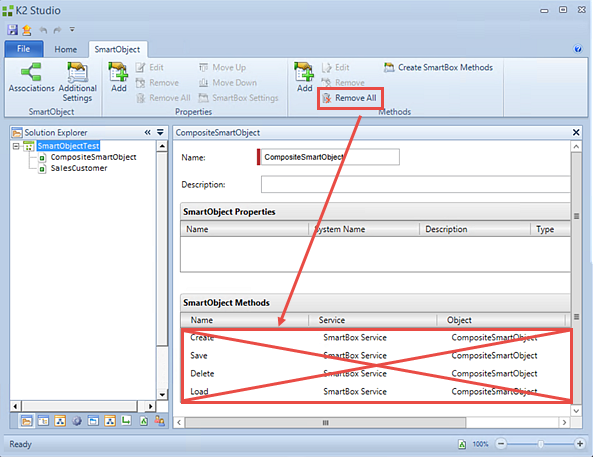
then click Create. - In the ribbon toolbar, within the Methods group, click the Remove All button. Click OK when you see the confirmation dialogue.
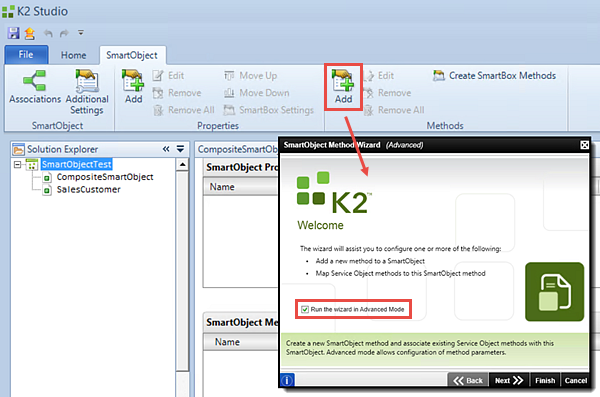
- Click the Add button found in the ribbon toolbar within the Methods group. On the SmartObject Method Wizard welcome screen, click the option to Run the wizard in Advanced Mode. Click Next to continue.
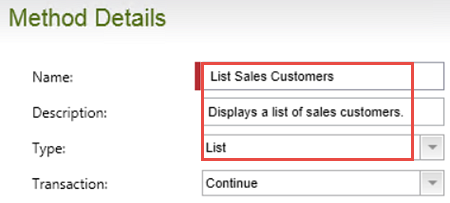
- On the Method Details screen, Name the method
List Sales Customers
then use the following for the Description:
Displays a list of sales customers.
and change the Type to List. Leave the Transaction value as is. Click Next to continue. - You will not be defining any method parameters for this SmartObject, so click Next on the Configure Method Parameters (Optional) screen.
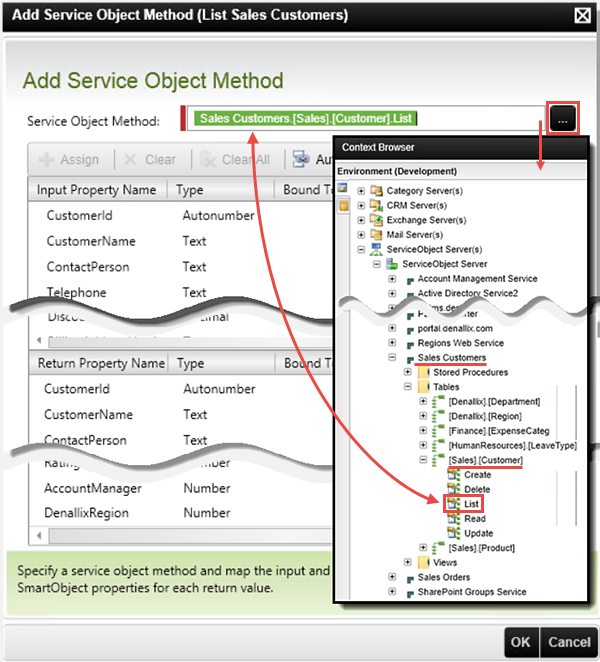
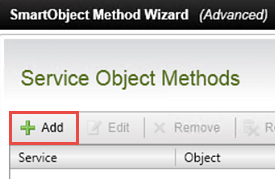
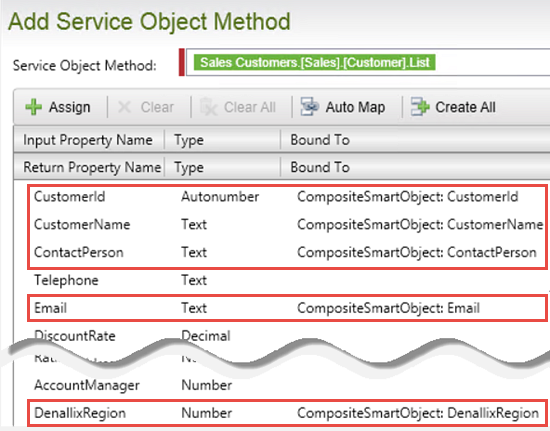
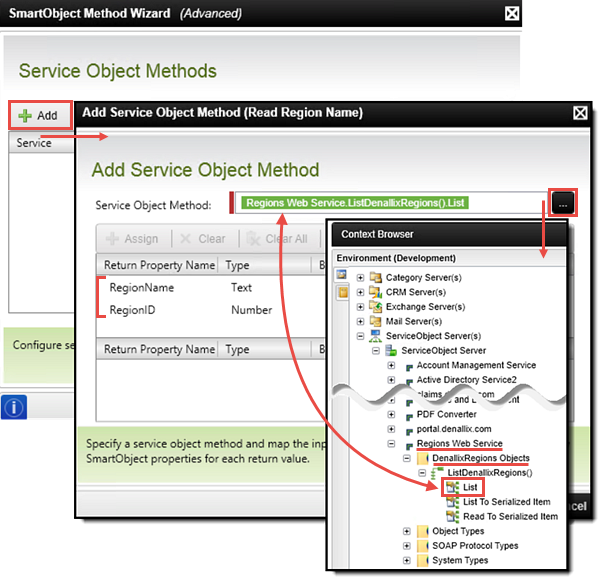
- The method definition you will add will be the list method from the Sales Customers service object. On the Service Object Methods screen, click Add.
- On the Add Service Object Method screen, click the ellipses to open the context browser, then navigate to the ServiceObject Server(s) > ServiceObject Server > Sales Customers service object. Expand the service object node, then expand the [Sales].[Customer] table. Drag, then drop, the List method into the Service Object Method property. Notice the Input and Return properties that were returned. Because this is a list method, there are no required input properties as there might be with a read method. Close the context browser.
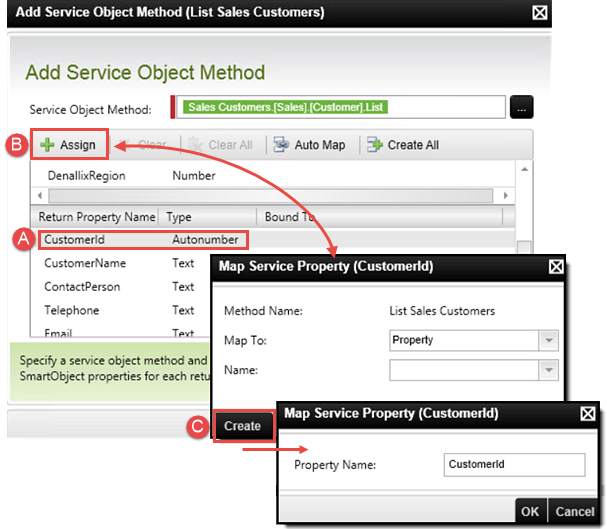
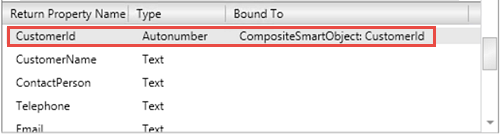
- Scroll down to the Return Properties pane. Click to highlight CustomerId, then select Assign. On the Map Service Property (CustomerId) screen, select Property from the Map To drop-down list (or confirm that it is already selected), then click the Create button. Click OK to save the new property. Click OK once again to complete the mapping.
- Using the same process as you just completed, create new properties for the following Return Properties:
CustomerName
ContactPerson
Email
DenallixRegion
then click OK to complete the method definition. - On the Service Object Methods screen, click Add. Click the ellipses to expose the context browser. Navigate to (and expand) the Regions Web Service node, then expand the DenallixRegions Objects node and finally the ListDenallixRegions() node. Drag, then drop, the List method into the Service Object Method property. Close the context browser.
- Using the same actions as before, create a new property for the RegionName and RegionID Return Properties. (If you like, you can just select Create All and K2 will create the two properties at the same time.) Click OK. Click Next.
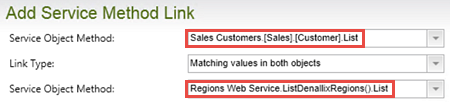
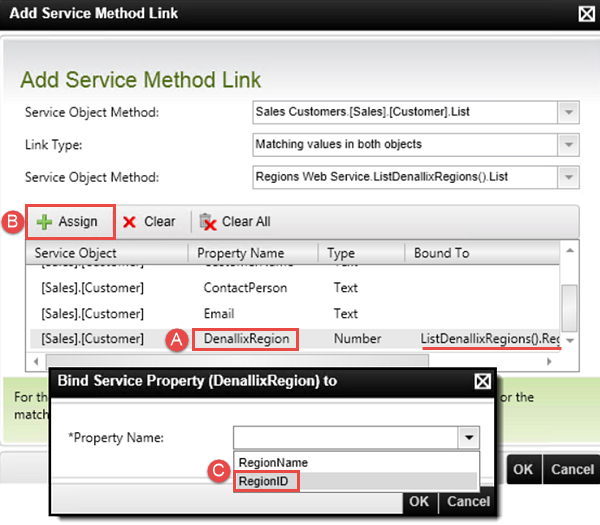
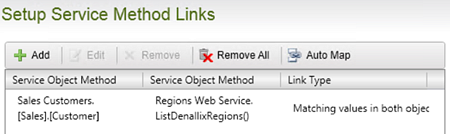
- On the Setup Service Method Links screen, click Add. In the first Service Object Method drop-down, select Sales Customers.[Sales].[Customers].List. This is the first method you want to link. In the Link Type drop-down, select Matching values in both objects. This is essentially saying the first method value should equal the second method value. In the second Service Object Method drop-down, select Regions Web Service.ListDenallixRegions().List. This is the second method you want to link the first method to.
- Scroll through the Sales Customers properties and click to highlight the DenallixRegion property. Click Assign. From the Property Name drop-down, select RegionID. Click OK. Notice that the Sale Customers DenallixRegion property is now bound to the Regions Web Service RegionID property. Click OK to complete the link wizard.
- Click Next, then Finish to complete the CompositeSmartObject configuration.
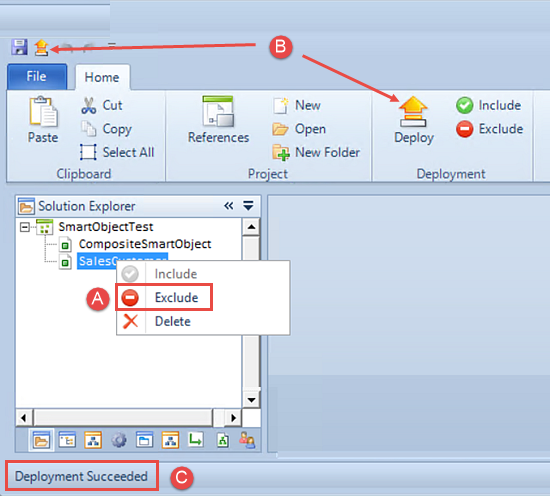
- Save (File > Save) your AdvancedSmartObjects.k2proj project. (If you have added other project items to this project, exclude them from being published. Most likely, you only have the one SmartObject listed, so you can just continue from here.) Click the Deploy button. When you see the Deploy Project Wizard, click Next, then Finish. You will see a message in the status bar when the SmartObject has been deployed successfully.

Take a minute to scroll down to the bottom of the Properties and Methods screen. Notice that K2 has automatically generated a default set of SmartBox Service methods for the new SmartObject. Since you will be adding new methods from the Sales Customers service object and the Regions Web Service service object, you will first remove the default methods that K2 has added.
Now you will add a list method to the composite SmartObject, then select an existing method from the Sales Customers service object to use as part of the new method's definition.
At this point, you need to create the properties in your composite SmartObject to correspond with the properties returned by the Sales Customers service object. K2 can automatically create all of the properties (notice the Create All button in the toolbar) or you can select to choose which properties you want to create, which is what you will do next.
Notice the CustomerId that is being returned by the service is now mapped to a new property in the CompositeSmartObject also called CustomerId.
Next you will add the list method for the Regions Web Service service object.
Notice the two return properties, RegionName and RegionID. The RegionName property contains the user-friendly name of the region, while the RegionID property contains a number. In a later step, you will assign the RegionID property to the DenallixRegion property creating a "bind" between the two.
Before you can use your new composite SmartObject (in SmartForms, workflows or even testing) you must publish it to the K2 server.
Step 2 Review
In this step, you created a composite SmartObject. You created a new method and added properties from two different systems (Sales Customers and Regions Web Service). You learned how to create and map SmartObject properties so that the properties in the existing service object map to the properties in the new SmartObject. Finally, you learned how to bind two methods together with a common property between them. In the next step, you will test your new composite SmartObject and observe the data that is returned from multiple data sources via a composite SmartObject.
In Step 3, you will test your new composite SmartObject by executing the list method from the K2 Management site. You will observe how data from multiple systems can be returned with one query.
Step 3 Tasks
- From the K2 Management site, execute the List Sales Customers composite SmartObject.
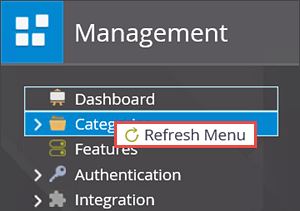
- Return to the K2 Management site tab in your browser. Right-click the Categories name and click Refresh Menu.
- Expand the Categories > AdvancedSmartObjects nodes, then click on CompositeSmartObject to highlight it. (AdvancedSmartObjects is the name of the K2 Studio project and CompositeSmartObject is the name of the new SmartObject you just created.)
- The SmartObject properties and methods are displayed in the central pane. Scroll down to the Methods section. Select the List Sales Customers method, then click Execute.
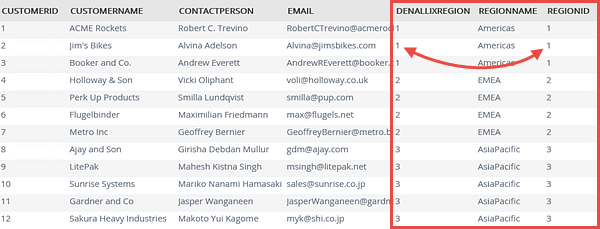
- You don't need to enter any input properties, so click Execute once again. The results from your composite SmartObject are returned. Scroll to the far right of the results table. Locate the DenallixRegion property from the Sales Customers service object and the RegionID property from the Regions Web Service service object. Notice how the property values correspond to each other, which is a result of the service method link you configured earlier.
If time allows, execute the list method once again and add an input property, for example, one of the RegionID values.
Step 3 Review
In this step, you tested your composite SmartObject from the K2 Management site, by executing the list method. What is significant with the steps in this tutorial is that you can create a single SmartObject that combines the data from multiple sources and differing systems (in this case, a SQL table and a web service) to return a single object.