K2 for SharePoint 2010 Configuration Wizard
The K2 for SharePoint Configuration Wizard runs from within SharePoint > Central Administration and does the following:
- Install and deploy the K2 for SharePoint components automatically after the K2 Setup Manager is complete.
- Manage the K2 for SharePoint solutions that are installed.
- Activate the K2 Features.
The Wizard runs automatically once the K2 Setup Manager has completed if the check box is selected on the Finish page. In a distributed environment this wizard must be run on each of the Web Front Ends.
The K2 for SharePoint Configuration Wizard landing page lets you select the method of configuration. For first time use, only the installation and deployment wizard is available. The management portion of the wizard is available after the initial usage of the wizard.
This wizard is the same wizard that is run when installing K2 blackpearl for the first time. Running the wizard after installing K2 smartforms ensures that the SmartForms Web service, the SmartForms Viewer and the K2 Designer SmartForms Client Event is deployed and activated.
Certain options may not be available until such time as additional steps have been completed.
The following pages will be displayed during the configuration, consider the on-page instructions carefully as they describe the available options:
Use the K2 for SharePoint Configuration wizard to configure the K2 for SharePoint components - The K2 for SharePoint configuration wizard will step you through the required steps to configure the K2 for SharePoint solutions.
Use the Solutions management Form to manage existing K2 for SharePoint components (advanced) - This option enables you to manage the K2 for SharePoint Solutions package that is installed and deployed by the K2 for SharePoint Wizard. This option is not available immediately and does require existing solutions to be upgraded or for the K2 for SharePoint components to be installed.
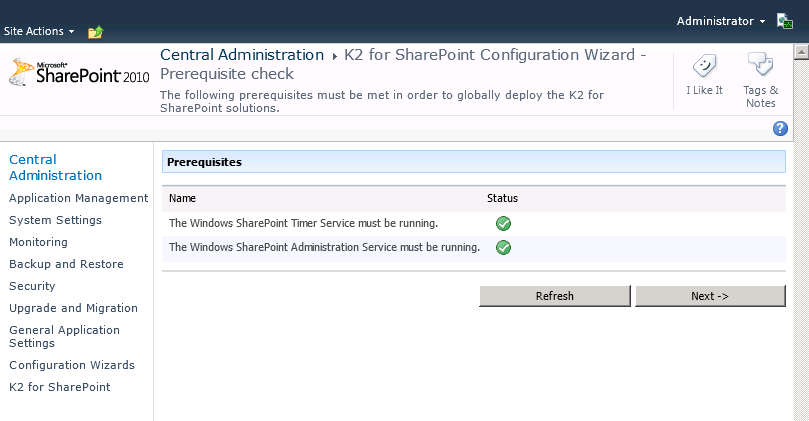
The prerequisite check will verify that the current installation meets the configuration requirements. Items that are not correct will have a red X in the status column and this will prevent the process from proceeding. The Next button will also remain disabled (grayed out) until such time as the prerequisites has been met. When a change has been made, click the Refresh button to refresh the page. This checks that the required services are available and running.
Distributed Installation: When installing a distributed installation and deploying solutions to WFEs, ensure that the services listed below are running on the remote machines. This check must be done manually for the WFEs.
What to do on this page
- There are two services which must be available for the installation to continue. If either of the two services listed above are not running, rectify this problem and then the process can proceed.
The Solution Installation page provides a list of solutions that will be installed automatically. This list is the entire K2 for SharePoint components package and there may be inter-dependencies so no individual selection is permitted.
What to do on this page
-
There is nothing to do on this page, except review the Status and Next Action of the solutions, then click Next to proceed.
Once the solutions have been installed, the next step is to schedule the deployment. As shown in the image below, the status of the solution indicates that either deployment is required or that the solution is deployed. The next step is to schedule un-deployed solutions for deployment by clicking Next. 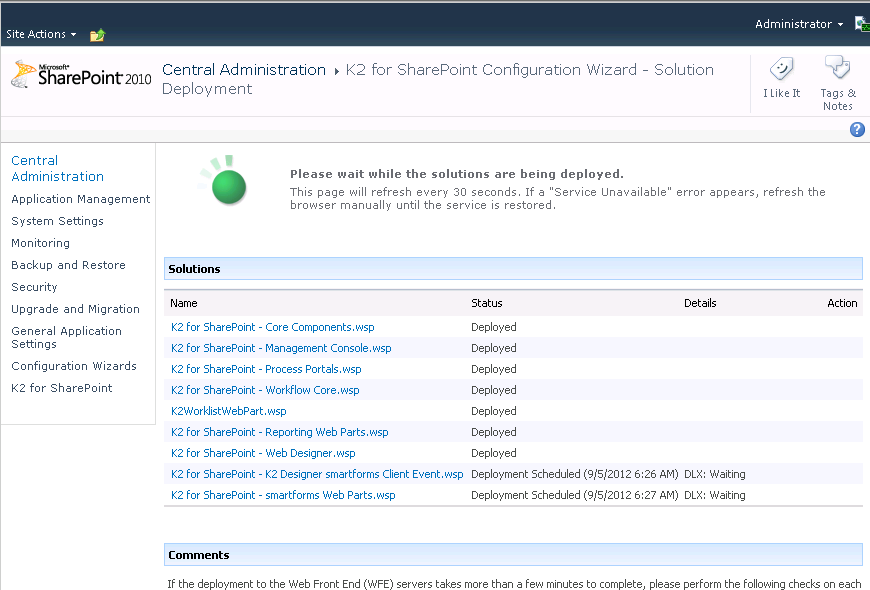
The SharePoint page may at times appear to be unresponsive, seemed to have timed out or a "503 : Service Unavailable" error may display. Manually refresh the page when this takes place.
If all the solutions have been installed successfully, the status will be changed to Deployed.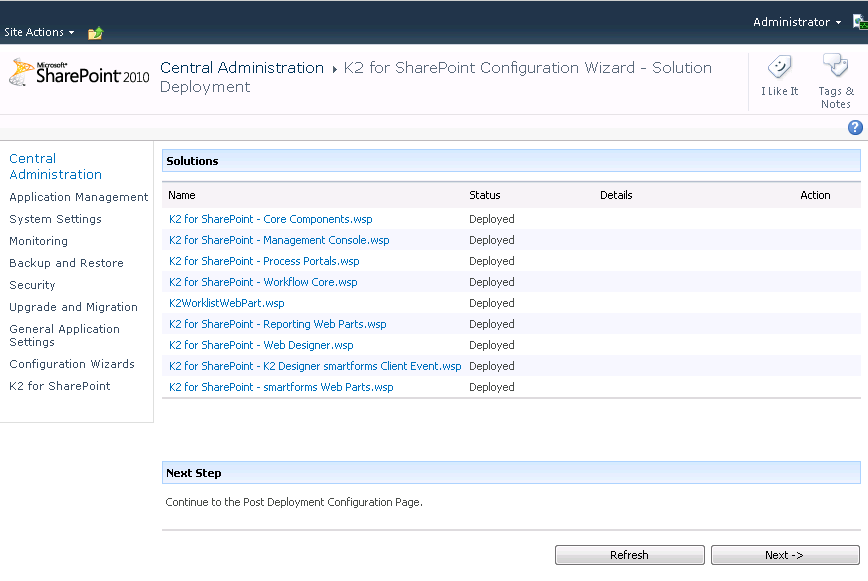
What to do on this page
- Review the Status of the Solutions and click Next to continue.
Once deployment is complete, the final step is for you to activate the SharePoint Features and deploy them to the Web Front ends. Within K2 there is a K2 Workflow Failover SharePoint Job definition. It is essentially a timer job that runs every minute and checks a queue for Workflow modifications that need to be run against the K2 SharePoint Workflow. Every time a K2 workflow is modified (for example a task created, or workflow completed) a check is performed to ensure the workflow is ready to accept the modification. If the workflow is not ready to be modified it will be queued for later execution by the Job Definition.
If the Job Definition is not registered the following issues can be experienced:
- When there is high volume certain tasks will not appear in Worklist.
- Under high volume certain tasks will not complete.
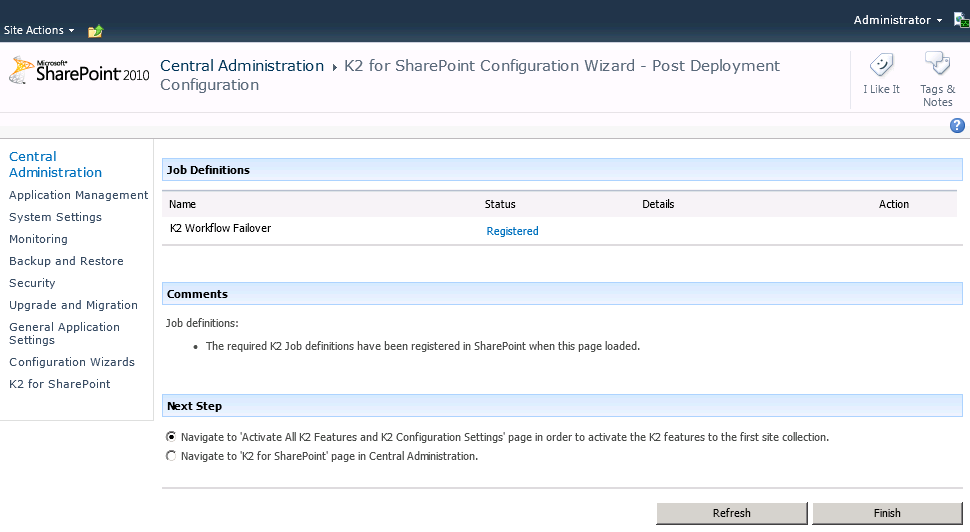
Navigate to 'Activate All K2 Features and K2 Configuration Settings'... - Allows you to activate the K2 for SharePoint features automatically. Selecting this option results in all the K2 Features being automatically activated.
Navigate to 'K2 for SharePoint' page in central Administration. - The K2 for SharePoint features can be activated manually in Central Administration. This allows a user to select which feature must be activated or not.
What to do on this page
- Select one of the options listed under the heading Next Step.
- Click Finish.
- If the first option is selected the Activate All K2 Features and K2 Configuration Settings page will open in Central Administration . Configure the various settings according to your environment setup.