Install K2 for SharePoint on the SharePoint server
See these sections of this topic too:
Set SPNs for the SharePoint Service Account
Configure SharePoint to use Kerberos
Validate the K2 for SharePoint Component
Prerequisites
![]()
The SharePoint Server role is defined to be the server on which the K2 for SharePoint component will be installed, and is already running Microsoft Office SharePoint Server 2007, Microsoft Windows SharePoint Services 3.0, SharePoint 2010 Foundation or SharePoint Server 2010. The K2 for SharePoint component, configuration manager, and K2 documentation will be installed on this server.
The SharePoint Server role requires the following prerequisites:
| K2 blackpearl Prerequisites for the SharePoint Server | |
|---|---|
| Operating System |
|
| Windows Components |
|
| Additional Software |
|
Rights and Permissions
The SharePoint Service Account is the account that the SharePoint application pool will run under. This account probably already exists in your environment, but there are some permissions that should be validated to ensure that the K2 integration with SharePoint functions properly.
The rest of this guide will use domain\SharePoint Service Account as a placeholder for the SharePoint Service Account name. When installing K2 in your environment, replace this placeholder with your actual account name.
The SharePoint Service Account will need the following permissions:
| SharePoint Server | |
|---|---|
| Rights | Folder or Registry Key |
| Modify | %SYSTEMROOT%\temp |
| Write | %COMMONPROGRAMFILES%\Microsoft Shared\web server extensions\12\Layouts\Features |
| Write | %COMMONPROGRAMFILES%\Microsoft Shared\web server extensions\12\ISAPI |
 |
Note that the \12\ in the folders mentioned above will be \14\ on a Microsoft SharePoint Server 2010 system. |
| SQL Server | |
|---|---|
| Permission | Used For |
| db_DataReader on the K2WebDesigner database |
For the K2 Designer for SharePoint to function properly, the SharePoint Service Account needs read permission on this database. |
| db_DataWriter on the K2WebDesigner database |
For the K2 Designer for SharePoint to function properly, the SharePoint Service Account needs write permission on this database. |
| Execute on Stored Procedures in the K2WebDesigner database |
For the K2 Designer for SharePoint to function properly, the SharePoint Service Account needs to be able to execute the Stored Procedures on this database. The easiest way to do this is to create a new role (i.e., db_executor), grant stored procedure execute rights to that role, and assign the SharePoint Service account to that role. Here is an example script for creating the role. /* select K2WebDesigner database */ /* create a new role */ /* grant execute to the role */ |
| Authenticated Users | |
|---|---|
| Rights | Folder or Registry Key |
| Modify | C:\Users and all folders below. (Applicable to Windows 2008 Servers). Apply this to all SharePoint Web Front Ends |
 |
While infrastructure changes are required by K2, each environment is different and has its peculiarities which must be taken into account. Modifying the infrastructure could have unforeseen results if the changes are not appropriately understood or managed. Given the broad spectrum of underlying infrastructure utilized, it is recommended that a panel or committee with appropriate skill in each area concerned be assembled to outline the underlying infrastructure changes and gauge the impact of the required changes. |
Kerberos / Pass Through Authentication
When components are installed on separate servers, credentials must be passed between the services. This can be accomplished by setting up Kerberos, which should be configured prior to installing K2. Any time where two or more hops are required for user authentication, Kerberos must be configured.
Pass Through Authentication is a K2 proprietary authentication methodology specifically for authenticating users whose credentials need to be passed between machines that interact with the K2 APIs. This authentication model can be used as an alternative to Kerberos, but is not in any way intended to be a replacement for Kerberos within the overall infrastructure.
Install Steps
After you have installed all the prerequisites, created the service accounts, and enabled DTC, you are now ready to install the K2 for SharePoint component.
Once the installation is done, the Configuration Analysis tool will be available to help troubleshoot any errors detected during the installation.
|
It is important to copy the installation files locally to the server before installing. Do not install from a network share or UNC path. The installation will not work properly. |
|
It is recommended to install all K2 components using either the K2 Service Account or the Central Administration Application Pool User. Log on to the server as the K2 Service Account or Central Administration Application Pool User before installing. Important note: Run the installer on the Central Administration server first and then on all the web front ends in the SharePoint farm BEFORE starting the K2 for SharePoint Configuration Wizard on the Central Administration server. |
To install the K2 for SharePoint component, follow the below steps:
 |
From the local installation folder, double-click on the Setup.exe file |
||
 |
On the Welcome screen, click Next |
||
 |
On the End User License Agreement screen, read through the EULA. You must select the I agree option before you can continue with the installation. You can print out the EULA for your records. Once you have read the EULA, click Next |
||
 |
On the Installation Setup screen, select the Custom Installation option and type in a Installation Folder, and click Next |
||
 |
On the Select Components screen, you should see that the components for which the prerequisites are met are:
|
||
 |
On the HostServer Database screen, type in the name of the SQL Server where you installed the K2 Databases. This points the K2 for SharePoint component to the HostServer database set up by the K2 Server, to share configuration information. If you changed the Host Server database name, update it here and click Next. |
||
 |
On the Configuration Summary screen, validate the settings. You can go back to make any necessary changes, and you can print this page for reference later. Once you are satisfied with your settings, click Install. |
||
 |
The Setup Manager will update and show you the progress of the components as it installs. |
||
 |
When the installation has completed, you will see a finished screen. There will also be a link to the created configuration log file as well as an option to launch the SharePoint Configuration, see the topic K2 for SharePoint Configuration Wizard in the Integration Configuration > SharePoint section of this help file. |
SharePoint Service Account
In a distributed environment where components are installed on more than one server or if host headers are used, Kerberos security must be configured. One of the components of Kerberos is the Service Principal Name (SPN). Whenever user credentials must be passed from one system to another, the system that is attempting to pass the credentials must be trusted for delegation. For this step to take place successfully, Kerberos delegation must be configured.
|
Configuring SPNs is an advanced task and should only be performed by an appropriately trained professional. The steps and configurations given in this help file are to be used as a guide - your system may require additional configuration due to different hardware and software compatibilities. |
Set SPNs
In order for the K2 Worklist Web Part and K2 Designer for SharePoint to function properly from another machine, you need to set the SPNs for the SharePoint Service Account.
The following placeholders are used in the commands:
- domain\SharePoint Service Account - The SharePoint Service Account that runs the SharePoint application pool
- MachineName - The name of the computer on which SharePoint Service is running
- MachineName.FQDN - The fully qualified domain name of the computer on which the SharePoint Service is running
|
Be sure to set all the SPNs as listed below. Also, the service account is required so be sure to specify the account properly. |
|
If you have SharePoint running on a cluster, be sure to use the name of the cluster and the fully qualified cluster name instead of a single node's machine name. |
|
If you are using Host Headers to access your SharePoint Service, use the HostHeader value instead of the MachineName in the below commands. An SPN for each Host Header will need to be created. |
Open a command prompt on a server that has the Windows Support Tools installed, and execute the following commands:
- setspn -A HTTP/MachineName domain\SharePoint Service Account
- setspn -A HTTP/MachineName.FQDN domain\SharePoint Service Account
After the commands have successfully executed, you can verify the SPNs were set by executing the following command:
- setspn -L domain\SharePoint Service Account
Configure for Delegation
After the SPN has been set, a new Delegation tab is available in Active Directory Users and Computers for the Service Account. By default, the option selected is the Do not trust this user for delegation. You need to set the account to be trusted for delegation, by following the below steps:
|
If you are running your Active Directory domain in Windows 2000 native mode, the Delegation tab will not be present. Instead, on the Account tab, you will see a Trust this user for delegation check box. |
|
Open Active Directory Users and Computers (Start > All Programs > Administrative Tools > Active Directory Users and Computers) |
|
Find the domain\SharePoint Service Account and view its properties |
|
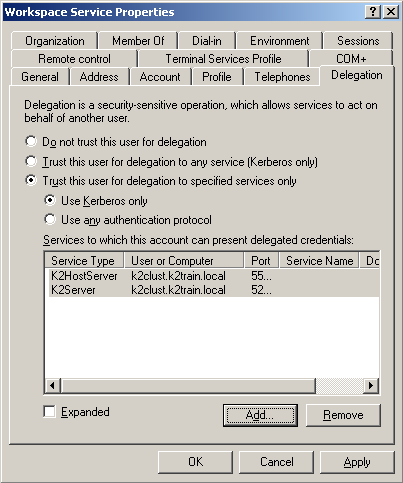
On the Delegation tab, select the Trust this user for delegation to specified services only option |
|
Select the Use Kerberos only option, and click on Add |
|
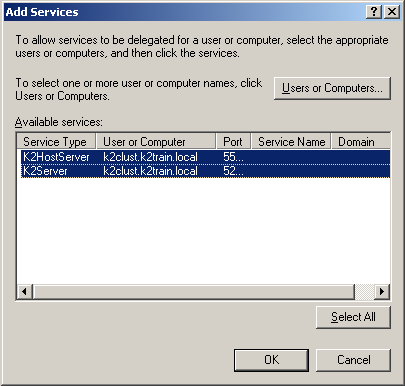
Click on Users or Computers and select the domain\K2 Service Account you created as the K2 Server Service Account |
|
In the Available Services section, select both the K2HostServer and K2Server items listed: |
|
Click OK. Your properties should resemble the following: |
|
Click Add again |
|
Click on Users or Computers and select the domain\K2 Workspace Account you created as the K2 RuntimeServices Account |
 |
In the Available Services section, select the HTTP item listed |
 |
Click OK. This will allow the SharePoint Service Account to delegate to the K2 Workspace Account. |
|
While infrastructure changes are required by K2, each environment is different and has its peculiarities which must be taken into account. Modifying the infrastructure could have unforeseen results if the changes are not appropriately understood or managed. Given the broad spectrum of underlying infrastructure utilized, it is recommended that a panel or committee with appropriate skill in each area concerned be assembled to outline the underlying infrastructure changes and gauge the impact of the required changes. |
Configure SharePoint to use Kerberos
In a distributed environment where components are installed on more than one server or if host headers are used, Kerberos security must be configured. One of the components of Kerberos is the Service Principal Name (SPN). Whenever user credentials must be passed from one system to another, the system that is attempting to pass the credentials must be trusted for delegation. For this step to take place successfully, Kerberos delegation must be configured.
|
Configuring SPNs is an advanced task and should only be performed by an appropriately trained professional. The steps and configurations given in this help file are to be used as a guide - your system may require additional configuration due to different hardware and software compatibilities. |
Set SPNs
In order for the K2 Worklist Web Part and K2 Designer for SharePoint to function properly from another machine, you need to set the SPNs for the SharePoint Service Account.
The following placeholders are used in the commands:
- domain\SharePoint Service Account - The SharePoint Service Account that runs the SharePoint application pool
- MachineName - The name of the computer on which SharePoint Service is running
- MachineName.FQDN - The fully qualified domain name of the computer on which the SharePoint Service is running
|
Be sure to set all the SPNs as listed below. Also, the service account is required so be sure to specify the account properly. |
|
If you have SharePoint running on a cluster, be sure to use the name of the cluster and the fully qualified cluster name instead of a single node's machine name. |
|
If you are using Host Headers to access your SharePoint Service, use the HostHeader value instead of the MachineName in the below commands. An SPN for each Host Header will need to be created. |
Open a command prompt on a server that has the Windows Support Tools installed, and execute the following commands:
- setspn -A HTTP/MachineName domain\SharePoint Service Account
- setspn -A HTTP/MachineName.FQDN domain\SharePoint Service Account
After the commands have successfully executed, you can verify the SPNs were set by executing the following command:
- setspn -L domain\SharePoint Service Account
Configure for Delegation
After the SPN has been set, a new Delegation tab is available in Active Directory Users and Computers for the Service Account. By default, the option selected is the Do not trust this user for delegation. You need to set the account to be trusted for delegation, by following the below steps:
|
If you are running your Active Directory domain in Windows 2000 native mode, the Delegation tab will not be present. Instead, on the Account tab, you will see a Trust this user for delegation check box. |
|
Open Active Directory Users and Computers (Start > All Programs > Administrative Tools > Active Directory Users and Computers) |
|
Find the domain\SharePoint Service Account and view its properties |
|
On the Delegation tab, select the Trust this user for delegation to specified services only option |
|
Select the Use Kerberos only option, and click on Add |
|
Click on Users or Computers and select the domain\K2 Service Account you created as the K2 Server Service Account |
|
In the Available Services section, select both the K2HostServer and K2Server items listed: |
|
Click OK. Your properties should resemble the following: |
|
Click Add again |
|
Click on Users or Computers and select the domain\K2 Workspace Account you created as the K2 RuntimeServices Account |
|
In the Available Services section, select the HTTP item listed |
|
Click OK. This will allow the SharePoint Service Account to delegate to the K2 Workspace Account. |
|
While infrastructure changes are required by K2, each environment is different and has its peculiarities which must be taken into account. Modifying the infrastructure could have unforeseen results if the changes are not appropriately understood or managed. Given the broad spectrum of underlying infrastructure utilized, it is recommended that a panel or committee with appropriate skill in each area concerned be assembled to outline the underlying infrastructure changes and gauge the impact of the required changes. |
Validate the K2 for SharePoint component
After installing and configuring the K2 for SharePoint component, you can check a few things to ensure that the component was set up properly:
- Open Windows explorer and navigate to C:\Program Files\Common Files\Microsoft Shared\web server extensions\12\TEMPLATE\FEATURES\. You should see several K2 folders for the various K2 features.
To validate that the K2 Designer for SharePoint has installed:
- Browse to the SharePoint Central Administration > K2 for SharePoint tab > K2 Designer for SharePoint link
- The Activate Feature page will be displayed. Activate the K2 Designer for SharePoint feature if needed.
|
Be sure to see the section on Post installation common tasks once done with the install. |
