Multiple Active Directory Domains
If an organization has multiple Active Directory domains or a new domain is added to the organization’s Active Directory infrastructure, those additional domains will not automatically be discovered by K2 or appear in K2 Workspace. K2 will add a Default Domain based on the domain of the account used to install K2; additional domains must be added, edited and deleted manually, preferably using the K2 Workspace.
There are 2 options to add additional domains to K2 (each approach is described in more detail below).
- Option 1: Adding domains in Workspace (recommended approach)
- Option 2: Adding domains directly in the K2 database using SQL scripts.
 |
Whenever domains are added, removed or edited, the K2 blackpearl service must be restarted. |
 |
Parent-child domains are supported. If using domains in different forests, a one- or two-way trust relationship must be established. The type of relationship required depends on your environment. |
Option 1: Add Multiple Active Directory Domains using K2 Workspace Management Console
- Launch K2 Workspace and navigate to the following section: Management > [server] > User Managers > K2 > Domains. The default domain will be displayed.
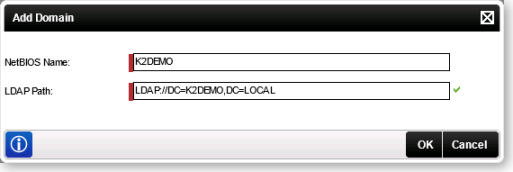
- Click the Add button to add a new domain.
- Provide the NETBIOS and LDAP paths for the additional domain.

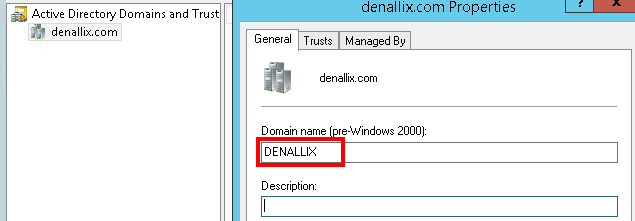
Field Description NetBIOS Name This is the NETBIOS name of the domain. You can locate this name by querying the general properties of the domain using the Active Directory Domains and Trusts tool: 
LDAP Path This is the LDAP path of the target domain. This is usually in the format of
LDAP://[distinguishedName]
For example:
LDAP://DC=denallix,DC=com
The exact value will depend on your AD configuration; check with your AD administrator to determine the LDAP path for the target domain. - Restart the K2 blackpearl service (if you have multiple machines in the same farm, you need to restart the service on each server).
Editing Domains
 |
Highlight the domain to edit and click Edit |
 |
When the user dialog opens, enter the changes |
 |
Click OK |
Removing Domain
 |
Highlight the domain to remove and click Remove |
 |
Confirm the removal |
 |
Click OK |
 |
The default domain cannot be removed using K2 Workspace |
Option 2: Adding Domains using Scripts
Registration of additional domains can also be performed by inserting the domain name and associated label into the SecurityLabels table in the HostServer database. The label has two components: Authentication Provider and Role Provider.
 |
This document assumes some programming knowledge and familiarity with SQL Server. |
If you have sub domains or domains in a different forest, you will have to add those domains to the same security label by modifying the AuthInit and RoleInit fields in the SecurityLabels table in the HostServer database.
The following two placeholders are used in the examples below:
| NETBIOS Name | LDAP String |
|---|---|
|
[PARENTNETBIOSNAME] |
LDAP://DC=ParentDomain,DC=COM |
|
[CHILDNETBIOSNAME] |
LDAP://DC=ChildDomain1,DC=ParentDomain,DC=COM |
 |
While the examples use a parent-child domain relationship, this is not required. If using domains in different forests, a one- or two-way trust relationship must be established. The type of relationship required depends on your environment. |
The AuthInit field for the security label being modified should contain both domain NETBIOS names.
 Copy Copy |
|---|
| <AuthInit> <Domain>[PARENTNETBIOSNAME]</Domain> <Domain>[CHILDNETBIOSNAME]</Domain> </AuthInit> |
The RoleInit field for the security label should be modified as follows:
- Set the "MultiDomain" property to "True"
- Edit the DataSources property by following the example below:
 Copy Copy |
|---|
| DataSources=<DataSources><DataSource Path="LDAP://DC= ParentDomain,DC=COM" NetBiosName="[PARENTNETBIOSNAME]"/><DataSource Path="LDAP://DC=ChildDomain1,DC=ParentDomain,DC=com" NetBiosName="[CHILDNETBIOSNAME]"/> </DataSources> |
 |
The escape characters "<" and ">" must be used as specified in the example above. Be careful to replace only the DataSources substring of the RoleInit string. |
Implementation Script
The following query can be run to modify the security label to be updated. Note the placeholder values in the script are the same as those used above. Additionally, the [LABELNAME] placeholder at the end of the script should be replaced with an actual value. This value is typically "K2" when using the security label for the default Active Directory provider.
 Copy Copy |
|---|
|
Use K2HostServer |
- Execute the modified script against your K2 database.
- Restart the K2 blackpearl service (if you have multiple machines on the same farm, you need to restart the service on each server).
 |
The following details about the database structure may or may not be useful, depending on modifications made to your database. Do not update database values beyond what is specified in this article unless instructed to do so by a support representative.
|
