Destination Rule
What does it do?
The Destination Rule allows you to configure who gets a workflow task. Often called workflow participants, these are the people who need to take an action during a step in the workflow.
How is it used?
When the activity requires human interaction, the individual or group to action the activity is specified using a destination rule. These people assigned the task can be static, for example a person specified manually or dropped in from the context browser, or they can be dynamic where the destination is determined by a data field, inline function or SmartObject call.
The destination rule resolves at run time when the workflow gets to the activity containing the rule, so if you create a dynamic rule, the people assigned a task may be different depending on how the rule executes and the state of the data at that time.
To configure the destination rule, open the activity strip and select the destination rule icon.

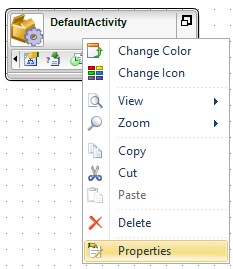
Alternatively, double click the  icon of the activity or right-click the activity and select Properties from the menu.
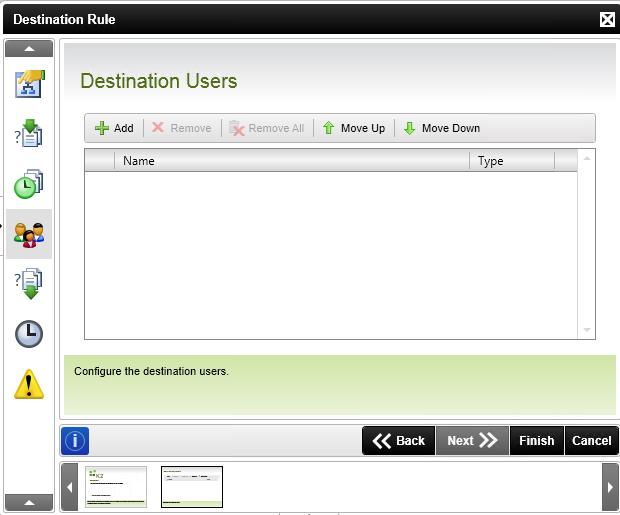
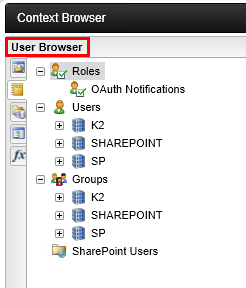
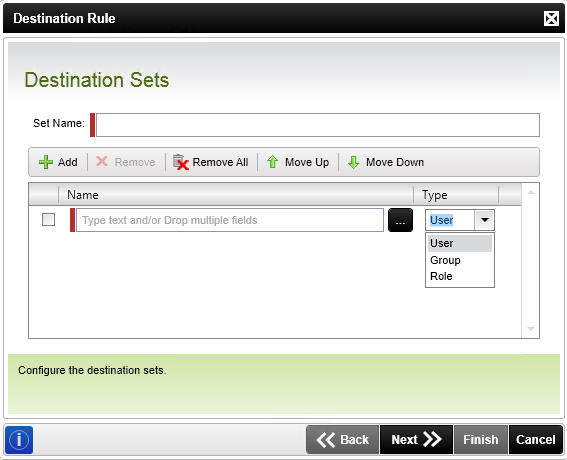
Select the destination rule icon on the left. The Destination Users page is blank by default. Configure and add one or more users, groups or roles to the list. Click Add to configure destination users.
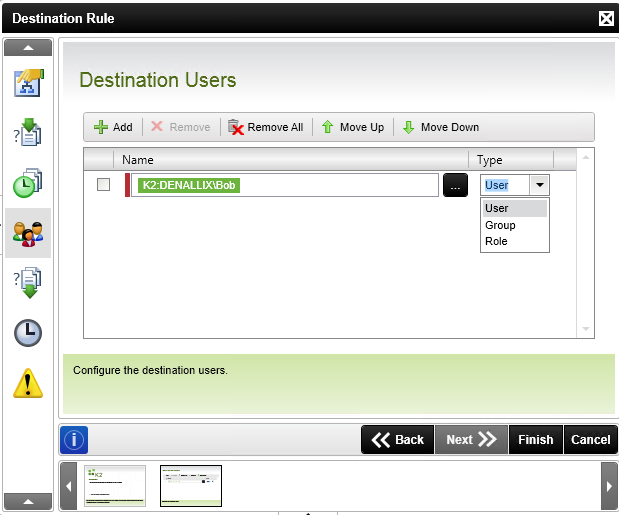
After clicking Add a new line is created and a text box is displayed that you use to select and configure a destination user. Multiple destination users can be added. An example is shown below. Click Finish when you're done configuring who will receive the task. See the How to Access the Advanced Mode section for advanced options when adding destination users, such as how tasks are assigned to groups.
| Field | Description | Sample Value |
|---|---|---|
| Name | Specifies the destination user's name | Type in the destination user's name in the text box or use the ellipsis button to browse to the destination user, group or role |
| Type | Specifies the type of destination user. Select between: User Group Role |
Select the relevant destination user type |
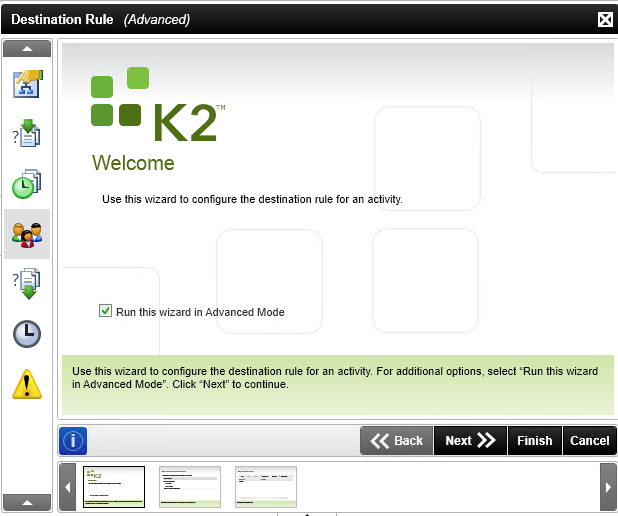
The standard wizard interface only allows you to enter the identity of the user, group or role. For more advanced settings, enter advanced mode by doing the following:
- Open the activity strip
- Open the destination rule
- Click Back to reach the Welcome screen
- Check the option to Run this wizard in Advanced mode
- Click Next to proceed
Advanced mode allows you to control how multiple users are assigned tasks. Keep in mind the following:
- By default (i.e. Advanced mode has not been run), the destination rule for a client event is Plan just once and 1 slot is allocated to the event item. This means that one instance of the client event is created and since there is one slot, the destination user can interact with and action the client event one time.
- If there is more than one destination user in the destination rule, only one of the specified destination users is able to interact and action the worklist item. However, all of the destination users receive a task.
If the default settings are used and the Succeeding Rule for requires a minimum of two slots (actions, essentially) respond, the succeeding rule will never resolve. It is therefore important to keep the planning options and succeeding rule in sync to enable the succeeding rule to resolve to true and the workflow to move on to the next event or activity. See the Destination Rules Guide for more information.
Contextualized Assistance: Destination Rule Planning Scenarios
This wizard page is only available in the Advanced Mode. Three scenarios are available in advanced mode when planning client event instances. The first Destination Rule Options page allows you to control how the activity is planned.

The Plan just once method of planning a destination rule is the default method of planning an activity. When using the default method, only one activity instance is instantiated. All events / modules contained in the instance only execute once. Only one task item is created and rights assigned to the single task item.
One or more slots can be made available to interact with and action the client event, see Destination Rule Options (Defining Slots). All destination users receive their worklist items simultaneously. The number of slots are set on the activity instance destination, and all the destinations defined in the destination rule are copied to the destinations collection of the activity instance destination.
Futhermore, because only one activity instance destination exists, the client event only executes once. This is why there is only one worklist header and one serial number associated with the task. All destinations have access to the same serial number (activity instance destination). Each action taken by those assigned a task updates the activity instance destination XML/data fields. A slot is created for that user and the XML/data field values are copied to the slot and, depending on the action performed and how the action is configured, the slot is completed or it remains open to the user.
The activity instance completes when all slots are completed or when the succeeding rule is true. The activity instance expires when the succeeding rule is false.
When using roles instead of individual users as the destination, task items are assigned to the role name rather than the individuals in the roles.
All destinations are planned for the lifetime of an activity, thus a user can participate only once for the activity in the process.
The primary advantage to this option is performance, as only one activity instance is instantiated. The pitfall as described below may occur:
- If advanced mode is not run, only one slot is available and one destination user can action the item
- If the succeeding rule requires two slots to respond before the rule resolves to true, this will never happen since only one slot is available
- When creating any activity the default destination rule is Plan Just Once, with this option the destination instance is created, but the K2.ActivityInstanceDestination.User object will always return null. This is by design as this option has no context to the destination user. To get ActivityInstanceDestination.User context it is recommended that the Plan per destination- All at once option is selected. This option can be selected by following the steps below:
- Right-click the activity to open the activity properties.
- Click on the Destination Rule Options tab, and click the Back button on the wizard. Check the box which says Run this wizard in advanced mode and click Next.
- Select the Plan per destination- All at once option
- Complete the wizard.
- Deploy the process.
This option creates an activity instance destination for every destination. The events execute once for everyactivity instance destination. Each destination has its own serial number, and because a client event is executed, each destination has its own worklist header. The slot property for the activity instance destination is always set to one. This slot property should not be confused with the one configured in the destination rule, which is the total number of slots for the activity instance. One or more slots can be made available to interact with (action) the client event, see Destination Rule Options (Defining Slots) for more information.
The destinations collection for the activity instance destination contains only one destination. When a user responds to the task, the activity instance destination XML/data fields are updated, a slot is created for the user, and the XML/data fields are copied to the slot for that user. Depending on the action performed, the slot is completed or remains open to that user. If the slot is completed and, because of the activity instance destination slot is one, the event's succeeding rule executes and evaluates to true (all slots = completed). After that, the activity instance destination continues to execute the remaining events that occur after the client event, if any; eventually the succeeding rule of the activity instance destination executes. This repeats until all activity instance destinations are completed or until the succeeding rule evaluates to true.
This option creates one task item per destination with the rights assigned to each destination for each task item. All destination users receive their tasks simultaneously. When using roles instead of individual users as the destination, task items are assigned to the role rather than the individuals in the roles. All destinations are planned for the lifetime of the activity.
The server creates one activity instance per destination, but does so in a serial manner, one instance at a time, and in the order the destinations are configured. The server creates one task item per destination at a time, and assigns rights to each task item. The next instance is created only after the previous event is completed by the previous destination user.
Tasks are assigned sequentially, so once the first destination user actions their task, the second task is assigned to the next user in the list. The server does not evaluate the succeeding rule on the activity until all activity instances are complete. When a role is used as a destination, instances are created in the order in which the role membership is returned from the server query. If a specific order is required, use individual users instead and specify the users in the proper order. Each destination's slots are planned only after the previous destination has completed their slots, thus a user can participate more than once for the activity.
This option works exactly the same as Plan per destination, except that there are no destinations configured. The activity instance destination rule executes as normal, but the destinations are ignored. The slot count is used to determine how many activity instance destinations should be created. This option is normally used in conjunction with server events or IPC events that require no user action. Because there are no destinations and no client events, no worklist headers exist. There is no need to create slots when the serial number is completed. As an example, this could be used for a parent process to start a variable number of child processes using IPC events. In this case, all configured destinations are ignored and the server creates one activity instance per slot. Activity data can be initialized and used for each slot. This allows each slot to have its own instance of the activity data fields. In this method, the number of slots can be configured using activity or list data, which means that the number of slots is equal to the number of nodes in the XML field or items returned from a SmartObject call that is mapped to this field. When the runtime activity starts, the server decides how many instances of the IPC process, for example, need to be started. Initialization data may contain any unique data that the IPC needs per call. If a SmartObject list method or repeating XML node is specified for the initialization data, the server retrieves the next value for each slot, until it reaches the number of specified slots. Using the list field, the server creates a slot for each item returned while at the same time using the property specified as the initialization data for the new child process.
| Plan Just Once | One activity instance is instantiated. All events / modules contained in the instance execute once |
| Plan per destination | Plan per destination instantiates more than one activity instance either:
|
| Plan per slot (no destinations) | This option is used in conjunction with an IPC or server events |
It is best practice to always have at least as many destinations as there are slots or you run the risk of an activity not completing as expected.
This wizard page is only available in the Advanced Mode. This second Destination Rule Options page is used to configure the behavior of a destination rule by setting the slots and roles of the destinations. This page is context-sensitive and displays different fields depending on the type of option selected in the first Destination Rule Options page.
After selecting Plan just once or Plan per destination on the previous page the following options are displayed:
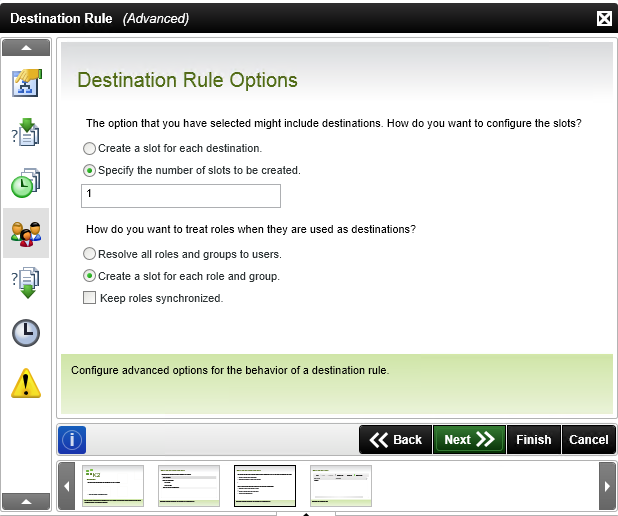
When the destination rule has roles or groups as destinations, the server resolves these roles and groups to individual users. When the Create a slot for each destination option is selected, the server creates a slot for each user that is contained in the role or group. If this option is checked, the count is adjusted to the amount of destinations added in the destination rule. This count can be influenced by the Resolve all roles and groups to users setting. If a user and group is used in the rule, and this setting is selected. the slot count equals four in total if there are three people in the group. If you are using the Plan per Destination option, four activity instance destinations are created.
When the Specify the number of slots to be created option is selected, a fixed amount of slots are created.
Resolve all roles and groups to users is done during activity execution and determines whether the roles and groups should be resolved to the user level, and that each user should be added as a destination instead of the role and/or group being the destination itself. Resolving a role or group makes the destinations static and does not change in the lifetime of the activity instance, which may not be desired for your scenario. All events execute once for each member of the role or group.
When selecting Create a slot for each role and group, the role is not resolved and a single activity instance is created. The role receives rights and all members of the role can access the task.
When the Keep roles synchronized check box is selected, the server automatically synchronizes roles when users are added or removed from the role. The activity instance reacts by adjusting the slots (if slot per destination is selected), creating new or expiring activity instance destinations (if the plan option is Plan per destination). In the case of Plan Just Once, only the slots are adjusted to keep the succeeding rule in sync (all slots=completed), otherwise there would be more or less slots that users.
If the Keep roles synchronized check box is not selected, the roles and groups are resolved only once. Adding or removing users from roles does not change the activity instance destinations.
| Field | Description | Sample Value |
|---|---|---|
| Create a slot for each destination | Creates a slot for each destination user enabling all destination users listed to interact and action the client event. This option is not advised for large destination user lists and groups as there is high load on the system | Select the check box to select this option if relevant |
| Specify the number of slots to be created | Creates the specified number of slots enabling destination users to interact and action the client event. This option is more efficient and establishes a destination user to slot ratio | Select the check box to select this option if relevant and specify the number of slots in the supplied text box |
| Resolve all roles and groups to users | Specifies that all roles and groups should be resolved to users | Select how the roles should be treated when they are used as the destination |
| Create a slot for each role and group | Selecting this option stipulates that roles and groups are not resolved to users and when the Create a slot for each destination option is selected, one slot will be created for each role and group | Select how the roles should be treated when they are used as the destination |
| Keep roles synchronized | Keeps the roles synchronized when a role is used as a destination | Select whether to keep the roles synchronized |
If the Plan per slot (no destinations) destination rule option is selected, and multiple slots may potentially be created, you should set up a succeeding rule to ensure that all slots are complete before the activity continues. In the case where a succeeding rule is not set up for this purpose, only the first slot is taken into account and the activity continues as soon as the first slot is complete.
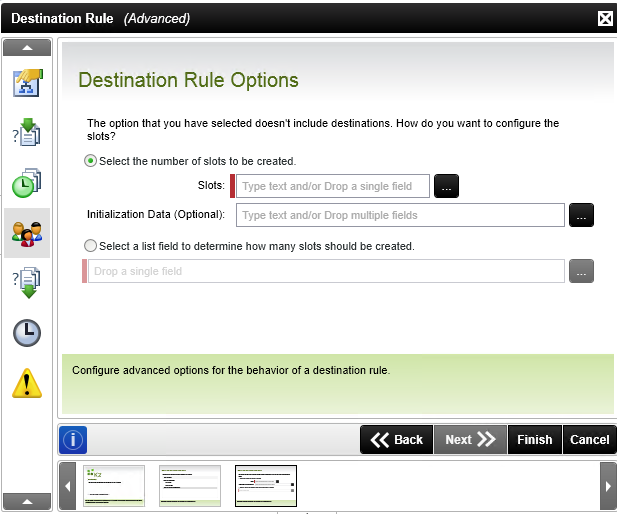
After selecting Plan per slot (no destination) on the previous Destination Rule Options page the following page is displayed:
| Field | Description | Sample Value |
|---|---|---|
| Select the number of slots to be created | Creates the specified number of slots enabling the server to start as many instances, see Destination Rule Options | Select the check box to select this option if relevant and specify the number of slots in the text box |
| Initialization Data (Optional) | Configures the Initialization Data, see Destination Rule Options | Type in the relevant initialization data in the text box. Alternatively click on the ellipsis button and browse to the relevant XML field or SmartObject list method to use |
| Select a list field to determine how many slots should be created | Specifies a list field that should be used to dynamically specify the number of slots that should be created, see Destination Rule Options | Click on the ellipsis button and browse to the relevant list field |
The activity slots determine the number of destination users that can interact with and action a client event. The number of slots allocated is normally the same or lower than the total destination users in the destination list. When configuring the number of slots, two options are available, namely:
- Configure K2 to allocate a slot to each destination user
- Specify the number of slots per activity instance
Destinations: The number of users, roles and/or groups that receive a task
Slots: The number of actions that should execute via a client or server event
It is important to note the impact of the options selected in the destination rule setup have on execution of the rules and, in turn, on performance of the server. Take the following scenario as an example:
- Destination Rule = Plan per Destination - All at once
- Number of slots specified = 3
- Destination Set = Role with 30 users
- Role treatment = Resolve all groups and roles to users
In this scenario, the destination set is resolved, i.e. the role membership is resolved to its users and each user is added as a destination as if you assigned them individually at design time. All events (defined within the activity) execute once for each member of the role. Only three slots are required to be completed, but 30 events execute at once. This could have an impact on the performance of the server and it is advised to rather use the Plan Just Once destination rule option. In that case, only one activity instance destination is instantiated. All events / modules contained in the instance execute once. Only one task item is created and rights assigned to the single task item, but everyone in the role gets a task and they receive it simultaneously. The number of slots are set on the activity instance destination, and all destinations defined in the destination rule are copied to the destinations collection of the activity instance destination.
Because only one activity instance destination exists, the client event executes once. There is only one worklist header and one serial number. In this case all destinations have access to the same serial number (activity instance destination). Each response from a user updates the activity instance destination XML/data fields. A slot is created for that user and the XML/data field values are copied to the slot and, depending on the action performed, the slot is completed or remains open to that user.
The activity instance completes when all slots are completed or when the succeeding rule is true.
The destination set rule is not a required configuration. If no destination set rule is configured, no validation is performed and destinations are automatically added.
The destination rule resolves a destination set. The destination set is composed of individual destination users, groups or roles. A destination rule can be composed of one or more destination sets. The destination set relies on logic supplied by the rule to determine who receives a task.
When a destination set rule evaluates to true, the specified destination rule is valid.
| Field | Description | Sample Value |
|---|---|---|
| Name | Specifies the destination user's name | Type in the destination user's name in the text box or use the ellipsis button to browse the relevant destination user, group or role |
| Type |
Specifies the type of destination user. Select: |
Select the relevant destination user type |
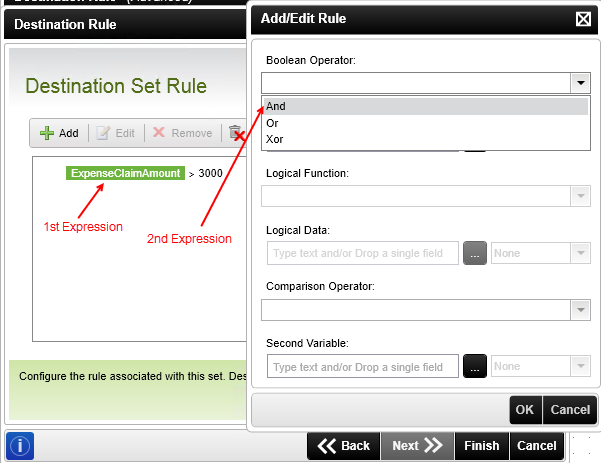
Use the destination set rule wizard page to configure the destination set rule to use with the workflow. Destinations are added when this rule evaluates to true. Destination rules are created per destination set. If more than one destination set is used, destination set rules are created on each destination set. If, for example, expense claims should be directed to different departments according to the amount of the claim, you can create different destination sets for the different departments and configure destination set rules per department. The rules might be as follows:
Financial Administration: If ExpenseClaimAmount < $3000
Financial Management: If ExpenseClaimAmount > $3000
The rule editor creates a logical statement that is evaluated:
- before the activity instance is started (when using the Preceding Rule)
- when the activity needs to be sent to the destination user to be actioned (when using the Destination Rule) . The rule determines whether the destination user will receive the item on their worklist.
Multiple expressions can be added.
The Rule is evaluated using the following formula: [First Variable] [Comparison Operator] [Second Variable] = Result
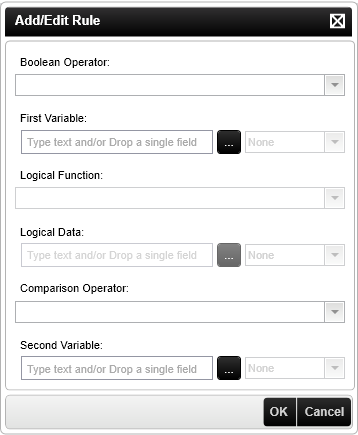
| Feature | Description | How to use it |
|---|---|---|
| Boolean Operator | The operator used to compare the different rules. See the section Using Line Rule Operators below | Click on the Boolean Operator drop-down and select the operator |
| First Variable | The first variable used in the comparison to determine if the outcome will resolve to true. When using GetList methods and repeating XML nodes, the drop down next to the First Variable is enabled which can be used to perform the following actions: Sum Minimum Maximum Average Count |
Populate the field manually or source it from dynamic fields from the object browser such as Data, XML, SmartObject Properties, SmartObject Methods, SharePoint columns etc |
| Logical Function | This function is only available if Non-Shared activity level Data Fields or XML Fields have been used in an activity before a Line Rule or in a Succeeding Rule. The following options are available: All All Slots At Most At Least None |
Not available for Preceding or Destination Rule |
| Logical Data | This option is only available when using the Logical Function of At Least or At Most | Not available for Preceding or Destination Rule |
| Comparison Operator | The operator used to compare the first and second variables in the expression. See the section Using Line Rule Operators below | Click on the Comparison Operator drop-down and select the operator |
| Second Variable | The second variable is used in the comparison to determine if the outcome will resolve to true | Populate the field manually or source it from dynamic fields from the object browser such as Data, XML, SmartObject Properties, SmartObject Methods, SharePoint columns etc |
All - All slots on the activity instance, whether completed or not
All Slots - All completed slots
The comparison operator is used to compare two values to achieve a result of TRUE or FALSE.
| Operators | |
|---|---|
| = | Equal to |
| > | Greater than |
| < | Less than |
| >= | Greater than or equal to |
| <= | Less than or equal to |
| <> | not equal |
Boolean operators evaluate the outcome to determine if the expression evaluates to TRUE OR FALSE.
Boolean operators can only evaluate two states i.e. 1 or 0 (Binary logic). They do not evaluate Text or numerical values. It is advised to only compare binary fields with other binary fields.
| Boolean Operators (A=First Parameter; B Second Parameter; Q = Result) | ||||
| And | The And operator requires that all input parameters be Valid for a True result | |||
| A | B | Q | ||
| 0 | 0 | F | ||
| 0 | 1 | F | ||
| 1 | 0 | F | ||
| 1 | 1 | T | ||
| Or | The OR Operator requires that any parameter be valid for a True result | |||
| A | B | Q | ||
| 0 | 0 | F | ||
| 0 | 1 | T | ||
| 1 | 0 | T | ||
| 1 | 1 | T | ||
| XOR | The XOR operator requires that one input parameter be valid for a True result. Where all input parameters are valid or all are not valid the output will be false | |||
| A | B | Q | ||
| 0 | 0 | F | ||
| 0 | 1 | T | ||
| 1 | 0 | T | ||
| 1 | 1 | F | ||
Multiple expressions implies that the destination rule evaluates more than one expression before evaluating to true. Creating multiple rules also allows for more sophisticated and complex logic. To create multiple destination rule expressions, at least one expression must be in place. To add the new rule, click Add. When one rule already exists, the next rule includes a Boolean Operator.
The Boolean operator evaluates the outcome of the expressions for the rule. A simplified formula below displays the outcome of a Boolean operator when two rules are listed in the destination rule dialog. The Boolean truth tables are provided in the Using Line Rule Operators section.
When configuring these operators, care must be taken to ensure that when the process is deployed it is possible for the destination rule to resolve to true. It is possible for the destination rule logic to be configured in such a way that it evaluates correctly but never resolves to true. Although never in error, the destination rule never resolves to true and the rule never executes, so complex logic requires a full set of testing scenarios.
To illustrate the operators evaluation process, the image below shows two expressions and two possible scenarios. In the first, the destination rule evaluates to true and in the second it evaluates to false.
For the rule to execute, the expressions must resolve to true. Where the expressions do not resolve to true, the rule will not execute.
| Parameter 1 | Operator | Parameter 2 | Result |
|---|---|---|---|
| ExpenseClaimAmount > 3000 | AND | ExpenseType = FoodAndBeverages | True |
|
ExpenseClaimAmount < 3000 |
AND |
ExpenseType = FoodAndBeverages |
False |
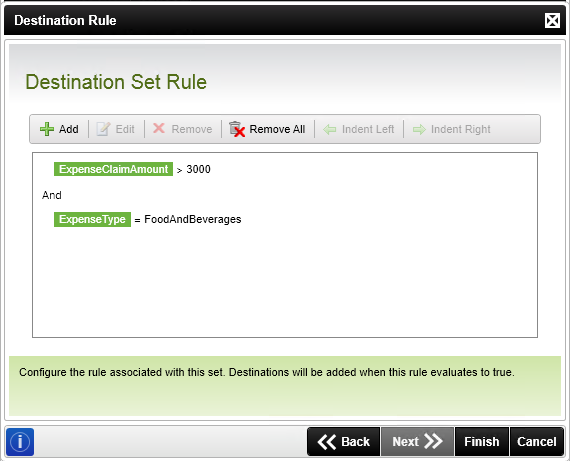
Use indenting to make it clear how the expressions have been configured. In this instance, both expressions evaluate separately, from top to bottom.
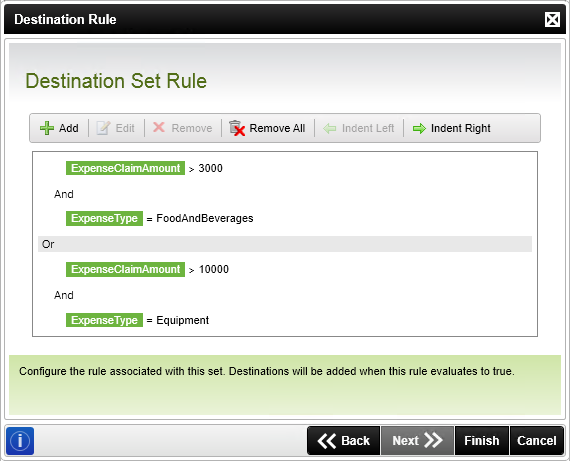
In the following instance, you want expressions 1 and 2 to be evaluated together and expressions 3 and 4 to be evaluated together. Select the Or operator on the destination set rule page and click Indent Left. This will ensure that the 3rd and 4th expressions are evaluated separately from the first two expressions. In mathematical terms this would relate to the following:
(ExpenseClaimAmount > 3000 AND ExpenseType = FoodAndBeverages) OR (ExpenseClaimAmount > 10000 AND ExpenseType = Equipment)