Temporary Access Application (K2 Studio)
This tutorial will teach you how to build workflows and SmartObjects with K2 Studio. The sample scenario for this tutorial is the Temporary Access Application, where employees can request temporary access to the premises and systems of an organization. Think of contractors or consultants that come on-site and need some kind of system access or security access for the duration of their visit. It is a type of on-boarding and off-boarding application, where systems and humans work together to make sure that resources are in place before someone starts, and that the necessary steps are performed once those users have left to revoke access. The primary driver for this application is security, so that any access to the organization is approved and so that it is easy for anyone in the organization to see who is allowed to be on the premises. As part of this application, automatic actions are applied by the workflow to terminate access at specific dates, if no user overrides have occurred.
Users familiar with K2 Workspace will notice that, from K2 4.7 onward, many of the workspace features have been moved to the new K2 Management site. The K2 Management site contains the tools commonly used to administer the K2 environment, plus several new additions. K2 administrators (full control) will use the K2 Management site to manage task lists (worklists), server and process rights, out-of-office settings, errors, etc. New additions to the K2 Management site include the ability to register new service types and service instances, generate and execute SmartObjects and view categories (both K2 Designer and system).
This tutorial can be completed in any environment that has K2 blackpearl 4.7 (or later) or K2 Appit 1.5 (or later) installed. The screen shots and users in the tutorial reflect the standard K2-provided virtual environment, commonly used for K2 blackpearl training events. You can, however, complete this tutorial in any other environment as long as the necessary K2 components are installed and operational, though your screens and users may be different. You must also have the necessary rights and permissions to create the K2 artifacts in the target environment. Be aware that it may be difficult to follow the steps in this tutorial if you are working in a
Some tutorials require that you have internet access to be able to connect to an external SQL database used for retrieving data. Those tutorials will contain additional information on internet connection requirements.
Since this tutorial focuses on workflows and SmartObjects built with K2 Studio, you will be provided with a starter project that contains the basic SmartObjects and SmartForms used for the application.
Tutorial Overview
The sections in this tutorial are designed to help you become familiar with K2 Studio and how to build workflows and SmartObjects with K2 Studio.
In Part 1, you will build the workflow component of the Temporary Access Application. You will be using K2 Studio to build the workflow, and you will learn about some more advanced workflow concepts like conditional lines, evaluating user data and business data in a line, escalations, loop-back lines and more. You will also become familiar with the K2 Studio workflow design environment and how to format workflows for clarity.
In Part 4, you will create a composite SmartObject in K2 Studio that will combine data from the workflow reporting service with data from the K2 SmartBox service. In effect, you are going to combine workflow reporting data with business data to build a report that is relevant to your users, so that users can easily see which temporary access authorizations are in effect and what the workflow status is.
Before building your application, it is important to understand what you want to achieve by designing the necessary pieces of the application. Let's start with the workflow component.
Workflow Design
The diagram below shows the conceptual flow of the Temporary Access Application workflow. You've laid out your flowchart in a swim-lane format, where you have separated the user tasks and system tasks into separate lanes. (The user tasks have been highlighted in a light blue color.)
In your workflow, a user submits a new temporary access request which is routed to their manager for approval. The access request includes information like the temporary user's name and company, the start date and end date of the request, whether an Active Directory (AD) account should be created for the user and whether there are additional IT and HR tasks for the request. If the request is rejected, the system will set the access request status to rejected and email the originator. If the request is approved, the system will determine whether a new AD user account was requested for the temporary user.
If an account was requested, the system will automatically create a new AD account for the temporary user. Once this is complete (or if no account was requested), the workflow will mark the status of the request as approved. Then, K2 will determine whether there were additional IT tasks and/or HR tasks and route the workflow accordingly. Note that if both IT and HR tasks were selected, the workflow will split into a parallel execution mode, since there is no reason for IT to wait on HR or vice-versa. Once the required tasks are complete (or if there were no additional HR or IT tasks), the workflow will wait until the day before the temporary access end date. Then, the requester must decide whether or not to extend the access for the temporary user. If access is extended, the workflow will loop back to the extend access step and wait until the day before the new end date.
If the originator selects the not to extend the access, the system will set the access request status to expired. If an AD account was created for the temporary user, the account will be automatically disabled.
As a security measure, you will also configure the workflow to expire the extended access step one day after the end date, in case the originator does not complete their task. In this case, the workflow will automatically set the access request status to expired and if necessary, disable the AD user account for the temporary user.
The Temporary Access workflow conceptual design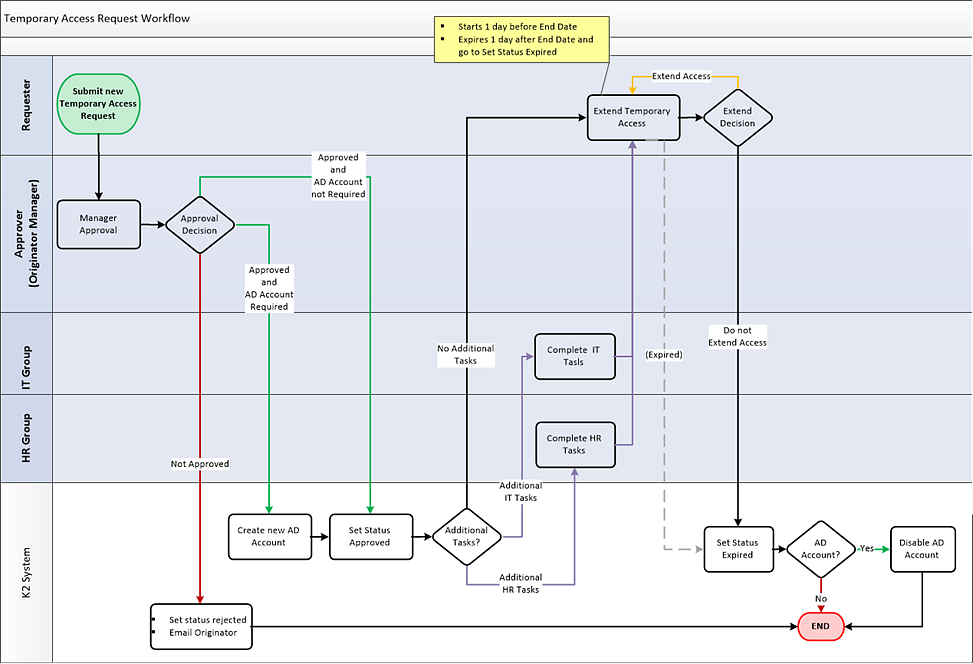
From a learning perspective, this workflow contains a number of interesting paths and escalations, including conditional lines, evaluation of user decisions along with business data, activities that loop back on themselves, parallel execution, escalations and pausing the start of certain activities until a particular date.
Now that you understand the basic flow of the workflow, let's look at the forms used in the application.
Forms Design
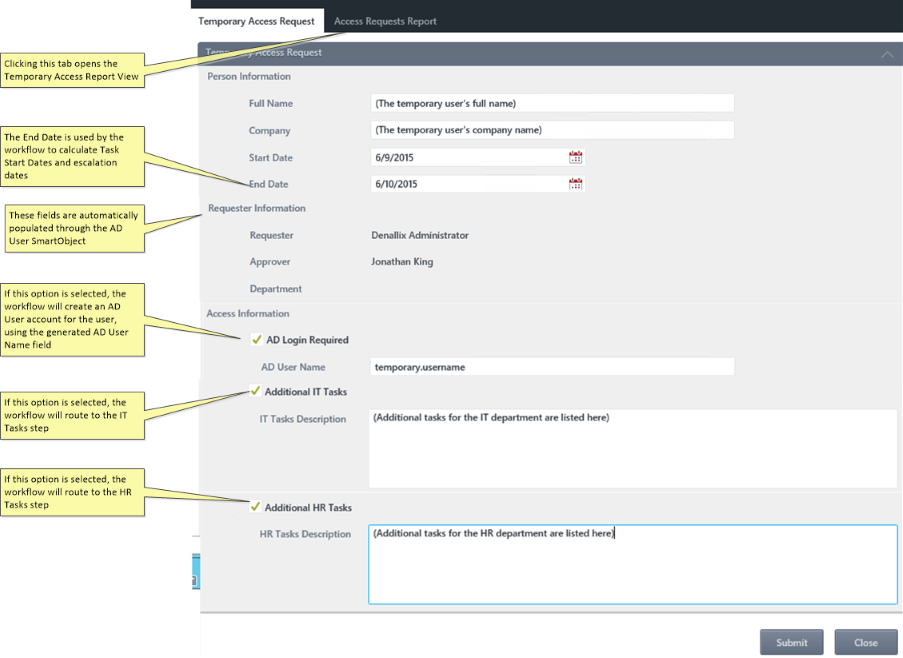
This application will consist of a single K2 SmartForms form that is used to capture and display the temporary access request information. Behind the scenes, this form has some logic that will check the current workflow step and selectively disable and hide certain sections of the form that are not applicable for the current user. Since this tutorial focuses mainly on workflows and SmartObjects, do not be too concerned with the behavior and rules behind this form, just understand the data that is being captured and displayed on the form, and that the workflow will behave differently based on the data captured on the form.
The Temporary Access request form
Data Design
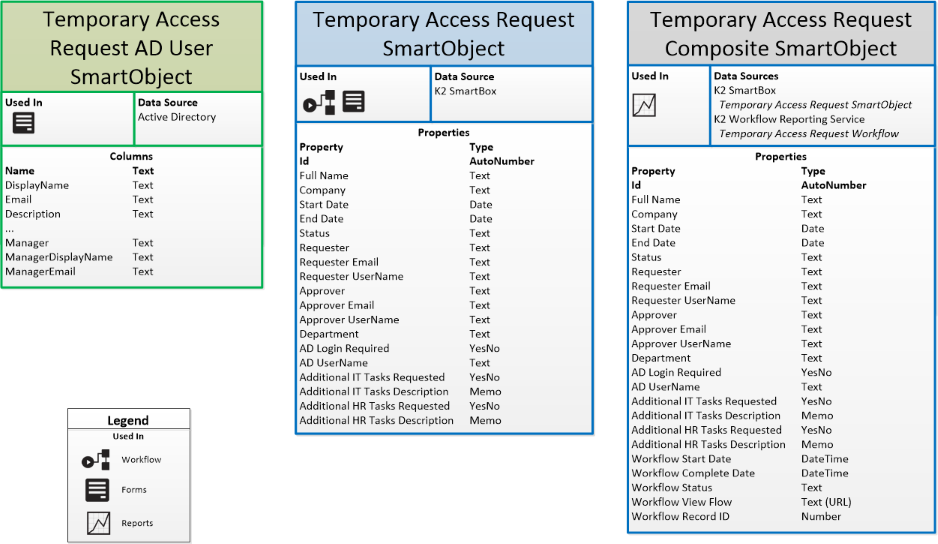
This application requires three SmartObjects for its data components. The Temporary Access Request AD User SmartObject is used to automatically populate fields on the form with user information, as well as to save the requester and approver details into the Temporary Access Request SmartObject.
The Temporary Access Request SmartObject is the primary SmartObject for this application and stores all of the data captured for a temporary access request. This data is displayed on the forms and is used by the workflow.
Finally, the Temporary Access Request Composite SmartObject will be used to build a report of request data along with workflow reporting data - see the Reports section for more information on this SmartObject.
Reports Design
In this application, you are going to create a single report which lists all the temporary access request records. What makes this report interesting is that you will create a composite SmartObject which will combine data from the K2 Workflow Reporting service with data from the K2 SmartBox SmartObject service.
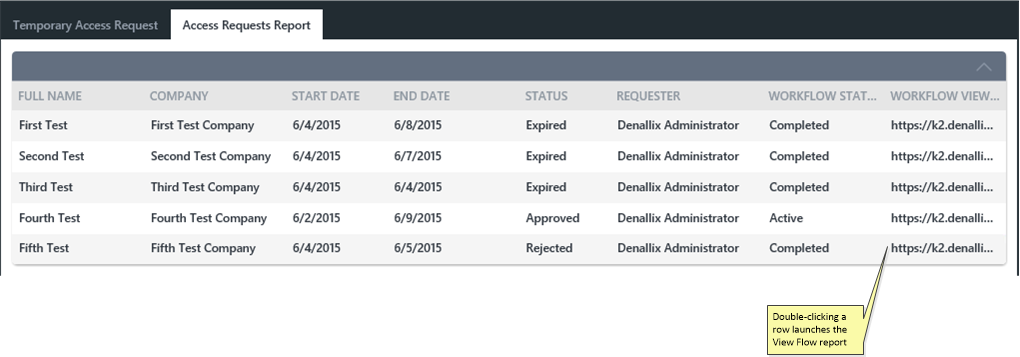
In effect, you are going to combine workflow reporting data with business data to build a report that is relevant to your users. In this case, you want to create a view of temporary access requests that anyone in the organization can review at any time, along with the workflow status and a link to the workflow. This is a security measure so that it is easy to see who is allowed to access the premises and so that it is easy to track down a workflow if it is paused at a user task. You might also use this report to identify if the workflow failed. To achieve this, you will build a composite SmartObject in K2 Studio, build a view against the SmartObject and then add the view to your Temporary Access request form.
The Temporary Access Request Composite SmartObject conceptual design
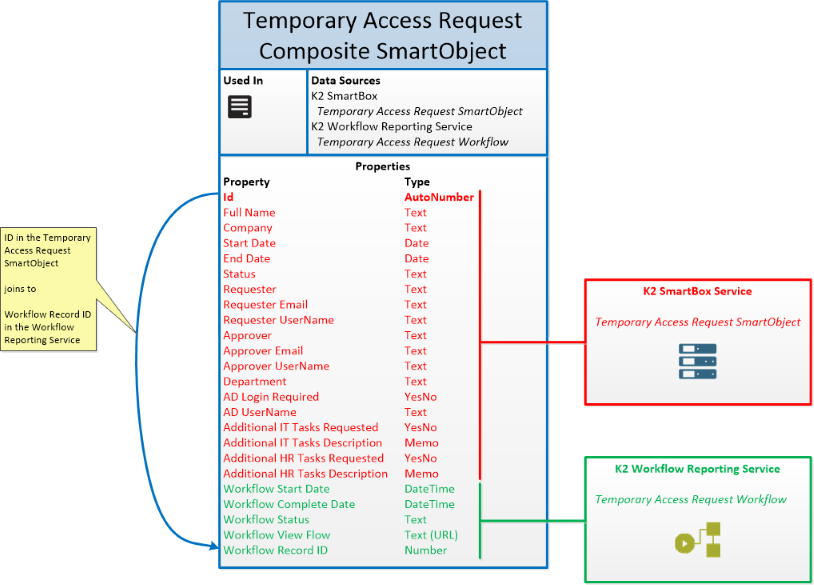
From a learning perspective, the important point in this tutorial is how to build an advanced composite SmartObject that combines data from different services. While you are using K2 services for this example, the principles apply equally to other SmartObjects as well: you can use the same approach to build a SmartObject that, for example, combines data from your HR SQL database with your Active Directory system to build a logical employee details SmartObject.
Building the Application
Now that you are familiar with the designs for each of the components (workflow, data, forms, reports), you are ready to begin building the workflow and report parts of the application. (Again, because this tutorial focuses on workflows and SmartObjects with K2 Studio, you will be provided a starter project with the forms and the majority of the data elements. You will only focus on the workflow and composite SmartObject in this tutorial.)
When you are ready to start building the application, continue on to the Part 1: Building a workflow with K2 Studio.