A simple workflow with K2 Studio
Application Overview
This guide provides the step-by-step instructions for building a simple, "Hello, World" style workflow with K2 Studio. This guide can also be used to build a simple workflow to validate that your K2 environment is operating as expected.
The workflow that you will build contains one user task and two system tasks. User tasks are tasks that are assigned to one or more users and they contain actions that the user (specifically, a human) must perform to move the workflow along (for example, making a decision such as approved or not approved). System tasks are tasks that are performed by the K2 server and do not require human interaction (such as sending an email or updating a list).
Users familiar with K2 Workspace will notice that, from K2 4.7 onward, many of the workspace features have been moved to the new K2 Management site. The K2 Management site contains the tools commonly used to administer the K2 environment, plus several new additions. K2 administrators (full control) will use the K2 Management site to manage task lists (worklists), server and process rights, out-of-office settings, errors, etc. New additions to the K2 Management site include the ability to register new service types and service instances, generate and execute SmartObjects and view categories (both K2 Designer and system).
This tutorial can be completed in any environment that has K2 blackpearl 4.7 (or later) or K2 Appit 1.5 (or later) installed. The screen shots and users in the tutorial reflect the standard K2-provided virtual environment, commonly used for K2 blackpearl training events. You can, however, complete this tutorial in any other environment as long as the necessary K2 components are installed and operational, though your screens and users may be different. You must also have the necessary rights and permissions to create the K2 artifacts in the target environment. Be aware that it may be difficult to follow the steps in this tutorial if you are working in a
Some tutorials require that you have internet access to be able to connect to an external SQL database used for retrieving data. Those tutorials will contain additional information on internet connection requirements.
Application Design
The following steps will explain the basics of K2 workflows, then guide you through building a simple workflow in K2 Studio. You’ll test the workflow components by starting an instance of the workflow from the K2 Management site. The workflow will consist of a user task, with the workflow originator assigned as the task participant. A task notification will be sent to the originator’s in-box, where it will be actioned using SmartActions.
SmartActions allow you to action the user task by simply replying to the email with a keyword in the email message body. You will complete the workflow by adding two system tasks that will send a confirmation email to the form originator, depending on the user task decision made.
Upon successful completion of tutorial, you will have validated the installation and configuration of the four K2 components previously installed. If you are using this guide as an introduction to K2 Studio, you will have a basic understanding of the K2 Studio environment and how to create a new project, along with a new workflow.
You begin with a review of workflow basics. If you are familiar with K2 workflows, feel free to proceed directly to the first step.
Workflow Design
This workflow will contain one user task and two system tasks. The user task will be assigned to the workflow originator, or more specifically, the person logged into K2 Workspace. You will use SmartActions to reply to the user task email notification, then confirm that one of the system tasks fired off and sent a final email confirmation with the correct task decision indicated.
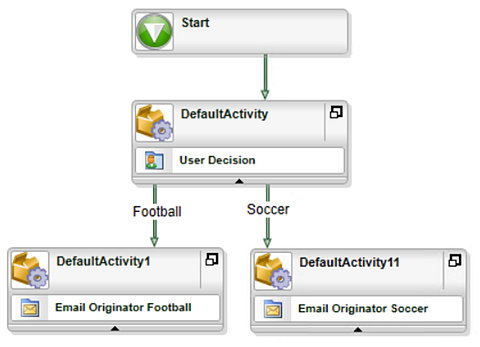
The diagram below shows the final version of the simple workflow. Essentially, the workflow will start, route a decision task back to the person who started the workflow, asking them whether they prefer the term "Football" or "Soccer" and then send an email to the originator with the preferred term. As simple as this scenario sounds, it introduces a number of workflow concepts such as activities, user events, system events, actions and outcomes.
The simple workflow you will build in this tutorial
Workflow Concepts: Process, Steps, Activities and Events
Knowing the proper lingo can help you to administer your workflows!
A workflow process is a container for all of the elements that make up a workflow. (Sometimes a process is referred to as a workflow. In K2 terms, 'workflow' and 'process' refer to the same thing.) Workflows built in K2 Studio consist of a series of activities with one or more events. They are connected by lines.
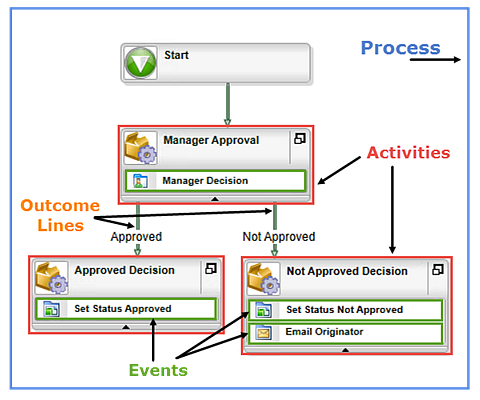
In the image below (not the actual workflow you will be building), there are three activities (Manager Approval, Approved Decision and Not Approved Decision). Activities are essentially containers for one or more events. In the image below, the Approved Decision activity has one event, Set Status Approved. Notice however, the Not Approved Decision activity has two event, Set Status Not Approved and Email Originator. These two events are system tasks, as they have performed by the K2 server without any human interaction. The Manager Decision event (contained in the Manager Approval activity) is a user task, in that human interaction is required to move the workflow along. (In this case, a decision must be made to either approve or not approved the request.)
When you are ready to begin building the workflow, continue on to Build a simple Hello World workflow using K2 Studio.