The K2 SharePoint CSOM Management Service
The K2 SharePoint Management service allows users to interact with SharePoint's CSOM (client side object model), managing lists and libraries.
For more information please see http://msdn.microsoft.com/en-us/library/ee857094.aspx
SharePoint CSOM Service in K2 Workspace
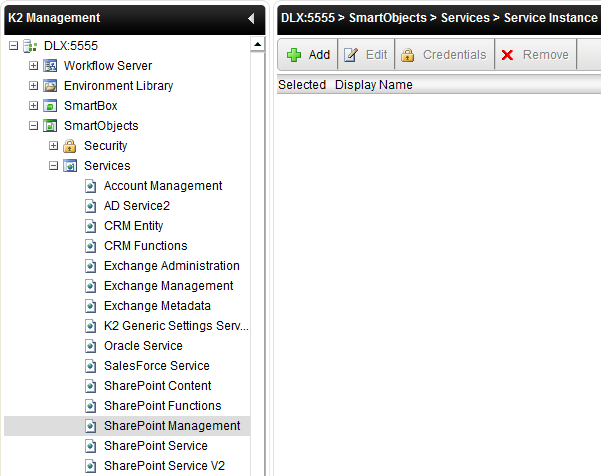
The SharePoint CSOM Management Service can be located in the Management Console in the SmartObjects > Services section. Once the Service instance has been created the Service Object methods will appear in the K2 Object Browser.

| Option | Description |
|---|---|
| Add | Adds a new Service Instance. Selecting to add a new Service Instance will open the Service Instance Configuration wizard screen |
| Edit | Edits the selected Service Instance. Selecting to edit an existing Service Instance will open the Edit Service Instance wizard screen |
| Credentials | For future use |
| Remove | Deletes the selected configured Service Instance |
| Selected | Selects the SmartObject Service configuration, enabling an administrator to Edit or Delete the configured Service |
| Display Name | The name of the Configured SmartObject Service |
| Description | A description of the configured SmartObject Service |
Service Instance Configuration

| Option | Description |
|---|---|
|
Site URL |
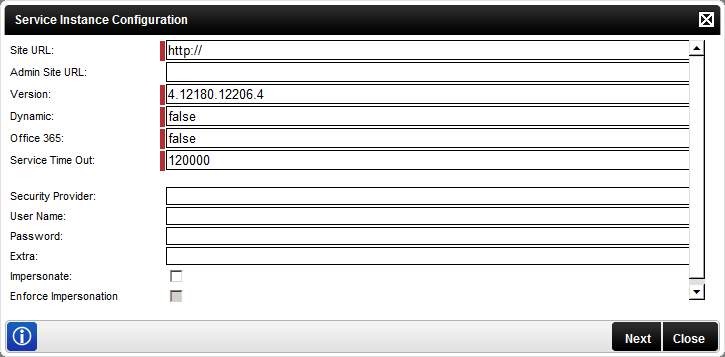
(Required) The local or cloud SharePoint site URL against which the instance is registered and from where the ServiceObjects are to be exposed. The default value is HTTP:// |
| Admin Site URL | The local or cloud Central Administration site URL against which the instance is registered and from where the ServiceObjects are exposed. The default value is blank. |
| Version | (Required) This is the service type assembly file version. The default value is read from the file in the Windows system. |
| Dynamic | (Required) When set to true this will force the user to specify a complete URL during execution as opposed to relative URLs based on the instance. Default value is False. |
| Office 365 |
(Required) If the Site URL field value is a URL which points to a local SharePoint system (within the domain), this field must be set to False. If the value is set to True, it will indicate the URL is not local and is external – E.g.: Cloud |
| Service Time Out | (Required) Service registration time out. The default value is 120000ms |
| Security Provider | Enter the required Security Provider label (SharePoint). The security provider label is mapped to the security provider created for the service types. |
| User Name | Your Online or local account user name |
| Password | Your Online or local account user password |
| Extra | No information is actually required in this field for the SharePoint security providers. We do not use this field during registration, we use the actual site URL specified in the instance. |
| Impersonate | Select this check box to enable impersonation rights. The impersonate option allows the K2HostServer service account to impersonate the user. |
| Enforce Impersonation | This is a Pass-through Authentication option. If Enforce Impersonation is NOT checked, and K2 Pass-through Authentication fails for the impersonated user, the service will revert to the K2 Service Account, and retry. If Enforce Impersonation IS checked, the service will not revert to the K2 Service Account if it fails with the impersonated user. |
When configuring the rights the following applies:
- If the User Name and password is configured and the Impersonate checkbox is selected (set to True) the service will ignore the User Name and password and use Impersonate.
- If the User Name and password is configured and the Impersonate checkbox is not selected (set to False) the service will use SQL Authentication.
- If the User Name and password is not configured and the Impersonate checkbox is not selected (set to False) the service will use the K2 Service Account.
- If only the User Name and password is configured the service will use SQL Authentication.
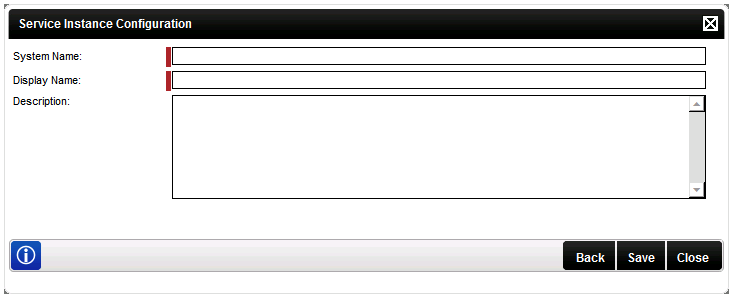
Clicking Next will load the Service Instance Configuration screen:

| Option | Description | How to use it |
|---|---|---|
| System Name | The name of the SmartObject Service | Enter the name of the SmartObject Service |
| Display Name | A user friendly name for the SmartObject Service | Enter a user friendly name for the SmartObject Service |
| Description | A description for the SmartObject Service | Enter a description for the SmartObject Service |
Edit SharePoint Service
To edit a Service Instance, select the Service Instance, then click Edit. The Edit Service Instance screen will be loaded with the information as provided previously. Edit the information as required and click Save.
