K2 Process Portals - Roles
When selecting the Roles for a specific server, the available roles are displayed on the screen. New roles can be added by selecting the Add option in the Actions menu. The List of roles can be refreshed by using the Refresh option in the View drop-down.
Adding a new Role
Click on the Actions button and select New Role from the drop-down.

The following screen is then displayed. At least one New Role Item must be added to the role (see next section).

| Option | What it is |
|---|---|
| Name | Defines the identity of the Role. Type in a name for the new Role in the Name text box |
| Description | Type in a description for the new Role in the Description text box |
| Dynamic | The Dynamic option stipulates to the process that when assigning tasks, the user that is currently online should receive the task. Select the check box to apply the Dynamic rule to the process |
To save the new Role, click on the down arrow on the Actions tab and select Save.
Adding a Role Item
The Add Role Item functions can be accessed by clicking on the down arrow on the Actions tab.

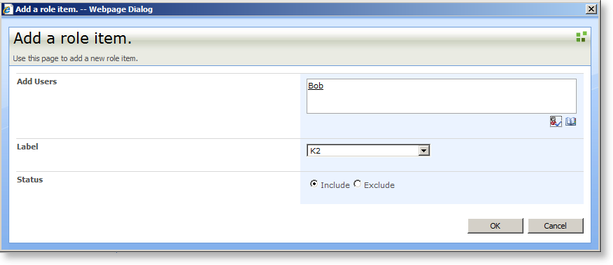
After selecting the Add Role Item option the following screen will be displayed:

| Option | What it is |
|---|---|
| Add Users | Adds Users to the new Role definition |
| Label | Provides a drop down selection of the K2 Label that should be used with the new Role Item |
| Status | Stipulates whether the users added will be included or excluded from the Role Definition |
Editing and Removing a Role Item
The Edit Role Item and Remove Role Item functions can be accessed by selecting an item and clicking on the down arrow.

