K2 Designer for SharePoint - Create Group
The Create Group wizard is used to create a new Active Directory group as part of a Workflow. Click and drag this wizard to the designated area on the design canvas to start the wizard
Fig. 1. Create Group Wizard
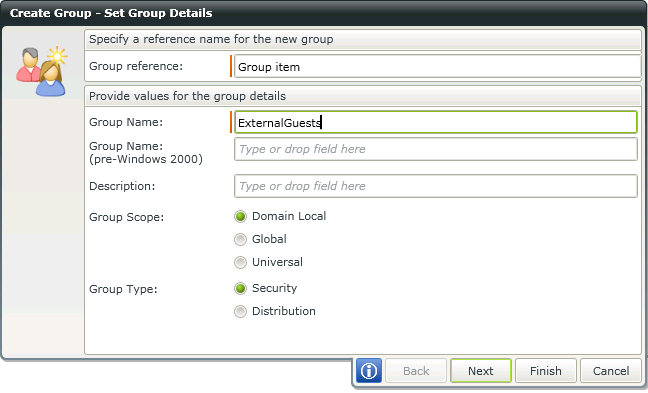
Fig. 2. Set Group Details Screen
| Feature | What it is | How to use it |
|---|---|---|
| Group Reference | The Workflow reference field that will contain the group's details for ease of use later in the Workflow | Enter a reference field name, or open the Context Browser and drag the required variable to the field |
| Group Name | The name of the Active Directory group to be created | Enter the new group name, or use the Context Browser and drag the name or variable to the field |
| Group Name (Pre-Windows 2000) | The compatibility access group name (if required). The Pre-Windows 2000 Compatible Access group is used for backward compatibility for computers that are running Microsoft Windows NT 4.0 and earlier. Members of this group have Read access on all users and groups in the domain. | Enter the new compatibility access group name (if required), or use the Context Browser and drag the name or variable to the field |
| Description | A description of the Active Directory group being created | Enter the description of the group, or use the Context Browser and drag the description or variable to the field |
| Group Scope |
The intended security level of the group to be created. The three possible options are:
For more information about Active Directory Group Scopes please refer to Microsoft documentation. For example: http://technet.microsoft.com/en-us/library/cc755692%28WS.10%29.aspx |
Select the required group scope by clicking on the option |
| Group Type |
The group type determines the type of task that is managed with the group. The two options are:
|
Select the required group type by clicking on the option |
| The e-mail address that will send the distribution e-mails to the Group. This address will be used to send e-mails to the Distribution group and will only appear on this screen if the Distribution group type is selected. | Enter the e-mail address, or use the Context Browser and drag the e-mail address or variable to the field |
Using the Group Reference Field
The Group Reference in the Active Directory wizard allows the process designer to create a field by typing in a name that can be referenced later within the AD wizard. This makes the design process easier and quicker as the field can be selected instead of specifying the details again. The reference field created in the Create Group screen is created as type Group and will therefore only surface in the following group actions with in the wizard:
- Update Group
- Remove Group
- Add Member to Group
- Remove Members from Group
Note that the Reference field does not appear in the context browser , but only in the Active Directory wizard itself. The value assigned to the reference field is only available for use in that specific process and cannot be surfaced in a different process.
For example, when a new group Approvers is added in the Create Group Wizard and a Group Reference field of Finance Approvers is created. Later on when using the Update Group wizard then Finance Approvers will appear in the Group Reference dropdown box.
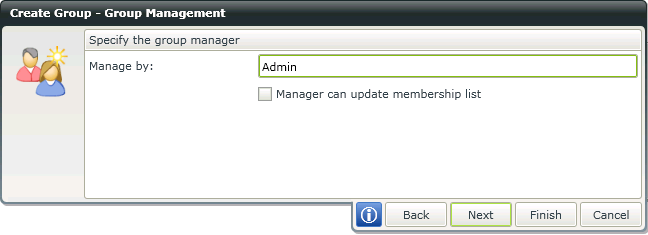
Fig. 3. Group Management Screen
| Feature | What it is | How to use it |
|---|---|---|
| Managed By | The Active Directory user who will have permissions to manage the newly created group | Enter the manager's user name, or use the Context Browser and drag the user name or variable onto the field |
| Manager can update membership list | This enables the manager configured in the above field to update the membership list of this group | Select this option by clicking on the check box |
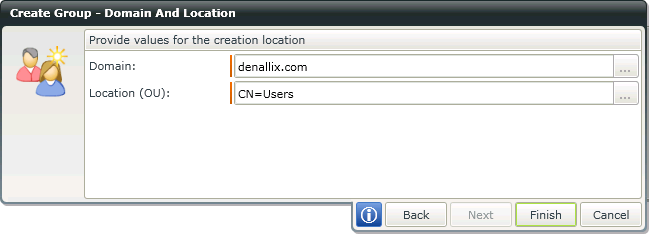
Fig. 4. Domain and Location Screen
| Feature | What it is | How to use it |
|---|---|---|
| Domain | The network domain within which the group's Active Directory account will be created | Enter the domain address, or open the Context Browser and drag the variable containing the name onto the field |
| Location (OU) | The organizational unit location in Active Directory is analogous to a directory in the file system | Enter the organizational unit location, or open the Context Browser and drag the variable containing the OU onto the field |
* The Active Directory wizard is only available in K2 blackpearl.
