K2 Designer for SharePoint - Create New User
The Create New User wizard is used to automatically create a new Active Directory user account as part of the Workflow. Click and drag this wizard to the designated area on the design canvas to start the wizard.
Fig. 1. Create New User Wizard

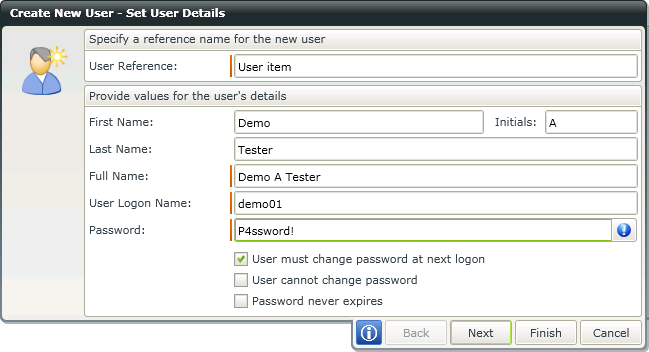
Fig. 2. Set User Details Screen
| Feature | What it is | How to use it |
|---|---|---|
| User Reference | The Workflow reference field that will contain the user's details for ease of use later in the Workflow. | Type a reference field name, or open the Context Browser and drag the required variable to the field. |
| First Name | The first name of the user that will be added as an Active Directory user - for example: John | Enter the user's first name, or open the Context Browser and drag the required variable to the field |
| Initials | The first letter of any middle names of the user that will be added an Active Directory user | Enter the user's initials (typically the initial letter of the middle name of the user), or open the Context Browser and drag the required variable to the field |
| Last Name | The last name or surname of the user that will be added by the event to the Active Directory - for example: Smith | Enter the user's last name, or open the Context Browser and drag the required variable to the field |
| Full Name |
All the given names of the user that will be added to the Active Directory - for example: John Donald Smith |
Enter the user's full name, or open the Context Browser and drag the required variable to the field |
| User Logon Name | The domain username assigned to the user for the purpose of logging on | Enter the user's assigned logon name, or open the Context Browser and drag the required variable to the field |
| Password |
The password assigned to the user for the purpose of logging on Password Options:
|
Enter the user's assigned password, or open the Context Browser and drag the required variable to the field |
Using the User Reference Field
The User Reference in the Active Directory wizard allows the process designer to create a field by typing in a name that can be referenced later within the AD wizard. This makes the design process easier and quicker as the field can be selected instead of specifying the details again. The reference field created in the Create New User screen is created as type User and will therefore only surface in the following User actions with in the wizard:
- Update User
- Disable User
- Add User to Group
- Remove User from Group
- Remove User from All Groups
Note that the Reference field does not appear in the context browser , but only in the Active Directory wizard itself. The value assigned to the reference field is only available for use in that specific process and cannot be surfaced in a different process.
For example, when a new user John Brown is added in the Create New User action and a User Reference field of JBrown is created. Later on when using the Update User action then JBrown will appear in the User Reference dropdown box.

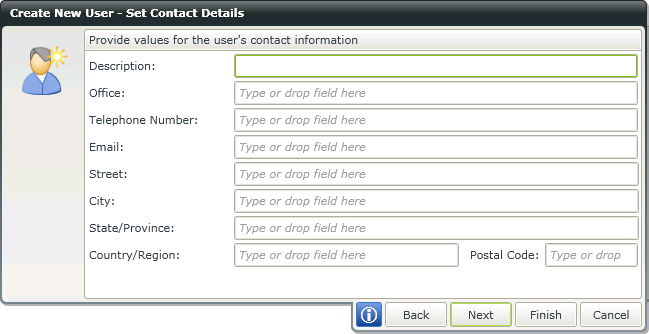
Fig. 3. Set Contact Details Screen
| Feature | What it is | How to use it |
|---|---|---|
| Description | A description of the person being added to Active Directory, or their position in the company - for example: Executive Secretary | Enter the description, or open the Context Browser and drag the variable containing the description onto the field |
| Office | The location or name of the office that the user works in - for example: CEO Suite | Enter the user's location, or open the Context Browser and drag the variable containing the location onto the field |
| Telephone Number | The telephone contact number of the user being added to Active Directory | Enter the user's telephone number, or open the Context Browser and drag the telephone number or variable onto the field |
| The e-mail address of the user being added to Active Directory | Enter the e-mail address, or open the Context Browser and drag the e-mail address or variable onto the field |
|
| Street | The street address of the user being added to Active Directory | Enter the street address, or open the Context Browser and drag the variable containing the street address onto the field |
| City |
The name of the city that the user being added to Active Directory works in |
Enter the city name, or open the Context Browser and drag the variable containing the city name onto the field |
| State/Province |
The name of the State or Province that the user being added to Active directory works in |
Enter the State or Province name, or open the Context Browser and drag the variable containing the name onto the field |
| Country/Region |
The name of the country or region in which the user being added to Active Directory works in |
Enter the country or region name, or open the Context Browser and drag the variable containing the name onto the field |
| Postal Code |
The postal code of the address given of the user being added to Active Directory |
Enter the post code numbers, or open the Context Browser and drag the variable containing the postal code onto the field |

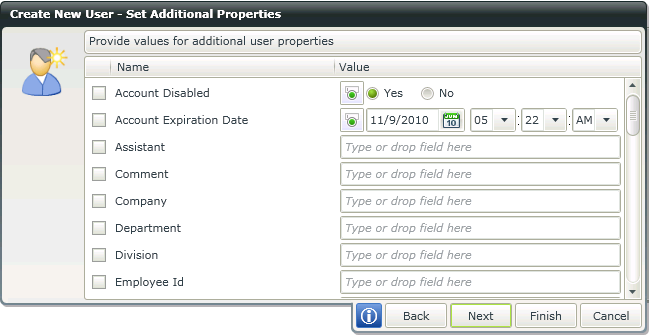
Fig. 4. Set Additional Properties Screen
| Feature | What it is | How to use it |
|---|---|---|
| Check Box | Allows the workflow creator to assign a value to the selected property | Select a property from the list by clicking on the Check Box |
| Name | The description of the property | Use the description to locate the property you wish to assign a value to |
| Value | Reflects the type of data field and allows the workflow creator to assign a value to the property | Enter or select a value, or use the Context Browser and drag the variable containing the value for the property |

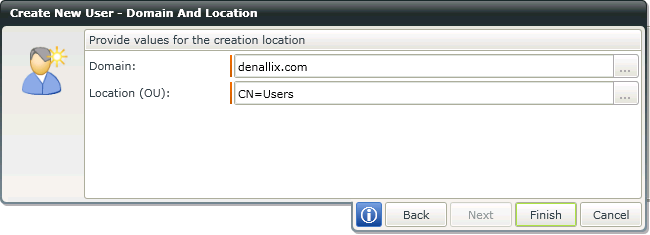
Fig. 5. Set Domain and Location Screen
 |
The user account executing the event must have rights on the Domain being set in the Domain wizard field |
| Feature | What it is | How to use it |
|---|---|---|
| Domain | The network domain within which the user's Active Directory account will be created | Enter the domain address, or open the Context Browser and drag the variable containing the name onto the field |
| Location (OU) | The organizational unit location in Active Directory is analogous to a directory in the file system | Enter the organizational unit location, or open the Context Browser and drag the variable containing the OU onto the field |
* The Active Directory wizard is only available in K2 blackpearl.
