33. Approve a Claim; Query a Claim
In this step, you will action the Approve Expense Claim tasks for the two expense claims submitted. If you selected yourself as the approver, you will open the task notification email for the first claim, then approve it. You will send the second claim back for rework. If you selected another user as the approver, they will need to action the tasks for you from their email client. The steps in this section assume you selected yourself as the approver.
- Access the approver's email client. Using the worklist item link found in the email, open the Expense Claim form. Enter some comments into the Approver Comments box, then select Approved for the action. Submit the form.
- From your email client, locate the task notification email for the first claim.
- Notice the email subject line contains the Title value for the claim. This is a result of the Context Browser reference you mapped to the subject line. Click the worklist item link in the message body to launch the Expense Claim form.

- The "display" form opens. Notice the Workflow view that K2 adds to the form. This view contains the instructions you configured for the task, along with a drop-down list of action items (Approved, Rejected, Query) and a submit button. Just below this view is the Task Comments view you added when creating the Expense Claim form. This view contains a text area box where you can enter any comments or questions. Notice too, the rest of the form is read-only, as you should not change any of the claim originator's entries.
Enter comments into the Task Comments box, then select Approved for the task action. Submit the form. Click OK for the confirmation dialog, then close the browser window.
If you are working on a K2-provided VM, you can access the email client from your browser. Launch a new tab, then click the OWA link found in the Favorites bar. Sign in as Administrator.
User name: Denallix\Administrator
Password: K2pass!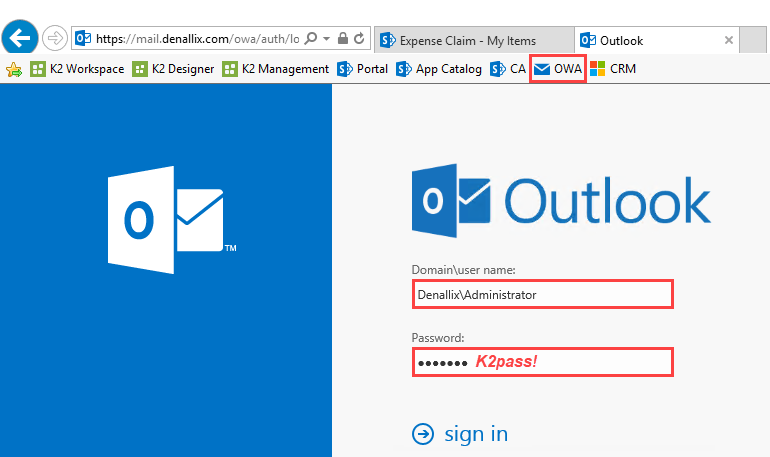
- Now, you will take action on the second claim. Navigate to the landing page of your SharePoint site or subsite (where your Expense Claim list resides). From the K2 Worklist web part, open the Expense Claim form for the second claim. Enter some comments, then select Query for the action decision. Submit the form.
- For the first claim, you launched the task form from the task notification email. This time, you will launch the form from the K2 Worklist web part. Navigate to the landing page of your SharePoint site or subsite. Locate the K2 Worklist web part. There should be two Expense Claim entries. You should see the second claim, which you have not processed yet and another entry for the first claim - Finance Processing. (Once you approve a claim, the next task is for finance to process it.)
Use the context menu to open the form for the second claim.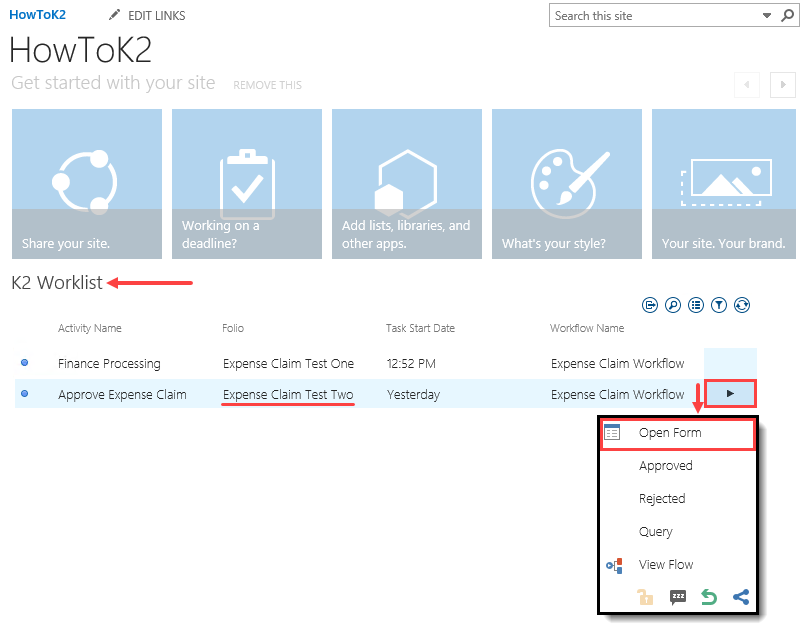
- Enter comments in Task Comments box, then select Query for the action decision. Submit the form. Click OK for the confirmation message, then close the browser window.
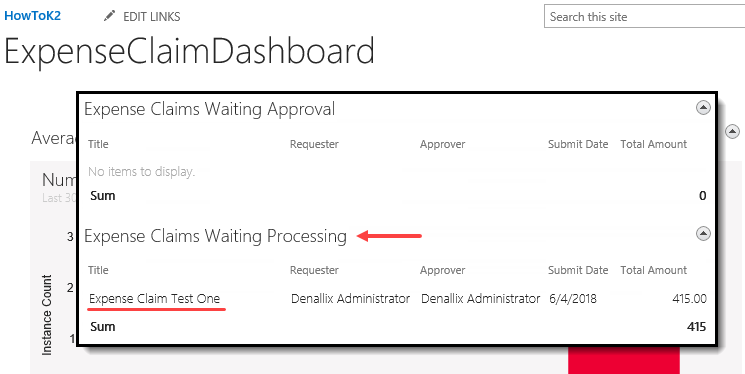
- Still on the landing page of your SharePoint site, click the Expense Claim Dashboard link from the Quick Launch menu. Notice now, you have only one claim displayed. The claim displayed is waiting for finance processing. The other claim now has a Query status, so it is not waiting for approval or finance processing.
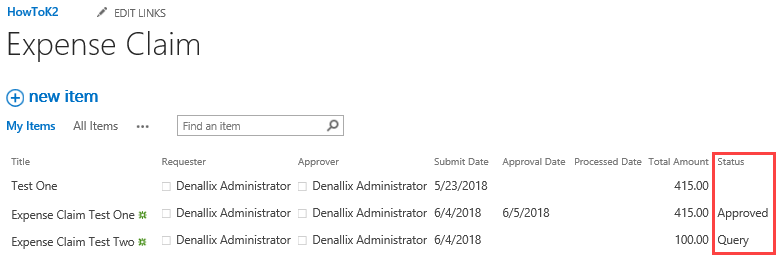
- Navigate to the Expense Claim list. Here, you see both claims, one with an Approved status and one with a Query status.
- For the first claim, you launched the task form from the task notification email. This time, you will launch the form from the K2 Worklist web part. Navigate to the landing page of your SharePoint site or subsite. Locate the K2 Worklist web part. There should be two Expense Claim entries. You should see the second claim, which you have not processed yet and another entry for the first claim - Finance Processing. (Once you approve a claim, the next task is for finance to process it.)
Review
In this step, you approved a claim and queried a claim. You opened the Expense Claim form from the task notification email and the K2 Worklist web part. You observed how the reporting dashboard updates based on the status of the claims. In the next step, you will resubmit the queried claim.