25. Edit the Display Expense Claim Form
In this step, you will edit the display form used for the Approve Expense Claim and Finance Processing steps of the workflow. You are using the same form and state for both task steps. Because there are two task steps involved, you must make sure you have conditions in place that check which of the two steps you are currently on. Any actions added to a condition apply to the task step specified. (You will have two conditions, one that checks that the current step is the Approve Expense Claim step and another that checks that the current step is the Finance Processing step.) You will confirm the worklist item (the action task assigned) is mapped to the correct task step, then you will save any comments entered to the correct column in SharePoint.
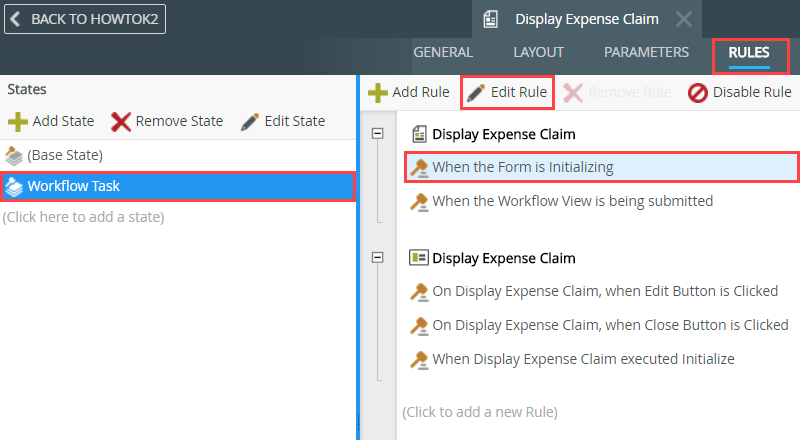
- First, you will confirm that the worklist items are mapped correctly to their respective workflow task steps. Check out and edit the Display Expense Claim form. Edit the form initializing rule for the Workflow Task state.
- You will work with the form that the approvers and finance processor use. You are just confirming that the worklist items (these are the actually assigned tasks) are mapped to the correct workflow task step. Check out and edit the Display Expense Claim form.
- From the RULES screen, edit the When the Form is Initializing rule for the Workflow Task state. This is the rule that controls the behavior when the form first loads.
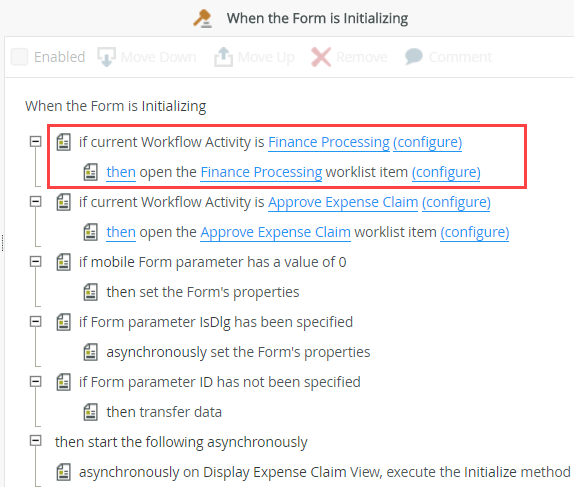
- Locate the if current Workflow Activity is Approve Expense Claim condition. Locate the action that says then open the Approve Expense Claim worklist item. Click (configure) link.
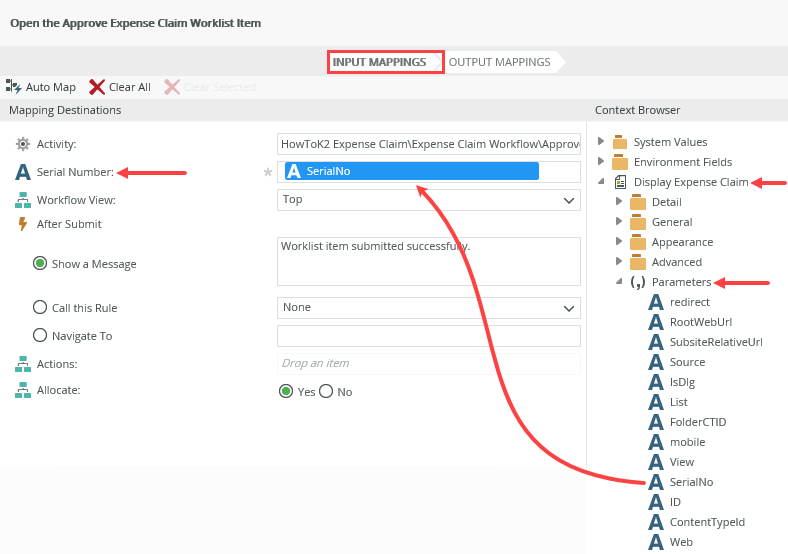
- Input Mappings: Confirm the Serial Number text box shows the SerialNo value. If it does not, map the Display Expense Claim > Parameters > ID to the text box.
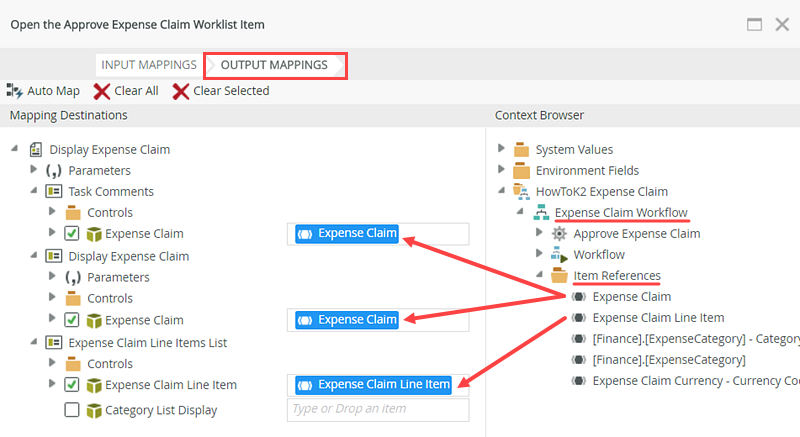
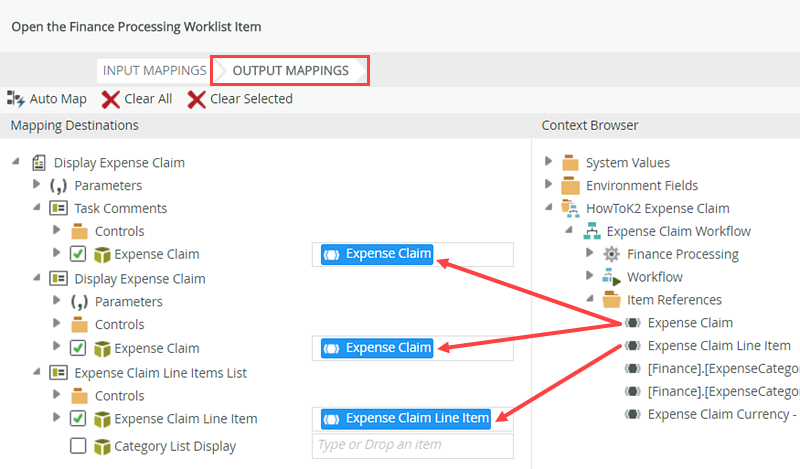
- Output Mappings: Confirm the Expense Claim and Expense Claim Line Item Item References are correctly mapped to their respective views. If they are not, map the Item References.
- Locate the if current Workflow Activity is Approve Expense Claim condition. Locate the action that says then open the Approve Expense Claim worklist item. Click (configure).
- On the Input Mappings screen, confirm the Serial Number destination shows SerialNo as its value. If it is not mapped, map it from the Context Browser > Display Expense Claim form > Parameters properties.
- Click the Output Mappings tab. Confirm the Expense Claim and Expense Claim Line Item Item References are correctly mapped to their respective views. If they are not, map the Item References from the Context Browser. Click FINISH.
- Repeat the steps above for the Finance Processing worklist item action. Confirm the Serial Number contains the SerialNo parameter. Confirm the item references (Expense Claim and Expense Claim Line Item) are mapped to their respective views. If not, map the references.
- Click the configure link for the Finance Processing worklist item action.
- On the Input Mappings screen, confirm the SerialNo is there. Switch to the Output Mapping screen. Once again, confirm the three Item References are correctly mapped to their respective views. If not, map the Item References. Click FINISH, then OK to close out of the Rule Designer.
- Click the configure link for the Finance Processing worklist item action.
- Now you will add actions to save the approver and finance processor comments back to the SmartObject. Recall that you added a separate view called Task Comments to the display view. The Task Comments view captures any comments or questions from the approver or finance processor.
Edit the When the Workflow View is being submitted rule of the Workflow Task state. Add a condition that checks if the current activity is Approve Expense Claim.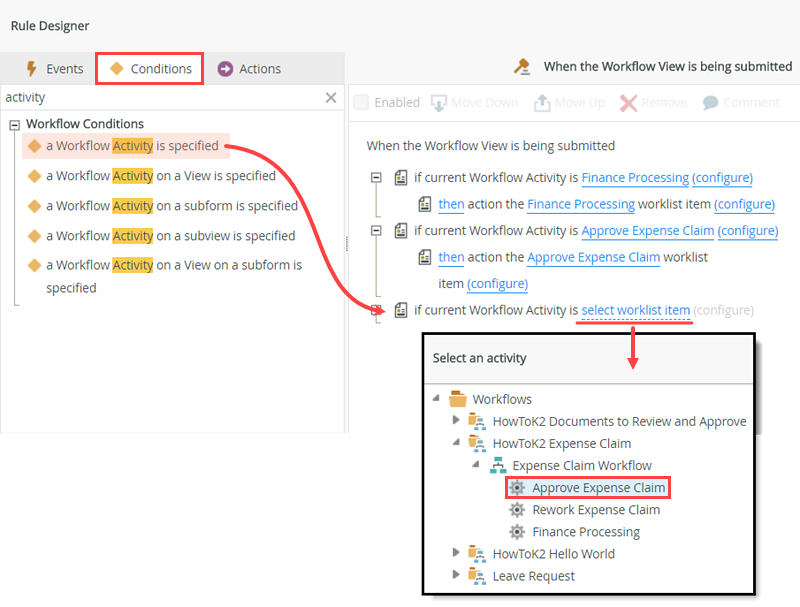
- Next, you will add an action that saves the approver's or finance processor's comments back to the Expense Claim list. Because you are using the same state (Workflow Task) for both steps, you must add an extra condition that checks to see which step you are on before saving the comments. The approver or finance processor enters comments into the Task Comments view at the top of the display form, just below the Workflow view. K2 automatically adds the Workflow view and it contains the actions (approved, rejected) along with a submit button. Your goal is to take those comments and transfer them to the appropriate column in the Expense Claim list.
Click the Workflow Task state, then click When the Workflow View is being submitted. Edit the rule. This rule fires after you click the submit button.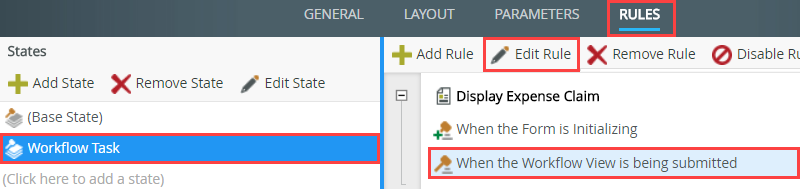
- Begin by setting a condition that checks to see if the current step is the Approve Expense Claim task. In the Conditions tab, locate and select the a Workflow Activity is specified condition to add it to the rule definition pane. Use the select worklist item link to select the Approve Expense Claim activity. Because you have two possible tasks (or steps) that you could reference in your rules (the approve task and the finance processing task are both using this Display Expense Claim form), you need this condition in place so that you can tell K2 you are referencing the approve step for the subsequent actions.
- Next, you will add an action that saves the approver's or finance processor's comments back to the Expense Claim list. Because you are using the same state (Workflow Task) for both steps, you must add an extra condition that checks to see which step you are on before saving the comments. The approver or finance processor enters comments into the Task Comments view at the top of the display form, just below the Workflow view. K2 automatically adds the Workflow view and it contains the actions (approved, rejected) along with a submit button. Your goal is to take those comments and transfer them to the appropriate column in the Expense Claim list.
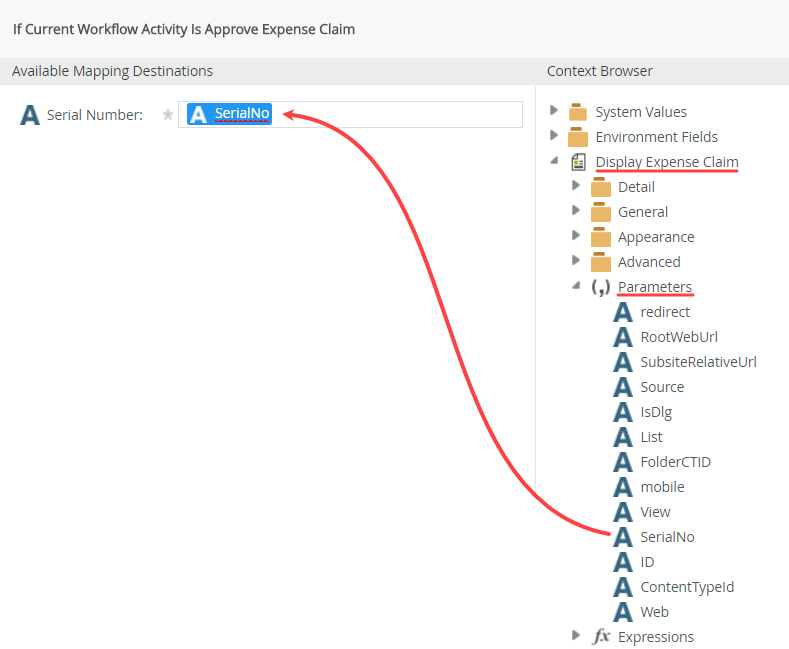
- Map the Display Expense Claim > Parameters > SerialNo to the Serial Number text box.
- Click (configure). Map the SerialNo parameter to the Serial Number text box. This condition ties the Approve Expense Claim workflow step to the current instance of the workflow. Click OK.
- Click (configure). Map the SerialNo parameter to the Serial Number text box. This condition ties the Approve Expense Claim workflow step to the current instance of the workflow. Click OK.
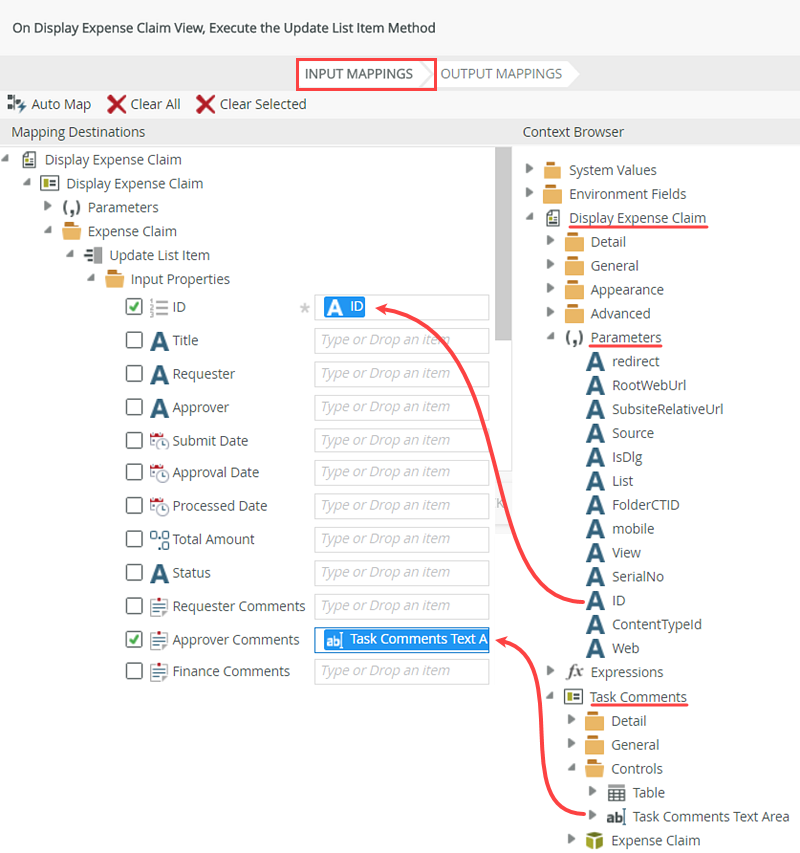
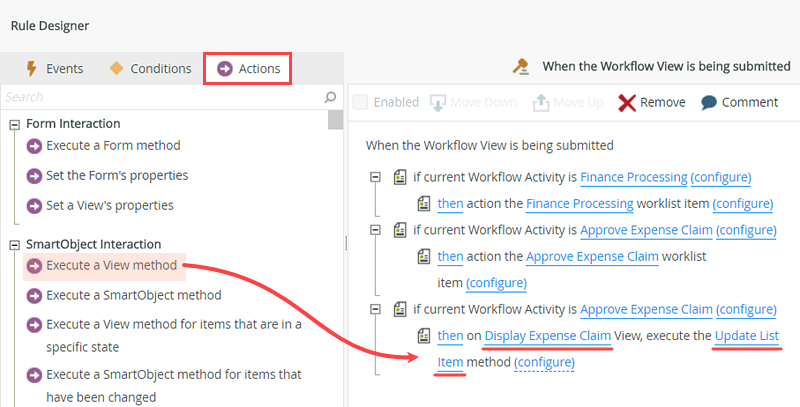
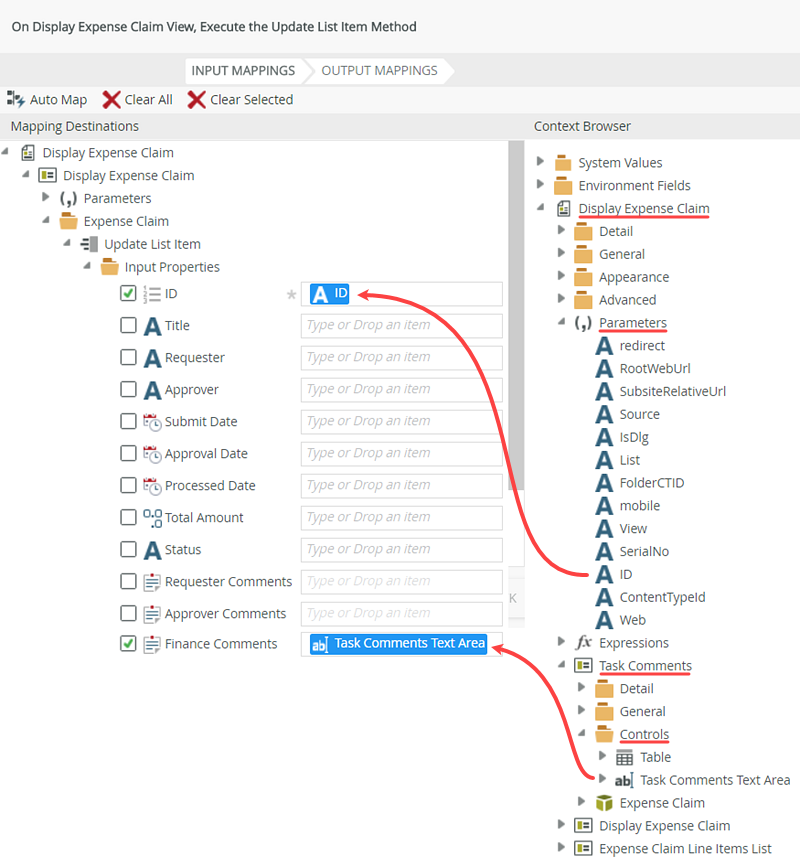
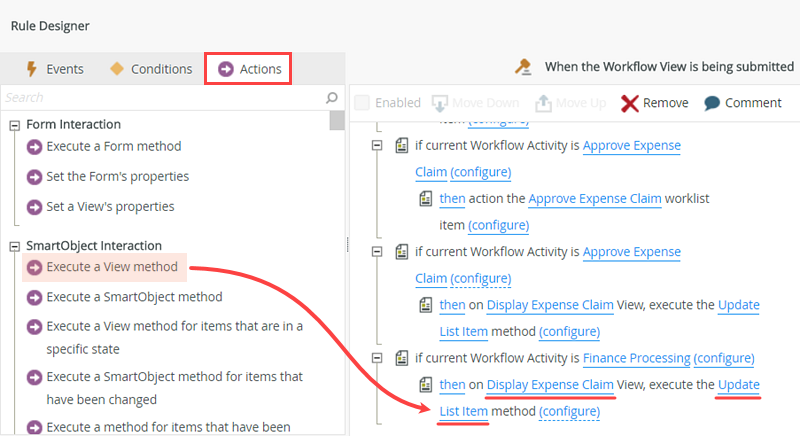
- Execute a View method. Configure the action to call the Update List Item method of the Display Expense Claim view and save the Task Comments Text Area comments entered by the task user into the Approver Comments property. Be sure to map the parameter ID to the ID input property so that K2 knows which record to update.
- Select the Actions tab, then select the Execute A View method. Configure the method to call the Update List Item method of the Display Expense Claim view. Click (configure).
- On the Input Mappings screen, drag the Context Browser > Display Expense Claim > Parameters > ID into the Display Expense Claim View > Expense Claim SmartObject > ID input property. For the Approver Comments, drag the Task Comments > Controls > Task Comments Text Area into the Approver Comments text box. Click FINISH to complete the action configuration.
- Select the Actions tab, then select the Execute A View method. Configure the method to call the Update List Item method of the Display Expense Claim view. Click (configure).
- Add a condition that checks if the current activity is Process Expense Claim. Map the parameter SerialNo.
- Next, you will repeat the steps above to add the comments for the Finance Processing step.
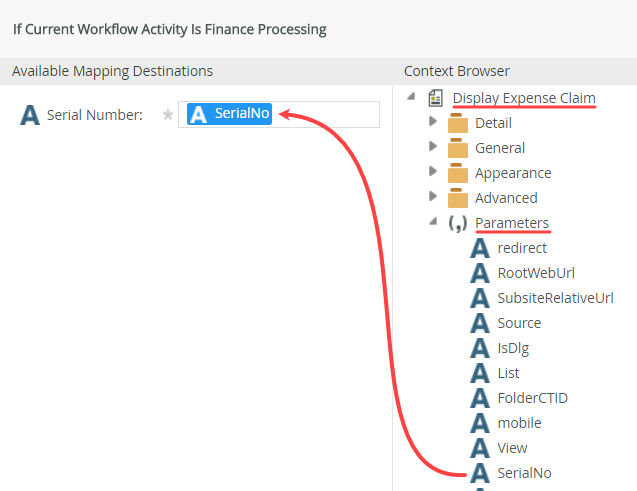
From the Conditions tab, add another a Workflow Activity is specified condition. Configure the condition so that it checks if this is the Finance Processing task.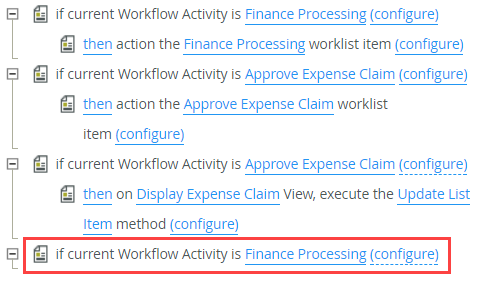
- Click (configure). Drag the SerialNo parameter into the Serial Number text box. Click OK.
- Next, you will repeat the steps above to add the comments for the Finance Processing step.
- Execute a View method. Configure the action to call the Update List Item method of the Display Expense Claim view and save the Task Comments Text Area comments entered by the task user into the Finance Processing property. Be sure to map the parameter ID to the ID input property.
- Add the Execute a View method action, with a Update List Item method of the Display Expense Claim view. Click (configure).
- On the Input Mappings screen, drag the Context Browser > Display Expense Claim > Parameters > ID into the Display Expense Claim View > Expense Claim SmartObject > ID input property. For the Finance Comments, drag the Task Comments > Controls > Task Comments Text Area into the Finance Comments text box. Click FINISH to complete the action configuration.
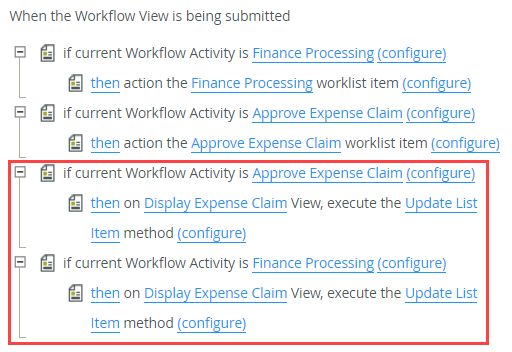
Your rules should look like the image below at this point.
- Add the Execute a View method action, with a Update List Item method of the Display Expense Claim view. Click (configure).
- Add an action to close the browser window. Finish the Form Designer.
- Add an action to close the browser window. Click OK to complete the rule configurations.
- This completes the rules setup for the display form. Click the FINISH button to complete the form designer and return to the K2 Application elements page.
Review
In this step, you added workflow integration rules to the display form used for the approver and finance processing steps. Because the two steps use the same display form, you configured a condition that checks to see which step you are currently on: Approve Expense Claim or Finance Processing. After specifying a task step, any actions that follow will apply to that step. You added actions to save any comments entered back to the relative column (Approver Comments or Finance Processing Comments) in your SharePoint list. In the next step, you will check in views and forms so that the changes are recorded to the K2 server.