Creating Forms
A Form is a container of one or more
It is important to note that a Form needs to be checked out in order to make any changes to the Form. As soon as the Form is checked out, it is not available for editing by other users and needs to be checked back in for other users to see the changes made
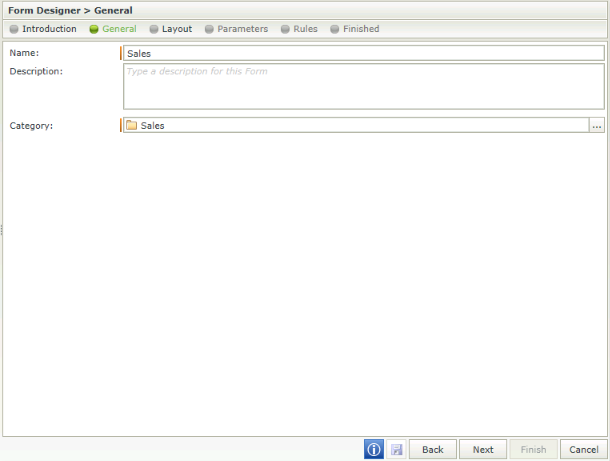
This screen captures the details of the Form.
| Feature | Description | How to use it |
|---|---|---|
| Name | The Name of the Form | Type the name of the Form |
| Description | The Description of the Form | Type a brief description of the Form |
| Category | The Category where the Form should be saved | Select the category by clicking on the ellipsis |
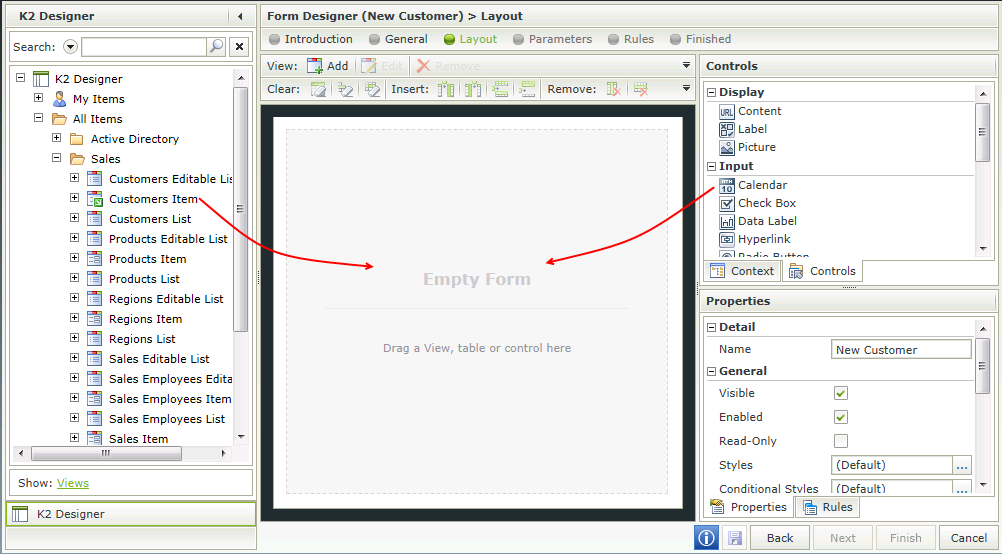
This screen captures the layout of the Form. The Layout screen allows the user to customize the Form by adding, editing or removing Views and Controls. In addition, the toolbar provides the functionality to add, edit, and remove cells, tables, rows, tabs, Views etc. Views can be dragged and dropped from the category tree onto the design canvas. The user can drag and drop a table, Views or controls onto the design canvas. See the Getting Familiar with the Form Designer topic for more detail.
This screen captures specific parameters when required. Parameters are used to parse data from one Form to another, but this screen is not compulsory.

| Feature | Description | How to use it |
|---|---|---|
| Name | The Name of the Parameter | Type the name of the Parameter |
| Data Type | The Data Type of the Parameter. It is important to have consistent data types where data mappings etc. are done |
Select the Data Type from the drop down list |
| Default Value | The Default Value to be used | Type a value if a default value should be used. This field is not compulsory |
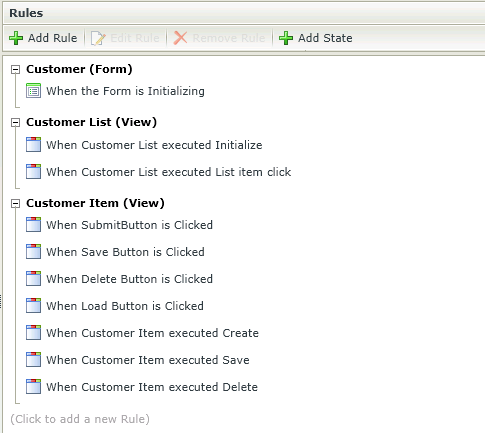
The Rules step of the wizard defines the State Rules configured for the Form. Existing Rules can be edited or deleted and new Rules and States can be added. When clicking on Add Rule, the Rules Wizard Configuration opens. This wizard can be used to configure Rules, Conditions and Actions for the Form. For more information on the Rule Wizard Configuration, see the Rule Designer.
When clicking Add State, the screen is split into two columns and States can be added to the Form. Form States are typically used when using different states for different Client Events in a Workflow, but the same Form is used for the different events. Each Form State will have its own Rules but will inherit the Base State Rules. So different Rules can be applied to the same Form in different states of the Workflow.
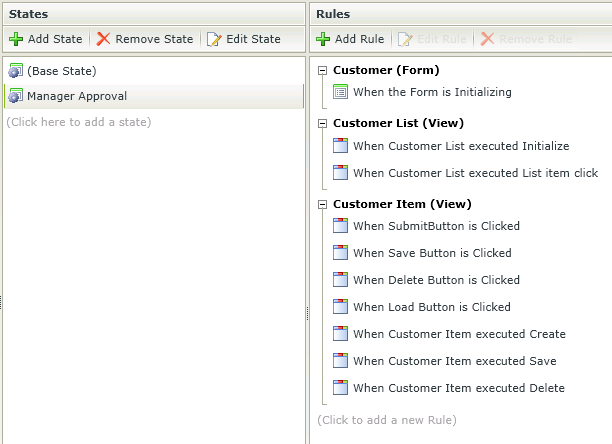
A Form State can be used in more than one User Task in a workflow. In addition, when using the same Form in more than one workflow, the Form State can be re-used in the subsequent workflows
View Rules can be set up to execute independently from Form Rules, but they can also be used to add more Rules to a Form. If a View Rule is created in the View Designer, this rule is available for editing in the Form Designer's rules section. When the View rule is changed on the Form, it does not modify the rule on the View. However, if the rule is changed in the View Designer for the rule that was previously overwritten in the Form, the change to the View rule will apply to the rule on the Form. The Form rule therefore inherits the View Rule and will see the changes made, but will still apply the previous change made to the View Rule on the Form as well.
A Rule Definition that was created in the View Designer can be enabled or disabled in the Form, but it cannot be removed from the Rule. Only Rule Definitions that belong to the specific designer can be removed in that designer.
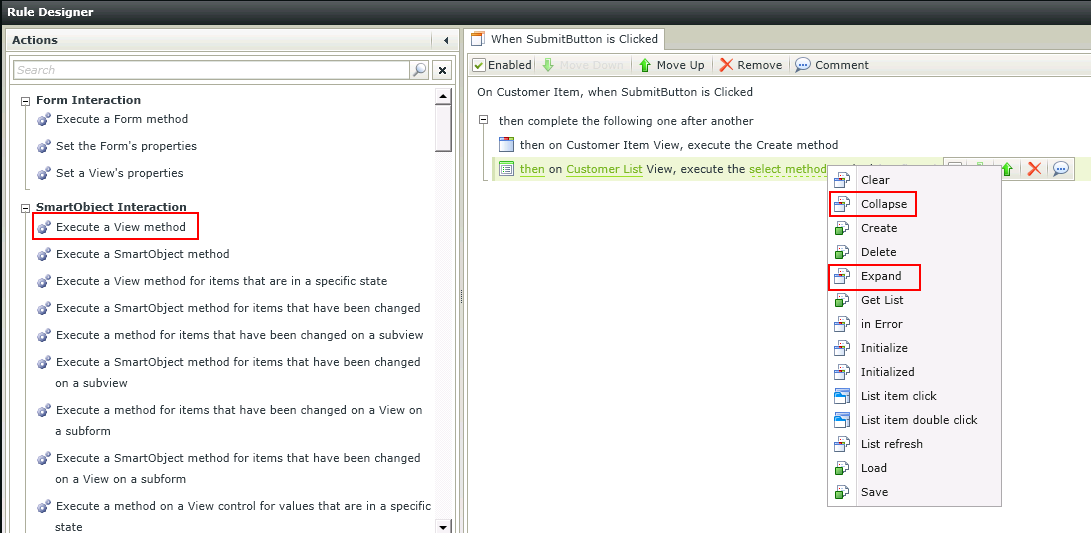
The Collapse and Expand Events and methods have been added to the Rule Designer when using a Rule on a Form. These Events and methods can be used with Actions such as Transfer Data for example or to improve performance. The Load and Initialize methods can be used when expanding the View for example and don't have to be executed when the Form is Initialized. This minimizes the execution time when a Form is Initialized. See KB001387 - How to use the Collapse and Expand View Events.
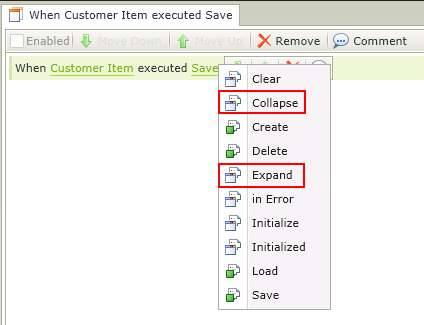
View Events
This screen indicates the end of the wizard and the successful creation of the Form. The Form can be run, edited, deleted, saved as another Form, or checked out from here.
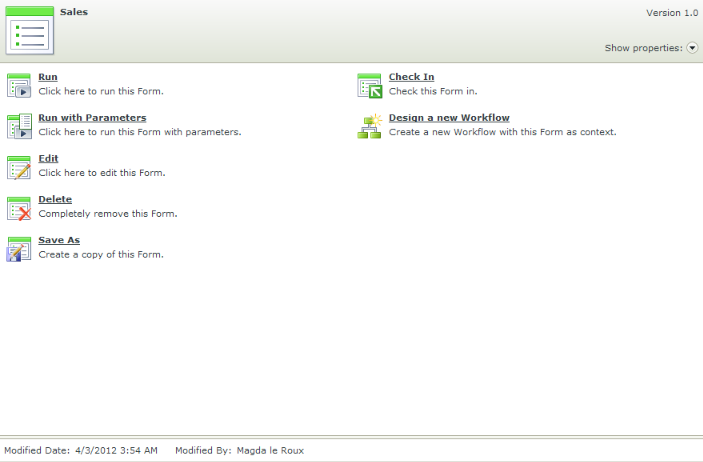
| Feature | Description | How to use it |
|---|---|---|
| Run | Opens the Form in runtime | Click on Run |
| Run with Parameters | Requires the parameter in runtime before opening the Form. The user can specify the parameters in order to test/run the View. | Click on Run with Parameters, then specify a parameter to open the Form |
| Edit | Opens the Form Designer wizard for editing purposes | Click on Edit |
| Delete | Deletes the Form | Click on Delete |
| Save As | Creates a copy of the Form | Click on Save As, then type a new name on the Save As screen |
| Check Out | Checks the Form out for editing. This will result in the Form not being available to other people to edit. It will only be available once checked in again | Click on Check Out |
If a "Runtime Only" license is used, only the Run option will be available. To identify the type of license, go to Workspace >Management Console > License Management > Licensing and check what type of license is used for SmartForms.
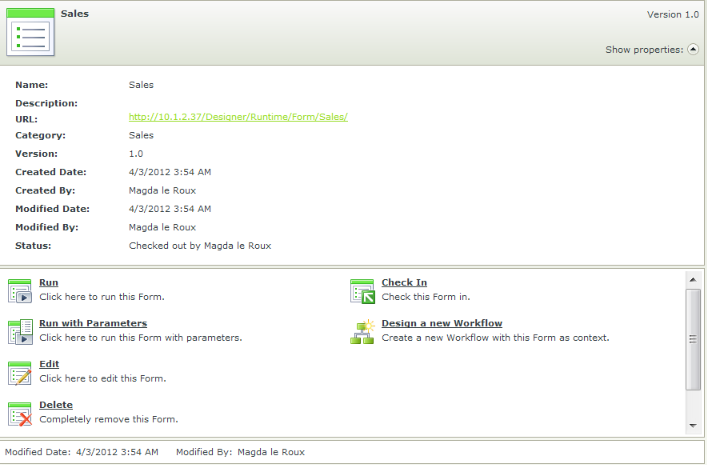
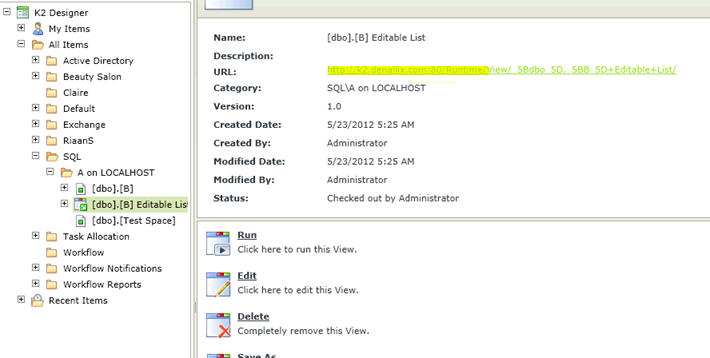
Clicking on the Show Properties arrow on the right of the canvas will open the specific properties of the Form as shown below. The URL of the Form is also displayed here and can be used in a K2 Workflow to open the Form.
- A Form needs to be checked out in order to make any changes to the Form. As soon as the Form is checked out, it is not available for editing by other users and needs to be checked back in for other users to see the changes made
- If a Form contains other subforms or Forms, it is important to check all dependent SmartForms in before checking in the main Form
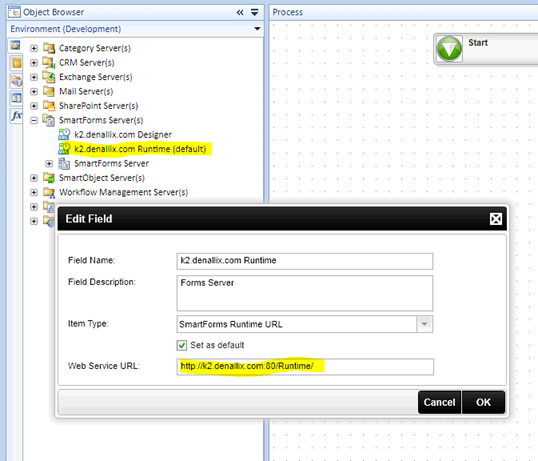
The URL is built by code and is not stored anywhere. It is called the Vanity URL and represents the full actual URL. The first part is stored in the K2 Environment Library in K2 Studio or K2 Designer for Visual Studio as the default runtime URL The second part is built from an URL pattern and the View/Form’s name. An HTTP Module in the SmartForms web site checks all requests reaching the Internet Information Services(IIS) Server for specific URL patterns. Checks for any URL containing “/View/{ViewName}/” or “/Form/{FormName}/” are performed and the module remaps the request to the actual URL.
http://K2DEV2SP:81/Runtime/Runtime/View.aspx?_name={ViewName}
http://K2DEV2SP:81/Runtime/Form.aspx?_name={FormName}
ProtocolWebSiteWebApplicationWebPageQueryParameters
Custom URLs can be build that will automatically be remapped to the correct actual runtime URL.
For example:
The View name is “TaskList2”
If the following URLs are entered in the browser's address bar:
http://K2DEV2SP:81/Runtime/View/TaskList2/
http://K2DEV2SP:81/Runtime/Runtime/View/TaskList2/
http://K2DEV2SP:81/Runtime/R/A/N/D/O/M/View/TaskList2/
http://K2DEV2SP:81/Runtime/HR/Employee/OnboardingView/TaskList2/
They will all be mapped to the same URL:
http://K2DEV2SP:81/Runtime/Runtime/View.aspx?_name=TastList2
The part is fixed and can be changed in IIS and DNS
The part is the pattern matched by the HTTP Module
The part is the actual aspx page that services the request
The duplicate /Runtime/Runtime/ is not required, it can be edited in the K2 Environment Library in K2 Studio or K2 Designer for Visual Studio as shown below to have a single /Runtime/.
Forms support the following:
- Vanity URL: http://dlx/SmartForms/Runtime/Form/test+form/
- By ID: http://dlx/SmartForms/Runtime/Form.aspx?id=b73caa60-ea6c-4948-a77e-18e05987a2ff
- By name: http://dlx/SmartForms/Runtime/Form.aspx?name=test form
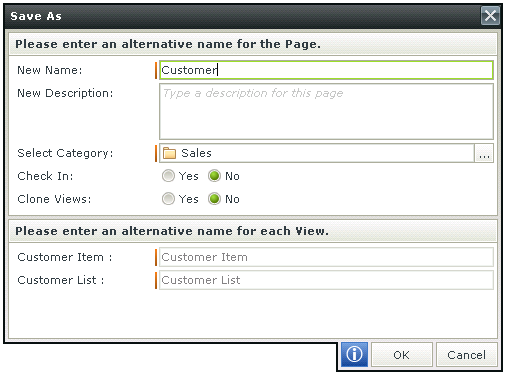
When clicking on the Save As option, the Save As screen opens. On this screen, a new name can be entered for the new Form, a description can be provided and a category can be selected where the new Form should be saved. The option to check the Form in for other people to be able to use it, can be selected. An option to clone the existing Views on the Form can also be selected. By selecting the Save As feature, the details of the current Form are used to create a duplicate Form, but saving it under a new name. This provides the ability to create multiple Forms that are more or less similar in design, but without duplicating the effort. In addition, existing Views can be cloned and given new names.
| Feature | Description | How to use it |
|---|---|---|
| New Name | Represents the new name given to the duplicate of the current Form | Type a new name |
| New Description | Represents the new description given to the duplicate of the current Form | Type a new description |
| Select Category | List of categories available where the new Form can be saved | Select a category from the list or click on the ellipsis next to the category to create a new category |
| Check In | Option to select whether the Form should be checked in when saved. By selecting Yes, the Form will be checked in when saved and will be available for use by other users. If No is selected, the Form is still available for editing by the owner, but other users won't be able to use it yet | Select Yes if the Form should be checked in and be available for use by other users |
| Clone Views | Option to select whether to clone the Views already existing on the Form. By selecting Yes, the Views are enabled at the bottom and new names can be provided for the new Views. By selecting No, only the Form will be cloned and none of the Views | Select Yes if the Views should be cloned |
| Please enter an alternative name for each View | If the option was selected to Clone Views, this section will be enabled. A new name should be provided for each View | Type a new name for each View |
When selecting to Run with Parameters, a screen will open in runtime requesting the parameter before opening the Form. An example is:
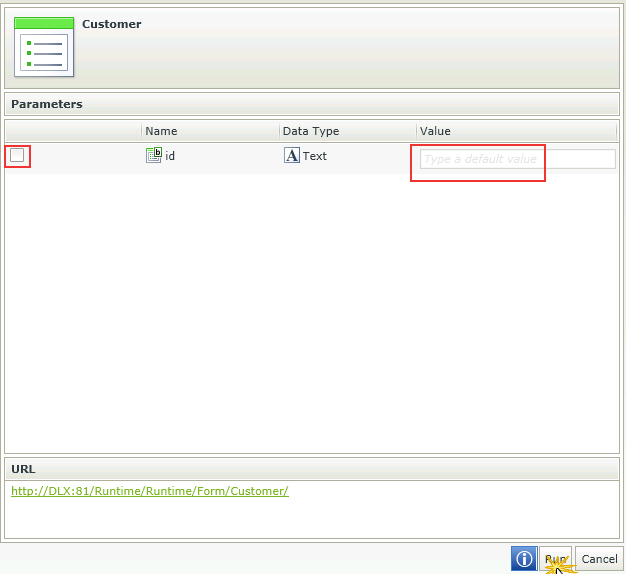
Select the Parameter, provide the value and click Run. The Form will open. The Form can also be viewed by accessing the URL at the bottom of the screen
