Leave Request Approval (V2 or "Extended" version)
This tutorial explains how to build a more advanced application by extending the basic version of the Leave Request Approval application and provides more advanced learning in the following components of K2 applications: Data, Forms and Workflows. The tutorial is intended for users new to K2, or with little K2 experience.
This tutorial can be completed in any environment that has K2 version 4.6.9 or later installed. K2-delivered training events normally includes access to a Virtual Server environment provided by K2 which you will use for the exercises, and the screenshots and users used in the tutorial reflects this K2-provided Virtual Environment. You can, however, complete this tutorial in any other environment as long as the necessary K2 components are installed and operational and you have the necessary rights and permissions to create the K2 artifacts in the target environment. The environment should also have internet access to be able to connect to an external SQL database used for retrieving data.
Tutorial Overview
You may recall that K2 Applications consist of four main components: Data, Forms, Workflows and Reports.
In Part 1, we expand upon the Data component by editing the existing Leave Request SmartObject and adding an additional property. We'll explore the SmartObject Service Tester tool and build a Service Instance based on the SQL Server Service Type. We will then create a new SmartObject called Leave Types, which will connect to an external SQL Server data source. In Part 2, we will expand the Forms component by adding the new Leave Types SmartObject as the data source for the Leave Type form field. In Part 3, we will expand on the Workflow component by adding additional email events and a new outcome called Rework. We will also return to Forms where we will edit rules and add actions that will incorporate our Data and Workflow updates. In Part 4, we will test the new version of the Leave Request Approval application.
Prior to jumping into building the application, it’s important to understand what we want to achieve, by designing the necessary pieces of the application. Let's start with the Workflow.
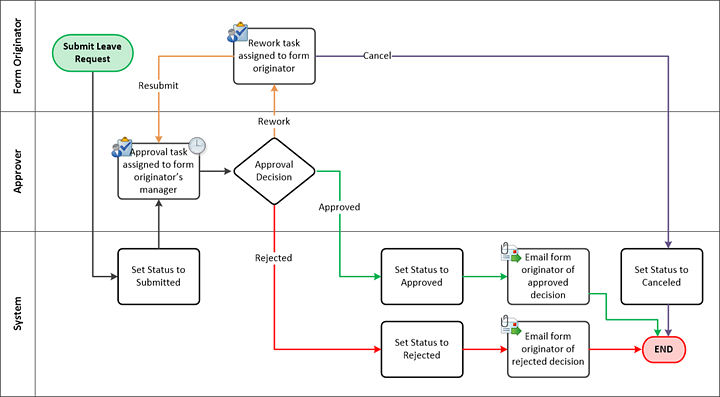
Leave Request Workflow
As before, we can use a logical flow diagram to represent the various steps and actors in the workflow. The diagram below shows the extended version of the workflow. Note that there is a rework loop so that the Approver can send the request back for rework, and there are additional steps in the workflow to send e-mail notifications to the requester. We will also add an escalation to the manager approval step to remind the approver and originator if the request is not approved by 2 days before the start date for the leave request.
Leave Request Data
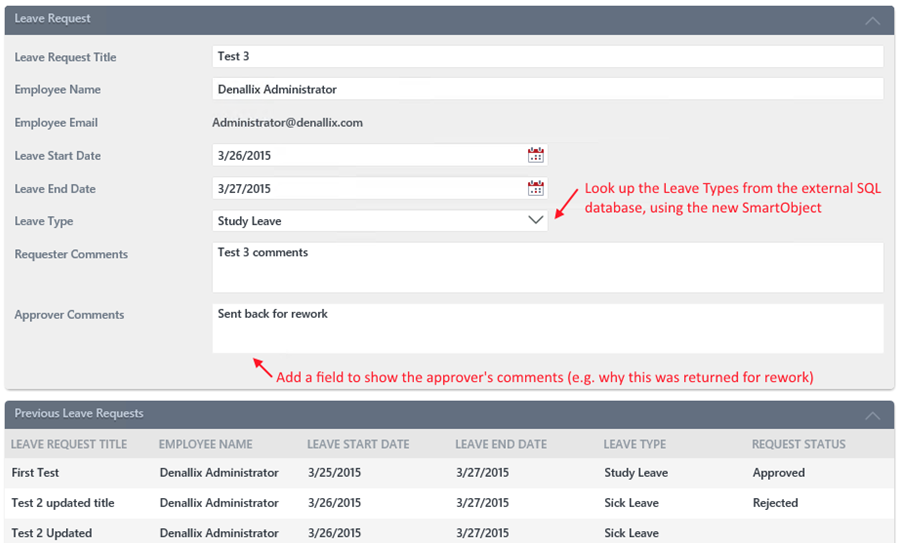
The first change to the Data design is that we want to provide a field where the approver can capture comments so that the requester knows why their request was sent back or rejected. To do so, we will edit the existing Leave Request SmartBox SmartObject and just add an additional Data Field called Approver Comments.
You may recall that SmartObjects can also interact with other systems. SmartObjects are essentially a "middle layer or connector" that allows consumers of data (such as forms and workflows) to interact with providers of data (such as SQL Databases, Active Directory or SharePoint, among others). In this version of the application, we want to leverage this power by creating a SmartObject which retrieves data from a SQL database that resides somewhere in the internet.
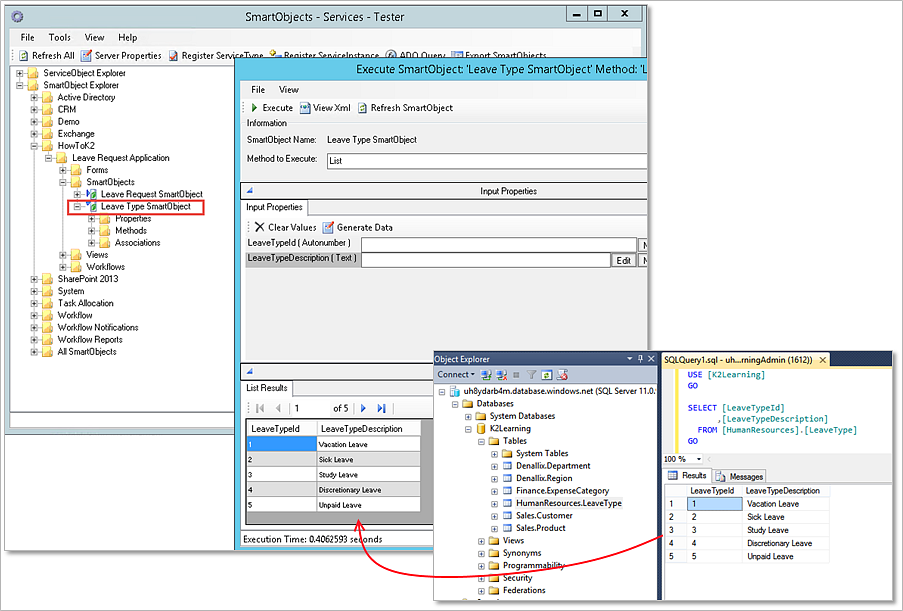
The screen shot below shows how we will retrieve data from this external SQL database and expose it as a SmartObject. Eventually, we will then use this Data on a Form to populate a drop-down list of values of the various leave types that the requester can select from.
The integration data sources used in this Application (the Azure SQL Database that provides the Leave Type data) is intended only for tutorial and demonstration purposes. It is not intended for use in Production applications and are not supported or guaranteed by K2. The SQL database used for this tutorial runs on SQL Azure. Connecting to the database will require an open port for port 1433 as described in this Microsoft KB article: http://support.Microsoft.com/KB/287932
If you are unable to connect to the provided SQL Azure database, you will need to open up the appropriate firewall rules or ports, or alternatively install the database on a local SQL environment using the provided SQL scripts located at http://help.k2.com/files/8553. Please contact your SQL Database Administrator for more information and help.
Leave Request Forms
The Forms in the application will be adjusted to include the new Approver Comments field, and this field will be locked down so that it can only be changed when the Approver is reviewing the request.
Additionally, we will update the Leave Type drop-down list to use the new SmartObject which retrieves the Leave Type values from the external SQL database. We will also make a few minor changes to the Form's behavior so that it is a little more user-friendly, such as clearing out the Data when the new request is submitted.
Building the application
Now that you have designs for each of the elements of the extended version of the Leave Request Approval application, you can start building them. As before, we will start with the Data elements, then do the Forms elements and finally the Workflow enhancements.
When you are ready to start building the application, continue on to the Part 1: Data section to get started.