Part 1: Data
Part 1 of this tutorial will extend your knowledge of K2 SmartObjects and how you can define SmartObjects that interact with other systems. SmartObjects are essentially a "middle layer" or "connector" that allows consumers of data (such as forms and workflows) to interact with providers of data (such as SQL Databases, Active Directory or SharePoint, among others).
We will extend the Leave Request SmartObject by adding a field to store the approver comments. We will also create a SmartObject (and the underlying configuration necessary) to connect to a SQL database which will provide a list of Leave Types, which we will use in a later step to populate a drop-down list with data.
This step will demonstrate how you can add additional properties to existing SmartBox SmartObjects. We will add an Approver Comments property to the Leave Request SmartObject. (Later on, we will add this field to the Leave Request view).
Step 1 Tasks
- In K2 Designer, edit the Leave Request SmartObject and add a Memo type property called
Approver Comments
- Launch K2 Designer (Start Button > All Programs > K2 blackpearl > K2 smartforms > K2 Designer).
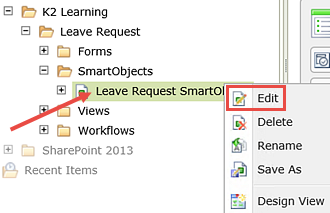
(If the shortcut is not on your desktop or if you are not using a K2-provided virtual machine for this tutorial, check with your K2 administrator to determine what the web address (URL) is for your K2 Designer environment and then open the site using a browser like Internet Explorer, Chrome or Firefox. We recommend using Firefox or Chrome since these fast web browsers tend to be a little more responsive.) - Expand the All Items category, then K2 Learning and then Leave Request. Expand the SmartObjects category. Right-click the Leave Request SmartObject and select Edit.
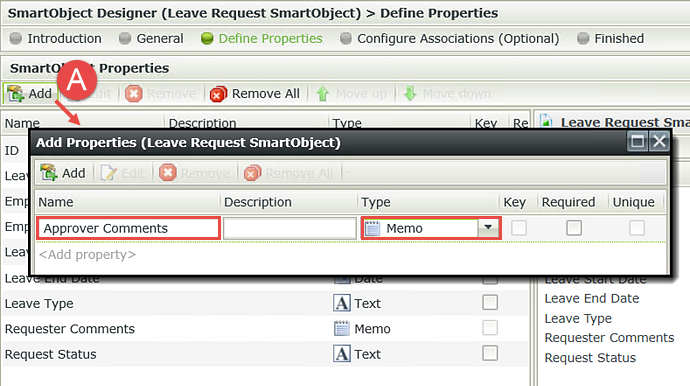
- On the SmartObject Properties screen, click Add. (A below) For the Name, enter
Approver Comments
then select the Memo option from the Type drop-down. Click OK, then click Finish to complete the SmartObject edit.
STEP 1 REVIEW
In this step, we added a new property to the Leave Request SmartBox SmartObject to hold the approver's comments. Adding a new property to a SmartBox is reflected as soon as you Finish the designer, meaning the new property is ready for use in the Leave Request Item View that is based off of that SmartBox SmartObject.
In Step 2, we will create a connection called a "Service Instance" to an external SQL database using the SmartObject Service Tester tool, then generate a SmartObject for a specific table in that database (Leave Types) so that we can use the data later on in our Leave Request View.
Step 2 Tasks
- Launch the SmartObject Service Tester tool. The default location is:
C:\ Program Files (x86)\K2 blackpearl\Bin\SmartObject Service Tester.exe - Register a new SQL Server Service Instance with the following settings: (See the table below the image for step-by-step details.)
- On the Add Service Instance Name and GUID screen locate the Display Name field and enter
Leave Types
then click Add. - Create a SmartObject from the new Service Instance. Deselect all of the Service Objects except HumanResources.LeaveType. UNCHECK the option to Append to the SmartObject SystemName. For the Main Category, enter
K2 Learning\Leave Request
| Field Name | Setting | |
|---|---|---|
| A | Authentication Mode | Static |
| B | User Name Password |
K2LearningUser
K2LearningPass |
| C | On Different SQL Server | true |
| D | Command Timeout | 90 |
| E | Database Server | K2Learning
uh8ydarb4m.database.windows.net |
| F | Use Native SQL Execution | false |
- Launch the SmartObject Service Tester tool. The default location is:
C:\ Program Files (x86)\K2 blackpearl\Bin\SmartObject Service Tester.exe
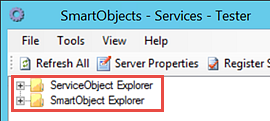
(If the utility is not on your machine or you are using an environment other than the K2-provided Virtual Server for this tutorial, check with your K2 administrator where you can locate the utility, or ask them to perform Step 2 of the tutorial for you.) - Notice there are two sections: ServiceObject Explorer and SmartObject Explorer. Expand the ServiceObject Explorer.
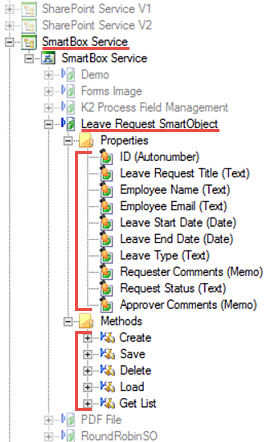
- Expand the SmartBox Service Type and locate Leave Request SmartObject. Expand the Leave Request SmartObject and notice the Properties and Methods available for that Service Instance. Notice too, that the new property we added in Step 1 (Approver Comments) appears as a property. What is important here is that we are looking at the SmartBox Service Type and it contains the Service Instance that was generated when we created our Leave Request SmartBox SmartObject.
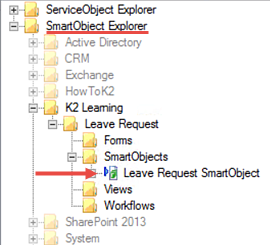
- Now expand the SmartObject Explorer and locate our application, Leave Request, that was created in the Leave Request (Basic) Application. Expand the Leave Request tree and notice the Leave Request SmartObject is shown under the SmartObjects category. All SmartObjects appear in the SmartObject Explorer and their corresponding Service Instances appear in the ServiceObject Explorer.
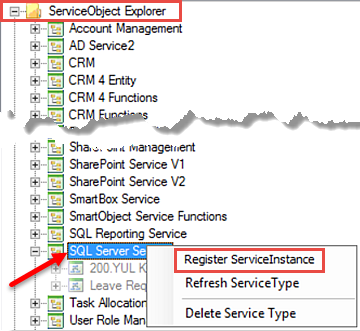
- Expand the ServiceObject Explorer tree and expand the SQL Server Service node. Right-click SQL Server Service and select Register ServiceInstance.
- On the Add Service Instance screen, enter the following settings. (Step-by-step instructions are below the image.) After you have completed the entries, click Next.
- On the Add Service Instance Name and GUID screen locate the Display Name field and enter
Leave Types
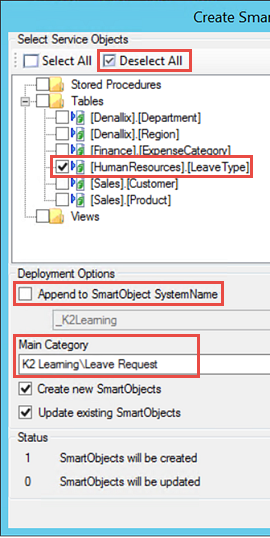
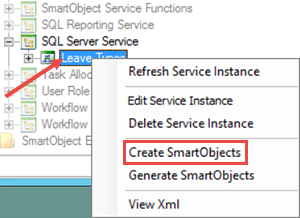
then click Add. - Right-click Leave Types and select Create SmartObjects.
- Expand the Tables node in the Select Service Objects tree. At the top of the screen, CHECK the option to Deselect All. Now CHECK the [HumanResources].[LeaveType] table. (We won't be using any of the other tables in the database for this application.)
Under Deployment Options, UNCHECK Append to SmartObject SystemName. Under Main Category enter
K2 Learning\Leave Request
The ServiceObject tree contains the available Service Types ("connectors"), which in turn contain Service Instances (instances of the connectors that are configured to point to a particular data source). Recall that Service Types represent the various data sources (such as Active Directory, SQL, CRM) that K2 is capable of connecting to and interacting with. Service Instances are a single, specific connection to a Service Type data source such as a specific web service or a specific SQL database. We will be registering a SQL Server Service Instance during the steps in this exercise because the data we want to consume resides in a SQL database.
In the next step, we will register a new Service Instance of the SQL Server Service Type, then create a SmartObject based on that new Service Instance. This Service Instance will connect to an externally located SQL Server and will be the source of the Leave Type drop-down list values we will use on our form.
| Field Name | Setting | |
|---|---|---|
| A | Authentication Mode | Static |
| B | User Name Password |
K2LearningUser
K2LearningPass |
| C | On Different SQL Server | true |
| D | Command Timeout | 90 |
| E | Database Server | K2Learning
uh8ydarb4m.database.windows.net |
| F | Use Native SQL Execution | false |
Notice the new Leave Types Service Instance has been added under the SQL Server Service ServiceObject. From here, there are a number of options for creating a SmartObject from the Leave Types Service Instance. You can create a SmartObject in K2 Designer or with K2 Studio or K2 Visual Studio. And of course, you can create SmartObjects directly from within the SmartObject Service Tester, which is the approach we will take for this exercise.
The remaining default settings are fine, so click OK. Do not close the SmartObject Service Tester utility yet, because we will use it in the next step
We have now created a new SmartObject based on the SQL Server Service Type and connected it to the K2Learning database. What is significant here is that the K2Learning database is externally located, which demonstrates K2's ability to interact with a wide variety of data sources and other Line of Business systems.
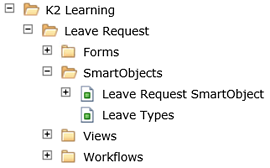
Notice however, that K2 added the new SmartObject under a new category called Tables. In Step 3 we will return to our application in K2 Designer and move the generated [HumanResources].[LeaveType] SmartObject to the correct SmartObjects category, then rename it to the desired name, Leave Types.
STEP 2 REVIEW
In Step 2 we created a new Service Instance based on the SQL Server Service Type. This step demonstrated configuring a connection to a specific data source. With the new Service Instance in place, we then generated a SmartObject based on that Service Instance. In configuring the SmartObject, we were able to select a specific table in the target source, then configure it to reside within our Leave Request application.
Before we leave the SmartObject Service Tester, we will execute the List method on the Leave Types SmartObject to confirm the connection configuration is correct and the values stored in the Leave Type database table are being returned. We will then return to K2 Designer and rename the SmartObject, then move it from the Tables category into the SmartObjects category, then delete the Tables category.
Step 3 Tasks
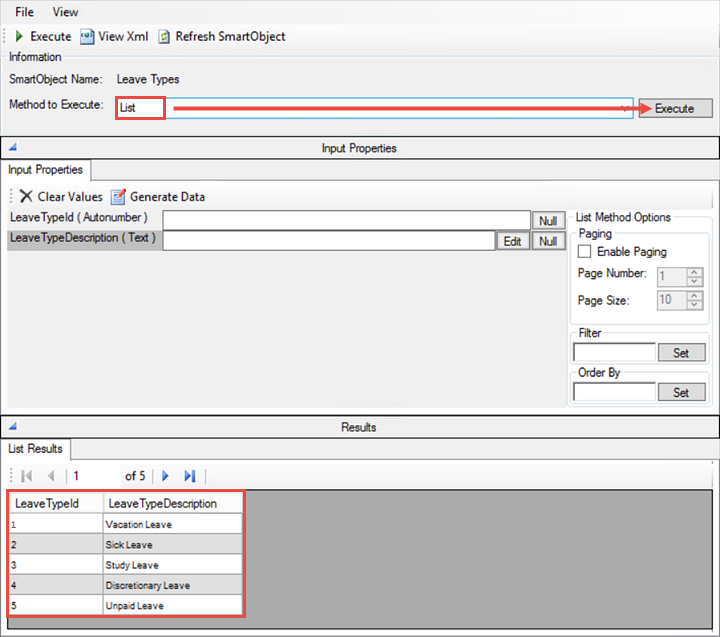
- Still in the SmartObject Service Tester, execute the List method on the Leave Types SmartObject and confirm results are returned with two properties shown: LeaveTypeID and LeaveTypeDescription.
- In K2 Designer, rename the SmartObject to
Leave Types
then move the Leave Types SmartObject from the Tables category into the SmartObjects category. Delete the Tables category.
- Still in the SmartObject Service Tester, right-click the Leave Types SmartObject and select Execute SmartObject.
- Change the Method to Execute to List and click Execute. You should now see the Leave Type results returned to the Results pane. Notice there are two properties returned for this SmartObject: LeaveTypeID and LeaveTypeDescription.
- Close the SmartObject Service Tester and launch K2 Designer if it is not already open.
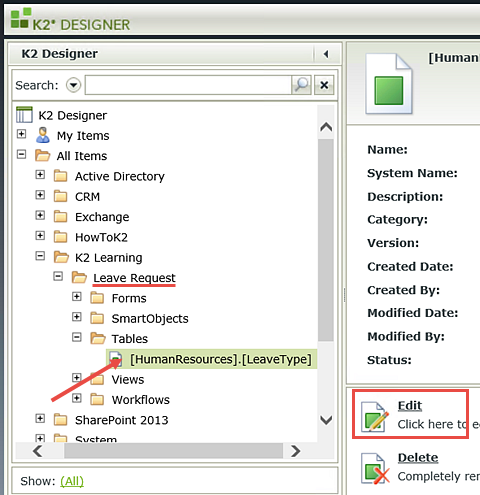
- Expand the Tables category and click once on the [HumanResources].[LeaveType] SmartObject to highlight it. Click Edit in the Properties pane. (You may need to refresh your browser window if you are not seeing the new Tables category under Leave Request.)
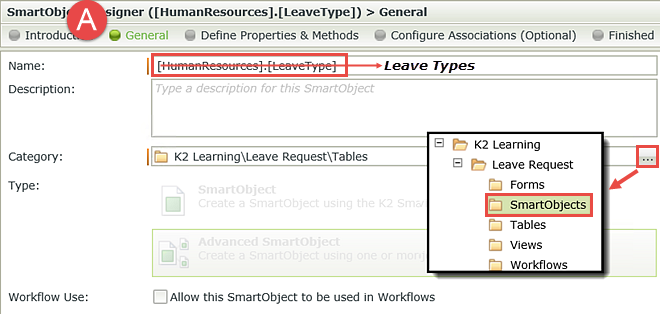
- Click the General button if it is not already selected. (A below) Change the Name to
Leave Types
then change the Category to SmartObjects. Click OK, then Finish. - Right-click the Tables category and delete it.
- Your Category Browser should look like the image below.
STEP 3 REVIEW
In this step we confirmed the Service Instance configuration works by executing the SmartObject with the SmartObject Service Tester. The results returned are the values that are found in the external database's Leave Type table. We were also able to view the properties of the SmartObject which we will use in a later step. We then returned to K2 Designer and did some minor housekeeping by renaming the SmartObject, then moving it into the correct category and deleting the unnecessary Tables category.
This concludes the Data changes we will make for this new version of the Leave Request Approval application. In the next part we will edit the Views to add these data sources to the Form used in the application.