Part 3: Workflow
In Part 3 of this tutorial, we will edit our Leave Request Workflow by expanding the system tasks and by adding an additional Manager Approval outcome. We will learn about escalations and how they can be used to remind a user of a task waiting to be actioned. We will also be tweaking the Forms in the application to behave differently depending on where in the workflow the form is being used.
In this part, you will learn:
- How to add additional system tasks for sending email notifications
- How to customize an email task notification message body
- How to add an additional outcome and configure a new user task for responding to that outcome
- How to implement a Rework loop in a workflow
- How to add an escalation to a user task
- Tweaking Form Rules for workflow integration
(If you have not completed Part 2 of this tutorial yet, please do so before continuing with this part)
In Step 5, we will replace the two Placeholders with email events that notify the originator with the manager's decision.
Step 5 Tasks
- Add a Send E-mail event to the Approved outcome event, replacing the existing Placeholder. Route the email to the Originator Email.
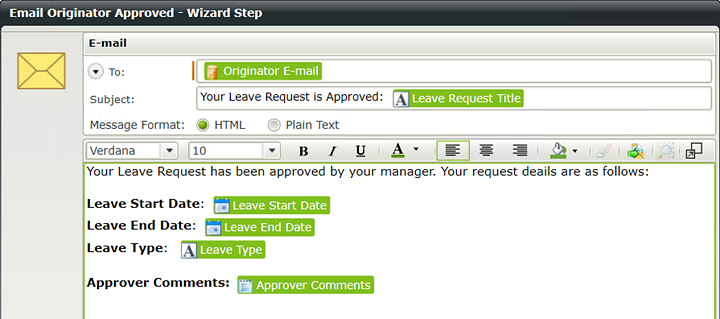
- Customize the Subject line and message body using Item References properties. You may structure the content in any manner you like; the image below is an example to use as a guide.
- Delete the Placeholder event for the Rejected outcome. Add back in a new Continue outcome, then copy and paste the Approved email event into the Rejected event box. Edit the Rejected email event to reflect the rejected decision.
- In K2 Designer, edit the Leave Request Workflow. (Right-click the workflow name in the category tree, then select Edit.)
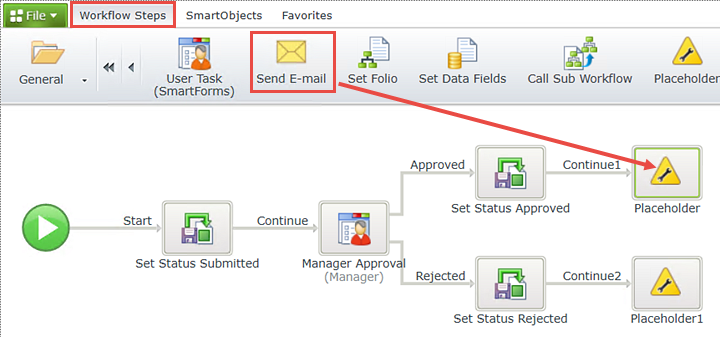
- Click the Workflow Steps tab to expose the wizards if it is not already open. Drag a Send E-mail event into the Approved outcome Placeholder event. Click Yes, for the Confirmation dialog that asks if you want to change this step.
- The E-mail event wizard opens. Expand the Context Browser, then Workflow Context. Drag the Originator Email into the To field.
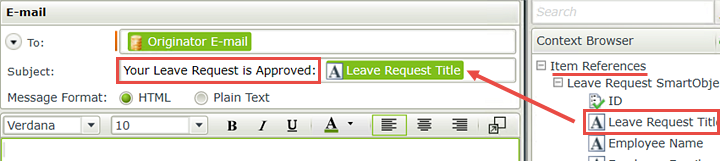
- For the Subject line, enter the following text, replacing the bracketed text [Title] with the Item Reference > Leave Request SmartObject > Leave Request Title found in the Context Browser.
Your Leave Request is Approved: [Title] - Using the same approach as above, enter the following content into the message body, again replacing the bracketed text with the appropriate Item References properties from the Context Browser.
Your Leave Request has been approved by your manager. Your request details are as follows:
Leave Start Date: [Leave Start Date]
Leave End Date: [Leave End Date]
Leave Type: [Leave Type]
Approver Comments: [Approver Comments] - Double-click the Placeholder title of the Step and change it to
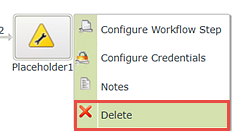
Email Originator Approved - In the Basic application, we copied and pasted events to speed up the build process. We will do the same here. Begin by deleting the Rejected side Placeholder so that we can paste the E-mail event we just created in its place. Right-click the Placeholder1 event and select Delete. Click Yes for the confirmation dialog that appears.
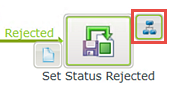
- Next, we need to add back in the Continue outcome line, which will add a corresponding event holder. Hover over the Set Status Rejected event until you see the Workflow Step Outcomes icon (it looks like a blue mini-flowchart). (If you don't see the icon when hovering, click anywhere on the design canvas to refocus your mouse, then try hovering again.) Click the icon when you can see it.
- On the Workflow Step Outcomes configuration screen, click Add. Replace New Outcome with
Continue
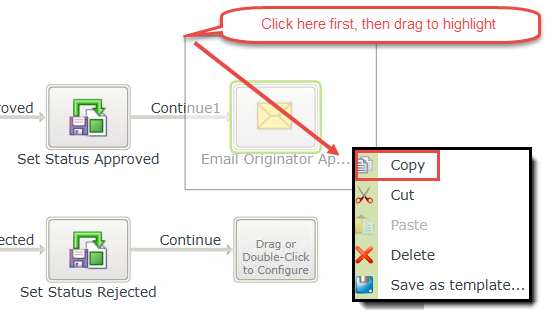
then click OK. You should now see the Continue line with an empty event box. - Copy the E-mail event we just configured. To copy an event in K2 Designer, click outside of the event box, then drag over the event to highlight it. Click Copy when the option menu opens. (If you get a dialog about allowing access to the clipboard, click Yes to continue.)
- Right-click the empty event box and click Paste. You should now see the Email Originator event has been replicated. We need to make a few adjustments to reflect the Rejected outcome.
- Double-click the event to open its wizard. Change the Name to
Email Originator Rejected
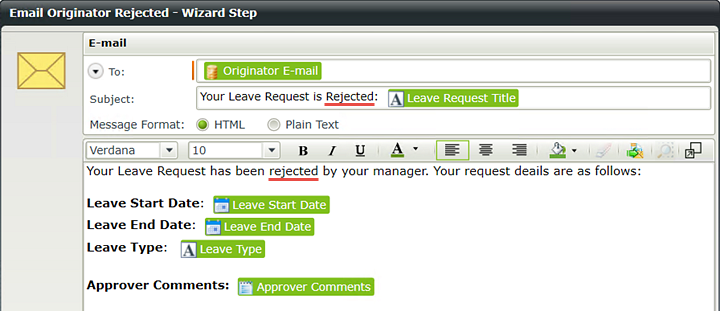
then click Next. - There are no outcomes to configure, so click Next. Change the Subject line and the message body to reflect the manager's Rejected decision. Use the image below as a guide, the changed values are underlined in red. Click Finish when ready.

Your email should look like the image below. Click OK when ready.
STEP 5 REVIEW
In this step, we added an email event and customized the email using properties found in the Context Browser. The placeholder values from the Context Browser (indicated by green blocks in the wizard screens) will be replaced at runtime by K2 with the actual values for that instance of the workflow. The Workflow Context offers properties that contains details about the workflow itself, such as the workflow Originator, Originator's email, Manager, Folio and so on. Item References contain SmartObject field references. For example, the [Leave Request Title] Item Reference is replaced at runtime with whatever value was entered into the form's Leave Request Title field. This allows you to customize and personalize your workflow. We also demonstrated the ease of reusing content by copying and pasting events.
In this step, we are going to add an additional outcome for the Manager Approval task. This third outcome, called Rework, will send the request back to the originator where it can either be resubmitted or canceled. We will add a new User Task for the form originator to action the Rework task, then add events to complete the Rework decision outcomes.
Step 6 Tasks
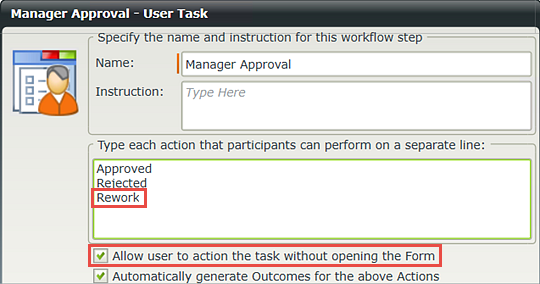
- Add a third outcome to the Manager Approval task and name it
Rework
and allow the user to action the task without opening the form. - Customize the manager's task notification email in any manner you like. You may use the image below as a guide.
- Add a User Task (SmartForms) to the Rework event box. Name the new task
Rework Request
then add the following actions:
Resubmitted
Canceled - Use the Leave Request Form for the Rework form and route the task to the Originator.
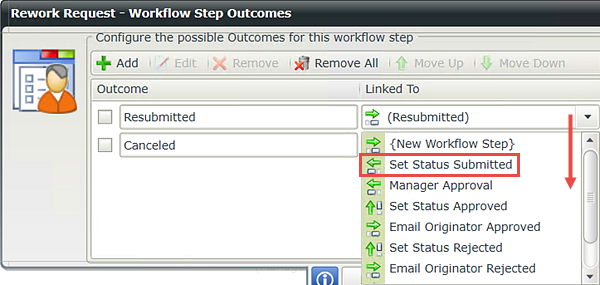
- Change the Resubmitted outcome so that it routes to the Set Status Submitted event.
- Copy and paste the Set Status Submitted event into the empty event for the Canceled outcome. Remove the Continue outcome for the cancel event as we want the workflow to end at this point. Change the Request Status value to
Canceled
leaving the ID value set as it is.
- Double-click the Manager Approval User Task to open its wizard. Enter a third action and name it
Rework.
then confirm the option to Allow user to action the task without opening the Form is CHECKED. Click Next to continue. - There are no changes to the Linked To values, so click Next. The Leave Request Form is correct, so click Next. There are no changes to the work item rules, so click Next. There are no changes to the Participants, so click Next.
- On the Event Notification Settings screen (email message/body content) CHECK the box to Customize the Notification Message. Notice that after you check the box, K2 adds the default task notification content in the message body. We are going to add additional text to the email so that the Manager can approve or reject the request by replying to the email, instead of opening the form.
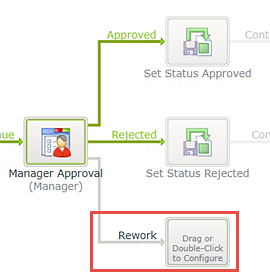
- Drag a User Task (SmartForms) event into the new Rework event box.
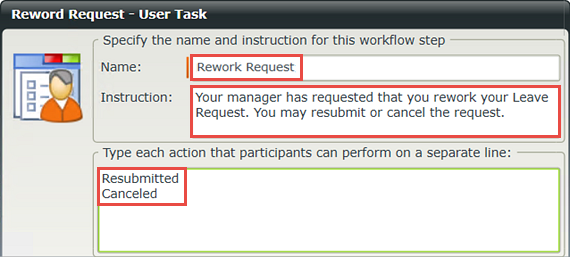
- The User Task wizard opens. Name the new event
Rework Request
and enter the following for the Instruction
Your manager has requested that you rework your Leave Request. You may resubmit or cancel the request.
For the actions, enter
Resubmitted
Canceled
then click Next. - The Leave Request Form is correct, so click Next. There are no changes to the work item rules, so click Next.
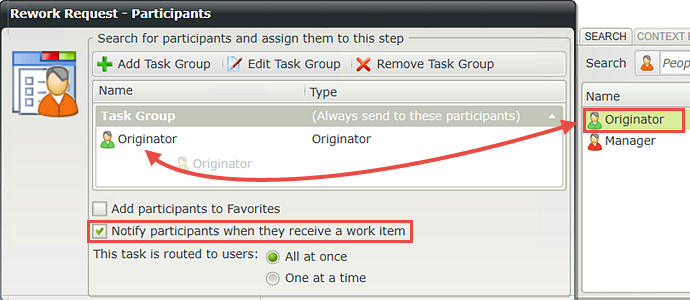
- On the Participants screen, drag the Originator into the Task Group box. CHECK the box to Notify participants when they receive a work item. To save time we will not customize the email content, so click Finish .
- Double-click the Rework Request User Task to open its wizard. Click Next from the home screen. Change the Linked To value for the Resubmitted outcome to Set Status Submitted. Click Next until you can click Finish to complete this step (three times).
- Copy and paste the Set Status Submitted event into the Canceled event. (See Step 5 (i) if you need a reminder on how to copy and paste events in K2 Designer.)
- Double-click the new Set Status Submitted1 event to open its wizard. Change the name to
Set Status Canceled
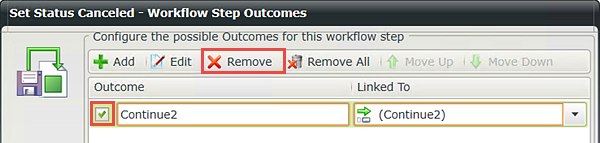
then click Next. - On the Workflow Step Outcomes screen, CHECK the box next to the Continue2 outcome and click Remove. (Depending on how you've worked through the steps, your outcome may have a slightly different name from Continue2.) Click Next.
- On the input properties screen, scroll down and change the Request Status value to
Canceled
then click Next. We do not need to change the ID value as it is telling K2 which record we want to update (the current record). Click Finish when ready.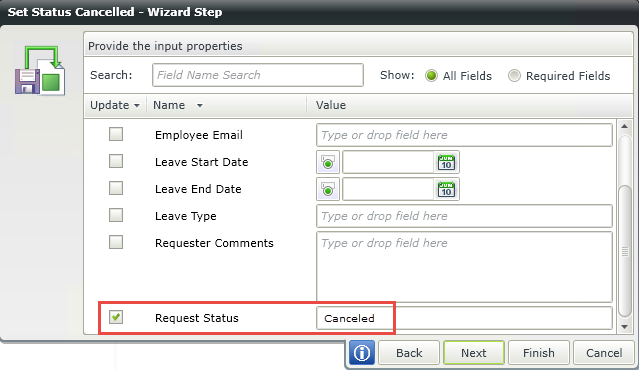
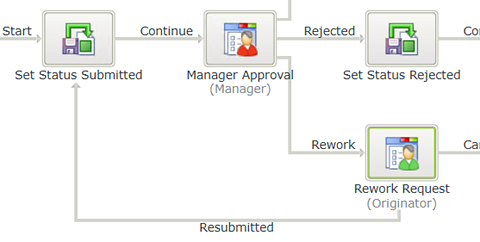
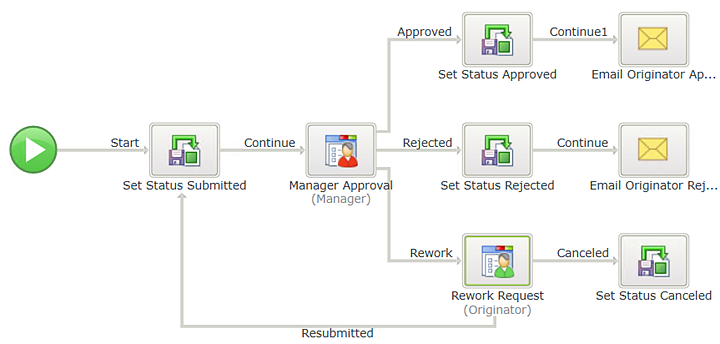
- Your completed workflow should look like the image below.
- Save your work. (File > Save)
For this step, we will add text to the notification email and customize the Subject line. For the Subject line, enter
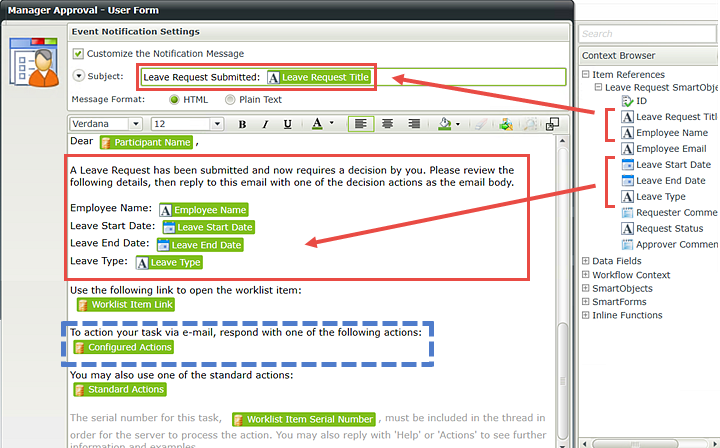
Leave Request Submitted: [Leave Request Title]
then drag the Item References > Leave Request SmartObject > Leave Request Title to the end of the subject line. (See the image below as a reference if necessary.)
In the message body, just below the Dear Participant line, enter the following, dragging values from the Context Browser as needed for the field marked in brackets.
A Leave Request has been submitted and now requires a decision by you. Please review the following details, then reply to this email with one of the decision actions as the email body.
Employee Name: [Employee Name]
Leave Start Date: [Leave Start Date]
Leave End Date: [Leave End Date]
Leave Type: [Leave Type]
(Click Finish when ready.)
Notice that K2 has added the third action outcome with an event box.

Now we want to configure the events for the two Rework outcomes (Resubmitted and Canceled). First, we will route the Resubmitted outcome back to the Set Status Submitted event so that the workflow returns to a previous step in the workflow. For the Canceled outcome, we will copy and paste a Set Status event, then update the Request Status value so that it indicates Canceled.
Notice now that K2 routes the Resubmitted outcome back to the Set Status Submitted event. This will create a loop effect in the workflow between the Rework and Resubmitted outcomes until a different action is selected.
We are removing this outcome because we don't need to continue the workflow after this step. If the decision is to cancel the request, then after the Request Status property has been updated, the workflow will be complete.
STEP 6 REVIEW
In this step we added a third action for the Manager Approval task. We customized the task notification email so that the manager can use SmartActions to action the task directly from the email. We added a User Task for the form originator in the event the manager decides the request needs to be reworked. We routed the Resubmitted outcome so that the workflow essentially starts over again if the originator resubmits the request, or the status of the request is set to Canceled if the originator decides to cancel the request.
In this step, we will explore escalations and how you can use them to keep your workflows running. An escalation kicks in when a user has not responded to a task assigned to them within the specified time period. An escalation can be a simple email to the task-assigned user, reminding them they have a task waiting. An escalation can be also more complex, like automatically redirecting the workflow to another user if the task is still waiting, repeating the escalation a number of times or multiple escalations on the same step to do different things depending on the elapsed time.
One word of caution: you don't want to crowd users' in-boxes with reminder notices, so take care in which events you apply escalations to and give some thought as to who you are reminding. For example, it might be a better choice to send the escalation notice to the originator so that they can follow up with their manager, or limit the number of escalations to only what is really necessary.
In this step, we will apply an escalation to the Manager Approval User Task that will send a reminder email to both the manager and the originator if the manager has not responded within two days of the Leave Start Date.
Step 7 Tasks
- Launch the Escalations editor for the Manager Approval event.
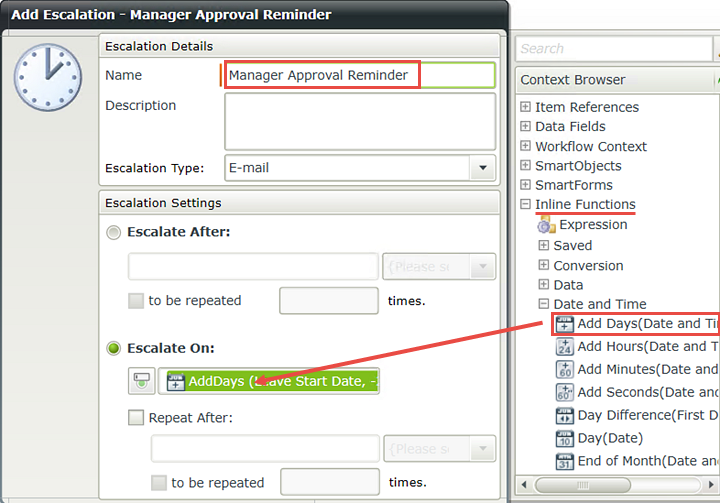
- Add a new escalation and name it
Manager Approval Reminder
then keep the default E-mail Escalation Type. - Select the Escalate On option then drag the AddDays function from the Inline Functions into date field.
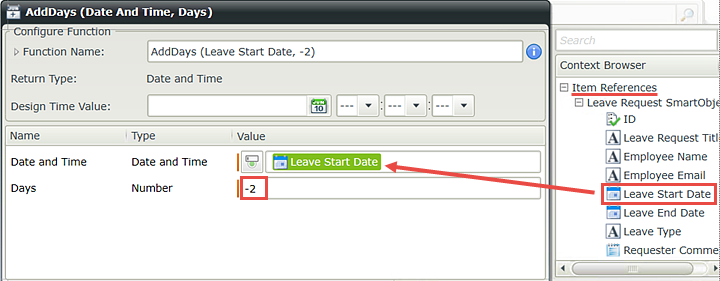
- Configure the AddDays function to start with the Leave Start Date -2 days.
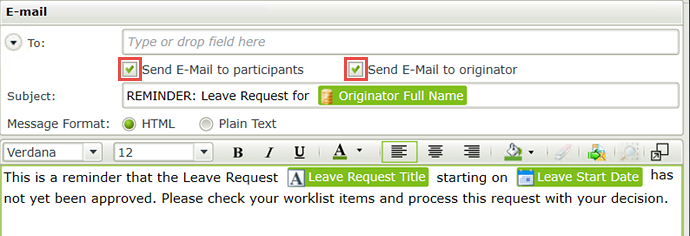
- Configure the email notification to be sent to both the manager and the form originator. Customize the subject line and message body using the properties found in the Context Browser. Use the image below as a guide if necessary.
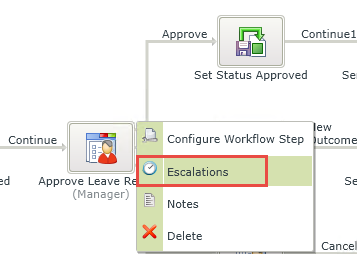
- Click the Manager Approval event to highlight it. Right-click and select Escalations.
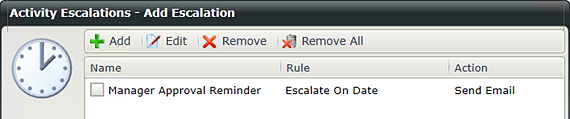
- When the Add Escalation screen opens, click Add.
- On the Escalation Settings screen, name the escalation
Manager Approval Reminder
then select the option Escalate On. - We want the escalation to fire 2 days before the leave start date, and you will use an Inline Function to achieve this. In the Context Browser, expand the Inline Functions > Date and Time tree and drag the AddDays function into the date field as shown below.
- On the AddDays screen, expand Item References in the Context Browser and drag the Leave Start Date property into the Date and Time field. For the Days value, enter (minus 2)
-2
then click OK, then click Next. - On the Escalation E-mail screen, CHECK the boxes to send the notification to the participant and the originator. This will send the email to the manager and the form originator. See the screen shot below for guidance, if needed.
For the Subject, enter
REMINDER: Leave Request for [Originator Name]
then expand the Workflow Context tree in the Context Browser and drag the Originator Full Name into the subject line (replacing the bracketed text).
For the message body, enter the following (again replacing the bracketed text with Item References properties).
This is a reminder that the Leave Request [Leave Request Title] starting on [Leave Start Date] has not yet been approved. Please check your worklist items and process this request with your decision. - Click Finish. Your screen should look like the image below. Click OK to close the Escalation configuration screen.
- Save your work.
There are three options for escalations. The most common perhaps, is Email, where an email reminder is sent to the destination user (and optionally, the form originator) letting them know they have an outstanding task. You can choose to Redirect the task to another user or Expire the task, which essentially marks the task 'complete' and moves the workflow on to the next step.
Here, we are simply telling K2 that we want to kick off this escalation two days prior to the Leave Start Date.
Click Finish when you are done to complete the Escalation wizard screen.
STEP 7 REVIEW
In this step, we added an escalation to send an email reminder two days prior to the Leave Start Date in the event the manager has not actioned the request yet. We customized our email to include details about the specific request, and we configured the email to route to the manager and the form originator.
Before the workflow changes will be applied, we must deploy the workflow to the K2 server.
Step 8 Tasks
- Deploy the workflow.
- Deploy the workflow (File > Deploy)
Now that the workflow changes have been published, we need to make a couple of tweaks to the Forms used by the workflow, because we want the Forms to behave differently depending on the current task. Recall in a previous step we added the Approver Comments field to the Leave Request Item View. We made the field read-only by default, as the form originator will not need to use this field for comments. In this step, we will edit the Form Initializing rule for the Workflow Task state for the Manager Approval task, and enable the Comments field.
Step 9 Tasks
- Check out and then edit the Leave Request Form
- Edit the Form Initializing rule for the Workflow Task State.
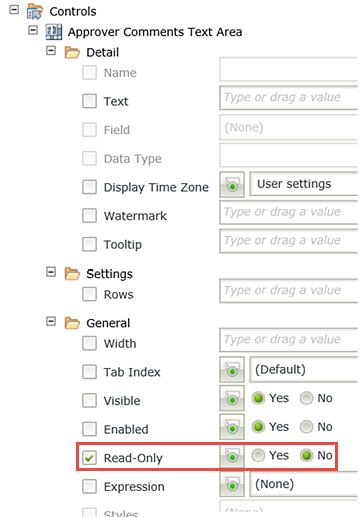
- In the if current Workflow Activity is Manager Approvalcondition, add an action to set a View control's properties on the Leave Request Item View. Change the Read-Only setting for the Approver Comments Text Area from Yes to No.
- In K2 Designer, right-click the Leave Request Form and check it out (if it is not already), then Edit it.
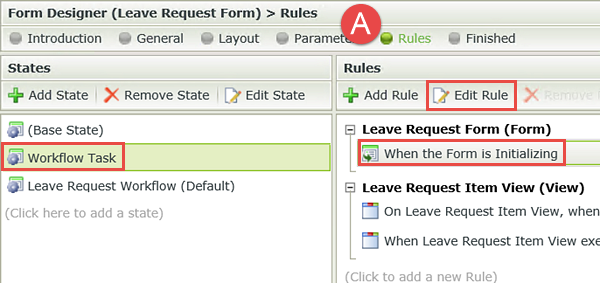
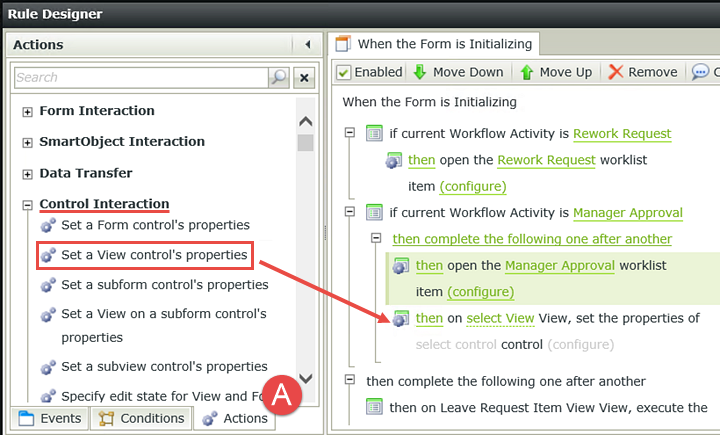
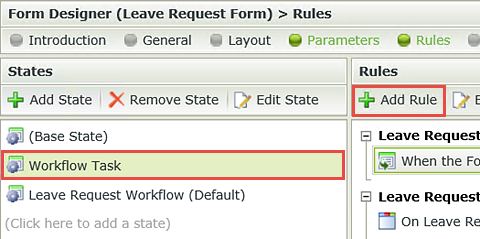
- Click the Rules tab in the Breadcrumb Bar. (A below) Highlight the Workflow Task state, then highlight the When the Form is Initializing rule. Click Edit Rule.
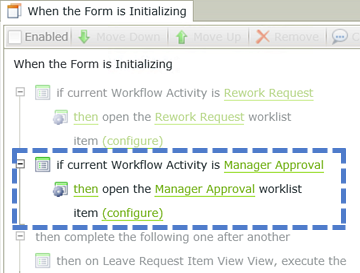
- In the Rule Definition pane, locate the condition that says if current Workflow Activity is Manager Approval. Notice that this condition already has an action to open the Manager Approval worklist item. K2 added this condition and action when we configured the Manager Approval User Task.
- Confirm the Actions tab is highlighted. (A below) Click on the current action (then open the Manager Approval worklist item) to highlight it. In the Actions pane, scroll down until you see the Control Interaction heading. Click on the Set a View control's properties action to add it to the Workflow Activity condition, just below the open worklist item action as shown below.
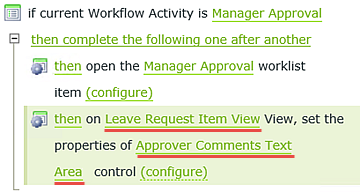
- Click the select View link and select Leave Request Item View. Click the select control link and select Approver Comments Text Area.
- Click the (configure) link. On the Mapping Destinations screen, scroll down until you can see the General heading. Change the Read-Only setting from Yes to No. By turning off the read-only setting, the manager will be able to add comments when they open the form. Click OK. Click OK to return to the Rules home screen.
STEP 9 REVIEW
In Step 9, we edited the Workflow Task state, Form Initializing rule and enabled the Approver Comments field for the Manager Approval task. This will allow the approving manager to add comments to the request if they choose. This step demonstrated the power of states and how you can edit individual states to customize the user interface for a specific task or event.
Now we will add a new rule to this state. This rule will allow us to save any changes the manager or originator might have made to the form, such as adding Approver Comments.
Step 10 Tasks
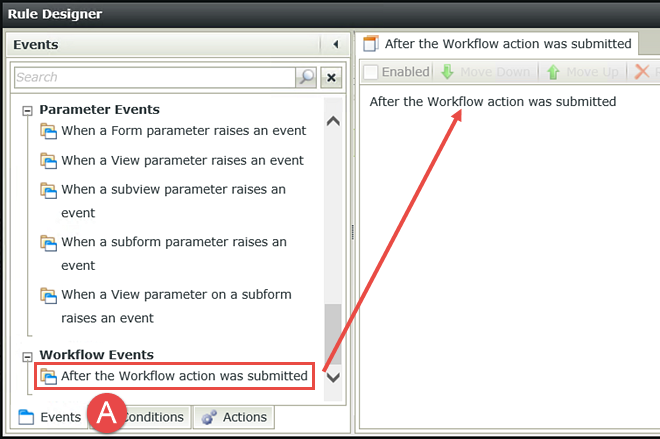
- Add a new rule to the Workflow Task state. Add the event After the Workflow action was submitted.
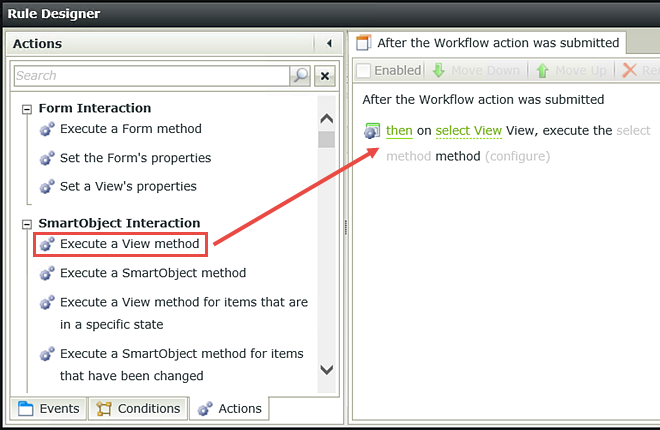
- Add a Execute a View method action to call the Save method of the Leave Request Item View.
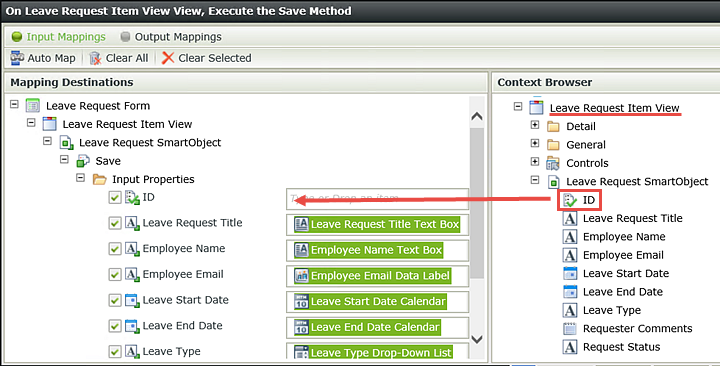
- You may Auto-Map the Input Properties, but you MUST delete the auto-mapped ID value and replace it with the Leave Request Item View SmartObject ID property so that K2 knows we are referencing the current record.
- On the Rules home screen, confirm the Workflow Task state is highlighted, then click Add Rule.
- Click the Events tab. (A below) Scroll to the bottom of the Events list and click the After the Workflow action was submitted event to add it to the Rule Definition pane.
- Now click the Actions tab and click to add the Execute a View method action to the Rule Definition pane. Click the select View link and select Leave Request Item View. Click the select method link and select Save.
- Click the (configure) link. We will auto-map the Input Mappings to save on time, however, we will have to edit the ID mapping as that value will be incorrect using the auto-map. Click Auto-Map.
- Now we will replace the auto-mapped ID with the correct value. Click to the right of the ID value and backspace until you have removed it. When the field is empty, expand the Leave Request Item View in the Context Browser, then expand the Leave Request SmartObject. Drag the SmartObject ID into the Input Properties > ID field.
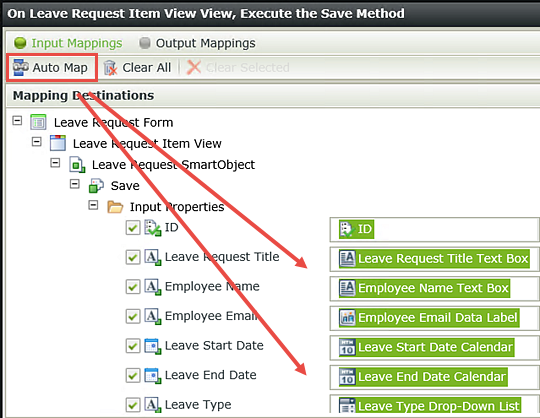
IMPORTANT: Be sure to complete this step. We want to use the SmartObject ID so that K2 knows we are updating the current record. If we use the auto-mapped ID, K2 would not recognize the value as the current record.
Click Finish. Click OK to close the Rule Designer.
STEP 10 REVIEW
In this step, we added a rule that will fire off the Save method (which is the equivalent of update) for the Leave Request SmartObject with any changes the user might have made.
The last few edits we are going to make to the rules will be to clear the form entries after the form originator has clicked the Create button, then add the new entry to the List View. Recall in the Basic application, when the form originator submitted the form there wasn't any visual indication of the form being submitted. By clearing the form entries and updating the List View, the user will have visual confirmation that their request was submitted.
Step 11 Tasks
- Edit the rule for the Leave Request Workflow (Default) state, when the Create Button is clicked. Add a View method action to Clear the Leave Request Item View.
- Add another View method action to populate (Get List) the Leave Request List View, using the System Value Email as the Input Property
- Add a Transfer data action and map the Current User Display Name and Email to their respective form controls.
- Check In the Leave Request Form
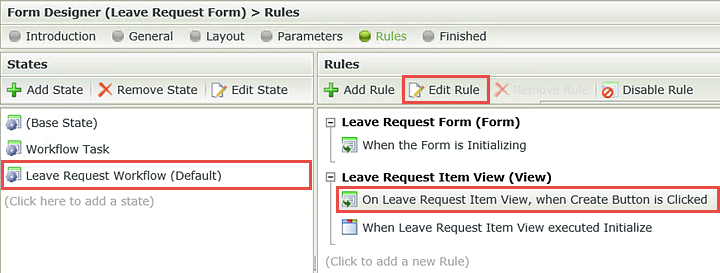
- First we will configure an action to clear the form entries upon submit. On the Rules home screen, highlight the Leave Request Workflow (Default) state, then the Create Button is Clicked rule. Click Edit Rule.
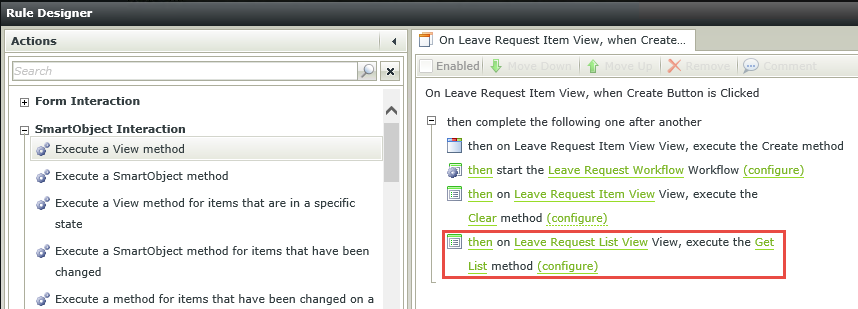
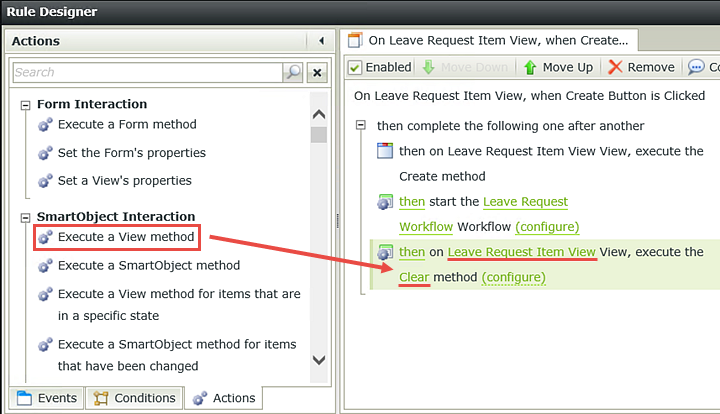
- Confirm the Actions tab is highlighted, then click the Execute a View method action to add it to the Rule Definition pane. Click the select View link and select Leave Request Item View. Click the select method link and select Clear.
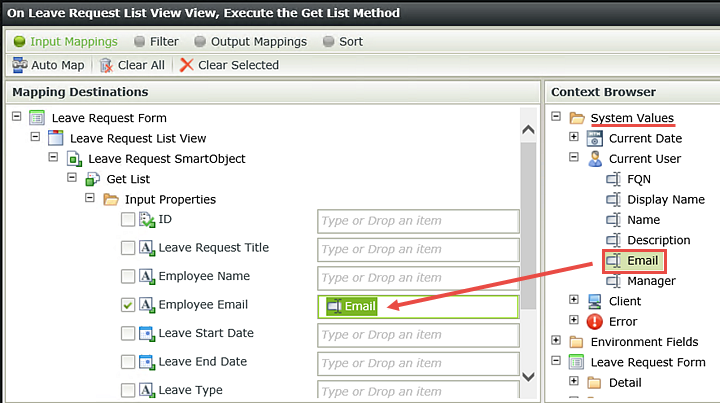
- Click Execute a View method once again to add another instance to the Rule Definition pane. Click the select View link and select Leave Request List View. Click the select method link and select Get List. Click the (configure) link.
- In this step, we will map the user's email as the input property so that K2 knows to search the SmartBox records for those that have the same email value as the current user. In the Context Browser, expand System Values, then Current User and drag the Email property into the Employee Email Input Property. Click Finish.
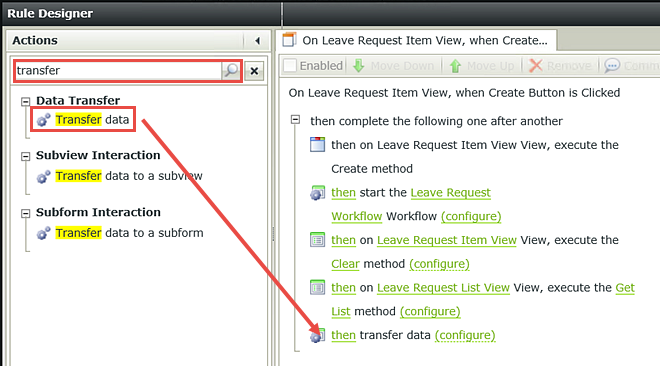
- Still on the Actions tab, search for
transfer
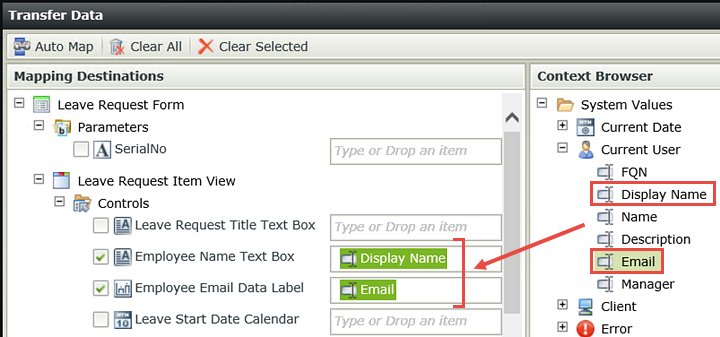
then click Transfer data to add it to the Rule Definition pane. Click the (configure) link. - Expand the System Values tree, then Current User. Drag the Display Name into the Employee Name Text Box field and the Email into the Employee Email Text Box field. Click OK twice, then click Finish.
- Right-click the Leave Request Form and select Check In. If you get a message about associated Views, click OK to continue.
Now we will update the Leave Request List View so that the new entry is shown.
We have one additional step we need before we close out of our form. In the previous step, we cleared the form entries when the user clicked the Create button. Now we need to add back in the Employee Name and Employee Email values so the refreshed form appears exactly the same as a brand new form.
STEP 11 REVIEW
In this final step of configuring actions, we added a clear method so that the user will have a visual confirmation that their form was submitted. There are a number of mechanisms for letting your users know they have successfully submitted a form, including adding a confirmation pop-up message or redirecting them to a web page, for example. As you build more applications within your own environment, you will gain knowledge of what works best for your target users.
Now that our application changes are done, we will move on to Part 4 and test the new version of the Leave Request Approval application