Active Directory User Details Update application
This tutorial explains how to build an Application that can be used to display and update details from Active Directory. Your organization may have a need to allow users to list information from Active Directory, and keep Active Directory updated by allowing users to update outdated information which can then be saved back to Active Directory.
This tutorial will explain how to create a SmartObject that interacts with an external system (Active Directory, in this case) and then use that SmartObject in Views and Forms. You will also learn how to build a workflow that will interact with Active Directory using the build-in AD wizards available in the K2 workflow designer. .
Application Overview
Prior to jumping into building our application, it’s important to perform some preliminary design to decide exactly what we need our application to accomplish. We begin by creating a flowchart of the complete process and determine what tasks need to take place and who (or what) will be performing them. Remember that you can think of K2 application in terms of Data, Forms, Workflow and Reports. When an application has a workflow component to it, it is usually best to approach the design starting with the Workflow, then the Forms, then the Reports and finally the Data.
Workflow Design
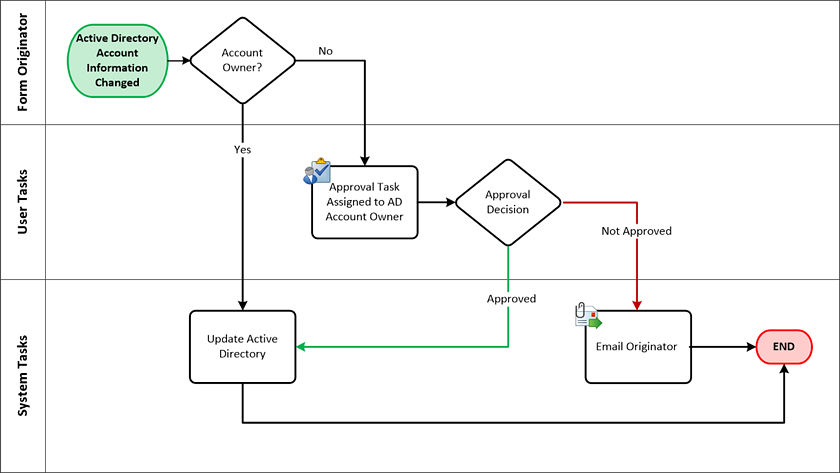
The flowchart below represents the logical behavior of the workflow in our application. There are two swim-lanes for User Tasks. The first is the Form Originator, or the person submitting the form for the first time. The second swim-lane represents the Approver lane, in our case this will be the Active Directory account owner. The third lane represents System Tasks, or tasks that K2 will manage behind-the-scenes. Notice that along the way, the workflow may move from one lane to another lane. K2 seamlessly interacts with both human and system components.
In this application a user will update the details for a User in Active Directory and start the workflow. The workflow will check if the updated details are for the originator of the workflow (in other words, someone updated their own details) and if this is the case, immediately update Active Directory with the new information. If the user updated someone else’s details, the workflow will assign a task to that person to review and accept the changes before the workflow will update Active Directory.
Forms design
We will use two different Forms for our application.
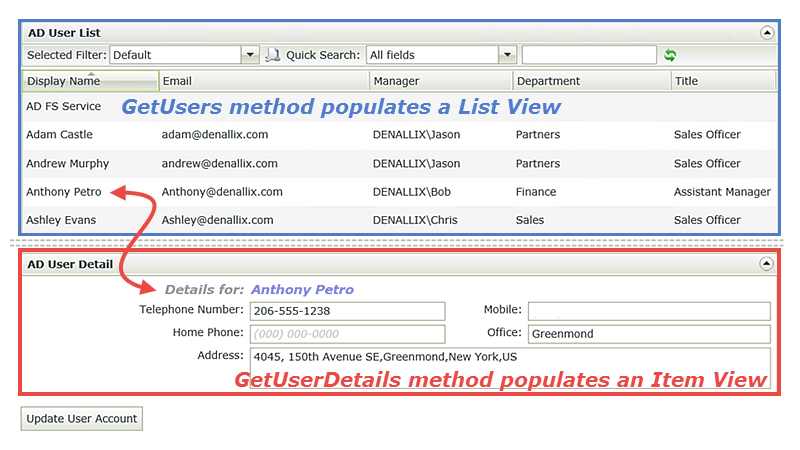
The first Form will be used to list AD Users and update a specific user's details. See the screenshot below for an example of this Form. In this case, the user selected Anthony Petro from the list of users, and Anthony's details were inserted into the AD User Detail View. The user can then modify any of Anthony’s telephone numbers and click the Update User Account button. That action will initiate the workflow.
The Form used to display and update a user's details
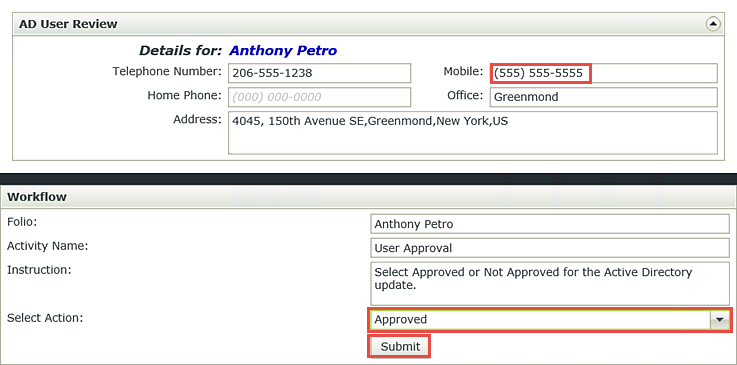
The second Form will be used if the Approval Task is required. In this case, the other user can open this Form to review the updated information, and then make a decision on whether they accept the changes or not.
The Form used to review and accept (or not) the updated details
Data Design
In this application, all the data required resides in Active Directory. To expose this Data to our application, we will need to create a SmartObject. This SmartObject will have two methods: one method will return a list of users from active directory, and another method will return a single user's details from Active Directory.
There is a slight complication, however. Suppose that you change some else's information. We cannot commit that new data to Active Directory because the other person has not reviewed and accepted your changes yet, so we need some way to temporarily store the updated values until the other person has accepted the changes.
While you certainly could create a K2 SmartBox SmartObject to store data, for this application the data is really only relevant while the workflow is running, so we will instead define separate Data Fields in the workflow to store the updated Telephone Numbers. If the other user accepts the changes, the workflow will then use these temporary values to update Active Directory.
Building the application
Now that you have designs for each of the elements of the AD User Details Update application, you can start building them. As before, we will start with the Data elements, then do the Views and Forms elements, followed by the Workflow. Finally, we will test the application.
When you are ready to start building the application, continue on to the Part 1: Data section to get started.