Task tab
Use the Task tab to add instructions for recipients and to configure the actions they can take. Configure a due date to specify when the task should be completed by.
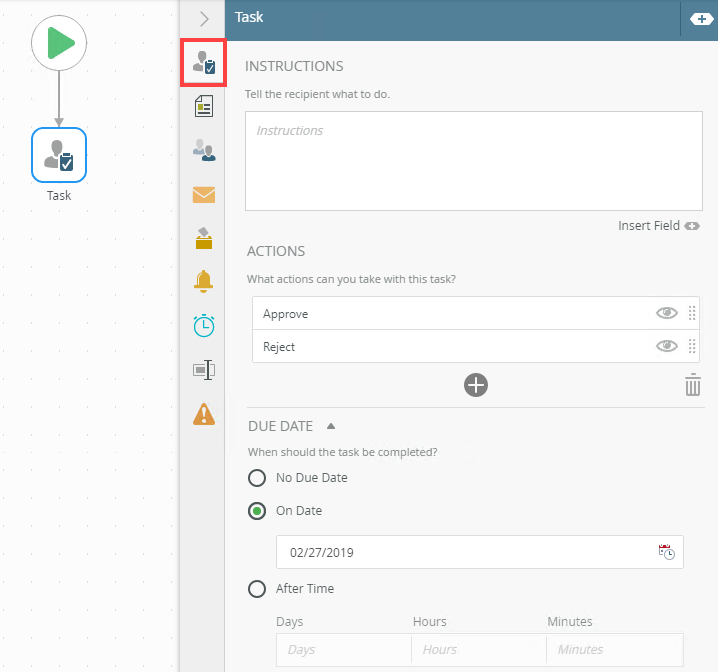
Example of a configured Task tab
- Select the Task tab. Use this tab to specify instructions for task recipients and to configure the actions (decisions) that they can take.

- On Date: Allows you to add a due date on a specific or calculated date. Click the calendar icon to display the date picker. Select a date using the calendar control. To use dynamic values, you can drag and drop inline functions, fields, variables and other values from the
- After Time: Allows you to configure the due date after a specified period, such as seven days. Enter values in days, hours, minutes, and seconds. You can use a single field or multiple fields, such as two days or one hour and 30 minutes. To use dynamic values, you can drag and drop inline functions, fields, variables and other values from the
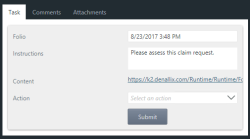
- Add detailed instructions in the Instructions field. When you open the task from the task list, the instructions display in the workflow strip on the SmartForm.

- From the Actions section, select one of the predefined action links. You can select between Approve, Reject or Both. Choosing Both adds the Approve and Reject actions.

- To add custom actions, click on the Add button.

- To edit an action, click and change by typing the values.

- To remove an action, select it and click the Trash bin.

- By default, you can view and take the action without opening the form. You can disable this option per action by clicking the action visibility /eye icon.

- When you add an action, an animated tip shows to remind you to add a Decision step to the workflow and connect it to the task step. Click the X to close the tip. If you don't want to see the tip again, click the Got It button. For more information on how to turn the tip back on, see the Ribbon topic.

- Expand the Due Date section. Select On Date to add a due date on a static or calculated date. Click the calendar icon and select a date.

- You can also drag and drop inline functions and field properties (from the Context Browser) into the field to create dynamic functions. This is typically more useful than configuring a static date.

- To set the due date after a specified period, such as 2 days, 1 hour and 30 minutes, select the After Time option. Enter values in days, hours, minutes, and seconds. You can use a single field or multiple fields, such as two days, or one hour and 30 minutes.
 To view the Seconds field, click the right arrow.
The following table explains the options available on this tab:
| Option | Explanation | How to Use |
|---|---|---|
| Instructions |
Use this to add instructions for the task recipients. This instruction shows on the recipient's worklist. Drag Functions, Fields, SmartObjects and Workflow related items from the Context Browser into this field. Adding detail to this field is optional. You can add up to 4000 characters in this field.  Example of instructions:  |
Click the Instructions field and provide details about the task. This is optional. Click the Insert Field link to expand the Context Browser. |
| Actions |
Use this section to add and configure actions for the task. These actions are available for recipients to choose from. By default, there are no actions are configured but you can choose from common actions or add your own. Each task must have at least one action. Common actions are Approve, Reject or Both. |
Click one of the common actions links or use Add to create custom actions. |
| Due Date |
Use this section to set a specific date or elapsed time by when the task should be completed. Configuring this value sets the expected duration of the task. When the date or time elapses, the task's state changes from Due to Overdue state. The No Due Date option is on by default. If you want to set the expected duration on a task, select one of the following options: The Due Date is available as a sortable column on the worklist control on a form. For more information see Worklist Control - Configuring the Layout section. |
Click On Date to select this option. Select a date from the calendar or configure a function to calculate a date. Click After Time to select this option. Enter values in the Days, Hours, Minutes or Seconds fields. Or configure a function to calculate a value. |