Planning for custom workflow steps
The custom steps you create will appear in the K2 Workflow Designer toolbox. It is important to plan the structure of the custom steps toolbox section before you create steps, because you cannot update the step name and location after you have created it. This means that if you change the structure of the toolbox, the change could affect deployed workflows containing the custom steps. For more information, see the Considerations section in the overview topic, as well as the Managing custom workflow steps topic. Make the Name and Toolbox Path that you give the custom step, unique.
K2 Workflow Designer toolbox structure
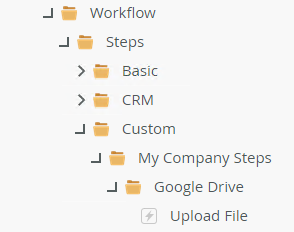
The Custom section of the K2 Workflow Designer toolbox reflects the folder structure in the category tree seen in the K2 Management site. Custom steps are located in the Custom folder under Categories > Workflow > Steps shown here:
When you create a custom step, you specify its position in the toolbox (the Toolbox Path field in the custom steps management form). You can specify up to two levels, for example, My Company Steps\Google Drive. If you don't want nested steps in the toolbox, specify the step location as Google Drive. When you create the step, the Toolbox Path is also created if it doesn't already exist. The Toolbox Path is created as sub-folders under the Custom folder in the category tree.
For example, if you want to create a single, root-level node in the toolbox that contains all your steps, you would create your steps specifying a Toolbox Path like: My Company Steps. You would find all your steps in the toolbox under Custom Steps > My Company Steps.
However, if you wanted nodes at the root for each technology you use, create your steps for that technology with the Toolbox Path of [root node]\[technology] . For example, My Company Steps\Google Drive.
For example, custom steps support the following structure:
- My Company Steps
- Google Drive
- Upload
- Download
- Get Info
- Box
- Upload
- Download
- Get Info
- HR Onboarding - Create Request
- Start Legal process
- Google Drive
Key:
- Nodes/folders
- Steps
If, in the future, you need to move the HR Onboarding - Create Request step to a new folder (HR for example), do the following:
- Create a new step with the Toolbox Path: My Company Steps\HR to use in workflows going forward.
- Either deactivate the original step or delete it, depending on if you have deployed workflows that use it. Deactivating the old step hides it from the toolbox but allows existing workflows to continue to run. Deleting the old step may cause errors in workflows that were using it.
If you have deployed workflows that use the old step, you could also:
- Create the new custom step in the correct location (Toolbox Path: My Company Steps\HR).
- Update existing workflows to use the new step.
- Deploy the workflows.
- Delete the original custom step.
The example above would now look like this:
- My Company Steps
- Google Drive
- Upload
- Download
- Get Info
- Box
- Upload
- Download
- Get Info
- HR
- HR Onboarding - Create Request
- Start Legal process
- Google Drive