Add Custom Service Objects and a SmartObject
This tutorial moves into developing with K2 connect and how we might build our own Service Objects and SmartObjects from scratch. We will add a new service to call extended job data, then manually add custom methods. We will define our own parameters and the properties we want returned. We will define our own custom structure. To complete the manual process, we will map the new input and outgoing structure and properties to their corresponding BAPI input and outgoing properties.
We will add an additional service to call company data. Finally, we will update an existing service by adding an XML method to call the employee's contact email addresses. (In this case, the XML method allows us to call and return multiple properties back to one outgoing property.)
After defining new services and updating an existing service, we will manually create a SmartObject based on all three service calls. The SmartObject will list employees based on their last name. The extended job data is bound to the employee 'list' data by the employee's ID. The job data provides us with a company code, which in turn, becomes the bind to the extended company information.
This tutorial has three main parts:
- Developing with K2 connect (basics, this topic, Step 1-4)
- Extending Existing Service Objects, Using Structures and XML Properties (Step 5a-c)
- Publishing and Updating an Existing Service Object and SmartObject (Step 6a-c)
What we specifically want to demonstrate in this set of parts for the tutorial is the ability to pull together a data set of information (employee > job > company) from multiple service calls, all in one SmartObject. We will then leverage that data from within our user interface, a SmartForm.
In this step, we are going to add a new project to Visual Studio for the Part 3 exercises. We will add a filter to the
Step 1 Tasks
- Create a new K2 Empty Project in Visual Studio and name it K2connectDev.
- Launch the K2 Service Object Designer. Expand the explorer nodes until you reach the K2LearningSAP node. Expand this node as well and when prompted, do one of the following:
- If you completed only Part 1 and have the login credentials embedded into the destination connection string, CHECK the option to use Predefined User Credentials.
- If you completed Part 1 and Part 2 and have enabled K2 SSO for K2LearningSAP, enter the following:
- UserName: K2Learning
Password: K2pass!
- UserName: K2Learning
- Define a Filter for the Rfc / Bapi Explorer with the following settings:
Filter Name: Employee BAPIs
Function: BAPI_EMP*
(Group should remain blank) - Locate the BAPI_EMPLOYEE_GETLIST method and test the connection using the K2 connect Test Cockpit. Use the following parameters to filter your results:
DATE(): CHECKED. Use the current date as the value.
LASTNAME_M: B*
- Launch Visual Studio if it is not already open. (Start > All Programs > Visual Studio 2013 > Visual Studio 2013)
- Create a new K2 Empty Project and name it
K2connectDev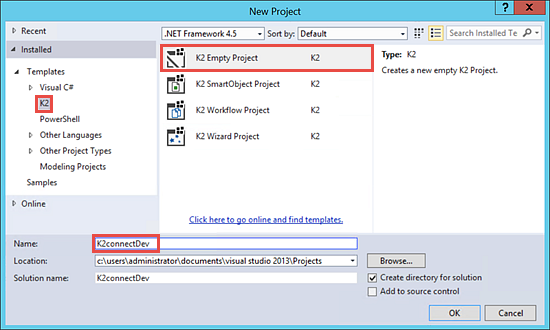
- Launch the K2 Service Object Explorer (View [ribbon tab] > K2 Service Object Explorer)
- In the explorer, expand the ERP Connect node, then the SAP R4.7 node. Expand the K2LearningSAP node and when prompted for credentials, use one of the following methods:
- If you completed only Part 1 and have the SAP credentials embedded in the destination connection string, CHECK the option to use Predefined User Credentials.
- If you completed Part 1 and Part 2 and have enabled K2 SSO for K2LearningSAP, enter the following credentials into the prompt:
- User Name: k2learning
- Password: k2pass!
- Right-click the Rfc / Bapi Explorer title and select Add Filter. For the Filter Name, enter
Employee BAPIs
then for the Function, enter
BAPI_EMP*
then leave the Group value blank. Here, we are simply saying to filter out any method that does not begin with BAPI_EMP.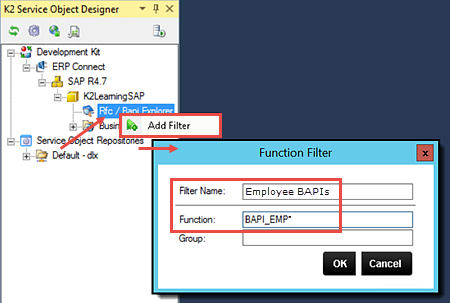
- Expand the Rfc / Explorer node, then the Employee BAPIs node. (This is the filter we just added.) Locate the BAPI_EMPLOYEE_GETDATA method. Right-click the method and launch the Test Cockpit.

- When the K2 connect Test Cockpit opens, click Load Interface to expose the Input (parameters) and the Output (results) panes. Clear All of the Input parameters. CHECK the box next to the DATE() parameter and confirm the default value is the current date. CHECK the box next to the LASTNAME_M parameter and for the value, enter
B*
then Execute the test.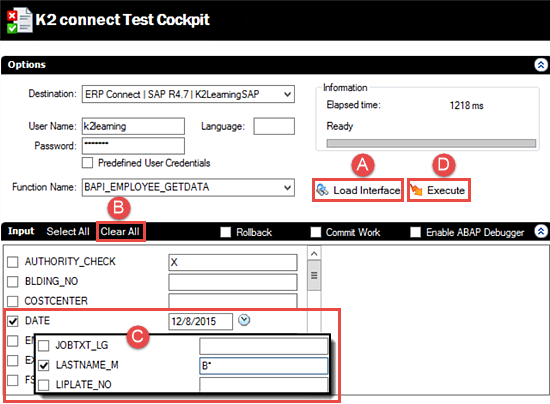
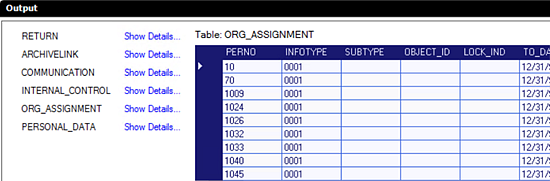
- After a few seconds, click the PERSONAL_DATA > Show Details... return in the Output pane. If you see a table with results returned, your test is successful! (You can collapse the Input pane if you like to provide more room for the table.) Close the K2 connect Test Cockpit and return to the K2 Service Object Designer in Visual Studio.
In the next step, we are going to add a filter to the SAP methods returned so that it is easier to find what we need. We don't have to add filters, but when we have very large systems such as SAP, filtering our results can make our application development a little smoother.
Next, we will navigate to the method we need for our exercises, then test the method with the K2 connect Test Cockpit.
Step 1 Review
In this step, we added a filter to limit the methods returned by our sample SAP system. When developing with very large systems such as SAP, adding filters can make application progress much smoother. After adding the filter, we tested the SAP destination connection using the K2 connect Test Cockpit and confirmed we had results returned based upon the input parameters we entered.
In this step, we will add a new service method that will return a list of employees based on the employee's last name. We will select a specific set of properties that we want returned. We will also give each property a friendly name, so that the person who is designing the SmartObject will be able to tell exactly what the property is for by the friendly name. We will then add a second service method that will read one employee's details based on their employee ID. Last, we will disable the option to automatically create a SmartObject (from this Service Object) as we will manually create the SmartObject in the next step.
Step 2 Tasks
- Add a new folder to the K2connectDev project and name it ServiceObjects.
- Add a new K2 connect Service Object to the ServiceObjects folder and name it EmployeeDataServiceObject .
- Add a new Service and change the name to EmployeeData.
- Add the BAPI_EMPLOYEE_GETDATA method to the EmployeeData service.
- Change the Function name of the GETDATA method to ListEmpByLastName.
- Clear the pre-selected properties, then select the following properties and change their Friendly names as indicated:
Property New Friendly Name DATE() InputDate LASTNAME_M InputLastName PERSONAL_DATA EmployeeInfo RETURN() <No change> - Access the Structure Declaration for the EmployeeInfo property. Once again, clear the pre-selected properties, then select the following properties and change their Friendly names as indicate:
Property New Friendly name BIRTHDATE BirthDate BIRTHPLACE BirthPlace BIRTHYEAR BirthYear FIRSTNAME
FirstName FROM_DATE EmploymentDate LANGU Language LAST_NAME LastName NATIONAL Nationality PERNO EmployeeNumber - Return to the K2 Service Object Designer canvas and Save the project.
- Add another instance of the BAPI_EMPLOYEE_GETDATA method to the service. Change the Function name to ReadEmpByEmpID, then Clear the pre-selected properties.
- Select the following properties from the Function Interface and give them friendly names as indicated in the table below:
Property New Friendly Name DATE() InputDate EMPLOYEE_ID InputEmployeeID PERSONAL_DATA EmployeeInfo RETURN() <No change> - There are no changes to the EmployeeInfo structure, so go back to the service design canvas.
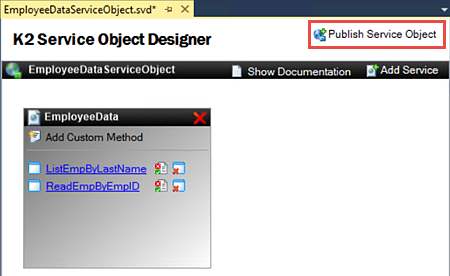
- Disable the option to generate a SmartObject, then publish the new Service Object to the K2 Server.
- In the SmartObject Service Tester, confirm the new service object is shown under the K2 connect Service node. Take a minute to compare the methods, properties and parameters with the configurations we just made in Visual Studio. In particular, notice how the friendly names appear and why they might be easier to work with versus the system-generated property names.
The first method we will add will be the list method that returns a list of employee's based on the employee's last name.
The second method we will add will be the read method that will return a specific employee's details based on their employee ID.
- First we'll add a new folder to store the Service Object in. In the Visual Studio Solution Explorer, right-click the K2connectDev project and add a new Folder. Name the folder
ServiceObjects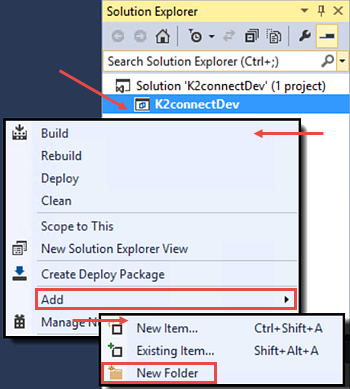
- Next, we'll add the new Service Object. Right-click the new ServiceObjects folder and Add a New Item. Confirm that the K2 Installed templates is highlighted, then select the K2 connect Service Object from the templates. Name the new Service Object
EmployeeDataServiceObjectThere are a number of limitations on the naming of Service Objects. For example, you cannot use a number to start the name or include periods in the name. If necessary, use underscores to separate words.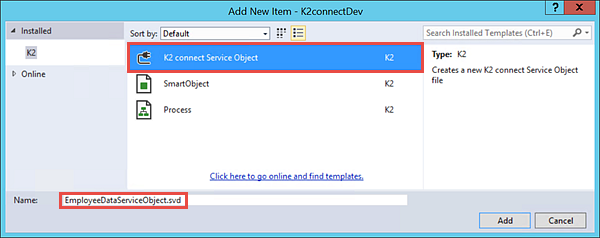
- Click the Add Service link located in the upper right corner of the design canvas. The Service1 service is added. (See the image in step (e) for link location.)
- Double-click the Service1 title bar and change the name to
EmployeeData
then press <ENTER> to commit the change.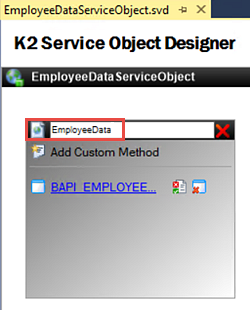
- Expand the Employee BAPIs node, then navigate to the BAPI_EMPLOYEE_GETDATA method. Drag, then drop, the method into the EmployeeData container.
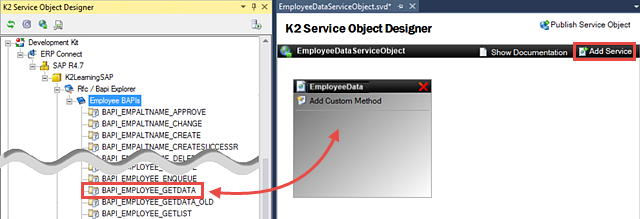
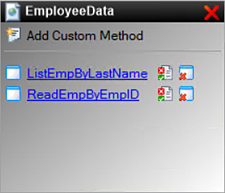
- Click the BAPI_EMPLOYEE_GETDATA method name to open its properties. Rename the method to
ListEmpByLastName
then Clear All of the listed properties. We will select a few properties to be returned instead.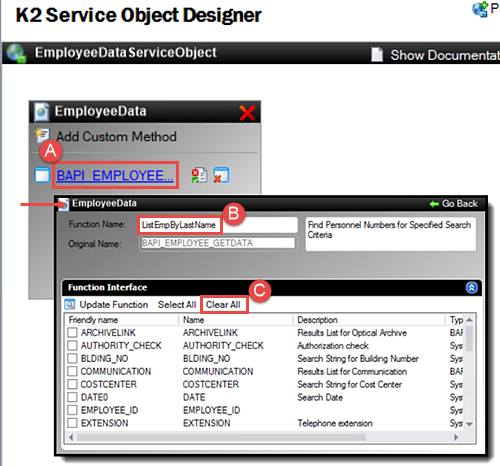
- Select the following properties:
DATE() This is the input date required for most SAP BAPIs. LASTNAME_M This is the input parameter to search by the last name. PERSONAL_DATA This is the structure of personal data returned by the BAPI. This property contains additional properties as well. RETURN() This is the return data (success message) returned by the BAPI. 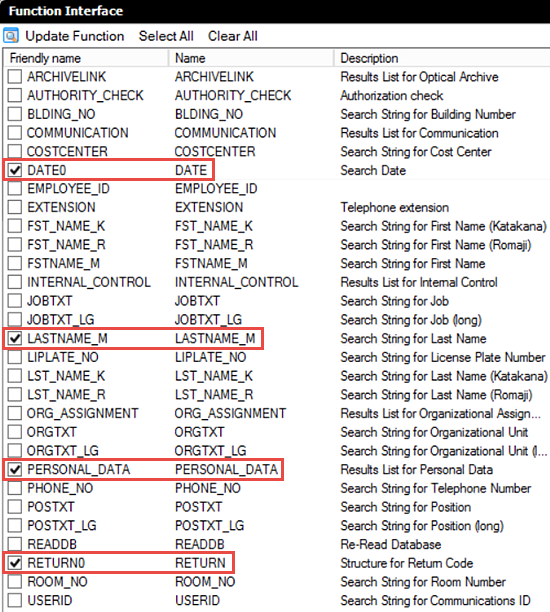
- Click on the DATE() value in the Friendly name column. You may need to click once or twice slowly to expose the text box. Change the name to
InputDate
then press <ENTER> to commit it.We are adding the 'Input' prefix to two of our property names so that the SmartObject designer can easily tell what the properties are used for.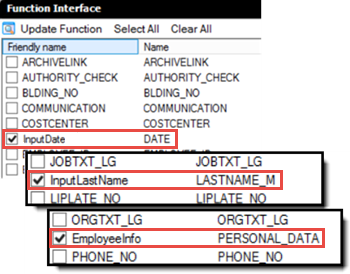
- Using the same actions as the step above, change the friendly names for the following:
LASTNAME_M: InputLastName
PERSONAL_DATA: EmployeeInfo - Click EmployeeInfo to highlight the row. Click the Show Structure link found in the upper right corner of the Function Interface pane. On the Structure Declaration pane, select Clear All to remove the pre-selected properties.
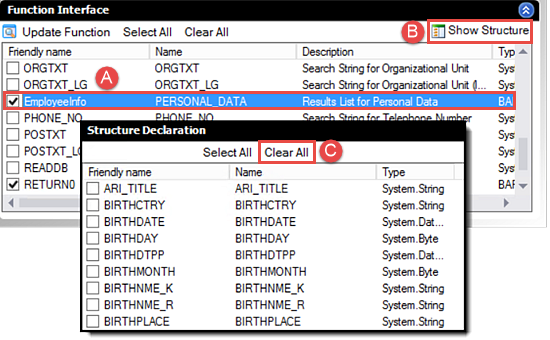
- In the Structure Declaration pane, CHECK the following properties and rename their Friendly names:
Property New Friendly name BIRTHDATE BirthDate BIRTHPLACE BirthPlace BIRTHYEAR BirthYear FIRSTNAME
FirstName FROM_DATE EmploymentDate LANGU Language LAST_NAME LastName NATIONAL Nationality PERNO EmployeeNumber 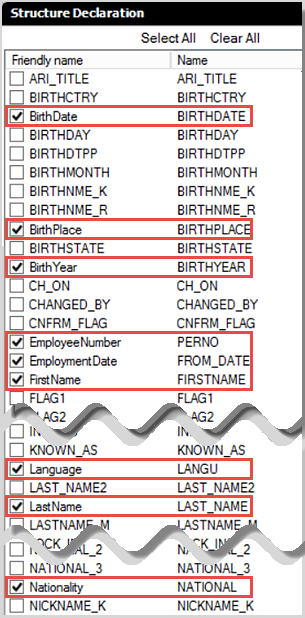
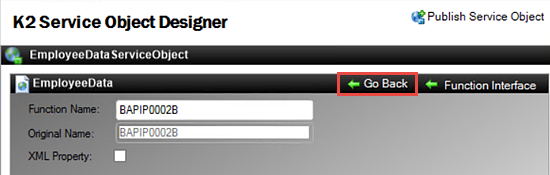
- Click Go Back to return to the K2 Service Object Designer canvas.
- Save the project.
- Drag another instance of the BAPI_EMPLOYEE_GETDATA method into the EmployeeInfo service, just under the List EmpByLast Name method.
- Open the method properties and change the Function name to
ReadEmpByEmpID
then Clear All of the pre-selected properties.
- In the Function Interface pane, use the values below to select the following properties, then change their Friendly names as indicated:
Property New Friendly Name DATE() InputDate EMPLOYEE_ID InputEmployeeID PERSONAL_DATA EmployeeInfo RETURN() <No change> - Access the structure for the EmployeeInfo (PERSONAL_DATA) property. The structure properties that we configured for the EmployeeInfo property should still be in place. You should see the specific properties we selected previously and their friendly names as well. There are no changes for this screen, so click the Go Back link to return to the K2 Service Object Design canvas.
- Save your project.
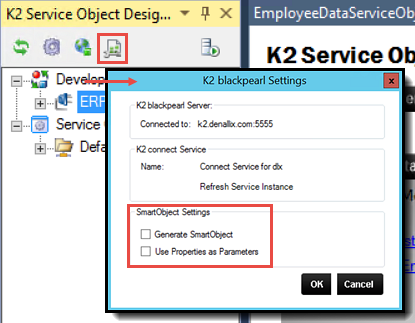
- Click the K2 blackpearl Settings icon found in the (left-column) explorer toolbar. UNCHECK the Generate SmartObject option. Confirm the Use Properties as Parameters option is also UNCHECKED.
- Publish the Service Object to the K2 connect server. Close the confirmation dialogue that indicates the ServiceInstance has been refreshed. Keep Visual Studio open.
- Launch the SmartObject Service Tester utility if it is not already open. (Start > All Programs > K2 blackpearl > SmartObject Service Tester.exe)
If you do not see the utility listed in the menu view, you can also navigate to it with the following path: (C:\Program Files (x86)\K2 blackpearl\Bin\SmartObject Service Tester.exe)
- Expand the ServiceObject Explorer > K2 connect Service > Connect Service for dlx (your server name may be different) > Connect Object nodes. Confirm that the EmployeeDataServiceObject we just published is there. (If you completed Part 2, you may also see the K2connectEmpData Service Object that was published as part of those steps.)
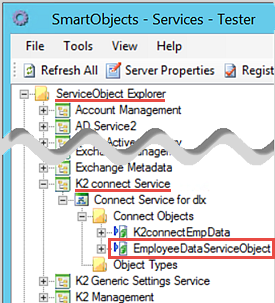
- Review the methods, properties and parameters for the new Service Object. Notice that we have two methods (list and read). Review the parameters for the methods. Note that the parameters were automatically prefixed with p_ by K2.
In the next steps, we will add a service to the Service Object, then add the BAPI method that will retrieve a list of employees by their last name.
Next we will change the service name so that it's more meaningful, then we will configure the method properties we want returned when the call is made. We can also adjust the 'friendly names' for the properties which will come into play when we create and configure the SmartObject that will be based on this Service Object.
Next we will rename the parameters and properties so that they have 'friendly' names. This is especially useful to the SmartObject designer so that they can clearly distinguish one property from another.
The PERSONAL_DATA (EmployeeInfo) property has a structure which contains additional properties. We will now use actions similar to above and select specific properties for the structure, then give them friendly names as well.
Now we will add the READ method that will return one employee's details based on their employee number.
The last step we need to make is to disable the auto-generation of SmartObjects. We want to build our SmartObject from scratch, so we don't need K2 to create one for us when we publish our EmployeeDataServiceObject service object.
At this point, we will take a minute to confirm our Service Object appears in the SmartObject Service Tester. We should be able to see the properties and methods that have been returned from our SAP destination.
Notice the properties show the friendly names that we entered. Building the SmartObject will much easier with names that describe the property instead of the system-generated names. The EmployeInfo prefix is the friendly name we gave to the PERSONAL_DATA structure.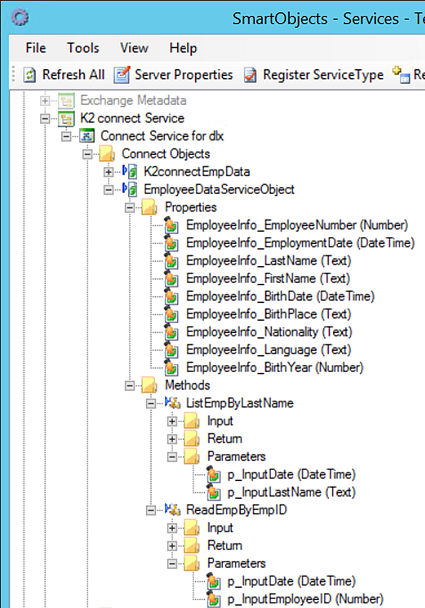
Step 2 Review
In this step, we added a new service method that will return a list of employees based on their last name. We modified the properties that will be returned and gave each property a friendly name. We then added a second service method that will read a specific employee's details by employee ID. We configured friendly names for this method as well. We disabled the option to automatically generate a SmartObject because we will build our SmartObject from scratch in the next step.
After publishing the new Service Object, we observed its properties, methods and parameters using the SmartObject Service Tester. In particular, the friendly names that provide a user-friendly scope to work with when we build the new SmartObject.
Now that we have our Service Object in place and have configured the methods and properties we need, we can build the SmartObject. The SmartObject will allow us to leverage the properties and methods returned from the SAP destination, in K2 Workflows and SmartForms. We will add both the list and read methods, then test the SmartObject functionality using the SmartObject Service Tester.
Step 3 Tasks
- In Visual Studio, add a new K2 SmartObject. For the Name, enter SAPEmployees.
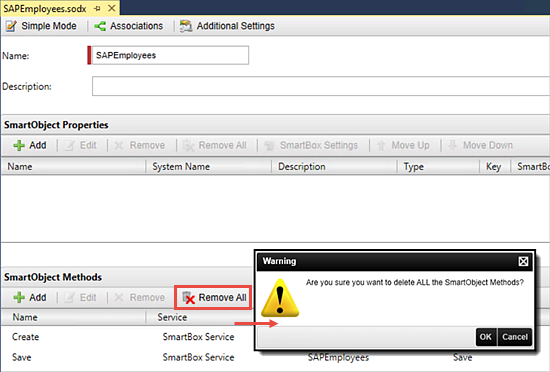
- Switch the SmartObject Designer to Advanced Mode and remove all of the default SmartBox methods.
- Add a new method and name it ListEmpByLastName then set the Type to List and the Transaction to Continue.
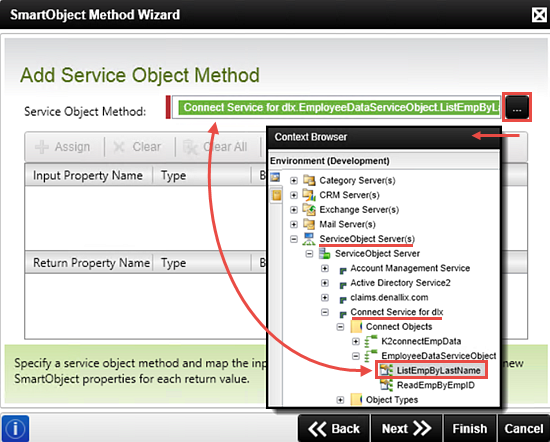
- Add the ListEmpByLastName Service Object Method from the EmployeeDataServiceObject.
- Create All of the properties.
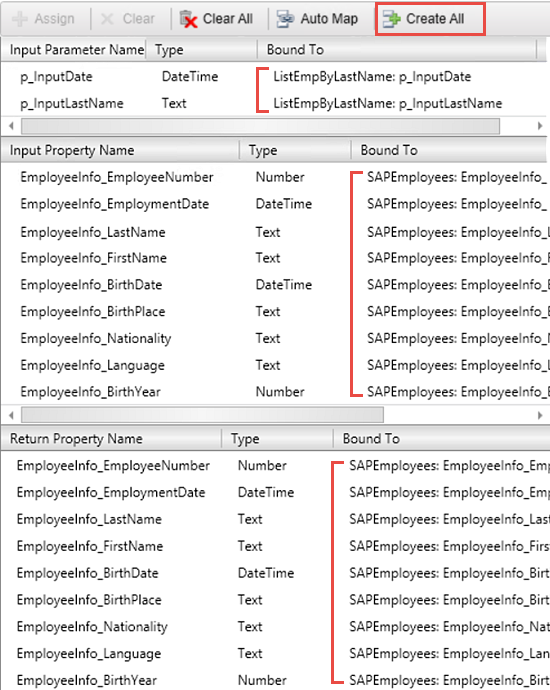
- Add another SmartObject method and name it ReadEmpByEmpID then make set the Type to Read and the Transaction to Continue.
- Add the ReadEmpByEmpID Service Object method, again found in the EmployeeDataServiceObject.
- Auto-map the properties.
- Assign the p_InputDate Input Parameter to a new Parameter called p_InputDate .
- Assign the p_InputEmployeeID Input Parameter to a new Parameter called p_InputEmployeeID .
- Build and Deploy the solution.
- Test the new SmartObject with the SmartObject Service Tester by Executing the SAPEmployees SmartObject. Use the following values for the input parameters:
Method: ListEmpByLastName
p-InputDate: Current date
p_InputLastName: B*
- In Visual Studio, add a new folder to the K2connectDev project and name it
SmartObjects - Right-click the SmartObjects folder, then select Add, then New Item. Select SmartObject. (If you don't see the Installed K2 templates, search for K2.) Name the new SmartObject
SAPEmployees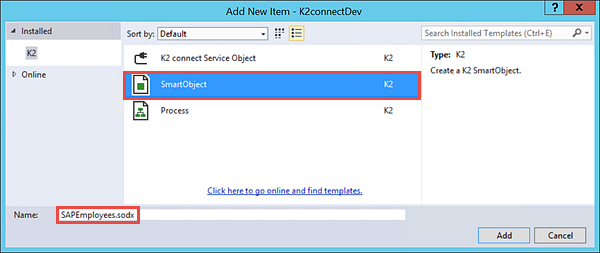
- Change the designer to the Advanced mode.

- In the SmartObject Methods pane, click the Remove All option, then OK when the confirmation dialogue appears.
- Add a new SmartObject method. (Click Next on the wizard landing page.)

- On the Method Details screen, add the following values:
Name: ListEmpByLastName
Type: List
Transaction: Continue
then click Next.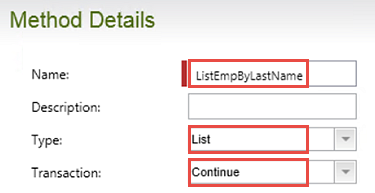
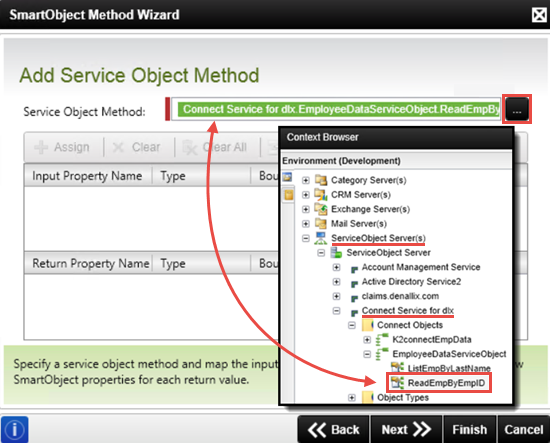
- On the Add Service Object Method screen, browse for, and Add, the ListEmpByLastName method found in the EmployeeDataServiceObject. Use the image below as a guide to navigating to this method. (Keep in mind your dlx server name may be different.)
- Use the Create All button to auto-create the properties in the new SmartObject method. Finish the wizard.
- Save the SmartObject.
- Add a new SmartObject method with the following values:
Name: ReadEmpByEmpID
Type: Read
Transaction: Continue
- On the Add Service Object method screen, browse to and Add the ReadEmpByEmpID Service Object method. (Keep in mind your dlx server name may be different.)
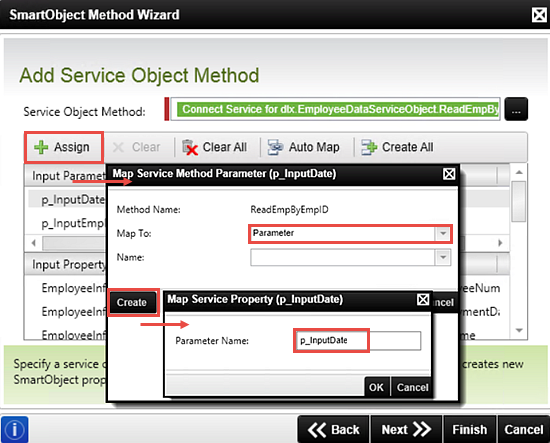
- Use the Auto-Map button to map the existing properties to the new Read SmartObject method.
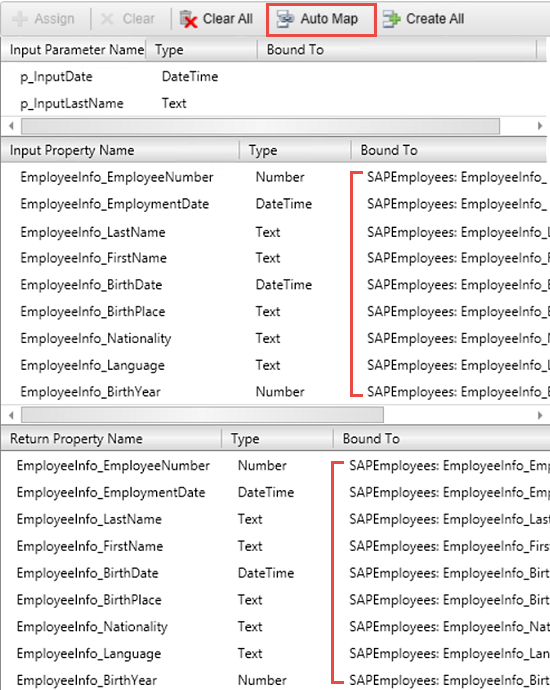
- Click on the p_InputDate Input Parameter to highlight it. Click Assign. On the Map Service Method Parameter pop-up, change the Map To value to Parameter, then click the Create button.
- Click the p_InputEmployeeID parameter to highlight it, then click Assign.
- Change the Map To value to Parameter, then click Create.
- For the Parameter Name, enter (or confirm)
p_InputEmployeeID
as the name value. Click OK twice to commit the change. - Finish the wizard. Save your SmartObject.
- Click the Build tab in the Visual Studio ribbon. Click Build Solution. When you see the Build Succeeded notation in the Status Bar (lower left corner of your screen), return to the Build menu and click Deploy Solution. Click Next twice on the Deploy Project Wizard, then Finish. Confirm you see a Deploy succeeded notation in the Status Bar.
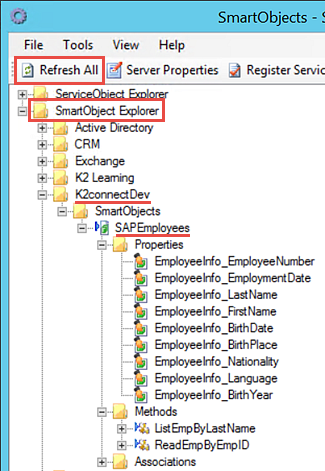
- Launch the SmartObject Service Tester if it is not already open. Click Refresh All in the toolbar so that we see any changes that have been made since our last test.
- Expand the SmartObject Explorer and navigate to the SAPEmployees SmartObject using the image below as a guide. Take a minute to expand the Properties and Methods for this new SmartObject. Expand the Methods further and explore the Parameters for each.
- Right-click the SAPEmployees SmartObject title and select Execute SmartObject.
- CHECK the box for the p_InputDate Input parameter and confirm the default value is the current date. For the p_InputLastName value, enter
B*
then click Execute. Confirm you have results returns in the Results pane.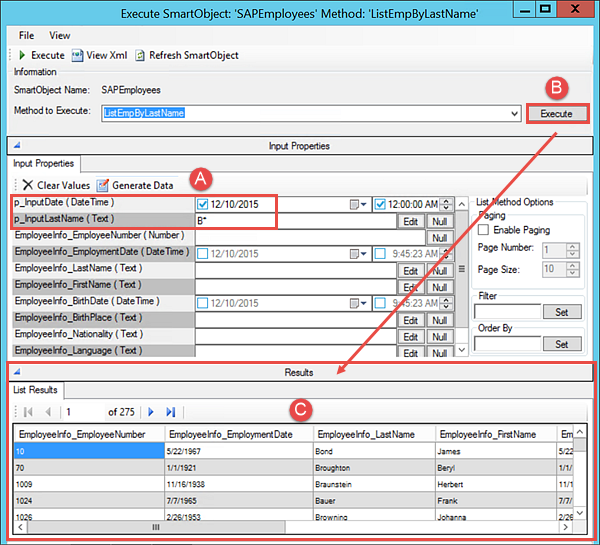
The SmartObject Designer opens. The SmartObject Designer is in Simple Mode by default. Notice the SmartObject Properties pane and the SmartObject Methods pane. The Methods pane contains default SmartBox Service methods. Because we have our own methods as part of our SmartObject (list and read), we will remove the default methods first.
Notice the Input Parameter, Input Property and Return Property values. This is another good example of why we use friendly names.
Using the similar steps as above, we will now add the read method.
In the next step, we will auto-map the existing SmartObject properties to the new 'read' method. We don't need to create the properties because we created them while setting up the 'list' method. To recap, the SAPEmployees SmartObject has a set of properties that we created while configuring the 'list' method. Since they are already set up, we can just map the 'read' properties to the existing SmartObject properties.
For the Parameter Name, enter
p_InputDate
then click OK twice to commit the change.
Now we will assign an Input Parameter bind for the p_InputEmployeeID parameter.
Your screen should look like the image below.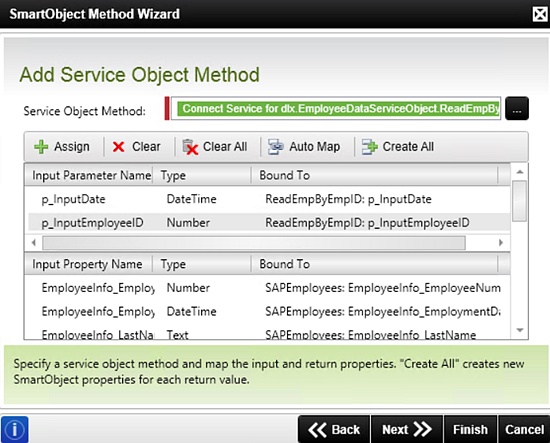
In Step 4, we will use our new SmartObject in a SmartForm. Before we can do that however, we need to build, then deploy, the SmartObject to the K2 server.
One last step we want to take before turning our attention to SmartForms is to test the new SmartObject using the SmartObject Service Tester.
Step 3 Review
In this step, we manually created a new SmartObject in Visual Studio. We added the two Service Object methods that were created previously, one returning a list of SAP employees based on the employee's last name. The other method will return the details of a specific employee based on the employee ID. After deploying the new SmartObject to the K2 Server, we tested it with the SmartObject Service Tester. We entered two input parameters (the input date and a wildcard input for the last name) then confirmed we had results returned.
What is especially significant is that we now have a SmartObject that can leverage the properties and methods of a SAP destination. This SmartObject can be called in K2 Workflows and SmartForms. In fact, in the next step, we will build a SmartForm using our SAPEmployees SmartObject.
If time permits, we can create a List View SmartForm using the K2 Designer. We will add two controls; a text box for inputting the last name and a button for firing off the SmartObject 'list' method call. We will then test our View and observe the results returned.
Step 4 Tasks
- In K2 Designer, locate the K2connectDev category that we created in Visual Studio. Add a new Category and name it
SmartObjects - Design a View from the SAPEmployees SmartObject using the following General settings:
Name: SearchEmpByLastName
Category: Views
View Type: List View
Data Source: SAPEmployees
List method: ListEmpByLastName
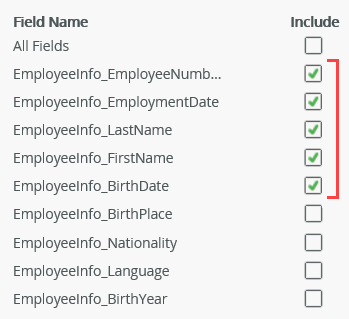
Call this method when the form loads: UNCHECKED - Create Labels and Controls and select the following Field Names to include in the list: EmployeeNumber, EmploymentDate, LastName, FirstName, BirthDate
- Change each Header Text value so that it reflects a friendly name. For our sample, we just removed the EmployeeInfo_ prefix and left the remaining common name.
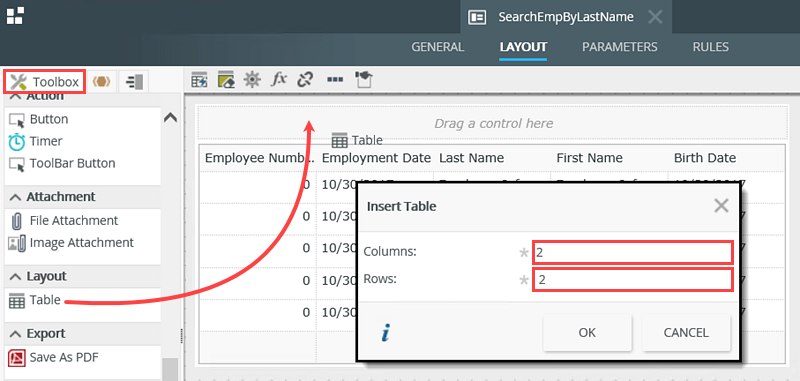
- Add a Layout Table to just above the list layout table. Configure it to have 2 columns and 2 rows.
- Add a Label control to the first row, first cell. Change its Text value to Enter search string.
then add a Text Box control to the first row, second cell. Change its Name value to LastName Text Box then add a Button control to the second row, first cell. Change its Name to Search Button and its Text to Search.
- Add a Rule to the View to that executes the ListEmpByLastName method when the Search Button is clicked. For the Input Parameters, use the System Date and the View's LastName Text Box control.
- Test the View using the Runtime URL. Enter a wildcard parameter for the search criteria (for example, B*) and confirm you have results returned that match the search input.
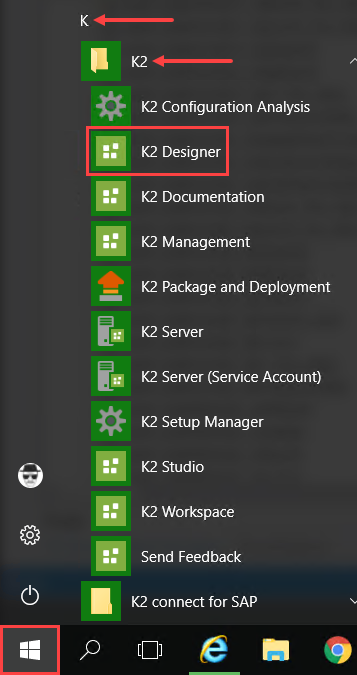
- Launch K2 Designer. (Start > scroll to K > K2 > K2 Designer)
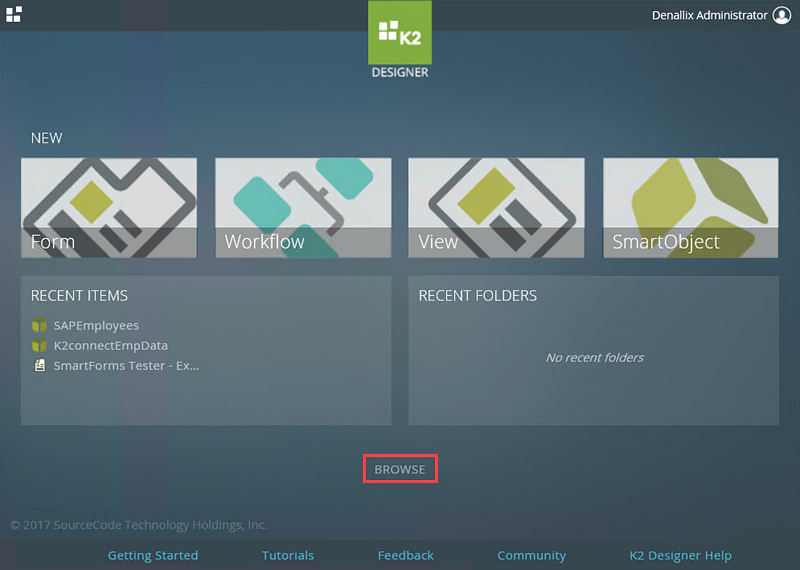
- On the K2 Designer landing page, click BROWSE to open the explorer, or category browser.
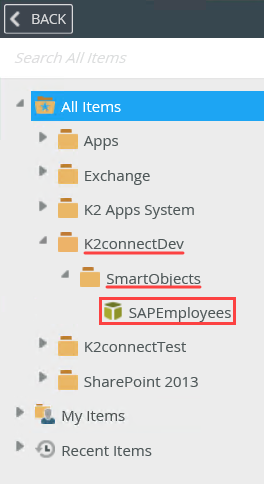
- Expand the All Items node and locate the SAPEmployees SmartObject located in the K2connectDev category. Use the image below as a guide.
- Right-click the K2connectDev category and select New Category. Name the new category
Views
Next, we will design our new view.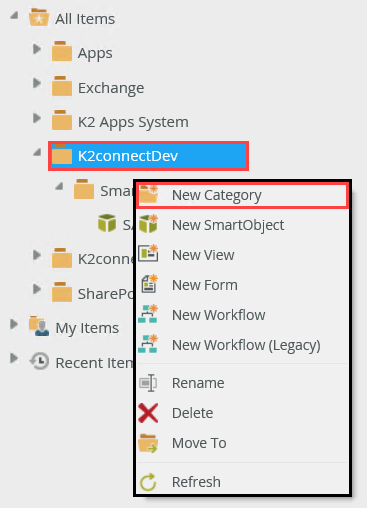
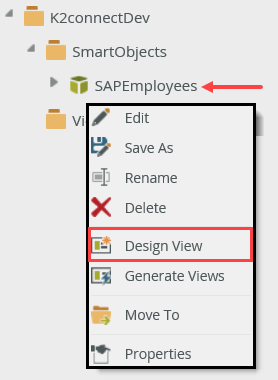
- Right-click the SAPEmployees SmartObject and select Design View.
- On the GENERAL screen, enter or select the following values:
Name: SearchEmpByLastName
Category: Views (Use the ellipses to select the Views category.)
View Type: List View
Data Source: Should be set on the SAPEmployees SmartObject
List method: Confirm the default is ListEmpByLastName
Call this method when the form loads: UNCHECKEDCall this method when the form loads. Because you designed the list view directly from a SmartObject, K2 by default will retrieve all content from the SmartObject when the view loads. In some cases, this may be the desired view behavior. If you need to filter the list content before it loads, uncheck this option. You can configure a rule that will load specific content. Examples include: if you want to load all contact records when the view launches, check this option. If you want to load only contacts from a specific department, uncheck this option and configure a rule to filter the records by department before they load.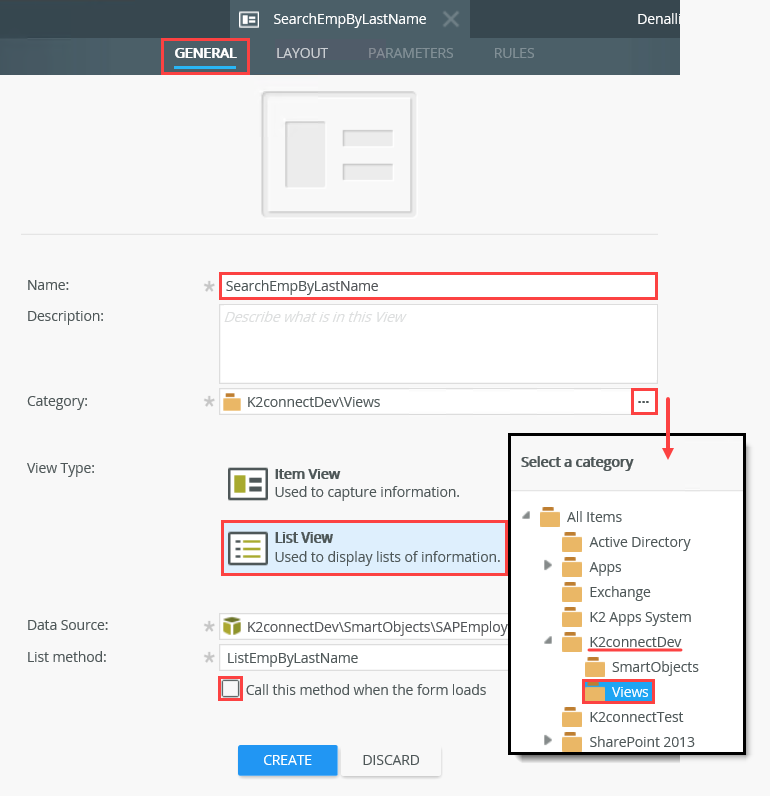
- Select the Create Labels and Controls option.
- On the Create Labels and Controls screen, select the following field to be included on the view: EmployeeNumber, EmploymentDate, LastName, FirstName, BirthDate (Depending on your environment, it may be difficult to see the entire field name. In that case, just check the first five options.) Do not make any other changes on this screen. Click OK to continue.
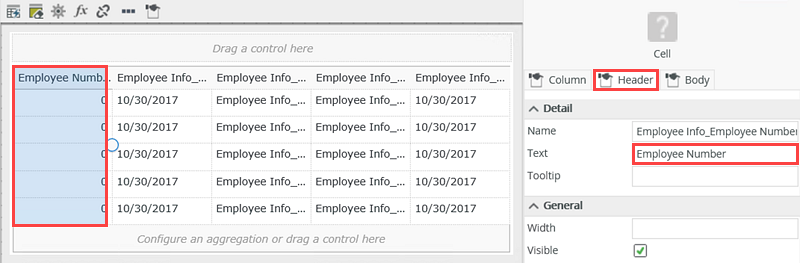
- On the Layout screen, enter a 'friendly' name for each of the column headings. First, highlight the column being edited. Then, in the Properties Pane, switch to the Header tab. Remove the Employee Info_ prefix from the Text property value. Repeat this for each of the column headings.
If you are new to K2 Designer, this is a typical representation of the list view layout. You are seeing a table format that at runtime, will be replaced by the actual values that are being returned for the list. From here, we can add controls at either the top or bottom of our table simply by dragging and dropping them from the Context Browser.
- On the left side of your screen, click the Toolbox tab. Locate the Layout > Table control. Drag it onto the design canvas, dropping it just above the list layout table. Set it to have 2 columns and 2 rows.
- Drag a Label control into the first row, first cell. Change the Text value for the label to
Enter search string
then drag a Text Box control into the first row, second cell. Change the Text Box Name to
LastName Text Box - Drag a Button control into the second row, first cell. Change the Name to Search Button
then change the Text to
Search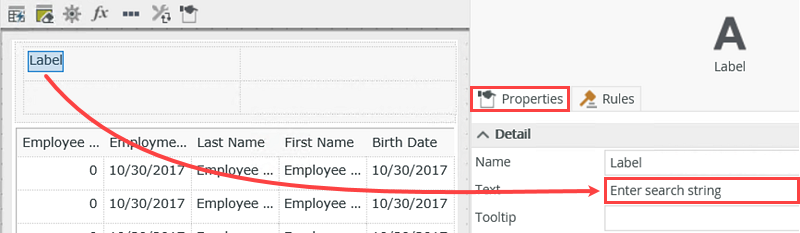
- Events define when the rule should run, such as when a button is clicked, or when the form loads. (Events are optional, you can define "event-less" rules that you can call from other rules.)
- Conditions define whether the rule should run. If the criteria are true, continue the rule, and if the criteria are not met, stop the rule. For example, a condition might evaluate a form to confirm that required fields have content. (Conditions are optional - not all rules will require conditions.)
- Actions define what the rule should do. For example, show a message, start a workflow, or enable a form field. Rules can contain multiple actions that are run in sequence or in parallel.
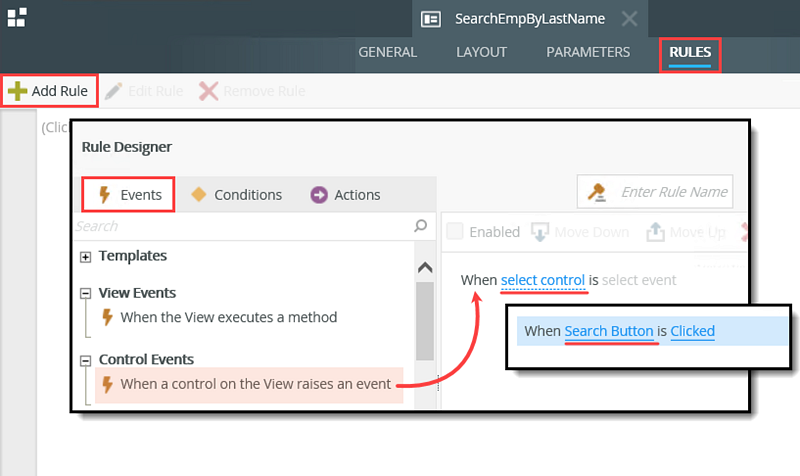
- Click the RULES tab in the breadcrumb bar. Click Add Rule to get started. Confirm the Events tab is active, then locate (and click) the When a control on the View raises an event option to add it to the Rule Definition pane. (It's located under the Control Events heading.)
- In the Rule Definition pane, click the select control link and select the Search Button. The 'select event' configuration will be automatic because buttons pretty much just have one action and that's to be clicked!
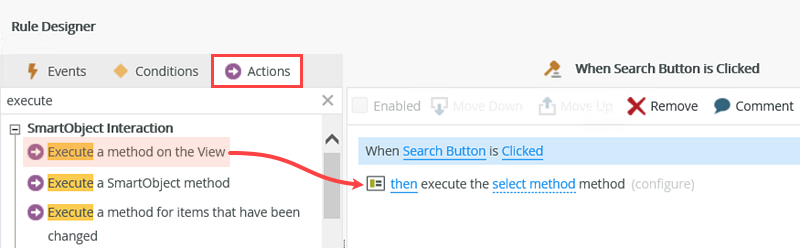
- Click the Action tab so that it is active. This time, we will search for the Action we want to add. As you become more familiar with Rules and Rules terminology, you can speed up the process by searching keywords. In the Search box, enter
execute
then press <ENTER>. - Click the Execute a method on the View action to add it to the rule definition pane.
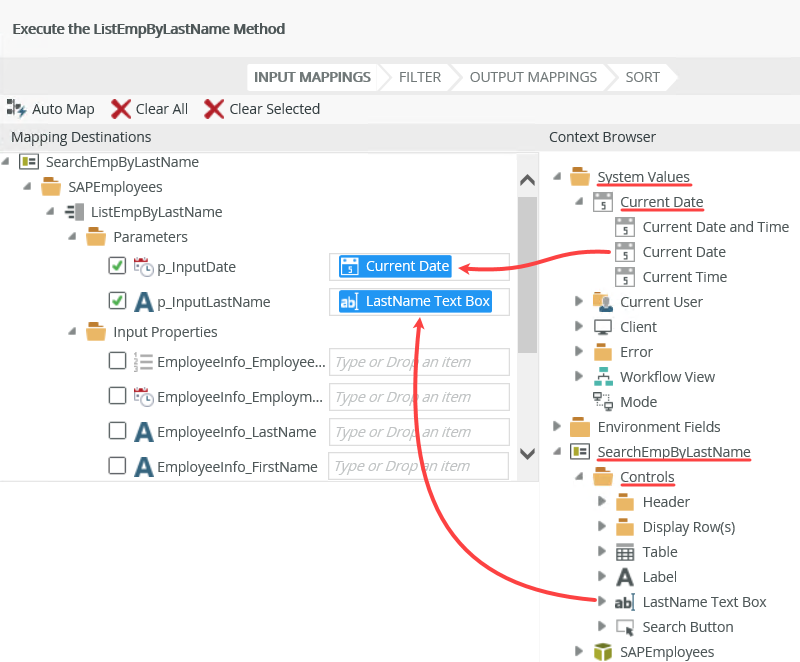
- Click the select method link and select the ListEmpByLastName method. Click the (configure) link. On the Input Mappings screen, notice the two Parameters that we previously created. Parameters are required values, so we must map them to the appropriate form and system values. Map the p_InputDate to the System Value > Current Date found in the Context Browser. Expand the SearchEmpByLastName View node, then the Controls node. Map the p_InputLastName to the LastName Text Box.
- Click NEXT, then FINISH the wizard. Click OK to complete the Rule Designer. Click FINISH to complete the View Designer. (If you are new to K2 Designer, the 'FINISH' button is near the upper right corner of your screen.)
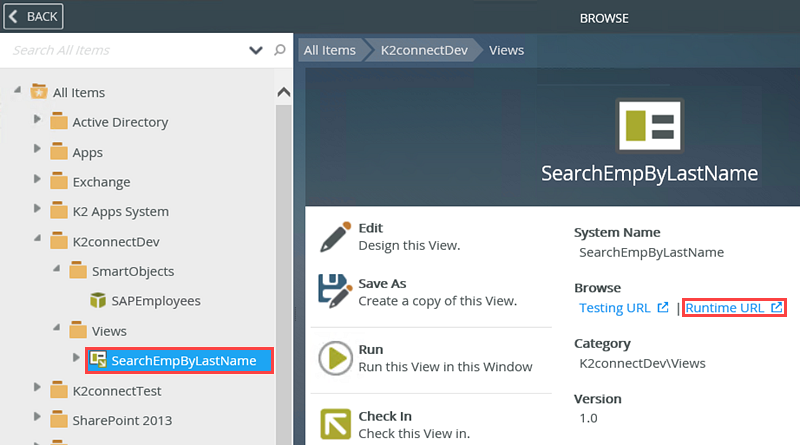
- We are returned to the Category Browser and Properties Pane. With the SearchEmpByLastName View highlighted in the Category Browser, click the Runtime URL found in the central pane.
- The View will open in a browser window. Depending on your environment, it may take several seconds for the View to render. First, we want to enter our search criteria. In the text box, enter the following
B*
then click the Search button. After a few seconds, you should see results returned where every last name begins with 'B'.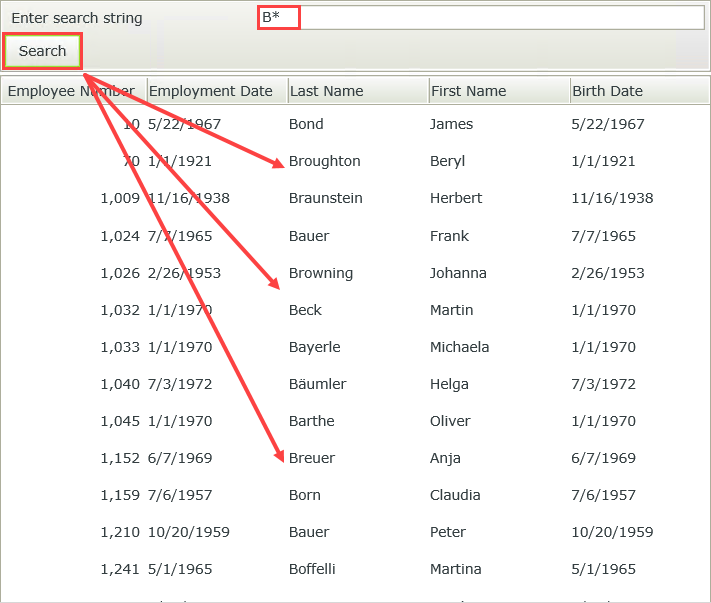
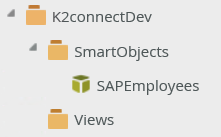
Notice that the SAPEmployees SmartObject is located in the SmartObjects folder. This is the same folder we created for our Visual Studio project. K2 refers to the folders as 'Categories'. To keep things neat and tidy, we are going to create a new category to store our new view.
In this next step, we will add another layout table to the design canvas that will contain a text box control and a button control. The text box will be used for entering a 'last name' search parameter and the button control will call the SmartObject 'list' method when clicked.
The next step is to configure the rules that will fire when the Search button is clicked. To break it down, when the Search button is clicked, we want K2 to take the value that was entered into the LastName Text Box and return all of the SAP employee records containing that value. Behind the scenes, the rule will look something like: "When the Search button is clicked, execute the ListEmpByLastName method". If you are new to the concepts of K2 Rules, a brief explanation on Events, Conditions and Actions is provided in the NoteBox below.
Now that we have configured our 'Event', we can move on to configuring our 'Action'. We don't need any Conditions for this exercise, so we can just skip that tab.
Now, we will configure the Action so that it fires our list method, using the LastName Text Box value as a filter.
Step 4 Review
In this step, we used a SmartObject within a user interface, namely a SmartForms View. What is significant about this step is that we were able to create a view with data coming from a SAP destination. As the view designer however, we did not actually need to know where the data was coming from, just that it was available for use in the form of a SmartObject. Nor, did we need to know anything about the underlying data source connection configuration that was created for this SmartObject. We exposed data from a SAP system, to a form on a web page without writing a single line of code. Not bad!