Mouse Sequence
The Record Mouse tool creates a Mouse Sequence that records your mouse activity as actions A feature that supplies the instructions in a botflow. and then adds the Mouse Sequence to a botflow A file that stores the actions and variables designed to automate tasks..
Using the Record Mouse tool to create a Mouse Sequence, you can record the following mouse actions:
- Click on a target.
- Right Click for a sub-menu.
- Hover Mouse to expand a menu.
Some examples of using the Mouse Sequence action are:
- Automate multiple mouse clicks to perform a task, such as the clicks needed to select the content in a spreadsheet.
- Expand a web page menu to select the required menu option.
-
Retrieve data from a system needed to interact with the botflow that retrieved the data from that system.
-
To add click actions to botflows using interactions such as If clauses.
Recommended browser and system settings
For best results when using the Mouse Recorder to add a Mouse Sequence action to a botflow, be sure to set your:
- Browser zoom to 100%.
- Microsoft Windows Display Scale and layout to 100% (Settings >System >Display).
- Microsoft Windows Display Make text bigger to 100% (Settings > Ease of Access > Display).
Add a Mouse Sequence action to a botflow
This example provides the steps necessary to add a Mouse Sequence to a botflow.
To add a Mouse Sequence to a botflow:
- Click on Tools in the Menu Bar Provides a variety of menus allowing you to use the commands in Nintex RPA. and select Record Mouse.
- Use your mouse to perform mouse actions:
- Click: Adds a Click action to the Mouse Sequence action.
- Right-click: Add as Right Click action to the Mouse Sequence action.
- Hover: Adds a Hover Mouse action to the Mouse Sequence action.
- Click Stop on the Recorder window to complete the recording when all required mouse actions have been recorded.
The Recorder window displays.
Note: The Stop Mouse to record hover message applies to the Hover mouse action.
Click Pause to temporarily pause the recording and click Resume to continue with the recording.
Click Cancel to cancel the recording.
The Mouse Sequence is added to the botflow and can be further adjusted.
Adjusting a Mouse Sequence action in a botflow
After the Mouse Sequence is added to the botflow it can be further adjusted.
To adjust a Mouse Sequence in a botflow:
- Navigate to the Mouse Sequence on the Build Pane.
- Click the Mouse Sequence edit (pencil) icon.
- Select the required recorded mouse action:
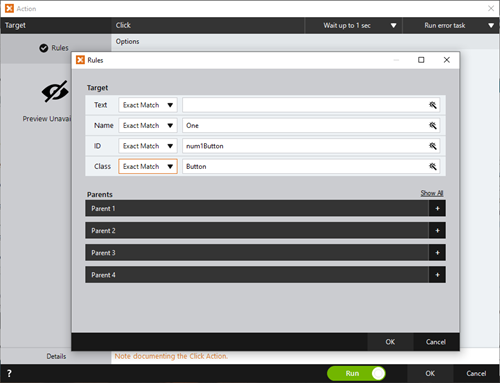
- If needed, adjust the Rule settings to modify how Nintex RPA finds the application target.
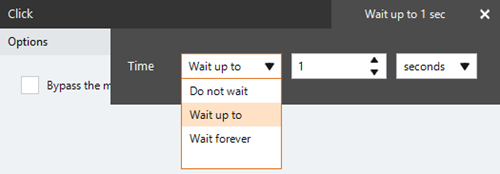
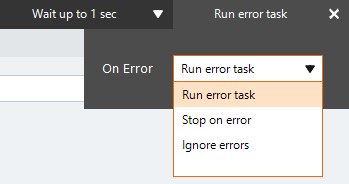
- If needed, adjust the Run Error Task settings and Timing settings to fine tune how the action runs.
- View the action Details settings.
- Optionally, add an action note.
- Click OK to save the Click, Right Click, or Hover Mouse action changes to the Mouse Sequence.
- Click Return to Task when all adjustments are complete to return to the botflow.
The recorded Mouse Sequence displays.
Tip: Click Test to test the recorded Mouse Sequence.
| Field or button | Description |
|---|---|
| Mouse Sequence options/settings | Click
The Bypass the mouse for a faster click option increases the speed of your botflow if supported by the target application. Note: Nintex RPA LE uses your mouse to click a target. Enabling the Bypass the mouse for a faster click option clicks the target without using the mouse. Applications responding to changes submitted by an actual mouse click will not support the Bypass the mouse for a faster click option. Perform the Click action in the botflow to confirm the expected actions are made by the Click action. Clicks resulting in a pop-up window are not supported. If the selected target is a check box, you will have the option of choosing how the check box is checked.
|
| Rules |
Some actions have rules required to locate a target and vary based on the targeted application. Rules of a targeted application element are configured and saved with the action. The rules are then used to locate the proper targeted element, such as an Microsoft Excel workbook. To set the most common rules type:
The Rules window displays the Rules available for the selected targeted application.
|
| Preview | All actions created using the Selector Tool include a Preview of the targeted element. |
| Details |
When directed by Nintex Support, click Details from the Preview Panel of the Action Builder. If needed, Nintex Support will supply additional information. |
| Timing Settings |
Some actions have timing settings and vary based on the targeted application. The timing settings of a targeted application element are configured and saved with the action. The timing settings are then used to control when the action starts.
|
| Run error task |
|
| Note |
(Optional) Type a Note to document any special instructions or functionality.
|
| OK/Cancel | Click OK to save the action or click Cancel to discard the action or any changes. |


